• Hi Guest !

    Welcome to the 500Eboard forum.

    Since its founding in late 2008, 500Eboard has become the leading resource on the Internet for all things related to the Mercedes-Benz 500E and E500. In recent years, we have also expanded to include the 400E and E420 models, which are directly related to the 500E/E500.

    We invite you to browse and take advantage of the information and resources here on the site. If you find helpful information, please register for full membership, and you'll find even more resources available. Feel free to ask questions, and make liberal use of the "Search" function to find answers.

    We hope you will become an active contributor to the community!

    Sincerely,
    500Eboard Management

Anyone have the p/n for a replacement LH module?

Quick4door

E500E Enthusiast
Member
1992 400e, vin WDBEA34E0NB761762.

had an issue with intermittent stalling while driving, leaving me stranded at one point and had to have it towed home. Found corrosion at the connector for the fuel pump relay, fixed it and it ran great for a 20 min drive. Almost home and it died again.

Checked and I’m getting intermittent power (mostly not power) on the green/brown wire from the LH module- and only when it’s connected to the fuel pump relay. If I unplugged the relay in back probe, I don’t get any signal from the LH module. I have good battery power in on the large red wire, and I’m not sure if I’m supposed to be seeing a ground on the red/black common wire, but I’m def not.

I’m suspecting the LH module is failed since both the brown/green and the common red/black both come from that module. I’d like to find a replacement tonight but am not sure of the part number and the car is at home. Can anyone help with the correct p/n for the LH?

Please and thank you!
 
Correct LH modules for a 1992 400E would be either:

012-545-30-32 or 014-545-15-32

Remember the LH module switches ground, not power - this means the relay has +12v to the coil, and then voltage back to the LH module, and the module connects that to ground to energize the relay.

If the colors on the ETM are correct, I believe red/black should have +12V present (with ignition on) from LH module to relay terminal 15, and then brown/green should have some voltage present with relay installed (may read below 12v since it's going through the coil resistance), back to LH module pin 25, which will be connected to ground and energize the relay. See ETM printed page 114/4 for a schematic (PDF page 34 of 277). With the relay removed from the socket, you should get +12v from red/black and probably nothing at green/brown.

If you have access to ANY other M119 LH module, you can use that for diagnostic / test purposes, then worry about buying a replacement module if needed.

:detective:
 
Fantastic info- . I thought that based on the commonality of the red/black wire it was a ground. I think likely I have a bad LH module but none available for testing. I’ll look around for one. Thank you!
 
Fantastic info- . I thought that based on the commonality of the red/black wire it was a ground. I think likely I have a bad LH module but none available for testing. I’ll look around for one. Thank you!
Looks like the part numbers you need may be hard to locate - for testing, see if you can snag a cheap module. If that fixes the problem, you can take some time hunting for the right one. If you have trouble finding the correct module, drop me a line. I should have an 014- module somewhere.

:rugby:
 
It is fixed. Turned out to be a 10a fuse, not the ecu as I thought. I had misinterpreted the wiring diagram that showed a common- what I thought was a common ground, turned out to be common power. I applied a ground to this circuit and thought I fried the ecu. Found one of the 3 fuses blown on the most outboard computer in the engine bay box. Voila. Didn’t need the ecu but I have spares now.

Big take away is don’t be dumb like me and apply ground when you don’t need to!
 
Almost had it fixed.

Replaced the LH module. Repaired the corroded wiring at the fuel pump relay. Car started and ran great. Drive it 15 mins and it sputtered and died- same as before when I found the corroded wiring. Won’t hot restart. Starting to think this is now spark related. Backfiring , and the exhaust smells very skunky- def loss of spark somewhere. Guess I had more than one issue but this is def strange as this car has been nothing but reliable for 8 years! Going to go home and see if what the state of the cap/rotor/Insulators are. Replaced all of it 2 years ago along with OE plugs, and have driven it only limited amounts since.

Any other suggestions are happily received.
 
Drive it 15 mins and it sputtered and died .... Won’t hot restart. Starting to think this is now spark related. Backfiring , and the exhaust smells very skunky- def loss of spark somewhere.
This is the classic scenario for secondary ignition problems, more specifically, moisture in the distributor caps which appears 10-20 mins after a cold start and causes misfiring, sometimes bad enough to make the engine stall and not restart.


Guess I had more than one issue but this is def strange as this car has been nothing but reliable for 8 years! Going to go home and see if what the state of the cap/rotor/Insulators are. Replaced all of it 2 years ago along with OE plugs, and have driven it only limited amounts since.
What brand cap and rotor did you install? I assume you did NOT add the vent slots to the caps... click here, follow those instructions. Also check for engine oil present at the bottom edge of the cap, if present, check for a leaking cam seal behind the insulator. If the cam seal is dry, your intake adjuster solenoid is probably leaking oil. Dry out the caps, add the vent slots, fix ALL oil leaks, and this issue hopefully will go away.

:shocking:
 
When I replaced the caps, I did not know about cutting new slots, but I will do that now. They were Bosch caps and rotors, and I got the genuine Mercedes spark plugs at the same time. I replaced one of the cam seals, but that’s not to say that another one isn’t leaking now. I’ll update as soon as I get it apart, thanks again for all your help Dave .
 
Is there a preferred brand of cap/rotor? I looked and I am using Bremi. I’m ordering new Bosch insulator cups since those didn’t get changed last time and figured I’d go ahead and have new caps and rotors just in case.
 
Caps = Bosch only now. (AFAIK, the OE caps are not different nor better, just far more expensive.)

Rotors = OE/Genuine (Doduco) preferred, but they are $$$. Alternate is Bosch. The Bosch have funky size rotor bolt hex sockets, be careful with those.

I wouldn't use Bremi, Facet, or any other brand.

Beru caps are NLA, and the reboxed OE/Doduco rotors which used to be sold by Beru are also NLA unless you can find some random old stock on a NAPA shelf as @Jlaa seems able to find on demand...

:gsxrepc:
 
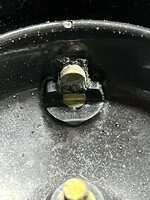
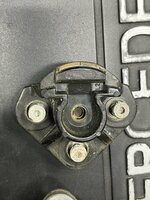
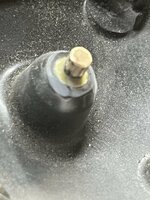
Finally got an opportunity to pull it all apart tonight. I did find signs of corrosion on the cap and rotor, see the pictures attached. Neither of the cam seals are leaking, but that’s to be expected since I replace those three years ago.

It does look like the cam sensor magnets are leaking, so I will definitely have to reseal those. However, it doesn’t look like any of the oil made it inside the distributor cap. Iive got Bosch rotors and Bert caps, and OEM insulators. I don’t know if I have any microscopic cracks in the insulators, but on a cursory glance, it doesn’t appear so. Not sure if I can save these caps, so I’m gonna go ahead and purchase new ones along with the rotors.

Btw the Bosch rotor Allen heads are closest to a 7/64 sae- a 3mm Allen fits but is sloppy.
 
*Beru caps
 

Attachments

  • IMG_5958.jpeg
    IMG_5958.jpeg
    1.5 MB · Views: 10
  • IMG_5966.jpeg
    IMG_5966.jpeg
    1.1 MB · Views: 11
  • IMG_5964.jpeg
    IMG_5964.jpeg
    1.2 MB · Views: 10
  • IMG_5963.jpeg
    IMG_5963.jpeg
    1.8 MB · Views: 10
  • IMG_5960.jpeg
    IMG_5960.jpeg
    2.1 MB · Views: 10
  • IMG_5959.jpeg
    IMG_5959.jpeg
    1.7 MB · Views: 8
  • IMG_5956.jpeg
    IMG_5956.jpeg
    2.2 MB · Views: 10
I decided to just refurbish what I have for now and I’ll order some caps and rotors here in the near future, but wanted to see if proof of concept held and boy does it. Cut more air flow grooves in each cap, cleaned up all the contact points, I’ll go ahead and order new caps and rotors because that made a huge difference, as well as new cam magnets.

Thanks for the help!
 

Attachments

  • IMG_5982.jpeg
    IMG_5982.jpeg
    1.3 MB · Views: 6
  • IMG_5980.jpeg
    IMG_5980.jpeg
    1.7 MB · Views: 6
  • IMG_5985.jpeg
    IMG_5985.jpeg
    2.4 MB · Views: 6

Who has viewed this thread (Total: 1) View details

Who has watched this thread (Total: 2) View details

Back
Top