• Hi Guest !

    Welcome to the 500Eboard forum.

    Since its founding in late 2008, 500Eboard has become the leading resource on the Internet for all things related to the Mercedes-Benz 500E and E500. In recent years, we have also expanded to include the 400E and E420 models, which are directly related to the 500E/E500.

    We invite you to browse and take advantage of the information and resources here on the site. If you find helpful information, please register for full membership, and you'll find even more resources available. Feel free to ask questions, and make liberal use of the "Search" function to find answers.

    We hope you will become an active contributor to the community!

    Sincerely,
    500Eboard Management

Latest on control arms

Curious, Dave... what's the reason for this?
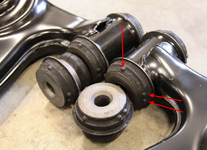
The bushings are "clocked" with a flat portion inside. here are also 2 different bushing pairs, one with 1+2 nubs, the other with 0+3 nubs.

The FSM makes a big deal about this affecting the ride and handling if done improperly, i.e. if the bushings are 90° off from the correct position, or if a bushing is in the wrong location.

:rugby:

1732217942362.png 1732217971804.png
 
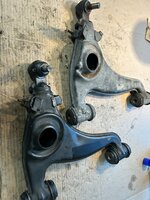
Spent some more time on this yesterday, left side is all done. I have the right side control arm on the bench, I owe the alignment tech a huge apology! The ball joint on this arm does have play, don’t know why I couldn’t feel or see it with the arm in place. Now looking for a used but serviceable right arm, I will install a new boot and bushings as long as the ball joint is still good. Any suggestions as to where I might find a suitable used arm would be appreciated. Thanks.


J.
 
JM, I'd look for a good used right LCA from someone parting out a 124 with M104 or M119 4.2L engine. All of those will have the late LCA, but make sure to verify from a photograph before buying. Check with forum member @david hendy (click here).

There are a half-dozen on eBay (click here) but most of those are early LCA's, make sure to look closely at the photos. For the couple of correct late LCA's, none look particularly nice.

Are there any salvage yards in your area that might have one, that you could look at in person before buying?

:runexe:
 
Yes, that ball joint was trashed. I’m a bit embarrassed by this, I should have dealt with the damaged ball joint boots before the road grit worked its way into the ball/socket causing the failure. The left side ball joint was still tight and had a good bit of grease in spite of the damaged boot, but on the right side all the grease had been rinsed away. This car has not been driven much over the last few years and I have not given it the maintenance attention it deserves.

Recently I considered selling it again but I just can’t part with it. It’s such a cool car with an interesting history, I know it would forever haunt me if I sold it. The decision to keep it means I now have to catch up on the deferred maintenance,

J.
 
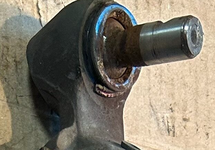
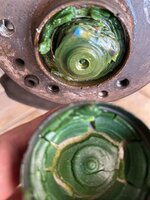
So I finally got the car in for an alignment. Tech said he could not do the alignment because the front bearings needed to be cleaned and repacked first (or replaced if damage was found). Quoted price for this work was $700. I politely declined, drove the car home, removed wheels, calipers, rotors, and dust cap. When spinning the hub by hand everything feels smooth, I can feel a slight click when pushing/pulling on the hub, I assume that is the specified axial play. (.01 to .02 mm IIRC). I don’t have a dial gauge but will get one so I can check properly. Can anyone tell from the pictures if this grease is dry and aged and needs to be replaced? Also, I do not have the special little slide hammer tool with the jaws that clip onto the dust cap, so I used some flat nosed pliers and a pry block to wedge them off. (see picture). Just do little at a time and work your way around. Worked great, hope this helps someone else.
 

Attachments

  • IMG_3635.jpeg
    IMG_3635.jpeg
    1.8 MB · Views: 20
  • IMG_3634.jpeg
    IMG_3634.jpeg
    2.3 MB · Views: 20
  • IMG_3633.jpeg
    IMG_3633.jpeg
    1.8 MB · Views: 20
I would replace that grease and why not get new bearings on top of it. It looks like it has some time on it in my view.

$700 was way too expensive. I just had the alignment and the both LCA installed and it was $805 for removal/install, alignment and clean OE units and return them to me. That price included the 8.25% sales tax and 2% environment fee.
 
That's pretty crusty grease in that cap. I would remove, clean and re-pack your front wheel bearings using the MB/Fuchs green grease. One or two tubes from MB should be enough. The amount/spec is in the FSM.

As far as play, if you don't have a dial gauge, you can get a very close approximation by manual method. When you tighten up the axle nut after repacking everything, tighten it by hand as much as you can. You will feel a lot of resistance to the wheel turning. Back the nut off by 1 cm counterclockwise. If you feel/hear any rattling/play in the rotor by moving it back and forth, then you backed off too far. You want to loosen it just enough so that there is no play, but that the wheel spins freely. So....tighten by hand, then back off slightly.

This is not an optimal method (dial gauge is the best way to go), but it's a method I have used on various cars for many many decades, and it's held me in good stead. Taught to me by my father. Nowadays I have a dial gauge, but this can and will work if needed.
 
that grease is way past prime. It has partially solidified. When I replaced my bearings last summer on a E320 I bought a $10 jewelry scale to weigh the grease per the FSM and a $40 dial indicator from Harbor Freight along with a bearing /race drive kit. Not a terrible job but the inner bearing is secured with a metal and rubber seal on the hub. Mine was rusted onto the hub so the seal puller tool was useless. You have to drive out the inner race which in turn drives out the bearing which in turn drives off the seal. It had me worried but worked out fine.
The dial indicator was a pain to set up but worked just fine. Frankly it took me more time to set up the tool then it did to set the pre load.

Regards,

Peter
 
So I finally got the car in for an alignment. Tech said he could not do the alignment because the front bearings needed to be cleaned and repacked first (or replaced if damage was found). Quoted price for this work was $700.
That is BS. There is NO reason why an alignment could not be performed, unless there was drastic amounts of play in the bearings, affecting alignment values. Doesn't sound like that was the case, and the dealer was hoping to swipe $700 out of your pocket. Thieves!


I politely declined, drove the car home, removed wheels, calipers, rotors, and dust cap. When spinning the hub by hand everything feels smooth, I can feel a slight click when pushing/pulling on the hub, I assume that is the specified axial play. (.01 to .02 mm IIRC). I don’t have a dial gauge but will get one so I can check properly.
When adjusted properly you can JUST barely feel a hair of movement when gripping the wheel top/bottom and yanking in/out. Might even hear a slight click. If there's zero movement, that's bad (too tight). If there's substantial movement, also bad (too loose). Spec when setting is 0.01-0.02mm which is awfully hard to achieve without a dial gauge. Limit of play for "used" bearings is 0.05mm which is quite loose. Without a dial gauge, err on the loose side.


Can anyone tell from the pictures if this grease is dry and aged and needs to be replaced?
Grease in the cap is waxy/solidified, and past its prime, as other commented above. While the grease in the bearings would likely work fine for tens of thousands of additional miles, it's cheap to replace. Since it' sooooo much work to clean the old bearings, I prefer to just install new bearings (OE or Timken preferred, be careful on brand names / COO). Weighing the correct amount of OE neon-green grease is critical. This is a slow, tedious job... but not difficult. Worst part is extracting the old bearing races. To ease installation, freeze the new races & heat the hub.

Pro tip: When using the dial gauge, you must bolt the rotor tightly to the hub! Otherwise the result will be too tight (zero play).


Also, I do not have the special little slide hammer tool with the jaws that clip onto the dust cap, so I used some flat nosed pliers and a pry block to wedge them off. (see picture). Just do little at a time and work your way around. Worked great, hope this helps someone else.
Great trick! I do the same thing, with short lug bolts to tighten the rotor to the hub... then I pry against the heads of those bolts to remove the cap. When installing the cap, tap on the lip around the circumference, not on the face - this avoids denting the cap.


:banana1:
 
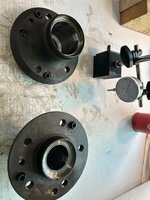
So I checked the axial play with my new made in China cheap dial gauge, right was .05 mm, in spec but barely, left was almost .10 mm, way to loose. I have the hubs on the bench ready for new bearings seals and grease which should be here tomorrow. Any tips for the shade tree mechanic to get the old races out and the new races in? I’m pretty crafty but I don’t have a press or proper fitting mandrels.
 

Attachments

  • IMG_3649.jpeg
    IMG_3649.jpeg
    1.7 MB · Views: 5
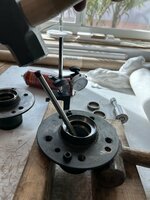
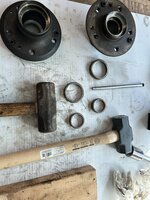
OK, figured it out. I read that the races can be drifted out. Indeed they can! Picture is worth a thousand words. Resting the hub on sledge prevents bounce thus the force of the blow with the other sledge drives the race out. Once you have the correct setup/arrangement and proper blow, the races practically fall out.
 

Attachments

  • IMG_3650.jpeg
    IMG_3650.jpeg
    1.6 MB · Views: 17
  • IMG_3651.jpeg
    IMG_3651.jpeg
    2.1 MB · Views: 17
Looks great, JM! For race installation, if you freeze the new races & heat the hub, they'll slide in easier.

I use a high-accuracy digital refrigerant scale to measure the grease weights. If you load a Ziplock bag with the 45g spec it makes it easier to pack the roller cage. You can't extract all the grease from the baggie though, so you'll end up with something like 10-15g left inside... adjust accordingly. This will be harder if you don't have a scale that reads to single digit grams.

:bbq:
 
FWIW, we have started taking our old/early LCA's stripping them down and powder coating in semi gloss...ordering up Genuine bushings and ball joints there by building "new" LCA's. If you have a late car or SA brakes it Does get tight, but with some careful removal of casting slagg I've always been able to make them fit. Worst Worst Case I've put a small hole in the dust shield.

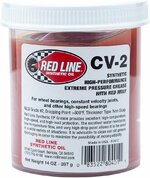
Also, on our joints we're pulling the boots on the ball joints and replacing the original grease with Redline EP. That stuff is magic when it comes to making metal things Last.

jono
 
So I have new bearings (Timkin, made in USA or so the box says) and MB grease, installed the races today, plan to do the rest tomorrow. I have a postal scale that measures to the nearest gram, but now I can’t find the post that specifies the total weight of grease. IIRC it was a total of 70 grams, 15 in the cap, full pack on the bearing, a swipe on each race and the seal and seal surface, then the rest goes inside the hub itself between the bearings. Is that correct? Thanks, J.
 
Thanks! Got it all put back together, haven’t had a chance to drive it yet. Couple takeaways: The large inner bearing when properly packed contains 4-5 grams of grease. The smaller outer bearing when properly packed contains 3-4 grams of grease. (Determined by weighing before and after grease packing) I figured the swipe of grease on each race would add a 1 or 2 grams so I figured a total of 10 for the bearings. Added 15 to the cap and 35 to the hub, determined by weighing the tube before and after.

I don’t think I could have accurately set the axial play without a dial gauge. When correct, you can see the needle bounce .01-.02 mm but I could not feel any play manually. I tightened the clamp screw enough to provide a fair amount of resistance when turning the adjusting nut with a wrench. Not sure but I think this prevents changes in the play values from before and after tightening the clamp screw. (Hope that makes sense)

Thanks for all the help!

J.
 

Who has viewed this thread (Total: 1) View details

Who has watched this thread (Total: 3) View details

Back
Top