Navigation
Install the app
How to install the app on iOS
Follow along with the video below to see how to install our site as a web app on your home screen.
Note: This feature may not be available in some browsers.
More options
Style variation
-
Hi Guest !
Welcome to the 500Eboard forum.
Since its founding in late 2008, 500Eboard has become the leading resource on the Internet for all things related to the Mercedes-Benz 500E and E500. In recent years, we have also expanded to include the 400E and E420 models, which are directly related to the 500E/E500.
We invite you to browse and take advantage of the information and resources here on the site. If you find helpful information, please register for full membership, and you'll find even more resources available. Feel free to ask questions, and make liberal use of the "Search" function to find answers.
We hope you will become an active contributor to the community!
Sincerely,
500Eboard Management
You are using an out of date browser. It may not display this or other websites correctly.
You should upgrade or use an alternative browser.
You should upgrade or use an alternative browser.
OWNER MY911S
- Thread starter MY911S
- Start date
were the lights working before? it's uncommon for the rotary switch to fail suddenly, especially if all the detents feel normal.Re-installed the headlights. Low and high beams don't work. New bulbs. Fuses look fine. I'm guessing rotary switch.
Did you mess with the wiring/connector at the headlights? Or just swap lamps, plug+play?

this might help:
HOW-TO: Converting 4-pin US Spec Head Light Connector Wiring to 6-pin Euro Spec | "HOW-TO" Tutorial Articles
FYI. Here's a wiring method discovered from another Forum (this version jumpers City Lights to Parking Lights). See Post #3. http://www.peachparts.com/shopforum/tech-help/181956-instructions-wire-european-headlights.html I think wiring the City Lights to the Driving/Fog Light circuit (ala gsxr...
www.500eboard.co
Well i figured it out. I need to plug them in haha. Drove the car to work today idles slightly rough kind of like an exhaust leaky rough/thumping. Drove great otherwise. Except there's a leak in the fuel filter vicinity so I think I'll need to get towed home so I can tighten the fittings.
Weird, after getting a push out of the driveway under the freeway where I was stranded, sitting around for 15 minutes waiting for the tow, Mr. Grey started right back up. Air bubbles in the fuel line because of the fuel leak? Car stopped after a steep downhill right hand turn.
A small fuel leak, or theoretical air bubbles, is extremely unlikely to have caused the engine to shut off.Weird, after getting a push out of the driveway under the freeway where I was stranded, sitting around for 15 minutes waiting for the tow, Mr. Grey started right back up. Air bubbles in the fuel line because of the fuel leak? Car stopped after a steep downhill right hand turn.
Is the crank sensor (CKP) old or original? Measure the resistance when cold, it should be around 800 ohms. If the engine dies again and won't restart, measure the resistance when it won't start... if it's increased to thousands of ohms or higher, the crank sensor is bad. Usually once it cools down a bit, the engine will start, and the cycle repeats.
I guess this is the closest diy description
Thread '1993 500E crankshaft position sensor DIY request'
1993 500E crankshaft position sensor DIY request | Electrical, CAN and Wiring
Thread '1993 500E crankshaft position sensor DIY request'
1993 500E crankshaft position sensor DIY request | Electrical, CAN and Wiring
The CKP replacement is straightforward, but not easy due to limited space. If the sensor is the type with metal body (Bosch) there's a chance it could be seized in the bracket, if so, DO NOT break it trying to remove... then you have to pull the transmission to get this fixed. Hopefully it's a non-Bosch sensor with plastic body. Getting the hex-head bolt inserted again is usually the worst part of the job. Take photos of the wire routing before you take anything apart.
I'd also verify this is the cause of your engine shutting off. No point in replacing a good sensor. Check codes to start with, but a failing CKP may not store codes. The real test is as 2phast described, when the engine dies and won't start, measure CKP resistance. If very high or infinite (open), yep, it's bad.

I'd also verify this is the cause of your engine shutting off. No point in replacing a good sensor. Check codes to start with, but a failing CKP may not store codes. The real test is as 2phast described, when the engine dies and won't start, measure CKP resistance. If very high or infinite (open), yep, it's bad.
The front one is a vestigial sensor, and connects to nothing - ignore it. This was deleted as of the facelift, for cost reduction, along with the 9-pin diagnostic port near the EZL.Thank you. I assume that the part number for the front is different from the one buried? I haven't researched part numbers yet.
The CKP that affects engine operation is the one buried behind the driver cylinder head, at the transmission bellhousing.

Darn wasted my money I think I purchased the front one.
Found this post

 www.500eboard.co
Found this post
HOW-TO: Replace M119 Crankshaft Position Sensor | "HOW-TO" Tutorial Articles
R&R of Crankshaft Position Sensor (CPS) The crankshaft position sensor is an electrical device located at approximately 1:00 o'clock (looking from front to rear) on the bell housing of the transmission. The CPS provides an analog voltage to the EZL to give a rotational signal so the EZL knows...
Tightened all the fuel hoses even thoug it was not leaking anymore after running it for a few minutes - strange. Drove the car to pick up lunch and no incidents. Will monitor. While I was down there i replaced a couple of exhaust hangers.
Attachments

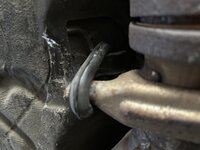
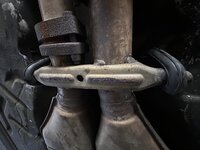
The exhaust hangers at the rear of the catalysts are not the plan plain donuts shown. Unfortunately the correct ones are NLA (details here).
I'd use either a chain-reinforced standard hanger, or try the R129 hangers which may be similar if not identical (OE only, the cheap HJS versions are junk). 129-492-00-82 or 129-492-01-44 look similar to 124-492-00-82.


I'd use either a chain-reinforced standard hanger, or try the R129 hangers which may be similar if not identical (OE only, the cheap HJS versions are junk). 129-492-00-82 or 129-492-01-44 look similar to 124-492-00-82.
Last edited:
One thing I remembered today - is that the battery terminals were not tightened down and the bracket was not installed. I wonder if that may have contributed to the car shutting down after going downhill and making a hard right turn. Drove him around running errands today no issues. I'm also wondering if the poorly supported exhaust may have contributed to an exhaust leak which is what the car sounds and feels like at idle.
Last edited:
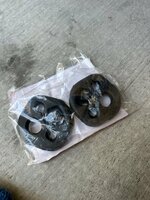
Walked across the street yesterday during lunch break and picked up my parts. Happpens to be the best place to restore your Vintage Mercedes - just like sending to the factory.
Attachments


Carlo,Anyone know if replacing the RDM bushings (I have new ones) is as simple as popping that top cover off without having to put the car on jack stands etc?
View attachment 203650
IMOP, You would want to raise the car to relieve the pressure/stress on the upper RDM joint by fully extending the LCA. Then it should be safe to remove the RDM and install the new one.
You might find that the damper is also very weak or possibly even shot if they are original. With the RDM removed you could probably even remove the strut thru the top just by unbolting the bottom end bolts?
PS: I don’t think a spring clamp is necessary for this task.
I’ve done similar tasks on my old 300E when I installed Eibach lowering springs and installed new MB OEM shocks 1st but had to replace the fronts with KONI Red adjustable shocks to get rid of the buckboard ride. Anyway, at the time I didn’t think it was that hard of a job.
I’m sure others could have a different opinion.
Well I replaced the SLS spheres over the weekend. The car sits awfully low still. I assume this is largely a function but I would have expected the rear end to come up a tad bit at least. Hmmm. I guess I'll check this out next
Properly Adjusting your SLS Ride Height - PeachParts Mercedes-Benz Forum
The SLS Valve controls the height at which the rear of the car sits. The lever arm position tells the valve to raise or lower the rear. The lever arm
www.peachparts.com
Last edited:
Rear ride height is a function of 2 things:
First question is, are the rear springs stock, AND also uncut? Only way to tell is to remove one for inspection & measurement, unless Sauceman already did this and can tell you what's back there. If the springs have been cut, you'll need replacement springs to raise it back up to stock levels.
Related question - what is the rear ride height, measured from wheel center to bottom of fender lip? With stock, uncut springs this should be at least 14" regardless of SLS adjustment.

1) The specific coil spring installed
2) SLS functioning properly, and adjusted correctly via the turnbuckle
First question is, are the rear springs stock, AND also uncut? Only way to tell is to remove one for inspection & measurement, unless Sauceman already did this and can tell you what's back there. If the springs have been cut, you'll need replacement springs to raise it back up to stock levels.
Related question - what is the rear ride height, measured from wheel center to bottom of fender lip? With stock, uncut springs this should be at least 14" regardless of SLS adjustment.
The springs are lowering springs per Sauce- I believe H&R. I was under the impression that even with lowering springs you could gain back some height using the SLS adjustment (turnbuckle?)
By the way I'm going to search for pics of this since I don't have a Peach account.
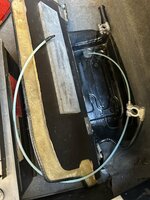
"1. With the engine off, remove the adjusting rod from the lever arm. You'll need two 10mm end wrenches. Don't just twist the nut off, you need to hold the other side or you'll break the ball joint.
2. Once the adjusting rod is off. Move the lever arm into the neutral position and insert the locking rod through the lever arm and and into the hole in the valve (As seen in the pic). You've now locked the the car into the proper neutral unloaded height."
I think it's this pic on post 42 on a related thread in this forum

I think this is an applicable video on it:
By the way I'm going to search for pics of this since I don't have a Peach account.
"1. With the engine off, remove the adjusting rod from the lever arm. You'll need two 10mm end wrenches. Don't just twist the nut off, you need to hold the other side or you'll break the ball joint.
2. Once the adjusting rod is off. Move the lever arm into the neutral position and insert the locking rod through the lever arm and and into the hole in the valve (As seen in the pic). You've now locked the the car into the proper neutral unloaded height."
I think it's this pic on post 42 on a related thread in this forum
I think this is an applicable video on it:
Last edited:

Read post #'s 56-61 at this thread. Klink explains how it works and why you need 2 wenches to loosen the jam nuts.I located the SLS lever. I don't understand why I need two (2) 10mm wrenches to loosen what I think needs to be loosened in order to raise the lever.
Measuring will define the specific height. Stock 036 is around 14.5" from fender lip to wheel center. Most people view this as "too high" and want to drop closer to 14.0", approximately.Car is super low.
Keep in mind the rear end will be 1/4-1/2" lower with a full tank of fuel (+150 lbs) vs empty tank.

Well nuts came loose easily, spun the rod to get the lever to as much of an upward angle as it would give me. While I was down there changed to the correct muffler hanger- scary how the entire assembly was hanging when I acquired the car - proper moutn are on now. Drove the car around the block - I think it's slightly higher. I'll try the pads next- have to research where to buy them and how to install etc
Did the GT3 undertrays and got the car off the jackstands and took the wife for a drive.
Pretty much a car day Christmas!

Did the GT3 undertrays and got the car off the jackstands and took the wife for a drive.
Pretty much a car day Christmas!
Attachments


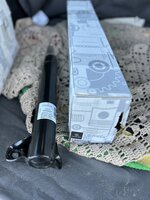
Sweet! Make sure to replace the foam stop buffers at the same time (OE only)... ditto for the accordion dust boot if it's not in good nick. Check the strut mounts while you're in there.Stopped by the good folks at MB Classic to pick these up.
IIRC the car has Silver Arrow brakes and should have late LCA's, if Sauceman installed new LCA's, they should be fine. If they were used, check the dust boot on the ball joint.

I discovered the hydraulic fluid was low - there was a small leak in the passenger side of the SLS that I had to tighten down that was probably the cause. Well it looks like the left rear that was a finger width lower than the right rear has lifted slightly and it seems Mr. Grey is now pretty even from side to side.

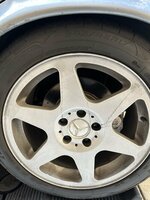
There should be plenty of photos on the forum showing Evos without spacers. They don't "poke" as much, but still look very good. Easiest search would be for E500 Limited models for sale in the classified section.Anyone run Evo wheels without spacers and can post pics? I noticed my front wheels have spacers and I wanted to run th without it- assuming bolt length works for both.
Bolts must be standard 40mm shank length. If your existing bolts screw into the spacer itself, they may be ok. If it's the type of spacer with holes only (no threads), your bolts may be too long. Edit: It's OK to have bolts longer than 40mm at the front hubs only. Bolts at the rear wheels MUST not be longer than 40-42mm shank length or they will contact the parking brake mechanism!
The "correct" bolts for Evo wheels are the extended-head type with 75mm total length, but these are nearly impossible to locate. The 72mm total length bolts are more common and (slightly) easier to locate as they were used on most all late production 124's with standard 8-hole wheels. Short-head 65mm bolts don't look right with Evos, IMO. See photo below on an Evo wheel. All of these bolts have 40mm shank length, only the length of the extended head varied.

Last edited:
Ah thank you @gsxr !There should be plenty of photos on the forum showing Evos without spacers. They don't "poke" as much, but still look very good. Easiest search would be for E500 Limited models for sale in the classified section.
Bolts must be standard 40mm shank length. If your existing bolts screw into the spacer itself, they may be ok. If it's the type of spacer with holes only (no threads), your bolts may be too long.
The "correct" bolts for Evo wheels are the extended-head type with 75mm total length, but these are nearly impossible to locate. The 72mm total length bolts are more common and (slightly) easier to locate as they were used on most all late production 124's with standard 8-hole wheels. Short-head 65mm bolts don't look right with Evos, IMO. See photo below on an Evo wheel. All of these bolts have 40mm shank length, only the length of the extended head varied.
View attachment 205864
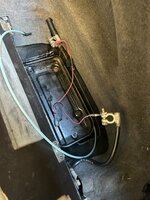
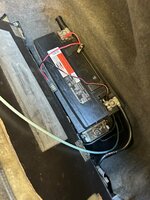
Well the RDM bushing install looked too involved to tackle today so I just finished my battery box area.
Attachments


#32 are the 2 bolts which attach the strut to the front knuckle. I am not seeing these as NLA / Discontinued, just "Currently Unavailable" via online part websites, which is often code for "may need to order from Germany". The options are:
1) Contact a dealership and have a live person check inventory / availability for 914125-012426, they are $3.50 each MSRP.
2) If the existing bolts are undamaged, clean the threads and re-use them, applying fresh blue threadlocker.
MB recommends replacing the bolts only because the new ones have microencapsulated threadlock compound pre-applied. They don't want to worry about the dealer techs applying too much, or too little, threadlock compound... engineering solution is to replace the entire bolt.
Feb 2025 Update.
Big month for Mr. Grey.
Johnson's Alignment - one of the best in LA. Steve A. Also a Poreche nut and track guy.
- New factory struts, dust boots, foam stop, strut mount/bushin and end plates (last pair in the country), new spring pads (13mm front, 18 mm rear)
- I removed the RDM camber plates - will be for sale with new bushings that I was going to install.
- 4 wheel alignment
Steve said right side had some rust and he had to do a little spot weld and that everything is to spec except the rear was at -3 deg camber.
He suggested looking into possible aftermarket control arms that are camber adjustable. Any suggestions appreciated.
Then I took Mr. Grey last week to Beach Benz. Mike is an old school guy and worked on my Garnet Red 500E a decade ago. Compression test showed a few percentage lower on one bank compared to the other but he also diagnosed found that the control unit was sending faulty signals and my MAF was stuck at 50% - and the module isn't even the correct one for the car.
I bit the bullet and purchased the last one in the world thanks to my good man at Mercedes Classic. Excited to plug it in.
Attachments


Rear camber correction arms - click here. I'd aim for about -1.5° to -1.0° (approximately) assuming you want the rear tires to last longer.
Sauceman had the heads off for a complete valve job along with port & polish, plus new head gaskets. A few percent difference in compression is nothing - could be margin of error on the gauge.
The module shown is the GM/BM (General/Basic Module) which is a fancy power supply. What was wrong with the old one, and what part number was it? Pretty likely it was a newer part number that is backwards compatible, not "wrong" in that it wouldn't work properly in the 500E.
If the MAF is "stuck at 50%" ... ? That's fishy. I've never seen this. Typical failure mode is MAF stuck at idle air readings. MAF reads airflow in kg/hr, not a percentage. The readings increase proportionally with RPM. And, the MAF readings are viewed from live data on the LH module, not the BM/GM. Hope this guy knows what he's talking about. Maybe he just didn't explain it well.
it's probably more that I didn't take down good notes. He did explain that it is a power supply/distribution module and provides power to different subsystems. And that the fancy power supply was not providing the required power. Thank you for the link to the rear camber correction arms!

