Thanks man just curious how about if the piece is from the 400EYes. On the bright side, usually its just the flat area on the bottom which needs repair, but youll find out more when you dig into it.
Last edited:
Follow along with the video below to see how to install our site as a web app on your home screen.
Note: This feature may not be available in some browsers.
Thanks man just curious how about if the piece is from the 400EYes. On the bright side, usually its just the flat area on the bottom which needs repair, but youll find out more when you dig into it.
Nope. Unfortunately, the 400E battery box is completely different. None of the sheet metal is the same, or even similar. The battery tray is also completely different.Thanks man just curious how about if the piece is from the 400E
Bummer thank youNope. Unfortunately, the 400E battery box is completely different. None of the sheet metal is the same, or even similar. The battery tray is also completely different.

Thanks man just curious how about if the piece is from the 400E
@MY911S, the 036 has a wider rear body with a wider battery trunk, so the battery is resting on the battery tray in the bottom and the top is below the trunk floor. The battery trunk on the 034 isn't wide enough to lower the battery to the bottom, so the battery is lifted and sits upon bracket.Nope. Unfortunately, the 400E battery box is completely different. None of the sheet metal is the same, or even similar. The battery tray is also completely different.
.jpg")

.JPG")
.jpg")
.jpg")
 124 630 00 89 (2).jpg")
FYI - as you can see on the image in the previous post, the battery trunk body panel is not just a thin plate but reinforced with stitch welded doubling plates. Additionally it has a recessed area for drainage which adds a rigid profile to the trunk bottom.ah bummer looks like custom metal work if I need it. How about from a 400E same year?
Ah interesting. I really don’t need them so I’m just going to sell them. I’ll get an ad going when I remove them.View attachment 161481
Anyone know what these wheels are? They are also marked with TUV so European? Was thinking of selling them. Actually looks like they’re also stamped JWL wheels- so Japanese maker?
Went with stock couldn’t find the ARCsCongrats with your purchase!I really, really like like this color combo.
As for the wheels, let me suggest 18 Rial Arc M800, they would fit extremely well with this color IMO.
") . Starting to look proper.
. Starting to look proper.Went with stock couldn’t find the ARCs
Haha I see what you did there!!I believe we just need to send a 500E factory wheel to Augment Wheel Company, and then whoever ponies up the $1350 per wheel ($5400 for 4) to make an 18 magnesium version, is in charge of the overall development effort. It would be nice to have a conversation with Augment Wheel how much they would charge for additional sets of wheels after the initial development. Whoever pays the development costs gets to work with Augment Wheel to determine how the design is scaled up, offset, etc. This would be a fun 500e board project but whoever ponies up the money first gets to be the decider after all the crowdsourcing input.
 . For anyone looking to do this, aluminum is also available at CAD1400 = USD1048. You don’t HAVE to do magnesium, although that would be waaaaaay cool to bring down the weight….. Couldn’t get the damn brake pad pins out. Was actually banging them the wrong direction in the end took the rear calipers out discovered a nice small shop 5 minutes away (silver lining)…had him bang out the pins and turn the left rotor. Reinstalled the whole deal back on the car myself. Right rear rotor piston (one side) wouldn’t go in all the way so I’m running it with 1 used pad and 1 brand new pad on the same caliper for now. Tried the front pad replacement—- quit after a few hours and ended up taking the car to American Tire next door (drove with parking brakes because I couldn’t bleed them properly). They were able to take the pins out replace the front pads. There was a moment of terror when I wasn’t sure if the tech was dremelling the pin - because I couldn’t get them at oreillys or autozone down the street -luckily he actually saved the pins- I also decided to have them change the engine oil and pressure sensor since I did not want to spend anymore time in my back. Gave the guy a tip after which I found out he didn’t bleed the brakes. Took it back today to finish the job and made it to work. Hope she behaves for a bit. Also I think I’ll name the car Beryl Beauty.
MB brake rotors ARE NOT designed to be turned -- they are designed to be simply replaced when the thickness spec is exceeded.had him bang out the pins and turn the left rotor.
Yup... never turn them. Replace with OE MB if possible, and don't remove the gray coating. If a caliper piston won't retract fully, REPLACE both calipers. At this point you could also upgrade to the larger 300x22 rear calipers and rotors. These were used on late Euro-spec E500 and also the "Silver Arrow" upgrade. Fits under stock 16" wheels. No point in buying rebuilt smaller calipers. Total cost should be <$500 for rebuilt calipers, new OE rotors, and new pads of your favorite compound. Note that all the part numbers will be different than stock... search the forum for details.MB brake rotors ARE NOT designed to be turned -- they are designed to be simply replaced when the thickness spec is exceeded.
They are very very cheap. It is advisable to get either the MB factory rotors, orZimmerpersonZimmermann, or ATE brand rotors. Preferably with the gray paint coating, which is designed to wear off after the rotors are installed.
@xfadmin, I think we need to cleave off these posts into a proper OWNER thread.

Wow what an ordeal. Given how rusty everything under the car is, you may wish to consider a slo-mo “rip and replace” of everything, starting with the brake system. Attached is The “brake bible“ of part nos from @gsxr ’s website. If you go to 17” wheels just replace all 4 brake rotors and calipers with SL600 or silver arrow units.Spent the entire long weekend pretty much under and around the car while taking breaks to eat or hang out with the wife, might have taken the dog to the beach to negotiate for more car time
Appreciate the advise yes I had the rotors on order. They actually arrived Saturday after all the work was done but i plan to replace them and the caliper(s)Yup... never turn them. Replace with OE MB if possible, and dont remove the gray coating. If a caliper piston wont retract fully, REPLACE both calipers. At this point you could also upgrade to the larger 300x22 rear calipers and rotors. These were used on late Euro-spec E500 and also the Silver Arrow upgrade. Fits under stock 16 wheels. No point in buying rebuilt smaller calipers. Total cost should be
Almost certainly needs replacing at this point. Might as well get it while you can.You may want to check/replace the A/C fan resistor while you have the left headlight out if you have not already done so.
You may want to check/replace the A/C fan resistor while you have the left headlight out if you have not already done so.
Yup - at least inspect it, and repair the wiring if burned (very common). The resistor is NLA last I checked but there were some NOS appearing on eBay for a premium, IIRC...Almost certainly needs replacing at this point. Might as well get it while you can.

Geez that was quick... I just did mine a few years ago. Can you make something else work or can they be rebuilt? No options?The resistor is NLA last I checked but there were some NOS appearing on eBay for a premium, IIRC...
These are relatively rare failures. The wiring gets overheated and burned, and often the resistor can be re-used. But, it was nice to replace with new while you were in there, and when they were "only" $50 or so, prior to NLA circa 2022. There's a couple NOS out there for ~$250. Otherwise, looks like good used ones can be found for ~$50.Geez that was quick... I just did mine a few years ago. Can you make something else work or can they be rebuilt? No options?
That's what I seem to remember. Mine started smoking on me, electrical smell only when stopped at a light. When moving it was undetectable. There seemed to be some kind of discharge around the bolts but the rest of the piece looked fine. Probably best to take @gsxr up on his NIB offer though.I have two used ones I might part with should someone need. They are constructed of stainless steel and ceramic, the only parts that seem to get destroyed from heat and corrosion are the two small bolts which can be replaced. I have not heard of the actual coil that dissipates the heat failing although I'm sure it can happen. It's the actual wire ends that suffer the worst.
Sandblasting cleans everything else up nicely.
So since I got interrupted had time to ask Sam the man that does the 360Tune stateside to read Miss Red’s ECUs. Then thinking about bolting in part of the roll cage in Mr.Black. Then quality time with Missus.Ran into a minor setback. I assumed both coils were the same part number. I was mistaken. At least I cleaned while I was in there .
View attachment 182972
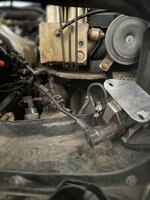
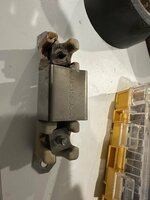
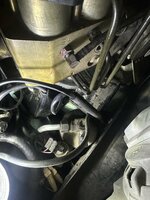
Yes. it isn't that.Im assuming the part you guys are referring to isn’t this.
 Your photo above shows the HVAC blower regulator & heatsink for a pre-facelift 124.

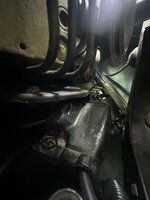
Getting warmer?Yes. it isn't that.
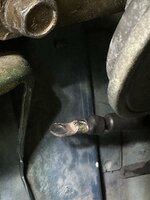
This is the aux fan resistor, located directly next to the coils.
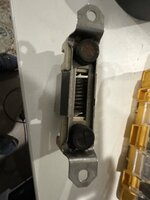
View attachment 182981
View attachment 182980

Their site may show "back ordered" with no ETA, but it's been NLA since 2022. Doesn't appear Beru plans to make any more of them, especially if MB isn't ordering any:Getting warmer?
Unfortunately back ordered.


No, there are two different part numbers for the coils based on terminal orientation. You really should read the EPC or ISPPI when checking for parts to order. It would have told you this. I thnk it is also well documented here on the forum in various threads o we the years, too.Ran into a minor setback. I assumed both coils were the same part number. I was mistaken. At least I cleaned while I was in there .
View attachment 182972
Make sure to fix that connection... looks like a loose crimp in the photo. I'd tighten the crimp and also solder it. Note that a piece of shrink wrap should be slipped over the wire before the terminal is crimped/soldered, but the ring is small enough that you may be able to slide it over afterwards.Got the bugger off. Had to dremel the nut. Cleaned off the terminal. Now I have to find the shrink wrap.
Bosch coil for $80...?Found an $80 on flea bay shipped.

Information on resistor replacement.
Yes, it’s all in the 2020 Top-End Refresh thread:
Here.
And here. (Including resistor and coil removal and side-by-side comparison).
And lastly, here. (Installation of the new resistor and coils is in this post). This includes a tip to avoid resistor overheating for the new one.
Others here may have posted more and better information in other threads (more than 15 years of information here on this forum), but this is what I remember doing back in the summer of 2020.