Postby Rudy on Fri Dec 12, 2008 11:51 pm
Hello,
bought me a new nicer sportline steering wheel which is supposed to fit 90 to 95 W124 models. Mine is a 92 500E.
The indy shop told me they cant connect horn (signal) and airbag.
On the back of the new one there are issues with carbon and spring.
I really have no idea what he meant.
So: do I have to return it or can I get some parts from the dealer to have it put on?
Any ideas, recommandations, hints??
Thanks,
Rudy
====================================
Postby Glen on Fri Dec 12, 2008 11:56 pm
You should be able to transfer the necessary parts from your original wheel.
Glen Tokuhara
====================================
Postby Rudy on Sat Dec 13, 2008 12:05 am
Hi Glen,
thanks. Good news.
Why didn't the shop know it? Its a MB/BMW shop.
They only wanna make some extra hours?
Anyway, good to know I did not waste 300 Euro.
Thanks again,
Rudy
====================================
Postby 2phast on Sat Dec 13, 2008 6:12 am
Wow, another 500e owner that has not visited my site, shame on you :down:
Ok, so your shop does not know much about MB steering wheels and what is necessary to install them, nothing suprising there.
Everything you need to know about this installation is here
www.2phast.com/500e/
Go to the interior updates section and scroll down till you come to the steering wheel upgrade, scroll past the Burl/leather steering wheel install till you get to the E55 wheel.
Better yet, have your shop visit my page, :dancings:
2000 CLK32k & 1993 500E
====================================
Postby gsxr on Sun Dec 14, 2008 3:44 pm
I'd find a new shop. Any MB tech with even HALF a clue should know this.

Dave M.
Boise, ID
1995 E420 (W.I.P.)
1994 E500 (Q-ship)
1993 300D (Sportline)
1987 300D (Sportline Stage 2)
1987 300D (R.I.P)
Click here for my website photos, documents, and movies.
====================================
Postby Rudy on Tue Dec 16, 2008 8:31 pm
well I thought so. I would understand, if may be a trainee wouldn't know, but the shop foreman called me and ruined my day.
The only reason I have chosen them is, because they are 5 walking minutes form my work place.
Otherwise I would go to Robert Fenton.
I am wondering, whether they will try to sell me a new contact ring for $200 or more.
I'll keep you posted and will make pictures when installed.
Thanks again,
Rudy
====================================
Postby 2phast on Wed Dec 17, 2008 1:27 am
Rudy wrote:well I thought so. I would understand, if may be a trainee wouldn't know, but the shop foreman called me and ruined my day.
The only reason I have chosen them is, because they are 5 walking minutes form my work place.
Otherwise I would go to Robert Fenton.
I am wondering, whether they will try to sell me a new contact ring for $200 or more.
I'll keep you posted and will make pictures when installed.
Thanks again,
Rudy
You said you have a 92 500e, so you don't need a new contact ring. All that is needed is to transfer your contact ring from your original steering wheel to this new steering wheel. Its a simple procedure, as the wheel your installing is the same design and uses the same airbag, shouldn't be any fab or mods needed at all.
Take off your old contact ring like so...

Remove filler ring from your new steering wheel

Install contact ring into new steering wheel

Making sure your wires align and come through similar to this

2000 CLK32k & 1993 500E
====================================
Postby Rudy on Sun Dec 21, 2008 7:46 pm
thanks for the explanations!
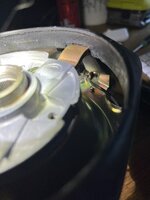
I think they forgot to the install the filter ring (the black plastic ring).
First the shop returned the old one without the bracket. Asking for it they also returned the black plastic ring (filter ring). Is that in important part, because I think its not installed?
But it looks nice.
Rudy
====================================
Postby gsxr on Sun Dec 21, 2008 8:21 pm
That sure does look nice!
BTW, I see you have manual, dual-zone climate control... I'm very jealous! I would LOVE to have that setup instead of the blasted automatic, single-zone setup that MBNA forced upon us. I like your updated radio, too! What other goodies are on your Euro-spec car? It should also have the factory oil cooler, etc...

====================================
Postby 2phast on Mon Dec 22, 2008 8:08 pm
Rudy wrote:thanks for the explanations!
I think they forgot to the install the filter ring (the black plastic ring).
First the shop returned the old one without the bracket. Asking for it they also returned the black plastic ring (filter ring). Is that in important part, because I think its not installed?
But it looks nice.
Rudy
The black plastic ring comes off so that you can install your OE horn contact ring. The black plastic ring is no longer needed, but you should keep it in case you decide to sell the wheel to someone with a 94-95 model car.
2000 CLK32k & 1993 500E
Hello,
bought me a new nicer sportline steering wheel which is supposed to fit 90 to 95 W124 models. Mine is a 92 500E.
The indy shop told me they cant connect horn (signal) and airbag.
On the back of the new one there are issues with carbon and spring.
I really have no idea what he meant.
So: do I have to return it or can I get some parts from the dealer to have it put on?
Any ideas, recommandations, hints??
Thanks,
Rudy
====================================
Postby Glen on Fri Dec 12, 2008 11:56 pm
You should be able to transfer the necessary parts from your original wheel.
Glen Tokuhara
====================================
Postby Rudy on Sat Dec 13, 2008 12:05 am
Hi Glen,
thanks. Good news.
Why didn't the shop know it? Its a MB/BMW shop.
They only wanna make some extra hours?
Anyway, good to know I did not waste 300 Euro.
Thanks again,
Rudy
====================================
Postby 2phast on Sat Dec 13, 2008 6:12 am
Wow, another 500e owner that has not visited my site, shame on you :down:
Ok, so your shop does not know much about MB steering wheels and what is necessary to install them, nothing suprising there.
Everything you need to know about this installation is here
www.2phast.com/500e/
Go to the interior updates section and scroll down till you come to the steering wheel upgrade, scroll past the Burl/leather steering wheel install till you get to the E55 wheel.
Better yet, have your shop visit my page, :dancings:
2000 CLK32k & 1993 500E
====================================
Postby gsxr on Sun Dec 14, 2008 3:44 pm
I'd find a new shop. Any MB tech with even HALF a clue should know this.
Dave M.
Boise, ID
1995 E420 (W.I.P.)
1994 E500 (Q-ship)
1993 300D (Sportline)
1987 300D (Sportline Stage 2)
1987 300D (R.I.P)
Click here for my website photos, documents, and movies.
====================================
Postby Rudy on Tue Dec 16, 2008 8:31 pm
well I thought so. I would understand, if may be a trainee wouldn't know, but the shop foreman called me and ruined my day.
The only reason I have chosen them is, because they are 5 walking minutes form my work place.
Otherwise I would go to Robert Fenton.
I am wondering, whether they will try to sell me a new contact ring for $200 or more.
I'll keep you posted and will make pictures when installed.
Thanks again,
Rudy
====================================
Postby 2phast on Wed Dec 17, 2008 1:27 am
Rudy wrote:well I thought so. I would understand, if may be a trainee wouldn't know, but the shop foreman called me and ruined my day.
The only reason I have chosen them is, because they are 5 walking minutes form my work place.
Otherwise I would go to Robert Fenton.
I am wondering, whether they will try to sell me a new contact ring for $200 or more.
I'll keep you posted and will make pictures when installed.
Thanks again,
Rudy
You said you have a 92 500e, so you don't need a new contact ring. All that is needed is to transfer your contact ring from your original steering wheel to this new steering wheel. Its a simple procedure, as the wheel your installing is the same design and uses the same airbag, shouldn't be any fab or mods needed at all.
Take off your old contact ring like so...
Remove filler ring from your new steering wheel
Install contact ring into new steering wheel
Making sure your wires align and come through similar to this
2000 CLK32k & 1993 500E
====================================
Postby Rudy on Sun Dec 21, 2008 7:46 pm
thanks for the explanations!
I think they forgot to the install the filter ring (the black plastic ring).
First the shop returned the old one without the bracket. Asking for it they also returned the black plastic ring (filter ring). Is that in important part, because I think its not installed?
But it looks nice.
Rudy
====================================
Postby gsxr on Sun Dec 21, 2008 8:21 pm
That sure does look nice!
BTW, I see you have manual, dual-zone climate control... I'm very jealous! I would LOVE to have that setup instead of the blasted automatic, single-zone setup that MBNA forced upon us. I like your updated radio, too! What other goodies are on your Euro-spec car? It should also have the factory oil cooler, etc...
====================================
Postby 2phast on Mon Dec 22, 2008 8:08 pm
Rudy wrote:thanks for the explanations!
I think they forgot to the install the filter ring (the black plastic ring).
First the shop returned the old one without the bracket. Asking for it they also returned the black plastic ring (filter ring). Is that in important part, because I think its not installed?
But it looks nice.
Rudy
The black plastic ring comes off so that you can install your OE horn contact ring. The black plastic ring is no longer needed, but you should keep it in case you decide to sell the wheel to someone with a 94-95 model car.
2000 CLK32k & 1993 500E


 .
.