• Hi Guest !

    Welcome to the 500Eboard forum.

    Since its founding in late 2008, 500Eboard has become the leading resource on the Internet for all things related to the Mercedes-Benz 500E and E500. In recent years, we have also expanded to include the 400E and E420 models, which are directly related to the 500E/E500.

    We invite you to browse and take advantage of the information and resources here on the site. If you find helpful information, please register for full membership, and you'll find even more resources available. Feel free to ask questions, and make liberal use of the "Search" function to find answers.

    We hope you will become an active contributor to the community!

    Sincerely,
    500Eboard Management

OCD Car cleaning / detailing

JC220

🇮🇪 Resto Jedi 🔧OCD Zinc Plating Type
Member
This is aimed for those who spend hours cleaning their car, admit it you are out there! Over the past year or so I find myself getting into detailing and investing in extra equipment, products etc. I have it well dialed in now.

Being able to properly and fully clean wheels makes the world of difference to a car's appearance for example. And regular proper cleaning makes it easier each time and decent products stop dirt from sticking to the car as bad making the wash process easier.

So I thought I'd share what I normally do in a wash for one of my cars. This is my recently acquired w220 S600 which was a little unkempt by the PO.

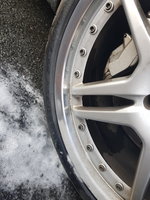
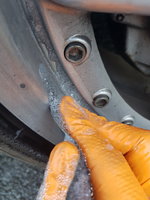
Step 1: Wheels. On the S600 the 20 inch wheels had bare alloy edges which needed buffed up. I used wet sand paper up to 2000 grit followed by autosol and fine wire wool. Photos during this step;
20190929_093408.jpg
20190929_094010.jpg
20190929_094310.jpg

Next I apply bilt hamber auto wheels iron remover: apply to inner barrels also.

20190929_112015.jpg

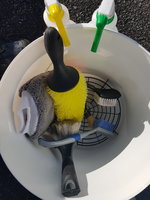
And allow to work for 5 mins. Then I get my wheel wash bucket and brushes
20190929_111913.jpg

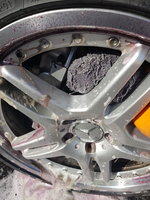
And get in there to scrub the barrels etc. Detail brush used for all nooks and bolts and small microfibre mit to wash behind spokes and hub

20190929_112156.jpg
20190929_112328.jpg
20190929_112446.jpg

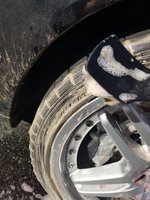
Then clean the tyres with a rubber scrubber brush and meguires degreaser
20190929_112550.jpg

Rinse and get all 4x wheels done first
 
Nice wheels! My S55 has the one-piece 18" versions :(
Thanks! Yes these are one piece reps. But nice wheels and never welded or anything like that. The PO had fitted 4x new german made Dublop SP sport 274 wide tyres also.

They really need a pro refurb which they will get after winter. And I'd like to obtain an original set of S600 wheels. I think the small tyre sidewall detracts from the ride quality but I do like the appearance of these wheels all the same. Would like original wheels in reserve and to compare ride quality
 
Step 2 – Wash.

I use 3 buckets. 1 reserved for wheels only (This water gets BLACK by the time your done) , 1x rinse bucket and 1x wash bucket. All 3x have grit guards fitted.

20190929_111918.jpg

I start with spray applying TFR detergent on the heavy mudded areas etc followed by Bilt Hamber Auto Foam pre wash high activity snow foam. One of the best performance and value snow foams around IMO. This includes spraying right into each fenderwell and arches:

20190929_114930.jpg20190929_114843.jpg

Leave to dwell or 3 – 5 mins and pressure rinse off including jetting out the arches and fenderwells. For the contact wash I use a deep microfibre wash pad and 5ml of Bilt Hamber shampoo into the wash bucket. Froth up with pressure washer.

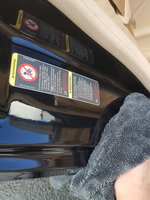
Start by going over all glass seals and nooks / badges etc and inside the fuel filler area with a detail brush and APC in a spray bottle. (Keep the residue from drying by regular rinsing off as required) Then open each door and thoroughly detail clean the inner jambs, all shut areas, rubber seals and under doors with the same products.

20190929_120706.jpg

Rinse jambs with low pressure hose. Do trunk lid recesses also. Proceed to contact wash all panels using 2 bucket method and keep pressure rinsing off as you go. What is 2x bucket?-after using the sponge on the car dunk it into the rinse bucket, wring it out then go for foam again in the wash bucket. It surprising even after pre-wash how dirty this rinse bucket water can get. The whole idea is to avoid swirl marks and it does work well.

For a “normal” maintenance wash the drying stage is next. At the moment I am using a petrol leaf blower to blow all water off the car and follow quickly with a deep microfibre drying towel before the water starts to spot. This includes all jambs and hinge areas and the wheels.

20190929_140055.jpg

Again for a normal wash at this stage I consider using a spray detailer / hydrophobic dressing spray buffed off with the towel and always tyre slick gel on the tyres to finish.

Bonded contamination removal and waxing is optional next stage. Coming next
 
Step 3 - Decontamination and buffing.

If you want to wax the car then "Decontamination" of the paint is the next step.

I use a spray on fallout remover on the paint and allow 5 mins to dwell before pressure rinsing off. This removed any bonded brake dust etc from the paint. Flowed by autosmart tardis Tar & glue remover solution to wipe down all panels.

At this stage I normally proceed to claying. Clay is used normally with a lubricant solution to rub over the paint and pull off any residual contaminants that are stuck to the paint. Run your fingers over the paint dry and feel / listen for roughness. Those are bonded impurities.

I use Bilt Hamber clay which is very good and does not require a special lubricant. Just plain tap water using a garden sprayer. Go over each panel and occasionally knead and turn the clay over to a clean area. This was half a front fender for example!-

20190929_130700.jpg

After claying another contact wash, rinse and dry is required. Allow a couple hours for all drips from mirrors etc to dry out.

Now to bring up the paint and improve / remove the appearance of any scratches. You can get into colour sanding and that sort of paint correction level but unless you really know what you are doing this is I'll advised for a DIYr.

After years if using various products, compounds and all that, I will make this simple as to what I use now.

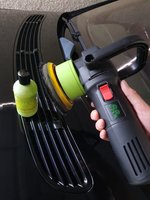
A dodo juice "buff daddy" orbital polisher.
Dodo Juice Lime Prime pre wax cleanser.
Meguires Ultimate compound for heavy marked paint.
A black microfibre flexipads buffing pad.

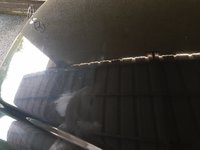
Just one pass with the dodo juice products taking a approx. 450 x 450mm area at a time gives instant great results. Any haze unnoticeable before is lifted, scratches removed / greatly reduced and the paint has an amazing smooth feel and high gloss. Lime prime needs wiped off immediately so this is why small areas are important. It leaves no white residue at all and the orbital polisher, pads and products combined will leave for a zero swirl finish every time even for a novice. This is a poor picture taken in a hurry but you can see the right side had a quick pass and the left still to do. The left side actually looks white-ish compared to the freshly buffed paint on right

20190929_171924.jpg
20190929_171942.jpg

Once the whole car and bumpers are buffed then you can choose to apply your favourite wax or sealant. Additional layers of polish are optional but the Lime prime does such a good job restoring the paint clarity it really isn't needed IMO.

I have just used Fusso coat 12 month wax on the S600 and it turned out looking amazing. Unfortunately the second I had it done it poured out of the heavens so you'll have to take my word for it for now.

Finished pics coming next weekend!

Comments & suggestions welcome. This is just a quick overview - it could get anal retentive and go on forever about wheel soaps, PH checking and all that. But I dont go that far myself. For me it is more about elbow grease and finding products that work well and is fairly cost effective for regular use.
 
Nice wheels! My S55 has the one-piece 18" versions :(
Thanks! Yes these are one piece reps. But nice wheels and never welded or anything like that. The PO had fitted 4x new german made Dublop SP sport 274 wide tyres also.

They really need a pro refurb which they will get after winter. And I'd like to obtain an original set of S600 wheels. I think the small tyre sidewall detracts from the ride quality but I do like the appearance of these wheels all the same. Would like original wheels in reserve and to compare ride quality

Nick probably had the 20’s dialed in about as nice as you could get them on that car. Before I looked too hard at tire sizes, I’d make sure the ABC system is dialed in. 8899 and I have both gotten into that a bit on our S55s this summer. It makes a world of difference, similar to new hydro legs and fluid on 500E cars. New fluid and dampers all around helps. After that, yeah get rid of the dunlaps. Continentals will be slightly less harsh and slightly less sporty than Michelin’s, all season will be softer and less sporty than summer, etc., all the usual rules apply. My S55 came with the 19” 2-piece forged version of this wheel in 235 front and 275 rear. Following Nick’s advice I went to 245/285 with remarkable results. An ever so slightly wider tire and taller sidewall made a noticeable difference. Maybe it puts a tad more stress on the ABC, but nothing that regular maintenance can’t deal with. It’s not like I have the car loaded down with a huge gas tank for a cannonball run or anything [Klink].

I grew up reconditioning cars, so I have my own OCD detailing processes, which basically means the cars never really need a deep clean. They stay pretty dialed in. I’ve been known to take McGuire’s ultimate compound to the whole car once every year or so before I realized it was overkill. Now, the spray on wax every car wash is plenty for my tastes. The cars are garage queens that get driven, washed, waxed, then put up. But the McGuire’s wheel cleaner stays in the trunk...

Cheers,

maw
 
Last edited:
Step 2 – Wash.

I use 3 buckets. 1 reserved for wheels only (This water gets BLACK by the time your done) , 1x rinse bucket and 1x wash bucket. All 3x have grit guards fitted.

View attachment 88831

I start with spray applying TFR detergent on the heavy mudded areas etc followed by Bilt Hamber Auto Foam pre wash high activity snow foam. One of the best performance and value snow foams around IMO. This includes spraying right into each fenderwell and arches:

View attachment 88830View attachment 88829

Leave to dwell or 3 – 5 mins and pressure rinse off including jetting out the arches and fenderwells. For the contact wash I use a deep microfibre wash pad and 5ml of Bilt Hamber shampoo into the wash bucket. Froth up with pressure washer.

Start by going over all glass seals and nooks / badges etc and inside the fuel filler area with a detail brush and APC in a spray bottle. (Keep the residue from drying by regular rinsing off as required) Then open each door and thoroughly detail clean the inner jambs, all shut areas, rubber seals and under doors with the same products.

View attachment 88832

Rinse jambs with low pressure hose. Do trunk lid recesses also. Proceed to contact wash all panels using 2 bucket method and keep pressure rinsing off as you go. What is 2x bucket?-after using the sponge on the car dunk it into the rinse bucket, wring it out then go for foam again in the wash bucket. It surprising even after pre-wash how dirty this rinse bucket water can get. The whole idea is to avoid swirl marks and it does work well.

For a “normal” maintenance wash the drying stage is next. At the moment I am using a petrol leaf blower to blow all water off the car and follow quickly with a deep microfibre drying towel before the water starts to spot. This includes all jambs and hinge areas and the wheels.

View attachment 88833

Again for a normal wash at this stage I consider using a spray detailer / hydrophobic dressing spray buffed off with the towel and always tyre slick gel on the tyres to finish.

Bonded contamination removal and waxing is optional next stage. Coming next

Since utilising these wash methods, swirl marks on my car's paint work have virtually disappeared! (Once the paint has been polished and thereafter)

I really want to start experimenting with Ceramic coatings now in the next few months
 

Who has viewed this thread (Total: 1) View details

Back
Top