• Hi Guest !

    Welcome to the 500Eboard forum.

    Since its founding in late 2008, 500Eboard has become the leading resource on the Internet for all things related to the Mercedes-Benz 500E and E500. In recent years, we have also expanded to include the 400E and E420 models, which are directly related to the 500E/E500.

    We invite you to browse and take advantage of the information and resources here on the site. If you find helpful information, please register for full membership, and you'll find even more resources available. Feel free to ask questions, and make liberal use of the "Search" function to find answers.

    We hope you will become an active contributor to the community!

    Sincerely,
    500Eboard Management

Screeching squealing noise rear driver side brakes

richardkwon

Active member
Member
This squealing noise has gotten progressively worse to the point that now there is screeching as the car is moving and goes over bumps and undulations in the road.

I first noticed that whenever I parked and got out of the car, there would be a squeal in the rear brake area on the driver side only. As I exit the car, the weight causes the suspension to go up and that's when it squeaks. Now the sound is continuous as the car is driven.

Supposedly the brake pads and rotors were changed about 5,000 miles ago. The car is a 400E and has about 182,000 miles on it.

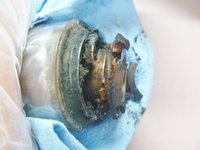
The second pic is of the pad. I can't tell if the pad is full or is nearly worn down completely? For the first pic, I noticed these little marks on the rotors every few inches or so. Have not had a chance to take off the wheel to inspect but any ideas would be appreciated.
 

Attachments

  • P1090135.JPG
    P1090135.JPG
    1 MB · Views: 10
  • P1090134.JPG
    P1090134.JPG
    1.4 MB · Views: 12
Last edited:
Hard to tell from the photos but I would certainly pull the wheels and check all calipers, pads and discs asap.
 
Sounds to me more like a rear carrier bushing may be going bad...
+1. Brakes make noise when you apply the brakes.

If the noise is when the suspension moves, it's suspension related, and based on what you describe I think Andy nailed it...

:cheers:
 
Read Gerry's writeup. The LCA does not need to be removed. The wheel carrier will push up & out of the LCA, you replace the joint, and re-assemble. The tool is required, either Baum, or the SirTools equivalent... or the OE tool of course.

proxy.php


proxy.php


proxy.php


:mushroom:
 
No need to touch the brake pads or rotor. Use Google to search for the SirTools part number, I think there are a few vendors around $120 or so. Also check eBay for both the ST and Baum versions, you may need to get creative with search terms to find this particular tool, as they may call it by different names. I think there are URL's in Gerry's thread?

:5150:
 
OK. Do you have a part number for the bushing. I can't find it on Pelican. I think it's also known as the Trailing Arm Bushing to Knuckle Assembly?
 
I just received the SirTool. To press out the bushing, how does the tool work? I trying to figure out how the bolt and the 2 large round nut things go.
 
The larger of the large round nut thing goes over the mount opening with the bolt running through it and the bushing, the smaller large round nut thing goes on the other end of the bolt against the bushing but inside the mount opening. Turning the nut causes the ends to squeeze together thereby pressing out the bushing.

More info: http://www.500eboard.com/forums/showthread.php?3377-Rear-wheel-carrier-joint-bushing

and here: http://www.500eboard.com/forums/sho...m-amp-Wheel-Carrier-Joint-Bushing-Replacement


proxy.php
 
Last edited:
So basically to remove, I will be screwing in the bolt to push out the bushing and to install vice versa?

The bolt doesn't screw into the bushing, it slides through it and then you add the nut to other side. gsxr's pictures show it perfectly. It will be clear when you remove the wheel and caliper and use the tool. Installation is the opposite.
 
Last edited:
OK guys I need your help. I'm stuck trying to get the bolt back in. For some reason the bolt holes of the LCA and the bushing hole won't line up. When I press down on the hub it appears the LCA is too forward towards the front of the car. I somehow got a screwdriver wedged in and I tried jacking up the LCA but I still can't seem to line it up. Any tips? I'll post some pics later.


And another question. I figured out how to remove and install the bushing but how do you know when it's in perfectly? I had to remove the tool a few times and just eyeballed it.
 
Last edited:
Thanks for the reply Gerry. I'm too tired to finish the job today but I will give it a shot tomorrow. As you know it's hot as hell in Houston and after a couple of hours I'm feeling the heat. It's so frustrating. I tried jacking up the LCA at various points and had it lined up at one point with some jigging of the screwdriver but could not succeed.
 
Gerry what is the inboard end of the LCA? If I'm facing the hub is it the right side that I need to jack/jimmy up?
 
I'm stuck trying to get the bolt back in. For some reason the bolt holes of the LCA and the bearing hole won't line up. When I press down on the hub it appears the LCA is too forward towards the front of the car. I somehow got a screwdriver wedged in and I tried jacking up the LCA but I still can't seem to line it up. Any tips?
There's no special trick. You need to muscle the wheel carrier around until it goes into the LCA, then muscle it some more until the holes line up. Get a screwdriver through the LCA & joint to hold it fairly close together, then pry enough to get the bolt started, then tap the bolt into place with a hammer.


And another question. I figured out how to remove and install the bushing but how do you know when it's in perfectly? I had to remove the tool a few times and just eyeballed it.
You eyeball it and compare with the other side, and/or with how it looked before you removed it.


:banana1:
 
I had the holes lined up almost perfect and was trying to tap in the bolt and then the banging caused it to slip back out. I've gotten a screwdriver in there but the damn thing now won't budge at all.
 

Attachments

  • P1090179.JPG
    P1090179.JPG
    2.1 MB · Views: 13
  • P1090180.JPG
    P1090180.JPG
    2.1 MB · Views: 10
  • P1090181.JPG
    P1090181.JPG
    2.1 MB · Views: 10
Richard,

How are you supporting the car. You need to lift the rear up by the differential and then lift the LCA with another smaller jack. From the photos it looks like you have no way to maneuver the LCA around.

If it still does not go in disconnect the shock and torsion bar link. You did the hard part this is easy.

You can do it!!

Terry,

I've jacked up the driver side rear at the jacking point just left of the rear wheel. So should I jack up the differential with a jack and then also jack up the LCA simultaneously?

I have a jack underneath the LCA and it does move up and down but it's still tough getting the bolt aligned. I got really lucky the first time when I had it almost perfectly aligned. I should have kept the screwdriver halfway in while trying to tap in the bolt.

I agree the hard part is over but getting this damn bolt aligned is driving me nuts!
 
If the car is supported at the jack pad, you're fine. You can use another jack to raise the LCA, or pull the wheel carrier down by hand into the LCA.

Either way, yes, leave the screwdriver in the hole while you are getting the bolt started. As you tap the bolt through the hole, it will push the screwdriver out.

Once the screwdriver is in place, you can tap on the brake rotor hub area with a rubber mallet to help move the wheel carrier around if needed, to get the holes better lined up.

:rugby:
 
OK finally got the LCA and the carrier bolt and nut back on. The trick for me to line up the bolt hole exactly was to jack up the LCA right underneath the spring. Jacking up the LCA right where the hub is did not work at all for me as the angles are horrible.

Basically, here's the Cliff Notes version:

1. Jack up the rear of the car at the driver side jack pad.
2. Remove wheel lug nuts using 17mmm socket
3. Remove 2 rear brake caliper bolts using 17mm open ended wrench. A socket would not fit for me
4. Remove brake rotor hex bolt with 5mm hex wrench
5. Remove brake rotor
6. Bend the brake dust shield down and back towards the outside of the car a little bit. Not too much. I used a big wrench to carefully bend it
7. Using 10mm socket, remove 2 bolts that hold the LCA plastic cover
8. Using a 22mm socket on the rear carrier nut and a 22mm open ended wrench on the bolt, undo the nut
9. Tap out the bolt (Be careful not to have your head or arms in this area as the hub could snap up)
10. Remove old bushing with special tool. I used a SirTool and it worked perfectly for me
11. Install new bushing with special tool. You will have to eyeball this a couple of times by removing the tool. You will know when it is centered perfectly.
12. To install the hub back onto the LCA, use your two hands and apply sharp downward force and try to snap as much of the hub into the LCA. If the LCA has moved a bit forward, bring it back towards the rear. Then, stick a screwdriver into the hole to keep it in place and jack up the LCA right underneath the spring. Slowly jack it up until the holes align. Then place bolt (goes from front of car to the back) into the carrier hole. You can then tap it in with a small wooden block or screwdriver. I'm not sure what the torque value is but when the nut is fully seated onto the bolt, it will no longer tighten.
12. When bending back the brake dust shield, make sure the inner part of the dust shield does not touch the rotor. There should be about 1/4 to 1/2 inch of space in between. I used a big screwdriver to carefully pry/bend it away from the rotor where it was touching.
12. Reinstall everything else.
13. Voila! No more screeching when driving and/or just standing still and pushing down on the rear. My bushings were so back that they would screech with just a minor breeze rocking the car.

I took some pics of the bushing and it looks awful. My car is a 400E so things may be a little different but should not be too much.

Thanks to everyone who replied. I could not have done it without everyone's guidance and expertise. Now it's on to the passenger side!
 

Attachments

  • P1090182.JPG
    P1090182.JPG
    1.9 MB · Views: 6
  • P1090183.JPG
    P1090183.JPG
    1.9 MB · Views: 5
  • P1090184.JPG
    P1090184.JPG
    1.7 MB · Views: 7
  • P1090185.JPG
    P1090185.JPG
    2.1 MB · Views: 7
  • P1090187.JPG
    P1090187.JPG
    1.6 MB · Views: 4
Last edited:
Wow Richard they were in HORRIBLE shape! Glad you got it sorted out and fixed the problem.

Funny, last summer my rear carrier bushings were squeaking and I bought the Baum tool to do the job, but they stopped squeaking on their own (I did spray them with silicone), so I haven't gotten around to doing the job.....
 
Yes, they were a mess. I tried to separate the inner part of the bushing from the outer but it would not come out. I guess it's attached somehow like a joint and is lubricated internally and sealed by the outer rubber. I'm assuming the driver side bushing failed more quickly due to the extra weight of the driver that favors the driver side.
 

Who has viewed this thread (Total: 1) View details

Back
Top