• Hi Guest !

    Welcome to the 500Eboard forum.

    Since its founding in late 2008, 500Eboard has become the leading resource on the Internet for all things related to the Mercedes-Benz 500E and E500. In recent years, we have also expanded to include the 400E and E420 models, which are directly related to the 500E/E500.

    We invite you to browse and take advantage of the information and resources here on the site. If you find helpful information, please register for full membership, and you'll find even more resources available. Feel free to ask questions, and make liberal use of the "Search" function to find answers.

    We hope you will become an active contributor to the community!

    Sincerely,
    500Eboard Management

timing guides and tensioner questions

YEs the tensioner is not installed yet. Im putting that in last.

When you say backwards you mean Upside down right? Becuase I mean upside down. I know the smooth part faces the chain. Just checking...
Yes - upside down. I'm sure your rails are in place correctly. Did you mark the driver side chain / sprocket to confirm the chain did not move on the opposite side?

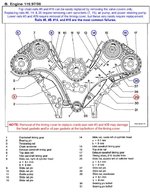
Remember, the idea is to pin all 4 cams and then install the chain, with zero slack on the driver side below the exhaust cam, and no slack between the two intake cams. With no slack between crank and drive exhaust, and no slack between driver exhaust over to passenger exhaust... there should be adequate slack to get the chain over the sprocket, using whatever method you used to remove the chain originally.

:detective:
 
Dave you are such a cool guy. You know a lot and you are humble.

Now back to the chain..Yes I marked all sprockets relative to the chain. Both drivers side cams are Pinned and lined up as before removal. I just cant understand whats up. Thats why Im thinking if I instaled the guide upside down then it could prevent the chain moving forward that ONE more tooth on the passenger Intake cam sprocket
 
Dave I have not moved the crankshft bolt. It is still at 40 BTDC. BUt seeing as no rails were broken it doesnt make sense that i have to move it to 45 btdc
 
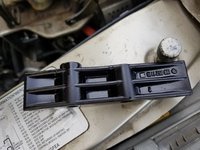
So Dave my question is whether this wider part is installed at the top or at the bottom?

So does the top pin go through the wide part?
I have installed the wider part at the top.

20180408_144754.jpg

Sent from my SM-N950U using Tapatalk
 
So, both pins should go through the rail... I'm assuming that was done. Again, I haven't done this job in a few years, but from memory it's physically impossible to install the rail upside down. I don't think the wide part will fit in the opposite position.

Moving the crank back to 45° would, in theory, make things worse... it would remove some chain slack from the passenger side. Are you certain the other 3 cams have the chain at the exact same tooth/position as when it was disassembled? And you're pulling the chain up as far as possible on the passenger side? I've never done this by removing camshafts, I always removed the sprockets from the cam (the exhaust sprockets are a simple bolt-on).

:klink3:


Well you must be right becuase I did attempt to install it with the wider part downwards and it would not go in.

So my issue must not be the guides but the chain must be not correctly positioned on the balance shaft thing between the cams..Lets see when I go and work on it later today!
 
Ok I figured out what it was.

Because I graduaslly tighten the cam bearing bolts to evenly distribute pressure on the cams I had left the Right Exhaust bolts a bit loose. As soon as I tightened them down I was able to put the chain on properly as marked and all 4 pins in all 4 cams.

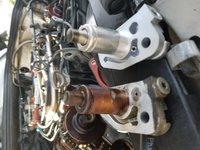
Interesting is that the Febi chain tensioner is a slightly different design than the original. See pic.
I thought i has to unscrew that side Allen bolt. But There are no threads in that same hole on the Febi one. So I didn't do anything to the new tensioner. Just put a bit of oil on the hole and installed it

20180411_172155.jpg 20180411_172159.jpg

Sent from my SM-N950U using Tapatalk
 
Glad you got the timing figured out. Don't forget to pull all 4 pins and then rotate the engine twice, and confirm all 4 cams still pin at ~40° or so.

There was a new style chain tensioner which replaced the old, pretty sure that is the difference you are seeing.

:hiding:
 
Interesting is that the Febi chain tensioner is a slightly different design than the original. See pic.
I thought i has to unscrew that side Allen bolt. But There are no threads in that same hole on the Febi one. So I didn't do anything to the new tensioner. Just put a bit of oil on the hole and installed it
I have to say out loud, for the record, that I am VERY nervous about you using the Febi chain tensioner. This is SUCH a critical part to the proper mechanical operation of the car, and the reputation of Febi for parts quality and longevity is so poor, that I am very nervous about this. Do what you must, and fit your budget, but this is such a critical part that I'd only go factory/OEM on it.

The Febi chain tensioners for the M117 engines (think 560SEL/SEC) are of demonstrably poor quality and do not last. It's not that different of a design from that of the M119.

As you noted, it's different than the factory unit and may not be correct in the line-up of the holes and passages and such, not to mention the quality of the interior spring.

Just sayin'. I wish you the best on this.
 
I had the same concern, but based on photos I found on vendor websites, it appears the Febi is reboxed OEM (SWAG). I think. Sure hope so. Needed a photo of the outside face of the tensioner to say for certain.

:duck:
 
Samm,

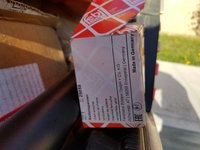
Can you kindly take some detailed photos of the chain tensioner to see what, if any, markings are on the part. Also, photos of the Febi box would be welcome to see where the "country of origin" sticker is saying that the tensioner was made. I have seen some online photos that concur with your assertion that the Febi unit is a SWAG part.

Dave,

The M117 Febi tensioners are NOT OEM and are NOT the same/as durable as the factory units. It's a $460 (list) part, and the Febi units are like USD $50-60 at the usual suspects. The 119 units are $378 (list) and are about $125 on the aftermarket (Febi).

Thanks
Cheers,
Gerry
 
thank you Dave,

I will definitely rotate the engine by hand twice. Although right now it is not rotating at all. Feel like I will break my ratchet. I did push the car back while I was doing the timing guide work. I dont know if that has caused anything. ALl 4 pins are in and the timing marks are exactly as they were before disassembly. So Its odd, maybe I will remove spark plugs to make it easier...
 
You are removing the pins before trying to rotate the crank, correct...? With the pins removed, it should turn freely. Spark plugs in won't make it act like a seized engine.

Moving the car won't affect anything, btw.

:blink:
 
Yes sure Gerry, Ill post those pics up. I've already installed the tensioner but I did take 3 pics I think. SWAG was definitely a brand I saw either on the box or tensioner itself. My original tensioner looks like its perfectly fine, so I will not throw it away (45k miles only on it).
 
Hi Dave,
Well I cannot rotate at the crank to allow me to pull out those bolts on my cams. The engine needs to rotate clockwise just a millimeter and I would be able to pull them out.

I know pushing the car would do nothing, just always like to mention things Ive done in case there is something that I am not aware of...

The engine was turning before with some force but not it feels like my ratchet is going to break or something. Crankshaft never moved throughout the work.

Could it be that the cams are at some particular point that requires a lot of of force? Will see this evening after I finish work.....

Thank you as usual..
 
OH - now I get it - the locking bolts are stuck in the cams. Use a wrench on the cam itself to wiggle them back & forth, there should be enough play to allow the bolts to come out. This is where the correct tool may help, as the diameter is a bit smaller, and they are smooth surfaces. Worst case, you might need to loosen the tensioner a bit, wiggle the passenger exhaust cam until that pin/bolt comes out, then work towards the driver side.

As a side note, unless the timing chain is brand new, it's not always possible to pin all 4 cams simultaneously with the tensioner fully in place.

:watermelon:
 
Yes the correct tool would have been useful. DO you know what the size of the spanner would be instead of that special tool? Ive been using an adjustable spanner but its prettyy thick and does scrape against the cam lobe a bit... :doh:
 
Im guessing that tool size is 25mm or 26mm ? Not sure though....

Apparently the hex flats on the cams are an oddball size - see attached image. Can you use slip-joint / Channel-Lock type pliers?
 

Attachments

  • M119_cam_wrench.jpg
    M119_cam_wrench.jpg
    65.5 KB · Views: 37
I used a large Crescent wrench on my M117 and M104 cams, until I got the tool that GSXR shows above.
 
the thing is I need pliers that are wide jaw but slim enought to fit in the gap without scraping the cam lobe :agree:

Thanks for that pic, looked up the price and its over 100!!
 
Apparently the hex flats on the cams are an oddball size - see attached image. Can you use slip-joint / Channel-Lock type pliers?

Am I reading that right? 26.5 mm and 27.5 mm? :yayo:

Whenever I run into stuff like that, or 18mm nuts (or any other size not commonly loaded in socket sets) I feel as if I'm entering forbidden territory. Like someone consciously chose the fastener size to prevent bozos(like me) from monkeying around with things.
Yup - crazy, huh? I bought it nearly 10 years ago and paid under $30, which still seemed like a lot for a simple wrench. I had no idea the price went stupid, now it's ~$80 dealer cost and ~$100 from most online dealers!!??

The crazier part is, the wrench really isn't needed. I bought it because I thought I would need it for a timing chain job, but from memory it was more of a convenience than a necessity. I sure wouldn't shell out $100 for one now! Sheesh.

:spend:
 
Wow 30 dollars 10 years ago. More than triple on some websites now!

So I figured what was up with me being unable to rotate the crankshaft. Its a very simple thing but n case someone read this a few years from now I'll be clear.

The 6mm (M6) bolts that I used were pinned in the rear of all 4 cams. I was looking at the right (passenger in USA) side m6 bolts and I could see that they were stucxk and needed the crank to rotate clockwise just a mm so that I could wiggle them out. I assumed the left side bolts needed the same. I later realized that the left side cams needed the to be rotated a mm ANTI- clockwise (wrong way of rotation of engine) and that the more I kept trying to turn the crankshaft bolt clockwise (the correct way) the more the M6 bolts in the back of the cams were getting more wedged. I am lucky I checked this before applying more force because I could have broken the cam bearing which the m6 bolts pass through.
So as always, keep checking and making sure of things. Assuming leads to damage or doing the job again. Also rarely is the solution to apply more force!!
So anybody doing a search online and seeing this a few years or months from now please understand that I am not writing a step by step detailed set of instructions. I am just hoping to help you learn or avoid things that got me frustrated.

  1. My car is a 1995 E420 with m119.
When you attempt the job of replacing your three UPPER timing guides add these fun facts to whatever instructions you are following:
The left side power steering bracket can be removed from the engine block without removing the power steering pump itself from the bracket to save time. So there are two 13mm bolts at the rear (one is at the top, just under the cylinder head near the edge. If you put ur hand near the AC hose on the side of the engine and feel in the are described you will feel a 13mm bolt there. The second bolt is very hard to see as there is the AC compressor and pipes blocking the view but it is a 13mm that has a small metal bracket attached with it that hold a wire. This bolt is the difficult one to remove if you never remove the AC compressor. I had to replace my compressor anyway so I had more space to see and take it off. The bolt is kind of just above the compressor, so if you can put your hand or use a small mirror you should see/feel it. ). The third bolt holding the power steering is a 6mm allen bolt that is from the front of the bracket, look to the left side of the PS reservoir, down a bit and you will see a 6mm allen slightly hidden there, maybe use a flashlight to see better.

  1. Accessing the upper timing guide pins for the guide nearest the left (drivers) exhaust cam means you need to move the PS bracket, but I did not have to disconnect it at all or empty the PS fluid in the reservoir). I simply move the pump as far as I could safely out of the way to just about fit the pin removal tool, or bolts/washers/socket onto the pins. For one of those pins I had to move PS pump far to the left, the other one I moved it far to the right.
  2. Never ever wiggle the cam tool or the bolt you are using when it is screwed into the pin!!! I snapped the tool like this! When you for example put the pin in a bit but u don’t feel that it is aligned so you try to pull it out, but its stuck, do NOT wiggle it. Either grab the protruding pin with a cloth and pliers (to not scratch/damage) or try and use the tool/bolt to continue drawing it out.
  3. Removal of the Cams: Pin the cams. MARK the CAMS and the CHAIN together with a marker pen or something suitable. Take pictures! Naturally after pinning the cams with your 6mm bolt wit the crankshaft at 45 deg BTDC or close to that point to allow the pinning to occur (mine was at 40 deg BTDC) you remove the tensioner which is held in by one 13mm bolt and a 13mm nut as well, don’t worry when you remove it the tensioner will not fly out at you or anything. You start undoing the bolts that hold down the cams. Start from the CENTER bolts and gradually work your way either side of the center. But you only start GENTLY cracking the bolts loose. Yes it will seem a bit tedious but you MUST gradually release the pressure that is being exerted on the cam, do not just take the bolts off at one time you can crack the cam! It will only take you like 10 mins or less anyway and this method means you DO NOT need to remove those cam adjusters that are a bloody nightmare to re-install unless you have the special socket tool that is sold. So remove the right exhaust cam then remove the right intake cam. Of course at this pint the chain will be dangling down, you can tie a plastic zip tie or anything suitable to hold the chain up. You can now after removing things in the way, start pulling the pins holding the upper right timing guide. You do NOT need to remove the oil dipstick from the engine, just undo the bolt holding it and lift it a bit and move it to the side slightly to necessary. So you do this guide rail but my advice is do NOT bother trying to reinstall the cams yet, just put them with their respective bearings and bolts in a clean area while you do the rest of the guides.
Left side guides, once the PS pump is moved you will see the pins clearly for both guides and it is self explanatory. Of course again remove the cams in the same way as before, gently. I am not certain if the guide can actually fall down inside the engine but maybe have a finger on it when you remove the last pin. The pins are NOT the same thickness, one is 8.1mm and other is 9mm. Take note when you remove each pin, write ‘top’ or ‘bottom’ on them so that you do not doubt which one was where.
There are two upper guide rails that are the same part number, the wider part at goes at the top, as Dave said before it is probably impossible to fit it upside down anyway.
Install cams: Once you have replaced the guides you install the cams starting with the left exhaust cam as it was the last one you removed. You DO NOT start bolting it into place fully until you have managed to install at least 3 cams and pinned them again. It takes a bit of time to do this but you need to understand that you are trying to line up the chain exactly as you had it before but the cams are in different positions trying to push down on the lifters and so the cams will not just sit freely. SO I would get the cam to line up with the marking on the chain (marker or whatever you marked) then gently start installing the cam bearings and bolts as appropriate to try and get the cam to get into its proper position. I did this for all 3 cams. I made sure they were all pined and the mark on the chain and cam all lined up as before you started removing them. Then the last cam goes in pretty easily and lines up and pins easily.
Once the cams are bolted in and you triple check the chain is in the correct pre-removal position in relation to all 4 cams, you can reinstall your tensioner. It just bolts in, no adjustment or whatever, torque was 25nm I think. Cam bearing bolt were not high torque at all, maybe 8 or 9nm.

I used Permatex 51531 blue anaerobic sealant for upper timing covers and those 3 air pump bolts.

Use a Genuine Mercedes gasket set for the valve covers, fits superbly. Get it online.
That’s all I can remember now, got to get back to work now…
 
I received my own M119 SWAG tensioner in a Febi box.

SWAG (which at one time stood for SudWest Autoteile Geschaft) is not the OEM for MB's M119 tensioners, but they are an aftermarket part of good quality and OK to use as an M119 tensioner replacement. Also, the SWAG parts are made in Germany.

SWAG has also been on our "nice" list of aftermarket parts manufacturers, since that list was first published.
https://www.500eboard.com/forums/showthread.php?t=1919

Interestingly, SWAG is a Bilstein (Febi) group brand.

Cheers,
Gerry
 

Who has viewed this thread (Total: 1) View details

Back
Top