UPDATE - see post #3 below for the answers:
Hey guys,
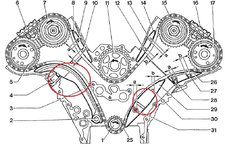
I was working on getting my spare 500E motor ready when I noticed the top of one chain rail was snapped off - see attached photo. It's the upper, inside rail, the one which is the same on left + right sides, part number 119-052-11-16. My question is, what is required to replace these rails? I can't find the procedure anywhere in the W124 CD-ROM, nor the WIS. I assume it's one of those things that MB thinks is so simple they don't have to explain it, but for someone like me who has never done this, I could use a little guidance.
Do I just need to remove the camshaft gears / adjusters, pull the chain out of the way, remove the pins, and the rail pops out? I really do NOT want to pull the timing cover on this engine if I can avoid it. From what I can tell, there is only one rail that requires timing cover removal, and I'm going to hope that one is ok; and just replace the others. I searched both 500 forums and PeachParts, seems that most people either just replace the top rails (above the camshafts), or pay the mechanic to do everything. A couple folks pulled the timing cover and changed all of them but that's not in my plans for this motor right now - that's a separate project for next year.
If anyone has tips about how to R&R those inside/upper rails, and also the long curved rail on the passenger side, I'd greatly appreciate any assistance... thanks!

Hey guys,
I was working on getting my spare 500E motor ready when I noticed the top of one chain rail was snapped off - see attached photo. It's the upper, inside rail, the one which is the same on left + right sides, part number 119-052-11-16. My question is, what is required to replace these rails? I can't find the procedure anywhere in the W124 CD-ROM, nor the WIS. I assume it's one of those things that MB thinks is so simple they don't have to explain it, but for someone like me who has never done this, I could use a little guidance.
Do I just need to remove the camshaft gears / adjusters, pull the chain out of the way, remove the pins, and the rail pops out? I really do NOT want to pull the timing cover on this engine if I can avoid it. From what I can tell, there is only one rail that requires timing cover removal, and I'm going to hope that one is ok; and just replace the others. I searched both 500 forums and PeachParts, seems that most people either just replace the top rails (above the camshafts), or pay the mechanic to do everything. A couple folks pulled the timing cover and changed all of them but that's not in my plans for this motor right now - that's a separate project for next year.
If anyone has tips about how to R&R those inside/upper rails, and also the long curved rail on the passenger side, I'd greatly appreciate any assistance... thanks!


 the guy was saying he leaves the heads on and uses roof flashing to preserve the head gaskets.


 .. i always is gone remember M119 Hmm


 ) exhaust cam? Is that the camshaft used to determine chain stretch really? And should I also check when the other 3 cams pin goes in for science?

