• Hi Guest !

    Welcome to the 500Eboard forum.

    Since its founding in late 2008, 500Eboard has become the leading resource on the Internet for all things related to the Mercedes-Benz 500E and E500. In recent years, we have also expanded to include the 400E and E420 models, which are directly related to the 500E/E500.

    We invite you to browse and take advantage of the information and resources here on the site. If you find helpful information, please register for full membership, and you'll find even more resources available. Feel free to ask questions, and make liberal use of the "Search" function to find answers.

    We hope you will become an active contributor to the community!

    Sincerely,
    500Eboard Management

The $400 400E

Or neutering US N7 (maybe I did not post this)
I removed that pin from my spare relay and swapped it in. The indicator no longer illuminates with the key on/engine off. Bad relay? I assume it should still illuminate when I first turn the ignition on, right?

Also, what is the downside to removing the pin from the US relay, as opposed to swapping to the ROW relay?
 
Yes - with key on / engine off, the "test" signal should keep the fault indicator bulb on, until the engine is started. I assume you've confirmed the bulbs are all in the proper location in the cluster? All warning lights should turn on, and only the SRS light should turn off after 4 seconds. The rest will stay lit until the engine starts, or the battery is drained, whichever comes first.

:shocking:
 
Yes - with key on / engine off, the "test" signal should keep the fault indicator bulb on, until the engine is started. I assume you've confirmed the bulbs are all in the proper location in the cluster? All warning lights should turn on, and only the SRS light should turn off after 4 seconds. The rest will stay lit until the engine starts, or the battery is drained, whichever comes first.
I haven't. The SRS light actually never illuminates. I should probably investigate all of that.
 
I removed that pin from my spare relay and swapped it in. The indicator no longer illuminates with the key on/engine off. Bad relay? I assume it should still illuminate when I first turn the ignition on, right?
No. By removing the ground to the bulb (as noted in pic 1 of post 646) in the dashboard (by removing the pin N7) that bulb will never light. …. Because you have neutered it!

Also, what is the downside to removing the pin from the US relay, as opposed to swapping to the ROW relay?
By using a modified Euro N7 relay (not just swapping), you will maintain BoW functionality for everything except for the CHMSL.
 
So, removing that pin just disables the whole system? Why not just remove the bulb at that point?
Swapping relays in and out is less tedious than taking the gauges in and out to insert/remove the bulb. Btw removing that pin doesn’t disable the whole system. Voltages are still meticulously compared by the comparators inside N7. The output is just disabled.
 
I'm having a hard time tracking down Beru distributor rotors. OE are pricey. What exactly is the difference between Bosch and Beru? I've heard the bolt hex is oversized on the Bosch. Not an issue for me. Anything else?
 
I'm having a hard time tracking down Beru distributor rotors. OE are pricey. What exactly is the difference between Bosch and Beru? I've heard the bolt hex is oversized on the Bosch. Not an issue for me. Anything else?
The bolt issue is a real nuisance on the Bosch. No Allen key fits correctly. Otherwise they are cromulent, if you can't locate the good Beru (reboxed OE Doduco), Bosch is the second choice.

Doduco has proper bolts and a clear lacquer finish, plus the Star logo and MB part number. Don't use any other brand (not Bremi, not Facet, etc).

For final assembly, use a dab of blue threadlock on the rotor bracket center bolt, and the 3 small bolts for the rotor as well. They can loosen and back out, destroying the cap+rotor.

:duck:
 
The bolt issue is a real nuisance on the Bosch. No Allen key fits correctly. Otherwise they are cromulent, if you can't locate the good Beru (reboxed OE Doduco), Bosch is the second choice.
The bolt issue is no concern for me. The hex is supposedly 3.2mm, which is 1/8". I have plenty of 1/8 hex wrenches. Even if that isn't perfect, I have a machine shop, so I can make a custom, slightly embiggened hex key just for those rotors. Or I'm sure I can swap in different bolts. As long as the Bosch are reliable, I'm good with that.
 
I'll need to check again, but I'd have sworn I tried every SAE hex key that I had and nothing fit correctly in the Bosch bolt head. The Doduco bolts are perfect with a 3mm hex. Arnt posted details about swapping the Bosch bolts with aftermarket here.

However, a custom embiggened hex key would be sweet!

Otherwise, the Bosch rotors should be acceptable...

:yahoo:
 
Just spoke with the local yard that has the 560. It's an 89 560 SEL. They say the engine has compression at 175-185 on all cylinders, so they want $600 for it despite having over 300k miles. Too rich for my blood. I was expecting they'd sell it as a core with that kind of mileage, but I guess not.
 
I measured the Bosch rotors I have. The hex is 0.121", which is 3.07mm.

That is bigger than 3mm, and smaller than 1/8". I think a good quality 3mm hex key should work just fine, but I agree that it's on the loose side. I may just take a 1/8 key and mill 0.002 off each flat at the tip to make it a perfect fit.

Sometimes it's nice having old school machinist equipment laying around.

1000005738.jpg
 
Interesting data! Subjectively, a 3.0mm key feels way looser than you'd expect for a 3.07mm socket. At least there's a couple of possible workarounds.
 
Interesting data! Subjectively, a 3.0mm key feels way looser than you'd expect for a 3.07mm socket. At least there's a couple of possible workarounds.
Yeah, the thing is a 3mm hex key with perfectly sharp corners should have a distance across the corners of less than 3.5mm. Given necessary clearances and softened corners, 3.4mm is more likely. That leaves very little meat to grab a loose hex. Not surprising that people have problems, especially if they're using thread locker on those fasteners.
 
Beater400E, you want a stick shift, get yourself a Mini with the 6 speed manual. I have a 2016 Countryman which I love. So much fun to drive.


Regards,

Peter
 
I think my hot idle misfire may be fixed.

It had gone away after I went through the whole system and replaced everything, including the spark plugs. It ran fine for a couple weeks after that, although to be fair I drove it very little during those couple weeks.

I pulled the caps off over the weekend and discovered oil in the bottom of the right side cap. I previously had thought this was from a leaking valve cover gasket, but when I was in there a few weeks ago I cleaned up all the oil residue, so this time I was able to see that the leak was actually from the cam solenoid. The left side solenoid was also seeping just a bit.

My 95 5.0 is sitting on a stand next to the car with its solenoids sitting right out in the open, so I decided to reseal those and install them. I'm pretty sure I remember reading somewhere that the later solenoids are preferable to the earlier ones. I followed JC220's repair how-to. I had the stainless rivets on the shelf already since I was planning on doing this at some point.

100x 1/8" M3.2 Stainless Steel Closed End Countersunk Blind Rivets ISO 15973 | eBay
These are the rivets I used. I knew I wouldn't be using them for a while, so I just ordered a bag of 100 from China. They arrived in about 2 weeks.

I definitely recommend using a drill press (or vertical mill) to drill the old rivets if you have one. Countersinking the holes deep enough to ensure the entire head of the rivet will sit flush or lower is absolutely required to ensure the solenoid will seal to the cylinder head.

The drill press will make that much easier. Rather than using a traditional countersink bit, I used a 90 degree carbide rotary burr. The carbide stays sharp and allows for smooth, controlled removal of material.

1000005739.png
SK-5 90° Countersink Premium Tungsten Carbide Burr

No affiliation. This is the exact tool I used.


The original how-to showed using the original seals with silicone RTV on either side. I didn't see any reason to keep those seals. I removed them and just used one fat bead below the magnet, and another above.

I clamped it together and popped the rivets in. I then made sure to clean all excess silicone from the solenoid, including inside the magnet bore. Once it was all clean, I let it set for two days.

While that was curing, I pulled the distributor insulators from my 5.0 and cleaned them up. They are OE MB, and looked to be in good condition. I cleaned them up, and then I decided to coat them inside and out with 4 or 5 coats of clear coat.

Yesterday I installed the solenoids using anaerobic sealer. Today I installed a new power steering filter, since the reservoir had to come off to remove the left side solenoid, and then I reassembled everything. I swapped the Bosch rotors back in since they were in good shape and I trust them more than the Bremi rotors I had in there from last month's work.

Took it out for a lengthy test drive, and the car ran flawlessly. Only time will tell, but I assume the oil shmoo was the issue. Like any good scientist, I changed several variables, including the insulators and rotors, so I guess I can't say for certain that it was the oil, but that certainly seems like the most likely cause.
 
Last edited:
Nice work! I am also highly suspicious that some misfiring problems are caused by oil leaking from the cam solenoids onto the lower edge of the distributor cap, as explained in detail here.

Yesterday I installed new late-style cam solenoids, and late-style armatures, on a different engine - pics below. This is a bit of a chore with the cylinder head front cover installed, as there's not room for a 24mm open-end wrench to hold the armature while torqueing the bolt. A crowfoot might help but I'm not sure that will fit either, clearances are tight because the armature doesn't pull out far enough. This is only an issue when installing the late-style (119- prefix part number) solenoids in place of the original 104- prefix solenoids.

1706726959378.jpeg 1706726943767.jpeg
 
Unfortunately, the issue appears to have returned today. It's not as bad as before, but there's still a misfire. It's definitely most noticeable when idling in gear, but I'm pretty confident it's present at other times as well.

Two questions about the later solenoids. First, which cars had the later solenoids? Second, what is the advantage of the later solenoids? I don't imagine it really has anything to do with my misfire. I'm just curious.

I installed the solenoids from my 95 5.0, but they did not look like yours here, so I'm guessing mine were not the "late style" you installed.
 
Unfortunately, the issue appears to have returned today. It's not as bad as before, but there's still a misfire. It's definitely most noticeable when idling in gear, but I'm pretty confident it's present at other times as well.
DRAT.


Two questions about the later solenoids. First, which cars had the later solenoids?
I believe these appeared on 1996 USA model years with the change from .97x (LH-SFI) to .98x (ME 1.0) but I'm not 100% certain if that was a definite break point. This would be any 1996-1999 vehicles (USA model years) with M119 engine.


Second, what is the advantage of the later solenoids? I don't imagine it really has anything to do with my misfire. I'm just curious.
AFAICT, there's no advantage to the later ones. Only the late ones are available to purchase new - the old style is NLA. Differences are explained in FSM job 05-2175 here. And yes, this would not be related to the misfire.


I installed the solenoids from my 95 5.0, but they did not look like yours here, so I'm guessing mine were not the "late style" you installed.
Yep, the 1995 units are probably the same 104- part number. The late units cannot be used with early armatures as described in the FSM above.


:matrix:
 
I believe these appeared on 1996 USA model years with the change from .97x (LH-SFI) to .98x (ME 1.0) but I'm not 100% certain if that was a definite break point. This would be any 1996-1999 vehicles (USA model years) with M119 engine.

AFAICT, there's no advantage to the later ones. Only the late ones are available to purchase new - the old style is NLA. Differences are explained in FSM job 05-2175 here. And yes, this would not be related to the misfire.
Thanks for clearing that up for me.
 
Back on the hunt for the misfire.

I pulled all the plastics off the top of the motor and let the car warm up and idle in the shop this afternoon to try to figure out what was going on. While it was idling I noticed a subtle tick noise coming from the left side of the engine at the exact moment the car would misfire. Fortunately the misfire was consistent enough that I didn't have any trouble replicating it.

I grabbed a piece of fuel hose and held one end to my ear and poked the other end around the engine like a stethoscope until I found the source of the tick. It was coming from the #7 spark plug well.

The tick occurs at exactly the same instant as the misfire, so I figured that was my likely cause. I yanked the plug wire and checked it out. It appears to be in fine shape. No obvious issues. No burn marks, cuts, loose or deteriorated components. Good as new as far as I can tell.

So I pulled the plug. Fairly normal. Remember. I just installed these plugs a couple hundred miles ago.

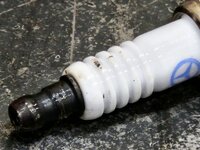
I did notice some scuffs or scratches or something on the porcelain. Picture:

1000005750.jpg

I tested resistance on the center electrode. Open circuit. No continuity at all.

So my hypothesis was that it had a bad plug. I ran down to the Mercedes dealer and bought 3 new 003-159-68-03 plugs. Gapped one to 1.0mm and installed it, then took the car for a drive.

The first few miles everything seemed fine. After a few minutes blasting down the highway and then pulling back into traffic and idling, the misfire came back. Subtly at first, but then it started doing exactly the same thing again.

Took the car home, pulled the plastics off again and gave it a listen. Same issue. Ticking coming from the #7 plug well at the exact moment of misfire.

I pulled the plug wire from #7 and installed an old Beru wire in its place. The car is sitting here idling as I type this. It seems to be fine. No miss.

Granted, the miss could return. It's fooled me before. Regardless of whether it's fixed or not, I'm trying to identify what exactly would have been occurring with that #7 cylinder to have caused the misfire. I was clearly hearing arcing. The thing is, for it to be arcing inside the spark plug well, the spark would have to jump through the boot and across the metal shield. Not impossible l know, but it doesn't seem like the most likely failure. Anyone have any thoughts on that?

I probably need to be considering new plug wires. I have 3 sets of wires currently. One is an OE Beru set that came on my 95 S500 engine. They appear to be in fine shape, but I suspect are original to that engine, so are probably 30 years old. The set that has been on the car this whole time is Bremi. There's also a mystery set of wires from my S500 parts car, but they're junk.

Should I trust any of those, or should I just be looking for replacements? Are there any quality options that cost less than 12 squillion dollars?

Anything else I should be looking at?
 
Last edited:
I pulled the shield off the end of the #7 wire. Looks like part of the rubber boot was missing, and it had been arcing around the end of the boot. Check it out:

1000005751.jpg
 
Nice find! Swap in one of your spares for now. Wire and boot failures are pretty rare overall.

The Beru set is the only one I know that is decent quality, and even then a forum member reported having a new Beru wire (or boot?) fail shortly after installation... no easy solution these days.

Details here:

 
The Beru set is the only one I know that is decent quality, and even then a forum member reported having a new Beru wire (or boot?) fail shortly after installation... no easy solution these days.
Looking at FCP, the Beru wires appear to have fully molded rubber ends instead of the orange composite end on the older, OE Beru wires. Does nobody make that old style any more?

I'm awfully tempted to just buy another Bremi set since they're HALF the price of the Beru and look to be pretty much identical in construction. I can say that the Bremi set I have is in nice shape aside from the one damaged wire I have, which was probably damaged due to hamfisted handling rather than any manufacturing issues.
 
The original wires from the early 1990's were the black+metal boot type. Somewhere around the mid-90's, this changed to the orange plastic style. I personally have seen more failures of the orange plastic (high resistance, 5k-20k ohms) and few failures on the metal-shell design.

Bremi and other off-brands may LOOK the same, but the construction is GARBAGE. Don't do it. Either hold off on buying anything for now and swap around used parts, or buy the Beru set. The Beru plug boots (metal shell) are made in Germany, and the wire insulation is much more robust than the gray Bosch wires. The gray Bosch wire insulation tears when you try to push it into the plastic X-tray on the engine! The only set I'm curious about are the blue NGK's but I haven't been willing to fork over $250 for an experiment to see what those are like (quality ends? quality wire? proper wire length? etc.)

The Bosch and Beru ends will have threaded female connections that attach to male threaded ends crimped to the wires. Aftermarket (Bremi and no-name) skip the crimped ends and use a sheet-metal-type thread that screws into the center of the wire - budget design, IMO, I don't like those at all. If you can get some extra wires from the junkyard, experiment with taking them apart, you'll see what I mean.
 
That's a good idea. I may try cutting one of each set apart just to check it out.

I installed a set of fancy new blue NGK plug wires on my dad's truck a couple weeks ago, and I'll say those were nice. Obviously different application, but I was pretty impressed. Best aftermarket wires I've seen in a long time.
 
What's the story with the red wires?
Custom fabricated with custom lengths. This was before I knew the aftermarket Beru set existed with correct lengths out of the package. I'd never do this again... way too expensive, way too many hours of tedious work, and I had to borrow the special crimper (I don't own that tool). More info here.
 
Nitrous is the easiest to implement, and a couple decades ago a company produced a kit for the M119/W124. A number of these have been installed with no reports of major failure. It's a dry setup based on a Mustang 5.0 kit, and will be limited by fuel supply / injector rate. This should be good for up to +150hp, maybe more.
The amount of power, at least on the BergWerks nitrous kits that were available back in the day, are solely dependent on the amount of extra fuel that can be supplied by the car's existing fuel injection system. There was also a safety margin of error built in, so that the ratio of fuel to gas didn't get too skewed. This all required some testing of the fuel pressure, to ensure that there was enough additional pressure in the system to provide this fuel supply.

I had my nitrous system (based on testing) set at +100HP, which provided a modest margin of safety based on the pressure my fuel system generated. I was told that I could probably have pushed it to +125HP, but that it was not worth it.

I do not believe the BergWerks kits could have supplied +150HP with regular usage and not, over time, had some internal damage to the engine. It's better to be safe, than sorry. The BergWerks principals told me personally, that every car is different; some cars have slightly higher fuel pressure than others, and can accept a larger boost setup, but others do not. It was generally accepted that +100HP was safe for most cars, using the BergWerks system.

Of course, using a "wet" nitrous system is a completely different story, as the additional fuel is supplied separately from the engine's "regular" fuel system; the BergWerks "dry" nitrous systems operated by over-stimulating the car's existing fuel system to provide extra fuel within certain engine RPM, transmission gear and operating parameters to provide safety while nitrous is injected through the side of the car's MAF.
 
I've driven the car a bunch the last couple days. Trying to really shake it down and find any concerns or issues that need to be addressed before I tear into the engine.

It's running and driving flawlessly. I spent a little time yesterday addressing a few minor cosmetic details. Swapped in a set of 94-95 corner markers, installed a new hood ornament, and repainted my grille badge. Did a little bit of detail cleaning on the interior and some buffing on some of the worst spots on the paint.

The paint on the car is all original, and the body is decent. There are several door dings, but that's pretty much it. Unfortunately some parts have some really bad touch up paint, and other parts have some pretty serious surface scratches from prior owners casually dragging things across the paint. It's going to need some careful paint correction. I'm going to hold off on that until the engine swap is complete though.

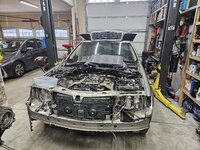
I think I've officially run out of excuses to delay the engine swap. The work begins today. I'm going to start by just tearing down the 5 liter and giving it a full inspection. Before I dismantle the car at all, I want to know that the new engine is viable and worthy of all the work. I'll post details on all the fun as I go.
 
Oh yeah, one other really stupid question. I have that 94 S500 parts car. The valve covers have AMG decals on them. Nothing else about the car gives me any reason to believe the car was ever touched by AMG, and I don't see any AMG stamping on the block. I'm 99% sure some prior owner just put decals on the valve covers. Is there any chance that this engine is anything more than a standard 5.0 with some stickers on it? I could pull it out and tear it down to find out if there's anything nonstandard inside, but that's a lot of work if it's just a beat old 5 liter.

1000005753.jpg
 
No AMG expert, but those look like good ‘ole ‘ebay special’ decals. Worth +5hp, IIRC
I am supremely confident that's all they are. Even so, I think I may yank that motor out and put it on a stand. I'm going to pull the heads off the 95 engine anyway, so I figure I might as well do the same with the 94 engine and measure both of them and just build whichever is better. I'm sure it will be a waste of time, but I was eventually going to part this car out anyway so, I guess I might as well.
 
Oh yeah, one other really stupid question. I have that 94 S500 parts car. The valve covers have AMG decals on them. Nothing else about the car gives me any reason to believe the car was ever touched by AMG, and I don't see any AMG stamping on the block. I'm 99% sure some prior owner just put decals on the valve covers. Is there any chance that this engine is anything more than a standard 5.0 with some stickers on it?
AMG engines will have an AMG stamping near the engine serial. Another tell would be camshafts ("AMG" cast into the cams), or longer stroke.

Jon is right, those are eBay bling specials. Adds 5-7hp when fresh, less when peeling.

:ROFLMAO:
 
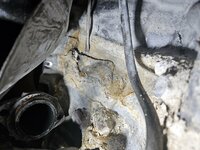
Wow. I pulled the exhaust off this car and got a much better look at the bondo on the side of the engine. I chipped a bunch away and found the real issue.

The block has a massive crack. Not much reason to bother removing this engine I think. I'll probably pull the transmission while the car is on the lift and then push this thing back out into storage.

1000005755.jpg
 
Whaaa? I vaguely remember the story when you picked this thing up, but wow! Wonder what catastrophe resulted in that mess.

Amazing shop btw. Super jelly!
 
Whaaa? I vaguely remember the story when you picked this thing up, but wow! Wonder what catastrophe resulted in that mess.

Amazing shop btw. Super jelly!
Thanks, I do love the shop.

I'd guess it was left with straight water over the winter at some point and froze. The block is pushed out a good 1/8 inch.

I'm amazed that someone would have thought packing that huge crack with bondo would do anything.
 
Whaaa? I vaguely remember the story when you picked this thing up, but wow! Wonder what catastrophe resulted in that mess.

Amazing shop btw. Super jelly!
Behind every ambitious man working on a MB rebuild / engine out project is a reliable Toyota …. in this case a Prius …. standing by that man, quietly providing mundane transport. 😅😅😅😹
 
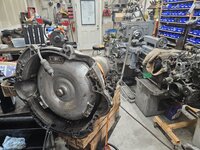
Got the transmission pulled out of the S500 today. It's clearly been out before. There's some minor damage to the bellhousing from someone prying without paying attention. Should still be usable I'd imagine. The torque converter has been painted, so I'd say there's a good chance it's been gone through at some point.

1000005760.jpg1000005761.jpg1000005762.jpg
 
@Beater400E,
Are you planning to use that tranny? I hope you’re planning to going thru it. Also you might want to get that bell housing welded up to prevent it from cracking further.

lol
 
@Beater400E,
Are you planning to use that tranny? I hope you’re planning to going thru it. Also you might want to get that bell housing welded up to prevent it from cracking further.

lol
No, my transmission is fine. This is just a spare. If I end up using it for anything I'd probably go through it. I can also weld it up. I have aluminum MIG and TIG welders, so it's no problem to weld it if needed.
 
No, my transmission is fine. This is just a spare. If I end up using it for anything I'd probably go through it. I can also weld it up. I have aluminum MIG and TIG welders, so it's no problem to weld it if needed.
I’ve been following your project since you started it. You’ve done an amazing job with this car. I guess I missed the part where you said it was a spare just in case. Albeit, I’m glad to hear that.:)

If you can weld you have much more talent than me.:jono:

lol
 
I’ve been following your project since you started it. You’ve done an amazing job with this car. I guess I missed the part where you said it was a spare just in case. Albeit, I’m glad to hear that.:)

If you can weld you have much more talent than me.:jono:

lol
I don't think I ever actually said it. I bought the car because I'd hoped it would be my 5 liter donor. The car will go to the crusher eventually, and before it does I plan to pull any parts that might be good spares for me later on. The only reason I chose to pull the trans now is that the car was already on the lift since I'd been planning to pull the motor. Obviously the motor didn't work out, but at least the trans is out of the car now, so I'm much closer to getting this car gone.
 
My headlights suddenly stopped working today. Looks like the switch is bad. I'm actually using the switch and knob from my S500. I like the fact that the knob doesn't simply pull off.

FCP has a genuine Mercedes switch for $63, or an "OE Supplier" switch for $34. I'm curious about the OE Supplier thing. Anyone have any idea what that really means? Is it even worth considering the OE Supplier switch, or any other non-genuine part?

Also, my temperature readout stopped working today. I recently replaced the LCD and it's been working fine, but today it just went blank. Any common things to check?
 
Last edited:
Meh. Its something you touch pretty much every day. I’d just go MB ( which, side note; I’d also refer to as OE, lol) despite being twice the price.
 

Who has viewed this thread (Total: 6) View details

Back
Top