Moderator edit: In addition to cutting extra vent slots to reduce/eliminate condensation inside the caps causing misfiring, oil leaks must also be completely eliminated from the cam solenoid and exhaust cam seals. If there's the slightest trace of oil at the lower edge of the cap, this misfire issue can still pop up occasionally, even with the slotted caps. Read this entire thread. A related "How-To" thread is located here that is also required reading.
___________________________________________________________________________________________
Hi all,
I have been meaning to address this on my little used 500E for years.... it is a problem I myself recognised about 5 years ago when I first looked at an m119 distributer cap..... Compare to any other distributor cap of the era such as an m104 and you will see there are NO ventilation slots at the top or top sides of the m119 caps. That and some other parts now aged / defective add to your woes!
This thread is not intended to be all encompassing. It is not getting bogged down into the ifs or whys. It is simply a straight forward and to the point thread to show what every m119 engine with distributor caps needs done to it now in order to provide reliable service. My own 500E farts, coughs, had extended cranking at times and has died on the road before due to this m119 problem.
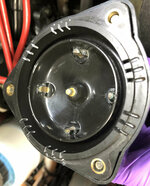
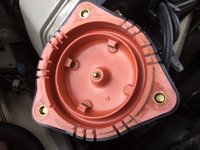
Here is what her caps looked like when removed:

The A typical m119 cap contamination. Here is what I did today:
First make a reference mark on the top point of your caps. (I know my caps are recent new less than 1k miles in my ownership so I am re-using them)

Check if your ignition cables are fitted with number labels. Mine were not so I used a paint marker. This is concealed anyway by the engine covers and makes it very clear. Note that the caps are marked L# + R#. So you look at the cap and mark the cable based on which side of the motor the cap is fitted as viewed from the drivers seat.

Remove the caps, rotors and rotor arm brackets.

Now remove the old cam seals. Since my 500E has recent new cam cover gaskets etc I chose to replace these in situ. (You could also pull the cam covers, power steering reservoir and front head covers if any if those are leaking)
To remove the old seals, punch one side inwards slightly then use a hook implement in order to pull out the seal.


I cleaned up the rust from the cam shaft with fine sandpaper, wd40 and scotchbrite. Fiddly but important.


Next get your new seals ready. Lube the inside rubber with grease and be very careful that you start the lip on square and gently or the spring can pop off the back of the radial seal! I also use a non setting loctite brand gasket dressing on these radial seals and a large washer then socket to press home. You would want about 6 inches of m6 stud to do this more easily.


Clean all areas with brake cleaner and Next part is mods and re-assembly
EDIT- Before you start please do read the thread below:
This is another documented problem area whereby the bolts strip out. See post #15 below also!
___________________________________________________________________________________________
Hi all,
I have been meaning to address this on my little used 500E for years.... it is a problem I myself recognised about 5 years ago when I first looked at an m119 distributer cap..... Compare to any other distributor cap of the era such as an m104 and you will see there are NO ventilation slots at the top or top sides of the m119 caps. That and some other parts now aged / defective add to your woes!
This thread is not intended to be all encompassing. It is not getting bogged down into the ifs or whys. It is simply a straight forward and to the point thread to show what every m119 engine with distributor caps needs done to it now in order to provide reliable service. My own 500E farts, coughs, had extended cranking at times and has died on the road before due to this m119 problem.
Here is what her caps looked like when removed:
The A typical m119 cap contamination. Here is what I did today:
First make a reference mark on the top point of your caps. (I know my caps are recent new less than 1k miles in my ownership so I am re-using them)
Check if your ignition cables are fitted with number labels. Mine were not so I used a paint marker. This is concealed anyway by the engine covers and makes it very clear. Note that the caps are marked L# + R#. So you look at the cap and mark the cable based on which side of the motor the cap is fitted as viewed from the drivers seat.
Remove the caps, rotors and rotor arm brackets.
Now remove the old cam seals. Since my 500E has recent new cam cover gaskets etc I chose to replace these in situ. (You could also pull the cam covers, power steering reservoir and front head covers if any if those are leaking)
To remove the old seals, punch one side inwards slightly then use a hook implement in order to pull out the seal.
I cleaned up the rust from the cam shaft with fine sandpaper, wd40 and scotchbrite. Fiddly but important.
Next get your new seals ready. Lube the inside rubber with grease and be very careful that you start the lip on square and gently or the spring can pop off the back of the radial seal! I also use a non setting loctite brand gasket dressing on these radial seals and a large washer then socket to press home. You would want about 6 inches of m6 stud to do this more easily.
Clean all areas with brake cleaner and Next part is mods and re-assembly
EDIT- Before you start please do read the thread below:
This is another documented problem area whereby the bolts strip out. See post #15 below also!
Stripped bolt heads on distributor rotors: How to remove?? HELP | M119 Engine
Hi guys, I tried to replace my old rotors and could not do it :hammerhead: It is 3 mm hex but it spins inside of a bolt (either bolt was crap or it was too tight) anyway now tree bolts are completely gone:pissed: , they are round inside instead of angular 3mm hex. :fun: So ... any ideas how...
www.500eboard.co
Last edited by a moderator:


")
![[500Eboard] IMG_1392.JPG](https://www.500eboard.co/forums/data/attachments/135/135177-af9c582ffe753115df67d090ac5775b6.jpg?hash=r5xYL_51MR "[500Eboard] IMG_1392.JPG")
![[500Eboard] IMG_1390.JPG](https://www.500eboard.co/forums/data/attachments/135/135178-a8c299554033d1c7f9f8d4e594373264.jpg?hash=qMKZVUAz0c "[500Eboard] IMG_1390.JPG")


 )
)