THIS HOW-TO IS A WORK IN PROGRESS, IT WILL BE FINALISED LATEST SUNDAY 20TH OF OCTOBER.
This HOW-TO will go through step by step how to fully disassemble and reassemble a 722.3 valve body. The how-to is done during a cleaning of a valve body and its internals, but can be used for removing, checking or replacing springs or any other internal parts. Our cars are going on 30+ years, and the two valve bodys I've done had a varying degree of contamination, the one used in this how-to being the worst.
I strongly recommend you read through all the information in this first post before you go on to post #2 where the actual work starts.
There are a lot of information here, but I want this to be as accessible as possible. It may seem way more difficult than it is, but I'm trying to share as much as possible so you don't have to make my mistakes.
Estimated time is difficult to estimate for this job, but it is several hours. You do NOT want to rush this. I typically work over a couple of days or so. Be prepared to be able to leave all of the components undisturbed, plan ahead so you don't have to relocate in the middle of the work.
General info:
This is a good video, an hour long, but it takes you through the process in general:
Job partition (will be split into four separate posts):
If you ONLY want to replace or inspect K1, K2 and B1, you do not need to split the VB, in fact you can replace them with the VB still in the car IIRC.
This guide presume that you already have the valve body out of the car, and that you can put it in again, here is an excellent how-to remove and reinstall it in your gearbox:

 www.500eboard.co
Before you start, make sure you've got your clean work area in order, tools in place etc.
We will be using the 27-400 document, I’d suggest to print it out, it is a good reference on the workbench.
And of course, I do not take any responsibility for any results from work done using this HOW-TO. I will however more than gladly help out where I can, and love to hear how it went. And please let me know any improvements to the guide.
This HOW-TO will go through step by step how to fully disassemble and reassemble a 722.3 valve body. The how-to is done during a cleaning of a valve body and its internals, but can be used for removing, checking or replacing springs or any other internal parts. Our cars are going on 30+ years, and the two valve bodys I've done had a varying degree of contamination, the one used in this how-to being the worst.
I strongly recommend you read through all the information in this first post before you go on to post #2 where the actual work starts.
There are a lot of information here, but I want this to be as accessible as possible. It may seem way more difficult than it is, but I'm trying to share as much as possible so you don't have to make my mistakes.
Estimated time is difficult to estimate for this job, but it is several hours. You do NOT want to rush this. I typically work over a couple of days or so. Be prepared to be able to leave all of the components undisturbed, plan ahead so you don't have to relocate in the middle of the work.
General info:
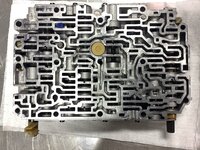
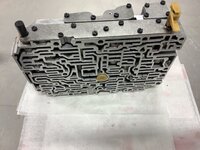
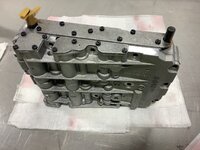
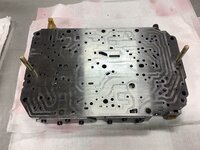
- The valve body is basically an analog computer that execute commands to instruct the transmission what to do, all mechanical and hydraulic.
- The valve body consists of two halves held together by two screws. In between the halves, there is an intermediate plate.
- The job is not overly difficult but demands very strict housekeeping and documentation on your part. If you mix the parts up, it will be quite a bit trickier to assemble again.
- Official documentation is quite vague, especially regarding what components go where for every valve body variant.
- You must keep your own documentation with photos, remember no mechanic ever said "I have too many pictures of this", again, there is NO resource readily available with instructions on your specific valve body, AFAIK.
- The valve body in this how-to (a FGS VB from a 034) may not be exactly the same as yours. They differ here and there, and for some differences there are logical explanations, and for others not so much. Trust your documentation, not mine or anybody else’s.
- Check and double check. Your transmission will not blow up if you get a spring in the wrong place, but it will probably exhibit strange behavior and it can be really difficult to find in which valve the fault is. And you'll of course have to R&R it again.
- The how-to is of course aimed at our 034/036 cars, but is applicable to any 722.3 with minor variations. If you are using this guide for any other car than 034/036, be even more diligent with your own documentation.
- This is a good opportunity to do any upgrades of springs or swap out K1 and/or B1.
- PLEASE use PPE in form of vinyl gloves since you will be working with ATF with long exposure, it is NOT healthy, your skin is a breathing organ too. Safety glasses is a must too unless you fancy ATF or brake cleaner (or both!) in your eyes.
- The official instruction 27-400, which is attached to this post in pdf format, but I recommend a printed copy for the workbench
- Screwdriver with a tight fit for the Shift valve housing screws
- 3-4 smaller clean containers for small items
- Thin vinyl gloves (ATF is not good for the skin) preferably one use ones so you can swap them regularly
- Cable ties of various sizes
- Small rubber mallet may come in handy
- Micro fibre or lint free rags
- Brake cleaner
- Degreaser
- ATF just enough to lubricate on installation
- Pen and paper
- Camera (preferably a camera or phone that you're not too careful with, it will be exposed to ATF, or you will be swapping gloves and/or washing hands constantly)
- VB = Valve Body
- HT = HOW-TO
- IP = Intermediate Plate
This is a good video, an hour long, but it takes you through the process in general:
Job partition (will be split into four separate posts):
- Part 1: Split the VB into the two halves and the IP. Sort and document the parts that sits between the halves.
- Part 2: Top Half disassembly, overhaul and reassembly.
- Part 3: Bottom Half disassembly, overhaul and reassembly.
- Part 4: Final reassembly of the halves and IP.
If you ONLY want to replace or inspect K1, K2 and B1, you do not need to split the VB, in fact you can replace them with the VB still in the car IIRC.
This guide presume that you already have the valve body out of the car, and that you can put it in again, here is an excellent how-to remove and reinstall it in your gearbox:
HOW-TO: Replacing Transmission Valve Body with First Gear Start Valve Body | "HOW-TO" Tutorial Articles
ADMIN EDIT: The factory procedure for VB R&R is at this link, also attached at the bottom of this post. There has been much discussion on the 500E and second gear starts. While several options exist to achieve permanent and temporary first-gear-starts, I am describing replacing the valve body...
Before you start, make sure you've got your clean work area in order, tools in place etc.
We will be using the 27-400 document, I’d suggest to print it out, it is a good reference on the workbench.
And of course, I do not take any responsibility for any results from work done using this HOW-TO. I will however more than gladly help out where I can, and love to hear how it went. And please let me know any improvements to the guide.