BACKGROUND INFO:
Since the late-style LCA's have been NLA for a few years, and the ball joint is NOT replaceable... it's critical to keep the ball joints serviceable for as long as possible. For reasons I don't quite understand, the late LCA ball joints seem to last a VERY long time. 200-300kmi or beyond is not unusual. The replaceable ball joints found on early LCA's don't seem to last as long. If you have early LCA's, just replace the entire ball joint (OE/Genuine recommended).
With late LCA's, the ball joint boot should be inspected periodically. At each oil change is a good time to eyeball them. The boots generally do not need proactive replacement. However if you find any sign of damage - cracked, torn, leaking grease, or all of the above - the boots should be replaced ASAP before serious damage occurs. Once water & dirt enter the joint, it will fail rapidly (excess play). If a late LCA has any play in the joint, the entire LCA is junk. The best option is to source a good used OE/Genuine late LCA with a tight ball joint, and refresh it with new boots / new bushings. To see an example of what happens if a late ball joint boot fails and is not discovered early, click here (courtesy of @J. M. van Swaay). Note that all the grease is gone and JM reported noticeable play in the joint. He had to replace the entire LCA.
As discussed elsewhere on the forum, aftermarket replacement late LCA's from TRW, Febi, Dorman, Moog, Vaico, FVP, Mevotech, Suspensia, or any other off-brand... these are all poor quality and it's NOT recommended to use them. I suspect all of the above off-brands are reboxing the SAME item coming from a single factory in China, they are likely NOT all different. If you're going to gamble, buy the cheapest, because paying twice as much will just be padding someone else's profit margin.
Sourcing a good used OE LCA (which must have tight ball joints!) and refreshing it is highly preferred. If you do choose to use aftermarket late LCA's, I strongly recommend removing the supplied ball joint boot, applying additional grease (they are often lacking adequate grease!), and installing a new OE/Genuine boot. Full details & video are at this link comparing OE vs aftermarket.
ON-CAR REPLACEMENT:
OK, enough history lesson. This DIY is not a step-by-step, but a high-level outline of what needs to be done to replace the ball joint boots with the LCA on the car. And, this adds a few recommended steps not mentioned in the FSM.
If you remove the LCA from the car, it's (relatively) simple to replace the boot on the workbench. Removing the LCA is much more work though, AND requires a full alignment afterwards (now $300 at my local dealer). If the LCA bushings are still serviceable and you don't want to shell out for an alignment, the boot can be replaced "on the car" as described below.
All of the following is required to provide good access to the ball joint. If no fasteners are rusted, seized, or stripped this will take approximately 2-3 hours per side for a first-time DIY'er. If this isn't your first rodeo, cut those estimates in half.
PARTS & TOOLS REQUIRED:
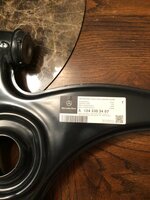
Replacement ball joint boot part number 201-330-00-85, qty=2. Current list price $15 each as of this writing.
Most fasteners can be re-used if undamaged. Replace fasteners as required (strut bolts/nuts, tie rod nut, ball joint bolt).
This is not a comprehensive tool list, but the main items are:
PROCESS:
The basic job process is outlined in FSM job # 33-0400 (click here). However, you do NOT need to remove the hub from the knuckle/spindle, unless you also plan to replace or repack the wheel bearings at the same time. In general:
With the ball joint exposed, move it around in all directions, and push/pull up & down to check for play. It should move smoothly in all directions and have ZERO play. If not... replace the entire LCA. If the joint is smooth & tight, clean the area around the old boot to remove all dirt before removing the old boot. Once clean, remove the lower circlip and pry the boot off. Inspect the joint carefully, especially if the old boot was torn/damaged. In my case there was no evidence of water or dirt intrusion. Clean the post and apply fresh grease.
Installing the new boot is straightforward but not easy, and can be messy. Wear gloves and have clean paper towels handy. Use a small, dull screwdriver or similar tool to pry the boot over the lip on the LCA. Next is the hardest part of the job: getting the new circlip in place. I wish I had a great tip or trick for this, but I don't. Carefully use the small, dull screwdriver to pry the end of the circlip down in the groove, working your way around. A second pair of hands would be very helpful (I didn't have any). Needle nose pliers may also help. If you screw up, you can poke a hole in your brand new boot, so I recommend buying at least one spare boot in case this happens - otherwise you wait a week for the replacement.
Side note: If you need to replace the struts, strut mounts, accordion dust boots, or stop buffers... it will never be easier than right now with the knuckle removed. These jobs are much more annoying otherwise. There is also easy access to the outer sway bar bushings at this time.
Installation is the reverse of removal. If reusing hardware, clean bolt threads with a wire brush on a drill, clean the threads with Brakleen or similar, and apply fresh blue threadlocker on all fasteners. A new compression locknut is provided in the boot kit, for the balljoint pinch bolt. Clean the ball joint post bore, tie rod post bore, and pinch bolt bore with appropriate-sized cylindrical wire brushes. Before sliding the knuckle onto the ball joint shaft, apply anti-seize inside the bore. Align the ball joint notch, it must be in the correct position to insert the pinch bolt. Before inserting the pinch bolt, apply anti-seize to the shaft of the bolt (NOT the threads, only the shank).
This is where the FSM jobs conflict: 33-0400 says to first tighten the strut pinch bolt, then tighten the lower 2 bolts. However, the strut replacement job 32-0100 (click here) says to first tighten the lower 2 bolts, THEN tighten the pinch bolt. I followed the strut procedure (lower 2 first, then pinch bolt). Logically, the lower 2 should be tightened first - I believe the other job is in error. Remove the coil spring if you haven't yet done so and thoroughly clean the spring seat before installing / decompressing the spring.
After re-assembling, if the "slot" of the knuckle at the ball joint post is exposed (old sealant fell out, or was removed)... apply new sealant to keep dirt/water from entering the ball joint post area. In most cases this probably won't be necessary. Photo below is from a different car.
Repeat on the opposite side.
Photos below show my beater 1995 E420 with 252kmi. I spotted the torn boot earlier this year. The boot on the other side was completely intact with no signs of degradation, but I replaced both anyway. And, I also replaced the struts (which were OE and possibly original!), and stop buffers (which were badly disintegrated). The strut mount & accordion dust boot had been replaced previously so I left those alone. The original struts were on the car when we bought it with 150k on the clock and there was no record of prior replacement. Amazingly, the struts still had some pressure left (not totally dead) but they had low pressure, were too easy to compress, and extended very slowly after compression. I also installed new OE "hard" sway bar end bushings as the originals were shot, and were the old style without Teflon liner.

Since the late-style LCA's have been NLA for a few years, and the ball joint is NOT replaceable... it's critical to keep the ball joints serviceable for as long as possible. For reasons I don't quite understand, the late LCA ball joints seem to last a VERY long time. 200-300kmi or beyond is not unusual. The replaceable ball joints found on early LCA's don't seem to last as long. If you have early LCA's, just replace the entire ball joint (OE/Genuine recommended).
With late LCA's, the ball joint boot should be inspected periodically. At each oil change is a good time to eyeball them. The boots generally do not need proactive replacement. However if you find any sign of damage - cracked, torn, leaking grease, or all of the above - the boots should be replaced ASAP before serious damage occurs. Once water & dirt enter the joint, it will fail rapidly (excess play). If a late LCA has any play in the joint, the entire LCA is junk. The best option is to source a good used OE/Genuine late LCA with a tight ball joint, and refresh it with new boots / new bushings. To see an example of what happens if a late ball joint boot fails and is not discovered early, click here (courtesy of @J. M. van Swaay). Note that all the grease is gone and JM reported noticeable play in the joint. He had to replace the entire LCA.
As discussed elsewhere on the forum, aftermarket replacement late LCA's from TRW, Febi, Dorman, Moog, Vaico, FVP, Mevotech, Suspensia, or any other off-brand... these are all poor quality and it's NOT recommended to use them. I suspect all of the above off-brands are reboxing the SAME item coming from a single factory in China, they are likely NOT all different. If you're going to gamble, buy the cheapest, because paying twice as much will just be padding someone else's profit margin.
Sourcing a good used OE LCA (which must have tight ball joints!) and refreshing it is highly preferred. If you do choose to use aftermarket late LCA's, I strongly recommend removing the supplied ball joint boot, applying additional grease (they are often lacking adequate grease!), and installing a new OE/Genuine boot. Full details & video are at this link comparing OE vs aftermarket.
ON-CAR REPLACEMENT:
OK, enough history lesson. This DIY is not a step-by-step, but a high-level outline of what needs to be done to replace the ball joint boots with the LCA on the car. And, this adds a few recommended steps not mentioned in the FSM.
If you remove the LCA from the car, it's (relatively) simple to replace the boot on the workbench. Removing the LCA is much more work though, AND requires a full alignment afterwards (now $300 at my local dealer). If the LCA bushings are still serviceable and you don't want to shell out for an alignment, the boot can be replaced "on the car" as described below.
All of the following is required to provide good access to the ball joint. If no fasteners are rusted, seized, or stripped this will take approximately 2-3 hours per side for a first-time DIY'er. If this isn't your first rodeo, cut those estimates in half.
PARTS & TOOLS REQUIRED:
Replacement ball joint boot part number 201-330-00-85, qty=2. Current list price $15 each as of this writing.
Most fasteners can be re-used if undamaged. Replace fasteners as required (strut bolts/nuts, tie rod nut, ball joint bolt).
This is not a comprehensive tool list, but the main items are:
- 19mm socket
- 22mm socket
- Assorted ratchets/extensions
- Assorted small screwdrivers & pliers
- 3/8" and 1/2" torque wenches
- XXmm hex key / Allen wench for 14mm pinch bolt (Note: Early 500E & M104 cars will have an M12 pinch bolt.)
- 4mm & 5mm hex key / Allen wench / sockets for brake rotor & shield bolts, and ABS wheel speed sensor
- Coil spring compressor
- Tie rod removal tool (NOT a pickle fork, which will damage the boot!)
- Blue threadlock compound (if re-using hardware)
- Anti-seize lubricant
- Grease for ball joint (Red Line CV-2 or similar synthetic)
- Shop vac for the copious amounts of brake dust that will go everywhere
PROCESS:
The basic job process is outlined in FSM job # 33-0400 (click here). However, you do NOT need to remove the hub from the knuckle/spindle, unless you also plan to replace or repack the wheel bearings at the same time. In general:
- Partially compress (or, remove) coil spring using a Klann or klone spring compressor.
- Remove the brake caliper and use wire to hang this from the upper brake line bracket (see photo below)
- Remove brake disc / rotor
- Loosen, but do not remove, the strut pinch bolt and lower attachment bolts
- Loosen, but do not remove, the ball joint pinch bolt
- Remove all 3 bolts for the brake dust shield so it is loose and will move freely
- Remove ABS wheel speed sensor (impact tool recommended, make sure 5mm hex driver is FULLY seated)
- Remove tie rod nut, use tie rod tool to pop tie rod out of the knuckle/arm
- Remove strut pinch bolt and lower 2 bolts, pry knuckle out of the strut. Leave strut attached at the top mount.
- Carefully lift / pry the knuckle up & off the ball joint
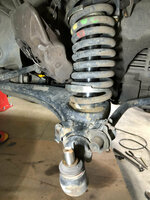
- You should now have easy access to the ball joint.
With the ball joint exposed, move it around in all directions, and push/pull up & down to check for play. It should move smoothly in all directions and have ZERO play. If not... replace the entire LCA. If the joint is smooth & tight, clean the area around the old boot to remove all dirt before removing the old boot. Once clean, remove the lower circlip and pry the boot off. Inspect the joint carefully, especially if the old boot was torn/damaged. In my case there was no evidence of water or dirt intrusion. Clean the post and apply fresh grease.
Installing the new boot is straightforward but not easy, and can be messy. Wear gloves and have clean paper towels handy. Use a small, dull screwdriver or similar tool to pry the boot over the lip on the LCA. Next is the hardest part of the job: getting the new circlip in place. I wish I had a great tip or trick for this, but I don't. Carefully use the small, dull screwdriver to pry the end of the circlip down in the groove, working your way around. A second pair of hands would be very helpful (I didn't have any). Needle nose pliers may also help. If you screw up, you can poke a hole in your brand new boot, so I recommend buying at least one spare boot in case this happens - otherwise you wait a week for the replacement.
Side note: If you need to replace the struts, strut mounts, accordion dust boots, or stop buffers... it will never be easier than right now with the knuckle removed. These jobs are much more annoying otherwise. There is also easy access to the outer sway bar bushings at this time.
Installation is the reverse of removal. If reusing hardware, clean bolt threads with a wire brush on a drill, clean the threads with Brakleen or similar, and apply fresh blue threadlocker on all fasteners. A new compression locknut is provided in the boot kit, for the balljoint pinch bolt. Clean the ball joint post bore, tie rod post bore, and pinch bolt bore with appropriate-sized cylindrical wire brushes. Before sliding the knuckle onto the ball joint shaft, apply anti-seize inside the bore. Align the ball joint notch, it must be in the correct position to insert the pinch bolt. Before inserting the pinch bolt, apply anti-seize to the shaft of the bolt (NOT the threads, only the shank).
This is where the FSM jobs conflict: 33-0400 says to first tighten the strut pinch bolt, then tighten the lower 2 bolts. However, the strut replacement job 32-0100 (click here) says to first tighten the lower 2 bolts, THEN tighten the pinch bolt. I followed the strut procedure (lower 2 first, then pinch bolt). Logically, the lower 2 should be tightened first - I believe the other job is in error. Remove the coil spring if you haven't yet done so and thoroughly clean the spring seat before installing / decompressing the spring.
After re-assembling, if the "slot" of the knuckle at the ball joint post is exposed (old sealant fell out, or was removed)... apply new sealant to keep dirt/water from entering the ball joint post area. In most cases this probably won't be necessary. Photo below is from a different car.
Repeat on the opposite side.
Photos below show my beater 1995 E420 with 252kmi. I spotted the torn boot earlier this year. The boot on the other side was completely intact with no signs of degradation, but I replaced both anyway. And, I also replaced the struts (which were OE and possibly original!), and stop buffers (which were badly disintegrated). The strut mount & accordion dust boot had been replaced previously so I left those alone. The original struts were on the car when we bought it with 150k on the clock and there was no record of prior replacement. Amazingly, the struts still had some pressure left (not totally dead) but they had low pressure, were too easy to compress, and extended very slowly after compression. I also installed new OE "hard" sway bar end bushings as the originals were shot, and were the old style without Teflon liner.
Attachments
-
 ball_joint_boot1.jpg115.2 KB · Views: 50
 -
 ball_joint_boot2.jpg86.9 KB · Views: 46
 -
 balljoint_exposed.jpg231.2 KB · Views: 46
 -
 boot_torn.jpg322.9 KB · Views: 41
 -
 balljoint_before1.jpg271.1 KB · Views: 39
 -
 balljoint_before2.jpg274.4 KB · Views: 39
 -
 balljoint_after1.jpg265.6 KB · Views: 39
 -
 balljoint_rebooted.jpg192.9 KB · Views: 39
 -
 caliper_hanging.jpg257.4 KB · Views: 38
 -
 pinch_bolt_antiseize.jpg256 KB · Views: 40
 -
 balljoint_seam_sealant.jpg90.7 KB · Views: 47
Last edited: