Hi guys,
After experiencing blue smoke on start up and when accelerating from a standstill, I knew it was time to change the valve stem seals. I read that this would impossible with the engine in the W124 engine bay, but I believed it would be very possible with some small adjustments to the tools that would be used.
I'm delighted to share that changing all 32 valve stem seals is 100% possible, as I have succesfully done so in the past days.
I will try to sum up the work that I did as clearly as possibly with the pictures that I have taken. Lots of the preceding steps have been elaborated in detail in other threads on the forum. Anyway, feel free to ask any questions of course.
First few steps consist of removing the air filter and hoses, plastic covers, cylinder head covers, PS pump reservoir, front cam covers, etc etc...

Then, set the crankshaft to 45° BTDC and pin the camshafts with the pinning tools, I used four 6mm drill bits. If the chain is not brand new, and/or you have broken chain guides, the cams, especially the passenger exhaust cam, will pin at a smaller crank angle, e.g. 42° BTDC or 40 or even less. To give you an idea, I rolled in a new chain + installed four new upper chain guides two years ago and my passenger exhaust cam pinned at 43° now. The old stretched chain and broken guides, mostly due to the PO neglecting oil changes, lead to the passenger exhaust cam pinning at 25° BTDC .... (no, it did not bend any valves luckily)
All cams pinned at 43-44°


Next, it's time to remove the air pump to be able to remove the chain tensioner, which will allow you to start taking out the camshafts. This is a perfect time to replace the air pump bearing as well (mine was grinding):

Remove the camshaft bearing caps carefully and evenly to avoid breaking the cam due to uneven loads over the shaft.


With the cams removed, it's time to take out the valve lifters. Don't use a magnet, use a suction cup or something similar. I used a valve lapping suction tool to pull them straight out.
Now, it's time to release the valve springs. First, the valves must be kept in place. I used a BGS universal valve spring compressor tool kit, which provided an air compressor attachment to connect to the spark plug opening. Doing so allows you to put pressure in the cylinder and thus prevent the valves from falling in.

However, I prefer the rope method. It basically consist of putting the piston on BDC and pushing in as much rope as you can via the spark plug hole (I used nylon rope), then turning the engine clockwise until you feel resistance. That would be the rope compressing between the piston and valves, which prevents them from falling in. I used an aluminium rod tin the spark plug hole to determine BDC for each piston before pushing in the rope, also make sure you hold the timing chain on both sides (a second person helping is very handy) so that it does not tangle itself on the crank sprocket while turning the crank.

Then, with the valves in place, you can setup the brackets of the spring compressor (use washers as standoffs between the head and bracket so that the bracket does not rest on the bearing cap oil sleeves. Then, using the handle and a magnetic screwdriver/tweezers for the valve keepers, you can remove the springs. The keepers can be a bit hard at first, but a few persuasive pushes should free them up. Push down the spring, then remove the keepers and finally slowly let the spring decompress and remove it.


With the springs off, you can use the special valve stem seal pliers to pull off the old, hardened and worn seals.
Old vs new:

The kit also had a pusher with different heads for different sizes of seals, to push the new ones on. Give the new seal and the valve stem a good oiling before pushing it on and don't forget to put the orange protective sleeve on the valve before pushing on the new seal. Remove the orange sleeve from the valve before fully pushing on the seal with the seal pusher.
Right: new seal installed
Left: no seal, only valve guide, protective sleeve on valve stem to protect seal during installation.


Repeat these steps 32 times
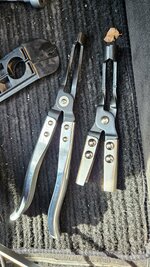
Cylinders 1-3 and 5-7 are easy, as are the intake valves of cylinders 4 and 8... But the real issues are with the exhaust valves on cylinders 4 and 8. For those four, I had to sacrifice my tools and make some cuts in them. More specifically, I cut the angled seal plier to be able to pull the seal out and also cut the top half of the spring compressor tool to be able to fit it between the engine and firewall, which is why I suggest doing these valves last, so you have 'decent and intact tools' for the other valves.
Still; a small sacrifice compared to removing the engine from the car...

Compare this foto below with the original one from amazon a bit higher up the thread. See, the round part that pushes on the spring was originally longer and had a second hole before I cut it (top left corner of toolkit)

Tip: reinstalling the valve spring keepers can be a major PITA, especially the second one. First one goes in fairly easy, but you need to play around with the compressor on the spring to allow the second one to fall in. I used tweezers to gently put them in place while I was compressing the spring with my other hand, so it can be done alone, but you will be beat up. Compress the spring fully, your arm will get tired, ask a second person to help if necessary and most important: BE PATIENT. You don't want to lose a keeper in the engine or let the compressor slip and hit the sidewalls where the valve lifter sits in or let the spring jump out and shoot one of the keepers in your eye or another dimension.
Turn engine counter clockwise a bit before pulling out the rope to relieve compression of the rope.
Installation is the reverse or removal, be sure to check for collapsed valve lifters (search the forum) and oil in everything very well before reassembly or use assembly lube. Install the cams evenly and carefully, triple check timing after installing the tensioner
First start was exciting, it started right up, and no more blue smoke! It made a slight ticking sound, but that went away after 15 minutes of driving, I suspect 3 weeks standing still + oil leaving all lifters and galleys at the top of the engine caused the initial ticking. Car runs beautifully now and blue smoke during start up and acceleration from standstill is completely gone.
Cheers and enjoy your weekend!
Sam
After experiencing blue smoke on start up and when accelerating from a standstill, I knew it was time to change the valve stem seals. I read that this would impossible with the engine in the W124 engine bay, but I believed it would be very possible with some small adjustments to the tools that would be used.
I'm delighted to share that changing all 32 valve stem seals is 100% possible, as I have succesfully done so in the past days.
I will try to sum up the work that I did as clearly as possibly with the pictures that I have taken. Lots of the preceding steps have been elaborated in detail in other threads on the forum. Anyway, feel free to ask any questions of course.
First few steps consist of removing the air filter and hoses, plastic covers, cylinder head covers, PS pump reservoir, front cam covers, etc etc...
Then, set the crankshaft to 45° BTDC and pin the camshafts with the pinning tools, I used four 6mm drill bits. If the chain is not brand new, and/or you have broken chain guides, the cams, especially the passenger exhaust cam, will pin at a smaller crank angle, e.g. 42° BTDC or 40 or even less. To give you an idea, I rolled in a new chain + installed four new upper chain guides two years ago and my passenger exhaust cam pinned at 43° now. The old stretched chain and broken guides, mostly due to the PO neglecting oil changes, lead to the passenger exhaust cam pinning at 25° BTDC .... (no, it did not bend any valves luckily)
All cams pinned at 43-44°
Next, it's time to remove the air pump to be able to remove the chain tensioner, which will allow you to start taking out the camshafts. This is a perfect time to replace the air pump bearing as well (mine was grinding):
Remove the camshaft bearing caps carefully and evenly to avoid breaking the cam due to uneven loads over the shaft.
With the cams removed, it's time to take out the valve lifters. Don't use a magnet, use a suction cup or something similar. I used a valve lapping suction tool to pull them straight out.
Now, it's time to release the valve springs. First, the valves must be kept in place. I used a BGS universal valve spring compressor tool kit, which provided an air compressor attachment to connect to the spark plug opening. Doing so allows you to put pressure in the cylinder and thus prevent the valves from falling in.
However, I prefer the rope method. It basically consist of putting the piston on BDC and pushing in as much rope as you can via the spark plug hole (I used nylon rope), then turning the engine clockwise until you feel resistance. That would be the rope compressing between the piston and valves, which prevents them from falling in. I used an aluminium rod tin the spark plug hole to determine BDC for each piston before pushing in the rope, also make sure you hold the timing chain on both sides (a second person helping is very handy) so that it does not tangle itself on the crank sprocket while turning the crank.
Then, with the valves in place, you can setup the brackets of the spring compressor (use washers as standoffs between the head and bracket so that the bracket does not rest on the bearing cap oil sleeves. Then, using the handle and a magnetic screwdriver/tweezers for the valve keepers, you can remove the springs. The keepers can be a bit hard at first, but a few persuasive pushes should free them up. Push down the spring, then remove the keepers and finally slowly let the spring decompress and remove it.
With the springs off, you can use the special valve stem seal pliers to pull off the old, hardened and worn seals.
Old vs new:
The kit also had a pusher with different heads for different sizes of seals, to push the new ones on. Give the new seal and the valve stem a good oiling before pushing it on and don't forget to put the orange protective sleeve on the valve before pushing on the new seal. Remove the orange sleeve from the valve before fully pushing on the seal with the seal pusher.
Right: new seal installed
Left: no seal, only valve guide, protective sleeve on valve stem to protect seal during installation.
Repeat these steps 32 times
Cylinders 1-3 and 5-7 are easy, as are the intake valves of cylinders 4 and 8... But the real issues are with the exhaust valves on cylinders 4 and 8. For those four, I had to sacrifice my tools and make some cuts in them. More specifically, I cut the angled seal plier to be able to pull the seal out and also cut the top half of the spring compressor tool to be able to fit it between the engine and firewall, which is why I suggest doing these valves last, so you have 'decent and intact tools' for the other valves.
Still; a small sacrifice compared to removing the engine from the car...
Compare this foto below with the original one from amazon a bit higher up the thread. See, the round part that pushes on the spring was originally longer and had a second hole before I cut it (top left corner of toolkit)
Tip: reinstalling the valve spring keepers can be a major PITA, especially the second one. First one goes in fairly easy, but you need to play around with the compressor on the spring to allow the second one to fall in. I used tweezers to gently put them in place while I was compressing the spring with my other hand, so it can be done alone, but you will be beat up. Compress the spring fully, your arm will get tired, ask a second person to help if necessary and most important: BE PATIENT. You don't want to lose a keeper in the engine or let the compressor slip and hit the sidewalls where the valve lifter sits in or let the spring jump out and shoot one of the keepers in your eye or another dimension.
Turn engine counter clockwise a bit before pulling out the rope to relieve compression of the rope.
Installation is the reverse or removal, be sure to check for collapsed valve lifters (search the forum) and oil in everything very well before reassembly or use assembly lube. Install the cams evenly and carefully, triple check timing after installing the tensioner
First start was exciting, it started right up, and no more blue smoke! It made a slight ticking sound, but that went away after 15 minutes of driving, I suspect 3 weeks standing still + oil leaving all lifters and galleys at the top of the engine caused the initial ticking. Car runs beautifully now and blue smoke during start up and acceleration from standstill is completely gone.
Cheers and enjoy your weekend!
Sam
Attachments

Last edited:


")


