Folks,
I just rebuilt the front calipers on my 314K mile E320 and thought I would post a "How-To" as there's not a lot of info out there. There's the FSM plus an owners write up embedded in my copy of the FSM. I ended up spending $20 on 2 videos from Uncle Kent which were very helpful as I wanted a more thorough procedure. Also his customer service gal was a big help on sourcing the proper assembly lube. He uses Permatex Ceramic Extreme Brake Parts Lubricant, item #20354 in his kits . However I did end up buying the ATE Assembly grease off an eBay seller in Eastern Europe.
My car has the 4 piston iron ATE calipers. [Moderator edit - these are 294x25mm, very similar to the Ate iron calipers used on the E500E.] Not sure what calipers you guys have.
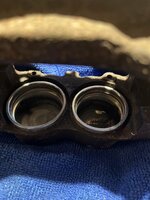
Dis Assembly: using a plastic trim tool pry off the circular metal guards. Blowing compressed air in the brake hose connection a single piston will pop out. Use a piece of wood or a wrench in the caliper to stop the piston from flying out. Carefully blow air in the small hole at the bottom of the open bore and 2 more pistons will pop out. After removing the dust seal on the remaining piston with a small screw driver pry out the piston using 2 large screw drivers placed under the lip of the piston. Rest the shaft of the screw drivers on the caliper to gain leverage. Re position the screw drivers as needed until the piston rises out of the bore. If you don't have a compressor use this method to remove all 4 pistons. Set aside the pistons and remove the remaining dust seals. Carefully remove the O rings from the grove in the bores. I used a safety pin that I bent open to just prick the O ring to dis lodge it. Worked great. They come out easily. You shouldn't use a metal pick tool or screw driver.
Cleaning the Caliper: The channel around the top of the bores must be scraped clean of brake dust, rust flakes and crud. Here you can use a small screw driver or metal pick. It doesn't matter if the area is a bit rusty just that you scrape all the gunk out and any loose rust bits. The dust seals seat here which will be difficult if the area isn't clean. Wash the caliper in a basin of hot soapy water. I used only a Scotch Brite pad cut into a few pieces. Clean the bores thoroughly including the groves. This is a tedious and time consuming process. Rinse the caliper and blow dry. I used canned air as I don't have a compressor. Heat the caliper in an oven for 15 minutes to finish the drying process. After the caliper cools wipe the bores with a micro fiber rag and denatured alcohol. If you find any rust has formed in the bores ( I did in one of my calipers) just remove with a Scotch Brite pad using denatured alcohol.
Cleaning the Pistons: Wire brush the piston FACES using a brass wire brush. Do not wire brush the pistons themselves! Clean the pistons with OOOO steel wool only. They should be in almost perfect condition. Any pitting or scratches renders them unusable. I rated mine 9.8/10. There was some very light scuffing on a couple. Wipe the pistons off with denatured alcohol on a micro fiber rag.
Installation: I bought 2 repair kits. When MB Laredo indicated not available, Autohausaz sent me an FTE kit. Made in the UK. At my local dealer (where I work part time) they found kits in Germany. Nowadays its 2-3 weeks delivery from Germany vs. 5 business days pre Covid. The MB kit seemed to be repackaged ATE seals. Made in Germany. No MB part numbers or logo on the seals. Instruction booklet from ATE.
Lightly coat the bores with assembly grease. Put a good coat on the O rings and install in the grooves. Once started they will pop in without a fuss. Lightly coat the pistons chrome surface. Smear grease on the back of the dust seals and push onto the pistons. Pull the seal up or down to verify the lower lip is sitting in the channel below the top of the piston. Push one piston into its bore,and bottom it out. Takes a bit of force. Now the dust seal must be seated over the piston face. There's a wire in the seal which takes some effort to force into place. It will only drop down maybe an 1/8 of an inch but must lay flat around the piston face. I used the blunt tip of a plastic trim tool, channel lock pliers pushing on a small washer and my fingers to seat the seal. It took me anywhere from 3 to maybe a dozen attempts to seat each seal. Once seated I used the trim tool to press on the seal in several spots to verify it was completely in position. If not bent you can reuse the metal guards which just press on the top of the pistons. No tools needed. Clean and replace the bleeder screw then install and bleed the caliper. I started the car then pumped the brake pedal with the wheel off to check for leaks. Test drove the car and checked again.
Regards,
Peter
I just rebuilt the front calipers on my 314K mile E320 and thought I would post a "How-To" as there's not a lot of info out there. There's the FSM plus an owners write up embedded in my copy of the FSM. I ended up spending $20 on 2 videos from Uncle Kent which were very helpful as I wanted a more thorough procedure. Also his customer service gal was a big help on sourcing the proper assembly lube. He uses Permatex Ceramic Extreme Brake Parts Lubricant, item #20354 in his kits . However I did end up buying the ATE Assembly grease off an eBay seller in Eastern Europe.
My car has the 4 piston iron ATE calipers. [Moderator edit - these are 294x25mm, very similar to the Ate iron calipers used on the E500E.] Not sure what calipers you guys have.
Dis Assembly: using a plastic trim tool pry off the circular metal guards. Blowing compressed air in the brake hose connection a single piston will pop out. Use a piece of wood or a wrench in the caliper to stop the piston from flying out. Carefully blow air in the small hole at the bottom of the open bore and 2 more pistons will pop out. After removing the dust seal on the remaining piston with a small screw driver pry out the piston using 2 large screw drivers placed under the lip of the piston. Rest the shaft of the screw drivers on the caliper to gain leverage. Re position the screw drivers as needed until the piston rises out of the bore. If you don't have a compressor use this method to remove all 4 pistons. Set aside the pistons and remove the remaining dust seals. Carefully remove the O rings from the grove in the bores. I used a safety pin that I bent open to just prick the O ring to dis lodge it. Worked great. They come out easily. You shouldn't use a metal pick tool or screw driver.
Cleaning the Caliper: The channel around the top of the bores must be scraped clean of brake dust, rust flakes and crud. Here you can use a small screw driver or metal pick. It doesn't matter if the area is a bit rusty just that you scrape all the gunk out and any loose rust bits. The dust seals seat here which will be difficult if the area isn't clean. Wash the caliper in a basin of hot soapy water. I used only a Scotch Brite pad cut into a few pieces. Clean the bores thoroughly including the groves. This is a tedious and time consuming process. Rinse the caliper and blow dry. I used canned air as I don't have a compressor. Heat the caliper in an oven for 15 minutes to finish the drying process. After the caliper cools wipe the bores with a micro fiber rag and denatured alcohol. If you find any rust has formed in the bores ( I did in one of my calipers) just remove with a Scotch Brite pad using denatured alcohol.
Cleaning the Pistons: Wire brush the piston FACES using a brass wire brush. Do not wire brush the pistons themselves! Clean the pistons with OOOO steel wool only. They should be in almost perfect condition. Any pitting or scratches renders them unusable. I rated mine 9.8/10. There was some very light scuffing on a couple. Wipe the pistons off with denatured alcohol on a micro fiber rag.
Installation: I bought 2 repair kits. When MB Laredo indicated not available, Autohausaz sent me an FTE kit. Made in the UK. At my local dealer (where I work part time) they found kits in Germany. Nowadays its 2-3 weeks delivery from Germany vs. 5 business days pre Covid. The MB kit seemed to be repackaged ATE seals. Made in Germany. No MB part numbers or logo on the seals. Instruction booklet from ATE.
Lightly coat the bores with assembly grease. Put a good coat on the O rings and install in the grooves. Once started they will pop in without a fuss. Lightly coat the pistons chrome surface. Smear grease on the back of the dust seals and push onto the pistons. Pull the seal up or down to verify the lower lip is sitting in the channel below the top of the piston. Push one piston into its bore,and bottom it out. Takes a bit of force. Now the dust seal must be seated over the piston face. There's a wire in the seal which takes some effort to force into place. It will only drop down maybe an 1/8 of an inch but must lay flat around the piston face. I used the blunt tip of a plastic trim tool, channel lock pliers pushing on a small washer and my fingers to seat the seal. It took me anywhere from 3 to maybe a dozen attempts to seat each seal. Once seated I used the trim tool to press on the seal in several spots to verify it was completely in position. If not bent you can reuse the metal guards which just press on the top of the pistons. No tools needed. Clean and replace the bleeder screw then install and bleed the caliper. I started the car then pumped the brake pedal with the wheel off to check for leaks. Test drove the car and checked again.
Regards,
Peter
Last edited by a moderator: