I've been making small improvements to the 400e, and tonight I attempted to fix the dot disease. This issue has been discussed a bunch but I haven't seen any step by step repair guide other than just replace the housing. I like the matte rubberized finish of the later clusters so I didn't consider repainting. It is a very unique brown finish and I don't think it could be easily replicated with a rattle can. It almost seems to be a rubberized spray similar to SEM interior dye.
First carefully remove everything from the back of the cluster and separate the housing


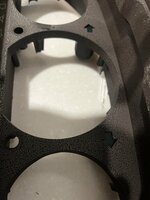
Notice the white dots all over my cluster. I live in a humid climate (southeast) and all the old MB's around here have this issue.

Get a sharp paring knife and dish soap. The soap will serve as a lubricant. You want to squirt the soap all around the seam of the plexiglass. You SLOWLY and carefully insert the knife all around the seam to pop it apart. It is glued in and will make cracking sounds when you separate the two. It sounds like you are going to break it, and you very well may, so go very slow.

You will need to very carefully push from behind the plexiglass as you are working the knife around. Start at the top, this is where most of the glue is. Once the top is broken free, the bottom should pop out fairly easily without having to dig the knife in too much.

With glass removed you can begin cleaning. I used a new toothbrush and rubbing alcohol. It takes maybe 5 minutes of cleaning/polishing with the brush & alcohol, this isn't a simple "wipe off" procedure.


I also washed under the sink but always finish with rubbing alcohol and a clean paper towel or you will get streaks or splotches. You may even consider using rubber gloves. Any fingerprints you leave inside the housing or on the back side of the plexiglass will be visable.

Dots still slightly visible but much, much better

Make sure everything is very clean with no fingerprints, glue the plexiglass back on. I used very little glue applied with a cocktail stirrer, as I don't want it to run. Just a few spots around the perimeter should do.
Also I don't recommend superglue (cyanoacrilate) as it seems to leave a white hazy residue on surfaces when it dries. Also foaming glue would be bad here.
This seemed to fit the bill


Put the plexiglass back on and weight it down to dry.


First carefully remove everything from the back of the cluster and separate the housing
Notice the white dots all over my cluster. I live in a humid climate (southeast) and all the old MB's around here have this issue.
Get a sharp paring knife and dish soap. The soap will serve as a lubricant. You want to squirt the soap all around the seam of the plexiglass. You SLOWLY and carefully insert the knife all around the seam to pop it apart. It is glued in and will make cracking sounds when you separate the two. It sounds like you are going to break it, and you very well may, so go very slow.
You will need to very carefully push from behind the plexiglass as you are working the knife around. Start at the top, this is where most of the glue is. Once the top is broken free, the bottom should pop out fairly easily without having to dig the knife in too much.
With glass removed you can begin cleaning. I used a new toothbrush and rubbing alcohol. It takes maybe 5 minutes of cleaning/polishing with the brush & alcohol, this isn't a simple "wipe off" procedure.
I also washed under the sink but always finish with rubbing alcohol and a clean paper towel or you will get streaks or splotches. You may even consider using rubber gloves. Any fingerprints you leave inside the housing or on the back side of the plexiglass will be visable.
Dots still slightly visible but much, much better
Make sure everything is very clean with no fingerprints, glue the plexiglass back on. I used very little glue applied with a cocktail stirrer, as I don't want it to run. Just a few spots around the perimeter should do.
Also I don't recommend superglue (cyanoacrilate) as it seems to leave a white hazy residue on surfaces when it dries. Also foaming glue would be bad here.
This seemed to fit the bill
Put the plexiglass back on and weight it down to dry.
Attachments
Last edited:


