Introduction
Model years 1994 and 1995 came stock with glass headlamps. Outside of the USA (or North America) glass headlamps were also stock for all years. Besides looking good, these offer a much better lighting experience than the plastic headlamps that most Americans were stuck with in the pre-facelift cars. There are a lot of great resources online for buying and retrofitting the European-spec glass headlamps.These headlamps work great and are worth protecting. It's very common to eventually hit a rock or something else which will chip the glass lenses. Lamin-X offers a great product which is 12 mils thick (1 mil = 0.001 inch) and there are two options on the Lamin-X website:
- Mercedes E-Class (86-93) Headlight Covers (~$47.95 USD)
These are pre-cut to the size of the headlamps. It's not clear to me if these were designed for the US-spec headlamps OR the European-spec glass headlamps. There are two tabs on the side where you can hold the film during installation.
- 12" x 24" Universal Film Covers (~$57.95 USD)
These are massive and at only $10 USD more expensive, I believe they're the better choice. This is what I went with because there is enough material to wrap it around the edges of the headlamp.
What you get when you buy it

Here's what you get
- The lens covers themselves (wrapped around a cardboard tube)
- "How to install" guide
- Green squeegee card (save this; it's also great for taking hood pads off)
- Utility knife for cutting
- Spray bottle
- "Lamin-X" sticker (not pictured)
The installation process
The guide included is actually great - I highly recommend following this. In addition, I wanted to share the steps as I did them with additional insight. Folks can also share their experience here (tips/tricks/etc).Prep work
It took me a while to get around to this because I was parking the car outside. I made room in the garage recently which gave a nice stable and clean environment free of rain, wind, and sand storms (Arizona). I recommend doing the installation in a closed environment too - make sure the area is well lit, so you can see bubbles under the plastic.Assuming you've already installed the headlamps, you'll want to take off the trim panel underneath them. Start off by popping the hood so you can get access to the turn signals (indicators).

Use both fingers to press the release clip on the back of the turn signal and slide it out and set aside. Now you can see the two 8mm bolts (red arrows) holding each trim panel into place.

If you have headlamp wipers, you can fold these down and use an 8mm socket to remove the wiper arm. In my case, I had installed a delete panel and threw the headlamp wipers/motors in the trash. Remove both 8mm fasteners on each panel and then gently wiggle the panel and set the parts aside.

Next you'll want to use a rag with some soapy water to clean the headlamp. Get the front, the sides, all the parts that you plan to apply the material to. I like to use a paper towel to wipe things clean - this lets you know how dirty things were. You'll want to clean until no dirt comes off when you wipe it clean.


Lastly, they include the little spray bottle. You'll want to fill that up with distilled water for the best experience.
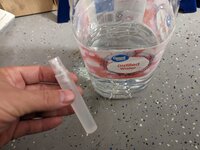
The installation
Pick a headlamp to start on and using your spray bottle, gently mist the headlamp itself. Don't saturate the headlamps - but do try to cover them evenly. I made sure to spray the sides where I wrapped the material around on.
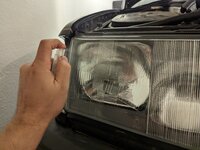

If you have a universal sheet, it might be extremely large. To make things easier, you can get some scissors, hold the sheet over the headlamp, and make sure you have at least 2 inches past each corner of the headlamp. Anything larger than that you can cut. If you don't feel comfortable cutting yet, no worries- you can skip this step.
Now that the headlamp is wet, we can remove the film from the sheet. You want to put the adhesive side on the headlamp. You can use your hand to press it onto the front. Place it in such a way that you have extra material on the sides. Don't worry too much about bubbles yet.
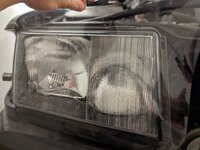
Once you have the sheet covering the front of the headlamp, you can peel it back a section at a time to try and get a better fit. There really is no way to do this wrong - just try not to stretch the plastic at all. Peel back gently, spray more water if needed under there, and try to make sure the sheet is applied evenly. Here, you can see I peeled the bottom portion up to get a better fit - getting rid of some wrinkles.

Once you feel comfortable that the front has been applied evenly (enough material on each side, etc), you'll want to spray the top of the sheet with some more water and use the squeegee to flatten out the sheet and get all the wrinkles and bubbles out. You can peel back again as needed and use the squeegee to flatten it out and eliminate the bubbles. As things start looking good, you can use your hand to start wrapping the sheet around the corners of the headlamp lens. Use the squeegee there too to get rid of bubbles. Unless you're amazing at this, it's going to take a few attempts to get all the bubbles out. Take your time.

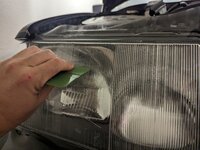

At this point, the product is uniformly installed on the headlamp. You should be pretty happy with things overall. We're not done yet - but if you're unhappy about something, NOW is the time to gently peel back the sheet and fix it.
Next, if you have a universal sheet, you can cut some of the extra material from around the edges. Don't do the final trim yet - leave some space around each of the edges. Use the supplied razor and cut closer. This is important if you're installing on the car so that you can get the edges easily (around the rubber gasket). In my case, after cutting closer I was able to get the corners better and I peeled things back to get an even more perfect fit. Notice in my picture - I have to put the material around the edge UNDER the fender. Cutting just a little material made that easier.


At this point, you're almost done. You should be very happy with things. For small imperfections or wrinkles, you can hit it with some heat. I used a heat gun very conservatively. You do NOT want to overheat the material, only get it warm so that it's more pliable. Using a hair drier is preferred - I didn't have one handy.

Now, we can do the final trimmings around the edges. Get your knife and gently trace around the outer portion of the headlamp. Be careful not to press too hard and cut what is under the sheet (plastic headlamp assembly, rubber gasket, etc). I basically traced inside the gray plastic of the assembly, just above the lens itself.
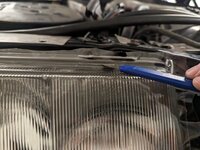
The corners are going to be tricky to get perfect. I did a technique where I cut two flaps, laid one down, and then used the knife to carefully cut the other flap, to avoid layering the sheet on top of itself.


At this point, you're basically done! You'll need to repeat the process for the other headlamp.


Conclusion and After-install tips
Once you have it fit and installed, you can just enjoy it. If you notice a bubble later on, you can use a small pin to pierce the sheet and pop the bubble. Then, using your finger, you can flatten the bubble to let the air escape. It should clean up nice.Overall, this is a fairly easy job. But it requires patience. If you don't have patience or you're pressed for time, don't do it. Put some music on and take your time doing this. The more time you put in, the happier you may be. Try to avoid cutting ANYTHING until you're very happy as it's VERY easy to make a mistake and cut too much.
Thanks for reading!
Last edited:

