Starting around the May 2022 time frame (and possibly before), I noticed on several long-distance trips up to the NYC area, that the damping and bump-absorption capability of my E500's rear suspension was severely diminished. It was basically not absorbing bumps, and every time I would drive over a crack, frost heave or speed bump the rear suspension motions would be highly exaggerated and very rough -- almost teeth-rattlingly rough.
I had replaced my SLS hydro-legs (rear struts) some years ago when I lived in Texas, so I knew they were in fine condition. However, I had never in 19 years of ownership replaced the rear SLS spheres (accumulators) before. I had purchased a new set of Corteco (which is the MB OEM for these accumulators) perhaps 3-4 years ago, so I had a new set in my parts stock.
The functionality of the accumulators is well documented, so I will not go into the theory here. However, I will say that the rear suspension damping quality of the E500E (and 400E420 models so equipped) leave a LOT to be desired if the SLS accumulators are not functioning well. What happens is that the rubber diaphragm on the inside of the accumulator, which flexes in and out with the up and down motion of the rear suspension and softens/damps the bumps, leaks .... and allows the pressurized nitrogen behind the diaphragm to leak out. With no pressurized gas to help absorb motion, the softening ability of the suspension is diminished severely, and basically the accumulator fills up with SLS hydraulic fluid.
For this job, it's advisable for a first-timer to budget 1.5-2 hours for the job.
There are some references to this job in other threads, although not formal HOW-TO articles, at the links below:
Part numbers:
Tools required:
First, place wheel chocks to block the front wheels of the car, to keep it from rolling forward when the rear-end is lifted. You can see this in the photo below. Best to chock BOTH front wheels, for safety purposes.

Next, taking your floor jack, carefully place it underneath the rear differential flat area (NOT under the cooling fins), and carefully lift the rear of the car from the center, lifting the rear wheels a few inches off the ground. This will give you plenty of room to get under the car. You can see this lifting process below.
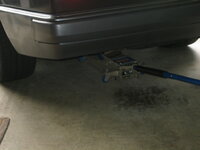
Once the car is lifted to an appropriate height, place two jack-stands under the lifting pads on the sides of the car, roughly inboard of the rectangular covers ahead of the rear wheels. This will secure the car in place while you are working underneath it. Lastly, before starting work, be sure to place some cardboard, or a moving blanket, or some other kind of protection UNDER the rear of the car to catch any spraying and leaking hydraulic fluid, as this job can be quite messy.

Next, you need to locate your two SLS accumulators. They are located in the forward corners of the spare tire well in the trunk. Open the trunk and lift the mat and plastic spare tire compartment cover, and you will see the two black spheres in the corners, as shown belos.

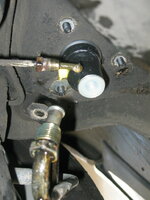
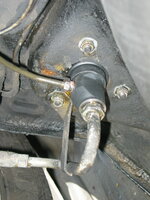
For the next step, get under the car, and locate the two SLS sphere connections. You should see one large SLS line emerging downward from each accumulator, a smaller line going into the side of the accumulator's snout, and three nuts that hold the accumulator to the bottom of the car. Note that one of the accumulator large lines, on the passenger side, is also secured to the bottom of the car by a metal bracket that goes underneath one of the nuts that secure the accumulator to the car. You can see this bracket in the first photo below. The driver's side large hydraulic line doesn't have this type of bracket.
Passenger side SLS sphere, viewed from underneath car
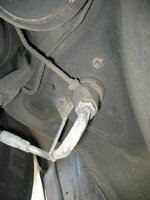
Driver's side SLS sphere, viewed from underneath car

With your 17mm flare nut wrench (you have one of these, right?), begin to loosen the large line going into the bottom of the passenger-side accumulator. It should loosen fairly easily, and will immediately begin oozing fluid. The hydraulic fluid will likely be very foamy -- this is normal.
GSXR edit: Alternately, you can de-pressurize the system by connecting a hose to the bleeder screw on top of the SLS valve above the rear sway bar, and loosening the bleeder. This will allow the fluid to run through the hose into a catch bottle, and reduce the amount of fluid that escapes from the threaded fittings at the sphere. This is optional, not required.


Tighten it back up, get your drain pan underneath the connection, re-position yourself so that you don't get sprayed with pressurized hydraulic fluid, and re-loosen the connection with your wrench. You will see a large spray of fluid, and then numerous smaller sprays as the pressure escapes from the system. Allow the fluid to run down and drip into the pan below.


Continue loosening the connection until you can turn it with your fingers. It will continue leaking hydraulic fluid during this time, so let it continue to drip into your drain pan.
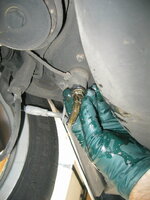
At this point, with the one connector almost removed, take your 11mm flare nut wrench, and loosen the 13mm nut for the connection going into the side of the accumulator shout, as shown in the photo below.

Continue to loosen that 11mm nut until you can pull it free from the accumulator. Also you can remove the larger connection from the bottom of the accumulator. Both of these hoses will continue to ooze and drip hydraulic fluid, so don't be alarmed that they continue to do this.

Next, with your 10mm socket on an extension, carefully loosen the three 10mm nuts that hold the accumulator to the bottom of the car. They may be crusted with dirt and debris from years of being under the car, so you may need brake cleaner or other cleaning fluid to clean the area to get a better bite on the nuts with your socket.
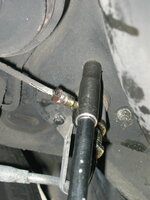
After removing the three 10mm nuts, soak them in a small container with brake fluid to clean the dirt and debris off of the nuts. This will make re-installation much easier. At the same time, open your trunk and lift the accumulator straight up and out of the trunk.


Here is a view of the removed accumulator.

Here is a view of the hydraulic oil continuing to drip into the drain pan below the car, during accumulator removal from the vehicle.

A view of the removed accumulator (left) next to the replacement (right)

After removing the accumulator from the car, take a rag soaked with brake cleaner, and thoroughly clean the area where the old accumulator was by wiping the area down. Then CAREFULLY install the new accumulator down into the cleaned hole. NOTE: take notice of the orientation of the side hole in the accumuator snout, so that it lines up with the 11mm hydraulic line connector underneath the car.


Here is what the re-installed new accumulator looks like from beneath the car.
This next step is crucial -- DO NOT re-attach the three 10mm nuts that hold the accumulator to the bottom of the car. First, you want to CAREFULLY (did I say CAREFULLY) thread the 11mm hydraulic line and then the 17mm hydraulic line into the fittings on the accumulator (remove the plastic caps that protect the openings from dirt, first!). It may take some wiggling to properly thread the 11mm line into the accumulator, as it is a parallel angle to the ground, and a bit awkward to do from underneath the car. DO NOT CROSS-THREAD THIS LINE -- take EXTRA care to ensure that it is properly threaded into the accumulator. NOT attaching the accumulator to the car gives you extra wiggle room to slightly adjust your angle to help get that 11mm line threaded into the accumulator.

After you have both lines well threaded into the accumulator, THEN use your 10mm socket to install and re-tighten the accumulator to the bottom of the car. THEN you can tighten the two hydraulic lines, using your flare nut wrenches. You do not need to reef on them - just get them hand-tight with a little extra push ... what many of us call "Gutentight". Don't forget to re-attach the metal bracket for the passenger-side large 17mm hydraulic line underneath the appropriate 10mm nut, as shown.
Repeat this process for the other side.
After this, check the hydraulic fluid level in the SLS tank underhood. Start the engine, and visually check the hydraulic line connections under the car to ensure they are tight and not leaking/oozing/spraying hydraulic fluid. If everything looks good, turn off the engine. Then, using brake cleaner on a rag, spray the areas under the car where the accumulators mount up, and clean up any hydraulic fluid runs and spray. Also be sure to clean the accumulators in the trunk spare tire well, of any stains or wetness from your gloved hands while installing them.
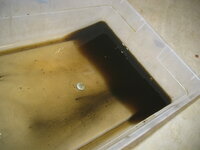
You will probably leak out about 1/2 to 1 liter of hydraulic fluid into your drain pan, as shown in the photo below.
After running the car, be sure to re-check the hydraulic fluid level at the SLS tank underhood. Note the proper level using the SLS dipstick, or as a general / rough visual indicator, the tank should be filled roughly up to the level of the spring that surrounds the outside of the tank to keep it in place.
With that, you are done. It is likely that the second accumulator replacement will go MUCH quicker than the first one. The biggest challenge with this job is to ensure that the 11mm hydraulic lines are properly threaded into the accumulators and are NOT cross-threaded.
And that's it !
I had replaced my SLS hydro-legs (rear struts) some years ago when I lived in Texas, so I knew they were in fine condition. However, I had never in 19 years of ownership replaced the rear SLS spheres (accumulators) before. I had purchased a new set of Corteco (which is the MB OEM for these accumulators) perhaps 3-4 years ago, so I had a new set in my parts stock.
The functionality of the accumulators is well documented, so I will not go into the theory here. However, I will say that the rear suspension damping quality of the E500E (and 400E420 models so equipped) leave a LOT to be desired if the SLS accumulators are not functioning well. What happens is that the rubber diaphragm on the inside of the accumulator, which flexes in and out with the up and down motion of the rear suspension and softens/damps the bumps, leaks .... and allows the pressurized nitrogen behind the diaphragm to leak out. With no pressurized gas to help absorb motion, the softening ability of the suspension is diminished severely, and basically the accumulator fills up with SLS hydraulic fluid.
For this job, it's advisable for a first-timer to budget 1.5-2 hours for the job.
There are some references to this job in other threads, although not formal HOW-TO articles, at the links below:
- Replacing my Sphere Accumulator | Brakes, Suspension and Steering
- not comfortable ride | Brakes, Suspension and Steering
- How do you check nitrogen spheres to see if they have failed? | Brakes, Suspension and Steering
- SLS adjustment | Brakes, Suspension and Steering
Part numbers:
- Corteco 21353060 (two required) -- around $85 apiece at AutohausAZ.com
- OR Mercedes-Benz 140 328 02 15 (two required) -- around $90-100 apiece at typical online MB parts dealers
Tools required:
- Cardboard, moving blanket or other protection for the garage floor under the car to catch spraying hydraulic fluid
- Floor jack and two jack-stands (or a hydraulic lift if you have access to one)
- Wheel chocks (if using a floor jack and stands)
- Brake cleaner spray
- Small plastic dish for soaking parts
- 3-4 shop rags or towels
- 11mm flare nut (brake line) wrench (in a pinch, regular 11mm wrench will work)
- 17mm flare nut (brake line) wrench (in a pinch, regular 17mm wrench will work)
- Small flat-blade screwdriver
- 10mm socket, extension and 1/4" or 3/8" ratchet
- Drip or oil drain pan (to catch hydraulic fluid dripping from loosened lines)
First, place wheel chocks to block the front wheels of the car, to keep it from rolling forward when the rear-end is lifted. You can see this in the photo below. Best to chock BOTH front wheels, for safety purposes.

Next, taking your floor jack, carefully place it underneath the rear differential flat area (NOT under the cooling fins), and carefully lift the rear of the car from the center, lifting the rear wheels a few inches off the ground. This will give you plenty of room to get under the car. You can see this lifting process below.

Once the car is lifted to an appropriate height, place two jack-stands under the lifting pads on the sides of the car, roughly inboard of the rectangular covers ahead of the rear wheels. This will secure the car in place while you are working underneath it. Lastly, before starting work, be sure to place some cardboard, or a moving blanket, or some other kind of protection UNDER the rear of the car to catch any spraying and leaking hydraulic fluid, as this job can be quite messy.

Next, you need to locate your two SLS accumulators. They are located in the forward corners of the spare tire well in the trunk. Open the trunk and lift the mat and plastic spare tire compartment cover, and you will see the two black spheres in the corners, as shown belos.

For the next step, get under the car, and locate the two SLS sphere connections. You should see one large SLS line emerging downward from each accumulator, a smaller line going into the side of the accumulator's snout, and three nuts that hold the accumulator to the bottom of the car. Note that one of the accumulator large lines, on the passenger side, is also secured to the bottom of the car by a metal bracket that goes underneath one of the nuts that secure the accumulator to the car. You can see this bracket in the first photo below. The driver's side large hydraulic line doesn't have this type of bracket.
Passenger side SLS sphere, viewed from underneath car

Driver's side SLS sphere, viewed from underneath car

With your 17mm flare nut wrench (you have one of these, right?), begin to loosen the large line going into the bottom of the passenger-side accumulator. It should loosen fairly easily, and will immediately begin oozing fluid. The hydraulic fluid will likely be very foamy -- this is normal.
GSXR edit: Alternately, you can de-pressurize the system by connecting a hose to the bleeder screw on top of the SLS valve above the rear sway bar, and loosening the bleeder. This will allow the fluid to run through the hose into a catch bottle, and reduce the amount of fluid that escapes from the threaded fittings at the sphere. This is optional, not required.


Tighten it back up, get your drain pan underneath the connection, re-position yourself so that you don't get sprayed with pressurized hydraulic fluid, and re-loosen the connection with your wrench. You will see a large spray of fluid, and then numerous smaller sprays as the pressure escapes from the system. Allow the fluid to run down and drip into the pan below.


Continue loosening the connection until you can turn it with your fingers. It will continue leaking hydraulic fluid during this time, so let it continue to drip into your drain pan.

At this point, with the one connector almost removed, take your 11mm flare nut wrench, and loosen the 13mm nut for the connection going into the side of the accumulator shout, as shown in the photo below.

Continue to loosen that 11mm nut until you can pull it free from the accumulator. Also you can remove the larger connection from the bottom of the accumulator. Both of these hoses will continue to ooze and drip hydraulic fluid, so don't be alarmed that they continue to do this.

Next, with your 10mm socket on an extension, carefully loosen the three 10mm nuts that hold the accumulator to the bottom of the car. They may be crusted with dirt and debris from years of being under the car, so you may need brake cleaner or other cleaning fluid to clean the area to get a better bite on the nuts with your socket.

After removing the three 10mm nuts, soak them in a small container with brake fluid to clean the dirt and debris off of the nuts. This will make re-installation much easier. At the same time, open your trunk and lift the accumulator straight up and out of the trunk.


Here is a view of the removed accumulator.

Here is a view of the hydraulic oil continuing to drip into the drain pan below the car, during accumulator removal from the vehicle.

A view of the removed accumulator (left) next to the replacement (right)

After removing the accumulator from the car, take a rag soaked with brake cleaner, and thoroughly clean the area where the old accumulator was by wiping the area down. Then CAREFULLY install the new accumulator down into the cleaned hole. NOTE: take notice of the orientation of the side hole in the accumuator snout, so that it lines up with the 11mm hydraulic line connector underneath the car.


Here is what the re-installed new accumulator looks like from beneath the car.

This next step is crucial -- DO NOT re-attach the three 10mm nuts that hold the accumulator to the bottom of the car. First, you want to CAREFULLY (did I say CAREFULLY) thread the 11mm hydraulic line and then the 17mm hydraulic line into the fittings on the accumulator (remove the plastic caps that protect the openings from dirt, first!). It may take some wiggling to properly thread the 11mm line into the accumulator, as it is a parallel angle to the ground, and a bit awkward to do from underneath the car. DO NOT CROSS-THREAD THIS LINE -- take EXTRA care to ensure that it is properly threaded into the accumulator. NOT attaching the accumulator to the car gives you extra wiggle room to slightly adjust your angle to help get that 11mm line threaded into the accumulator.

After you have both lines well threaded into the accumulator, THEN use your 10mm socket to install and re-tighten the accumulator to the bottom of the car. THEN you can tighten the two hydraulic lines, using your flare nut wrenches. You do not need to reef on them - just get them hand-tight with a little extra push ... what many of us call "Gutentight". Don't forget to re-attach the metal bracket for the passenger-side large 17mm hydraulic line underneath the appropriate 10mm nut, as shown.

Repeat this process for the other side.
After this, check the hydraulic fluid level in the SLS tank underhood. Start the engine, and visually check the hydraulic line connections under the car to ensure they are tight and not leaking/oozing/spraying hydraulic fluid. If everything looks good, turn off the engine. Then, using brake cleaner on a rag, spray the areas under the car where the accumulators mount up, and clean up any hydraulic fluid runs and spray. Also be sure to clean the accumulators in the trunk spare tire well, of any stains or wetness from your gloved hands while installing them.
You will probably leak out about 1/2 to 1 liter of hydraulic fluid into your drain pan, as shown in the photo below.

After running the car, be sure to re-check the hydraulic fluid level at the SLS tank underhood. Note the proper level using the SLS dipstick, or as a general / rough visual indicator, the tank should be filled roughly up to the level of the spring that surrounds the outside of the tank to keep it in place.
With that, you are done. It is likely that the second accumulator replacement will go MUCH quicker than the first one. The biggest challenge with this job is to ensure that the 11mm hydraulic lines are properly threaded into the accumulators and are NOT cross-threaded.
And that's it !
Last edited:


