• Hi Guest !

    Welcome to the 500Eboard forum.

    Since its founding in late 2008, 500Eboard has become the leading resource on the Internet for all things related to the Mercedes-Benz 500E and E500. In recent years, we have also expanded to include the 400E and E420 models, which are directly related to the 500E/E500.

    We invite you to browse and take advantage of the information and resources here on the site. If you find helpful information, please register for full membership, and you'll find even more resources available. Feel free to ask questions, and make liberal use of the "Search" function to find answers.

    We hope you will become an active contributor to the community!

    Sincerely,
    500Eboard Management

HOW-TO - Remove and Replace Seat Covers

With the cushion compressed, pry the edge of the fabric out of the groove on the seat back using a panel tool.
Dan, what exactly is a "panel tool". Googling shows me trim removal sets... Which is the correct one?

Also, have you had any spare plastic tabs or locks beforehand, just in case?
 
I'm curious as well. The metal "channels" that the seat cover edge goes into is a U shaped channel. I found the shaft of a medium size Phillips head screw driver works well as a prying tool, starting from the end and working around. Be aware, in the middle of all 3 sides there is a small additional clip to help hold the edge in. It will take a little extra extra care / force to get these areas to release.

drew
 
6.) Remove the connectors and free the wiring harness from the seat bottom. There may be a couple of reusable tie wraps holding them in place.
I'm doing this job right now. Reached 6th step. I've disconnected 3 beefy connectors + 2 small ones at front, under the bottom cushion. There is one cable that comes out from the car's floor and goes somewhere towards the back. I can't trace where it leads even with my face flash against the space between the floor and seat bottom, shining a powerful headlight in. I see that there are 4 connector that are similar to the 3 beefy ones upfront. Is that where that single wire that originates from the car's floor goes to? Do these rear connectors need to be disconnected and pulled out just like the front ones? Car is 400E, no heated seats

Thanks
 
Last edited:
Kiev. Are you attempting to replace the lower cushion seat cover while the seat is bolted in the car?

drew
 
Kiev. Are you attempting to replace the lower cushion seat cover while the seat is bolted in the car?

drew
Drew, I'm completely removing the seat to replace horsehair pad and install reinforcing Styrofoam blocks that I got from MB.

I've disconnected these connectors at the front, under seat bottom cushion
2193.jpg

There is this cable that originates from the car's floor and connects somewhere in the seat towards the back, under the cushion
2195.jpg

I see these 4 connector at the back, under the cushion. I popped 3 of them up, since each has an ear into which I can insert a screwdriver as a lever. There is a 4th one without the ear. I'm trying to understand/confirm if I have to disconnect these 4 connectors, and if the cable from the photo #2 is related to them. Just being overly careful to avoid any disasters
2194.jpg
 
Last edited:
OK, There is one small wire that may run through the seat back that runs to the seat belt receptacle. ALL the wire disconnects are within 6 or 7 inches of where they come out of the floor carpet. I recommend removing all 4 seat bolts first and then you can tilt the seat for or back to access wire disconnects easily. Hope that helps.
It may be that one of the wires you have disconnected is captive due to the position of the seat. The connector pinched between the seat frame, so to speak. The smaller connectors are held in clips to the seat frame

drew
 
Last edited:
Also, before you remove the seat completely, away from the connectors, try to determine where you want the position of the seat for your task. Tilting the front of the lower cushion up makes access to the connectors much easier.

drew
 
The cable you're describing (I'm guessing) is for the phone connection that goes to the center console.

I remove the bolts that hold the seat in place first so I can tip the seat both forward and aft to get at the various connectors underneath it. This is after moving the seat all the way forward and raising the lower cushion up as far as it will go both in front and back. Take the forward bolts out first, move the seat all the way forward, then remove the rear bolts last.

Dan
 
Gentlemen, thank you. With the help of my wife I managed to literally get under the seat while it was tilted forward until the backrest touched the windshield. I disconnected this single mysterious cable from the floor by lifting the carpet slightly. The opening is almost smack in the middle under the seat cushion. Photo taken with me lying on the floor behind where the driver seat, looking diagonally towards driver door

PXL_20210220_014018248~2.jpg

It leads from the floor and joins this bunch of cables and they all stream into the rear right corner of the street and up:

PXL_20210220_013841609~2.jpg

Just or of curiosity, does anyone know what this cable is? Is it indeed, as Dan says, a phone cable? 🧐
 
Good progress! Very clean under there, but minimal change and no Cheetos. Too bad. Always good for a quick snack and a cold soda.

200.gif
 
@LWB250, Dan, I need your guidance, please. First of all, I'm not doing the backrest. I have not touched it at all. I'm only doing the bottom cushion - I want to replace horsehair bad and install reinforcing noodles into the springs.

I'm following your write up like hasidic jews follow Tora.

I have 95% completed step #17 and I'm half way through step #18 (see below). I have released almost all of the leather cover from retention groove. On the left side, I have already released the edges of horsehair pad from the spring frame - no problem

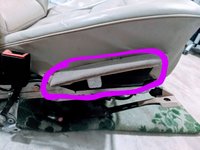
Now, on the right side (close to transmission tunnel), in one spot 3-5 inches wide, I can't release the cover from retention groove. This thing (see photo) obstructs those 3-5 inches. It's made out of black-colored flimsy plastic that I can sense will easily brake. I don't see a way to remove it. What did you do in this spot to aid release of the cover from retention groove?

Thanks!

PXL_20210221_020845130~2.jpg
PXL_20210221_020904536~2.jpg


17.) Move around to the front of the seat. Starting at one corner near the hinge, compress the seat cushion to release the material from the retention groove. You'll need to work your way around the front of the seat to the other side to completely release the cover. Lift the edges of the cover to expose the horsehair seat pad on each side.

18.) From the side of the seat starting at the rear, reach under the horsehair pad and pull the edges down and out to release them from the spring frame. Move forward about halfway towards the front of the seat. Once about half of the cushion has been released, stand in front of the seat, grasp the seat cover and cushion, and pull forward. The seat pad and cover will come off the seat spring frame and be free of the seat.
 
Last edited:
@LWB250, Dan, I need your guidance, please. First of all, I'm not doing the backrest. I have not touched it at all. I'm only doing the bottom cushion - I want to replace horsehair bad and install reinforcing noodles into the springs.

I'm following your write up like hasidic jews follow Tora.

I have 95% completed step #17 and I'm half way through step #18 (see below). I have released almost all of the leather cover from retention groove. On the left side, I have released the edges from the spring frame - no problem

Now, on the right side (close to transmission tunnel), in one spot 3-5 inches wide, I can't release the cover from retention groove. This thing (see photo) obstructs those 3-5 inches. It's made out of black-colored flimsy plastic that I can sense will easily brake. I don't see a way to remove it. What did you do in this spot to aid release of the cover from retention groove?

Thanks!

View attachment 126539
View attachment 126540
Easy.

In the middle of those "U" shaped openings at the front and rear of the plastic panel is a black plastic pin. You can see the one on the front part of the panel quite well in your picture. Get a punch or some flat ended rod that's the size of the pin or smaller and just tap them in until they fall out of the back of the panel and onto the floor or your work surface. Don't lose them!

These are pins that expand a plastic "rivet" that's built into this panel. Installation is the reverse of removal - get them started in the hole on the outward facing side, like we see in your picture, and just tap them into place until they're flush. This expands the rivet and holds things in place.

I'll tell you another secret - don't forget to put this panel back on before you install the seat. Don't ask me why.

Dan
 
It's a success 🍾 :banana1:. I can feel the left side of the spring frame is somewhat weaker then the right, but no broken coils
PXL_20210221_025332187~2.jpg

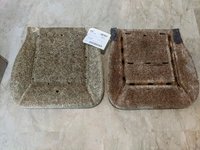
New pad and styrofoam cylinders:
PXL_20210221_030946135~2.jpg
 
I pulled the old seat pad. No any meaningful signs of disintegration, but it's significantly enough less rigid than the new one. Definitely will make a difference to seating!

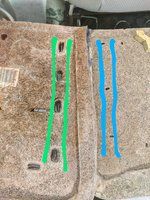
The new and old pad have exactly the same part #, but their design differs slightly. New one does not have a metal wire along left, right, and front sides, to which J-hooks secure the leather cover to... @LWB250, any idea what to make of it/how to proceed? Thanks

PXL_20210221_193404871~2.jpg
PXL_20210221_193343406~2.jpg
 
I'm confused. To the best of my recollection, the horsehair pad has no hooks or anything that the upholstery connects to. The wires that the nylon "J" hooks clip on to are part of the upholstery cover, not the pad.

The horsehair pad is just a medium to provide support and shape to the upholstery and is held in place through it's fit around the seat frame and the interaction between the leather upholstery and the clips that are used to hold the upholstery to the pad.

200.gif
 
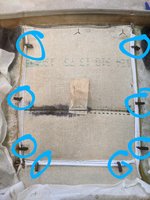
J-hooks on seat cover:
PXL_20210221_200439061~3.jpg

Metal wire along horsehair pad's left, right, and front sides to which J-hooks attach. New horsehair pad with the same part # does not have this metal wire...
PXL_20210221_200504632~3.jpg
PXL_20210221_201032020~3.jpg
PXL_20210221_201037550~2.jpg
 
I can only wonder if there is a difference between facelift and preface lift seat construction.

@gsxr - can you look up and see if there is a difference in the seat pad part #s?

Dan
 
Part # on the old pad and the new is identical #124 910 2350
 
Dan, the part numbers are the same for all years 034. And he has 2 of the same part number 'orsehair pads, the labels are still attached on both.

My guess is it could be a manufacturing defect - not the first time I've received bum parts from the dealer. The pads are NLA now, of course.

Kiev, if there are definitely no wires in the new pads, would a different plastic clip work? Possibly the 201- part numbers shown below?

Also, which clip style is currently attached to your leather covers? I can't quite see in your photos.
 

Attachments

  • clips_all.jpg
    clips_all.jpg
    142.7 KB · Views: 5
  • clips_standard.jpg
    clips_standard.jpg
    109 KB · Views: 5
It seems that wire needs to be and should be there. You may have to remove them from the old pad and push them into the new pad.

drew
 
@gsxr, thanks! My hooks are 140-988-3738 (2nd from the top in the 1st picture you posted).

Staring at the old and new pads though it the day, it seems to me (just thinking aloud) that the pad was not meant to have a metal cable though it. The holes for hooks are much tinier vs old pad. A hook fits in somewhat lose: it doesn't fall out, but it's not exactly very snag in there. If my new pad had a metal cable in it, it would require a lot of cutting to enlarge those holes, to fish out the hooks.... I don't think Mercedes would design it like that...

I'm thinking 1) ether new pad is designed for an updated MB leather cover that had a different hook system or 2) as one mounts the cover into horsehair pad, the hooks should (somehow) just be plugged into those smaller hols from below and hold the cover that way... @LWB250, in your estimation, are the hooks on the leather cushion cover are there just to prevent sliding of the cushion, or also to secure it's up and down movent? I'm thinking cushion's up and down movent is secured by the retention groove, and siding is secured by cushion hooks... What do you think?

PXL_20210221_225042132~3.jpg
PXL_20210221_222833580~2.jpg
 
Given the smaller size of the holes on the new pad... is there any chance the different-design 201- clips would work, without requiring wires in the pad?
 
Dan, the part numbers are the same for all years 034. And he has 2 of the same part number 'orsehair pads, the labels are still attached on both.

My guess is it could be a manufacturing defect - not the first time I've received bum parts from the dealer. The pads are NLA now, of course.

Kiev, if there are definitely no wires in the new pads, would a different plastic clip work? Possibly the 201- part numbers shown below?

Also, which clip style is currently attached to your leather covers? I can't quite see in your photos.
I looked in the XENTRY. It looks like 140 988 3738, which is what my car had from the factory, has no trace there at all. Instead, 201 988 3978 is specified, which, looking at the picture of various clips that you posted, seems to make sense. If not for your picture, I'd never known that. So thanks again, Dave! :gsxrlove:

#1.png
 
@gsxr, thanks! My hooks are 140-988-3738 (2nd from the top in the 1st picture you posted).

Staring at the old and new pads though it the day, it seems to me (just thinking aloud) that the pad was not meant to have a metal cable though it. The holes for hooks are much tinier vs old pad. A hook fits in somewhat lose: it doesn't fall out, but it's not exactly very snag in there. If my new pad had a metal cable in it, it would require a lot of cutting to enlarge those holes, to fish out the hooks.... I don't think Mercedes would design it like that...

I'm thinking 1) ether new pad is designed for an updated MB leather cover that had a different hook system or 2) as one mounts the cover into horsehair pad, the hooks should (somehow) just be plugged into those smaller hols from below and hold the cover that way... @LWB250, in your estimation, are the hooks on the leather cushion cover are there just to prevent sliding of the cushion, or also to secure it's up and down movent? I'm thinking cushion's up and down movent is secured by the retention groove, and siding is secured by cushion hooks... What do you think?

View attachment 126608
View attachment 126609
Had the same issue with my SL500. GAHH Automotive supplied me with a new style hook set. Here's what it looks like.
 

Attachments

  • Hook1.jpg
    Hook1.jpg
    52.3 KB · Views: 5
  • Hook2.jpg
    Hook2.jpg
    87.9 KB · Views: 5
@LeeWireless, W124 has different seat than SL, so your GAHH hook is not suitable in my case. I'm reusing original cover, but changing an old seat pad for a new one with the same part #. I thought I could reuse my original hooks that came with the car. They look like this:
Screenshot_20210221-224842~2.png

Thanks to @gsxr, I can see XENTRY doesn't specify above part# and doesn't mention it at all. Instead it points to a hook with a different part #, which looks like this and I have a feeling it will do the job for me. It's available from MB for a $1 each
Screenshot_20210221-224842~3.png

Dave, you're a GOD. If not for your picture with hooks and their corresponding part #s, I would have thought that my original hooks is what is in XENTRy, since they don't have part # stamped on them
 
Last edited:
@LeeWireless, W124 has different seat than SL, so your GAHH hook is not suitable in my case. I'm reusing original cover, but changing an old seat pad for a new one with the same part #. I thought I could reuse my original hooks that came with the car. They look like this:
View attachment 126627

Thanks to @gsxr, I can see XENTRY doesn't specify this part# and doesn't mention it at all. Instead it points to a hook with a different part #, which looks like this and I have a feeling it will do the job for me. It's available from MB for a $1 each
View attachment 126628

Dave, you're a GOD. If not for your picture with hooks and their corresponding part #s, I would have thought that my original hooks is what is in XENTRy, since they don't have part # stamped on them
My SL had the exact same "old" hooks as you have.
 
What have you done to your seat as part of refurbishment?
Replaced both upper and lower pads on both seats and new leather covers from GAHH. Also added lumbar support to driver seat using a kit supplied from MB.
 

Attachments

  • Lumbar.jpg
    Lumbar.jpg
    123.8 KB · Views: 8
  • GAHH Seat Covers.jpg
    GAHH Seat Covers.jpg
    176.6 KB · Views: 8
Nice! I imagine the difference in the comfort of the seat is substantial. That is what I'm expecting
 
Had the same issue with my SL500. GAHH Automotive supplied me with a new style hook set. Here's what it looks like.
These are the hooks I've seen on cars like my 95 E420. No wires in the horsehair pad, the "web" on the end of the hook spreads out across the pad and provides the retention.

Dan
 
These are the hooks I've seen on cars like my 95 E420. No wires in the horsehair pad, the "web" on the end of the hook spreads out across the pad and provides the retention.

Dan
Likely part of the cheapening MB initiated in the early 90s. No metal wire in horsehair pad vs different plastic hook
 
Are the GAHH plastic hooks aftermarket, or OE/OEM? Is there an MB part number for the type with the wide base shown in post #77?
 
Likely part of the cheapening MB initiated in the early 90s. No metal wire in horsehair pad vs different plastic hook
I guess. I don't recall ever seeing the wire in the pad. Both of my 034s had the wide base clips.

Dave, they've got to be MB, as they were installed on my 95 034 which did not have wires in the pad and had the original pad, as I saw the sticker on it with a date code.

Dan
 
Interesting... would like to get the MB number for the wide-base clips, to add to the photo collection. Great info in this thread!

:jono:
 
Thanks to @gsxr, I can see XENTRY doesn't specify above part# and doesn't mention it at all. Instead it points to a hook with a different part #, which looks like this and I have a feeling it will do the job for me. It's available from MB for a $1 each
126479-a8738a04b9301fa575d748474209c8d0.png
I finally got my seat cushion that received freshening back from a fabric shop. The 201-988-39-78 hooks solved the problem of attaching original seat cushion to the updated version (but same part# as original) of the horsehair pad
 

Who has viewed this thread (Total: 1) View details

Who has watched this thread (Total: 1) View details

Back
Top