ADMIN EDIT: See post #31 below for tips on removing the rocker covers and fender trims. Thread title udpated.
I decided to replace a dented piece of metal Garnish Moulding on the rear left door. The WIS Factory Service Manual provides several W124 procedures regarding sedans & coupes, yet nothing truly specific for the 500E. In fact, damage may occur to components if one were to wholeheartedly follow the WIS procedures on the 500E. This thread will provide the process of successfully removing/replacing the 500E rear door cladding & garnish moulding. You can do this job. Familiarize yourself with the pictures & locations of the key components first.
Required Parts:
Left Rear Door Garnish Moulding (EPC Grp 69, SubGrp 060, Item 110 p/n 124 698 15 80)
Reference:
• EPC Group 69 Paneling & Lining, SubGrp 060 Outside Attachment Parts
• WIS/FSM Group 88-800/802 Body Panels & Bumpers
Required Tools:
• Philips head screwdriver
• Body trim removal set
• Snap ring pliers
The dented Garnish Moulding is pictured on top; its new replacement below.
The rear door cladding is held in place by 2 metal screws & 8 white nylon clip assemblies.
1. Open door. Remove metal Screw (Item 128 p/n A 201 990 20 36) located on lower inside handle-end of door. Its mating piece attached to the cladding is Screw Lock (Item 125 p/n A 002 994 65 45).
2. Remove metal Screw (Item 128 p/n A 201 990 20 36) located on mid-level inside hinge-end of door (just below door check-strap). Its mating piece attached to the cladding is Screw Lock (Item 116 p/n A 002 994 75 45).
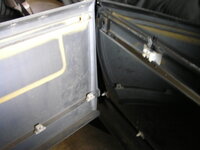
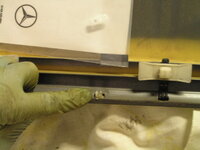
Observe the underside edge of the door. The cladding extends below the bottom-edge of the door it is attached to. Note the locations of the 4 white nylon lower cladding retaining clips. Knowing the location of these clips will aid in the ease of the cladding removal process.
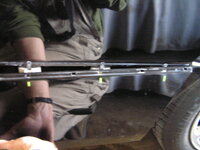
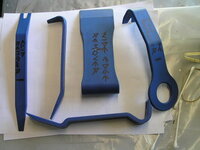
It is always best to use the proper tools. A set of non-marring (glass-filled nylon) trim removal tools proves invaluable in this type of job.
The lower cladding clips consist of a 2 piece male/female assembly. The male portion is attached to the door (hinge-side Fastener Button Item 134 p/n A 001 988 46 81 & Fastener Buttons Items 131 p/n A 001 988 49 81). The female portion is attached to the cladding. I started the removal process from the door-handle end, working toward the hinge-end.
3. Closely position a trim removal tool on each side of the first lower retaining clip. Apply steady, even pressure to firmly leverage the cladding straight out towards you until you separate the mating portions of the clip. You will have an uneasy feeling that something will break, especially after hearing the noise made as the clip separates (I imagine a clip may break if already damaged or if old & brittle). None of the clips on my ’93 broke during this process. I was pleased to see what good condition they were in. Should replacement parts be required, refer to EPC Sect 69 Paneling & Lining, Subgrp 060 Outside Attachment Parts.
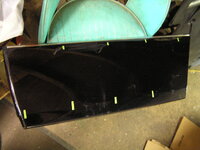
4. Continue this same process to separate the remaining lower cladding clips (Fastener Buttons). This backside cladding view displays the locations of the 4 Fastener Buttons (Item 122 p/n A 001 988 51 81) and the lower & upper Screw Locks.
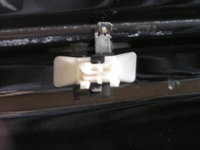
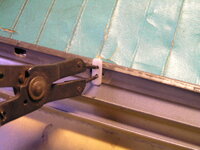
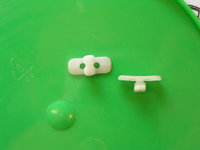
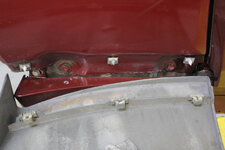
There are 4 strange-looking upper cladding Holddown Clip assemblies (Item 119 p/n A 124 988 94 78) that are attached to the door-side. The assembly consists of 2 pieces. The white nylon portion mates to corresponding detents in a molded channel on the cladding backside. A metal portion fits vertically through the white nylon portion. The top of this metal portion fits through holes molded within the upper cladding & pivot-locks into the back of the cladding’s metal garnish moulding. Think of this metal trim at the cladding top as a hinge which runs the length of the upper cladding. This thought will aid in its final removal & reinstallation.
5. Using a similar process as with the lower cladding, apply steady, even pressure to firmly leverage the cladding straight out & slightly upwards until you separate the mating portions of the white nylon clip (the sound of this separation is not as loud or unnerving as the lower cladding clips).
6. Continue this same process to separate the remaining upper white nylon clips from the cladding.
At this point the cladding is held only by the metal retaining clips which are fit within holes molded into the cladding directly behind the metal trim. Once again, thinking of the metal trim as a lengthwise hinge, pivot the bottom of the cladding up. As the cladding moves toward a 90 degree position to the door, you will be able to lift & separate the cladding from the metal retaining clips.
That’s it for cladding removal! Move the cladding onto a non-marring working surface (such as a table covered with a mover’s blanket) How does the uncovered portion of the door look?? This is a good time to conscript someone into washing & waxing the newly uncovered portion of the door.
I decided to replace a dented piece of metal Garnish Moulding on the rear left door. The WIS Factory Service Manual provides several W124 procedures regarding sedans & coupes, yet nothing truly specific for the 500E. In fact, damage may occur to components if one were to wholeheartedly follow the WIS procedures on the 500E. This thread will provide the process of successfully removing/replacing the 500E rear door cladding & garnish moulding. You can do this job. Familiarize yourself with the pictures & locations of the key components first.
Required Parts:
Left Rear Door Garnish Moulding (EPC Grp 69, SubGrp 060, Item 110 p/n 124 698 15 80)
Reference:
• EPC Group 69 Paneling & Lining, SubGrp 060 Outside Attachment Parts
• WIS/FSM Group 88-800/802 Body Panels & Bumpers
Required Tools:
• Philips head screwdriver
• Body trim removal set
• Snap ring pliers
The dented Garnish Moulding is pictured on top; its new replacement below.
The rear door cladding is held in place by 2 metal screws & 8 white nylon clip assemblies.
1. Open door. Remove metal Screw (Item 128 p/n A 201 990 20 36) located on lower inside handle-end of door. Its mating piece attached to the cladding is Screw Lock (Item 125 p/n A 002 994 65 45).
2. Remove metal Screw (Item 128 p/n A 201 990 20 36) located on mid-level inside hinge-end of door (just below door check-strap). Its mating piece attached to the cladding is Screw Lock (Item 116 p/n A 002 994 75 45).
Observe the underside edge of the door. The cladding extends below the bottom-edge of the door it is attached to. Note the locations of the 4 white nylon lower cladding retaining clips. Knowing the location of these clips will aid in the ease of the cladding removal process.
It is always best to use the proper tools. A set of non-marring (glass-filled nylon) trim removal tools proves invaluable in this type of job.
The lower cladding clips consist of a 2 piece male/female assembly. The male portion is attached to the door (hinge-side Fastener Button Item 134 p/n A 001 988 46 81 & Fastener Buttons Items 131 p/n A 001 988 49 81). The female portion is attached to the cladding. I started the removal process from the door-handle end, working toward the hinge-end.
3. Closely position a trim removal tool on each side of the first lower retaining clip. Apply steady, even pressure to firmly leverage the cladding straight out towards you until you separate the mating portions of the clip. You will have an uneasy feeling that something will break, especially after hearing the noise made as the clip separates (I imagine a clip may break if already damaged or if old & brittle). None of the clips on my ’93 broke during this process. I was pleased to see what good condition they were in. Should replacement parts be required, refer to EPC Sect 69 Paneling & Lining, Subgrp 060 Outside Attachment Parts.
4. Continue this same process to separate the remaining lower cladding clips (Fastener Buttons). This backside cladding view displays the locations of the 4 Fastener Buttons (Item 122 p/n A 001 988 51 81) and the lower & upper Screw Locks.
There are 4 strange-looking upper cladding Holddown Clip assemblies (Item 119 p/n A 124 988 94 78) that are attached to the door-side. The assembly consists of 2 pieces. The white nylon portion mates to corresponding detents in a molded channel on the cladding backside. A metal portion fits vertically through the white nylon portion. The top of this metal portion fits through holes molded within the upper cladding & pivot-locks into the back of the cladding’s metal garnish moulding. Think of this metal trim at the cladding top as a hinge which runs the length of the upper cladding. This thought will aid in its final removal & reinstallation.
5. Using a similar process as with the lower cladding, apply steady, even pressure to firmly leverage the cladding straight out & slightly upwards until you separate the mating portions of the white nylon clip (the sound of this separation is not as loud or unnerving as the lower cladding clips).
6. Continue this same process to separate the remaining upper white nylon clips from the cladding.
At this point the cladding is held only by the metal retaining clips which are fit within holes molded into the cladding directly behind the metal trim. Once again, thinking of the metal trim as a lengthwise hinge, pivot the bottom of the cladding up. As the cladding moves toward a 90 degree position to the door, you will be able to lift & separate the cladding from the metal retaining clips.
That’s it for cladding removal! Move the cladding onto a non-marring working surface (such as a table covered with a mover’s blanket) How does the uncovered portion of the door look?? This is a good time to conscript someone into washing & waxing the newly uncovered portion of the door.
Attachments
-
 Molding%20Part%20Number.jpg256.1 KB · Views: 136
 -
 Door%20Clips.jpg292.8 KB · Views: 164
 -
 UpperDoorCladdingClip.jpg287 KB · Views: 142
 -
 Cladding%20Clips.jpg265.1 KB · Views: 148
 -
 Mating%20Surfaces.jpg267 KB · Views: 145
 -
 TrimRemovalTools02.jpg264.9 KB · Views: 133
 -
 RearDoorBottomView.jpg257.5 KB · Views: 132
 -
 HingeSideScrew.jpg256.6 KB · Views: 124
 -
 HandleSideScrew.jpg252.6 KB · Views: 126
 -
 RearDoorTrimMolding.jpg241.7 KB · Views: 120
Last edited:


")


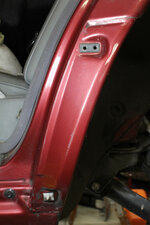
![[500Eboard] 500E_rear_fender_clip_upper.jpg](https://www.500eboard.co/forums/data/attachments/165/165519-15aed904fc10a1971952d920870725be.jpg?hash=Fa7ZBPwQoZ "[500Eboard] 500E_rear_fender_clip_upper.jpg")


 I’m lost.. I got it to work on the passenger side. Drivers side doesn’t wanna clip in on the second hole closest to the door.