Well, these are good mousers! Read on!
As many of you have experienced, your exterior temperature indicator in the instrument cluster is haywire. If you gave it credence, the winds of the Arctic have descended on you or conversely, the Sahara, despite the appearance outside of it being quite pleasant. It's not the unit in the cluster, it's the thermocouple that is located below your front bumper. It's either failed or become wildly inaccurate as it's aged.
Looking into this, you'll find that for a princely sum Mercedes will sell you a new temperature probe, complete with cable that must be snaked through all manner of openings and grommets to reach the sanctum sanctorum of the dash and connect to the display unit. However, a fix is far simpler and cheaper. To-wit:
Locate your temperature probe. They're typically behind or just below the license plate insert on the front bumper. Some will be a metal probe with a mounting tab spot welded to it, others like the one shown here will have a metal clamp that holds the probe in place.
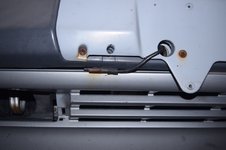
I was able to pry the clamp back and remove my probe. If you have one with the mounting tab you'll have to remove the fastener that holds it in place.

A close look at my probe showed that the insulation had cracked where it entered the probe's rubber boot or housing.
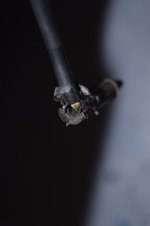
I cut the base of the boot/cover away to expose the thermocouple. You can see that I was able to remove the tip of the cover from the thermocouple. If you have the earlier type that's all one (metal) piece with the mounting tab, you'll need to simply cut the cable off of it and strip the leads. You can pull the guts out of it and install the new thermocouple inside.

And here's the thermocouple and the reason for it's lack of function is pretty clear.
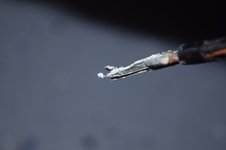
Yup, a definite open circuit. I took the tip of the boot and cleaned it out with a cotton swab soaked in alcohol. It appeared that it was full of what appeared to be silicone grease. I guess that makes sense in that it would allow for better heat transfer to the thermocouple, but I'm going to install the replacement more or less "dry".
Here's the new thermocouple.

I should have put something in the photo for scale, but this device is about 2mm in diameter with leads about 5 cm long. I stripped about 1-2mm of insulation and tinned the leads of the cable after removing the old thermocouple from it. I also added a small piece of heat shrink tubing to one lead of the thermocouple to provide insulation. Using the boot and cable to determine how long the leads needed to be, I trimmed the leads of the thermocouple and soldered the lead with the heat shrink tubing on it.

Once the first solder joint has cooled, I moved the heat shrink down to cover the joint, then soldered the second lead. The heat of soldering the second lead shrank the heat shrink tubing for me on the other lead. Once both had cooled, I cut a small piece of black electrical tape and inserted it in between the leads to insulate the remaining exposed leads and wrapped it around to secure.
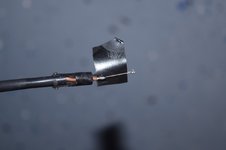

Crude but effective. With the leads insulated, I placed heat shrink tubing over the cable, then placed the boot over the thermocouple.

I heated the tubing to seal the boot to the cable. Another larger piece of heat shrink to seal the whole thing into a single unit.

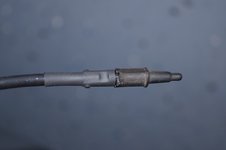

I pulled the clip back and put the probe back in the clamp under the bumper.
Now for validation. Ambient temperature about 82 F. Note that I let things stabilize for about 30 minutes before I checked this. I say that because even five minutes after I had done the heat shrink and all that it was still reading 135F!

Dash says:

Success!
I bought four of these probably 4-5 years ago and if I recall correctly they were a few bucks apiece. Looks like the price has gone up slightly.
Mouser 527-1003-3K NTC Thermistor
Dan
As many of you have experienced, your exterior temperature indicator in the instrument cluster is haywire. If you gave it credence, the winds of the Arctic have descended on you or conversely, the Sahara, despite the appearance outside of it being quite pleasant. It's not the unit in the cluster, it's the thermocouple that is located below your front bumper. It's either failed or become wildly inaccurate as it's aged.
Looking into this, you'll find that for a princely sum Mercedes will sell you a new temperature probe, complete with cable that must be snaked through all manner of openings and grommets to reach the sanctum sanctorum of the dash and connect to the display unit. However, a fix is far simpler and cheaper. To-wit:
Locate your temperature probe. They're typically behind or just below the license plate insert on the front bumper. Some will be a metal probe with a mounting tab spot welded to it, others like the one shown here will have a metal clamp that holds the probe in place.

I was able to pry the clamp back and remove my probe. If you have one with the mounting tab you'll have to remove the fastener that holds it in place.

A close look at my probe showed that the insulation had cracked where it entered the probe's rubber boot or housing.

I cut the base of the boot/cover away to expose the thermocouple. You can see that I was able to remove the tip of the cover from the thermocouple. If you have the earlier type that's all one (metal) piece with the mounting tab, you'll need to simply cut the cable off of it and strip the leads. You can pull the guts out of it and install the new thermocouple inside.

And here's the thermocouple and the reason for it's lack of function is pretty clear.

Yup, a definite open circuit. I took the tip of the boot and cleaned it out with a cotton swab soaked in alcohol. It appeared that it was full of what appeared to be silicone grease. I guess that makes sense in that it would allow for better heat transfer to the thermocouple, but I'm going to install the replacement more or less "dry".
Here's the new thermocouple.

I should have put something in the photo for scale, but this device is about 2mm in diameter with leads about 5 cm long. I stripped about 1-2mm of insulation and tinned the leads of the cable after removing the old thermocouple from it. I also added a small piece of heat shrink tubing to one lead of the thermocouple to provide insulation. Using the boot and cable to determine how long the leads needed to be, I trimmed the leads of the thermocouple and soldered the lead with the heat shrink tubing on it.

Once the first solder joint has cooled, I moved the heat shrink down to cover the joint, then soldered the second lead. The heat of soldering the second lead shrank the heat shrink tubing for me on the other lead. Once both had cooled, I cut a small piece of black electrical tape and inserted it in between the leads to insulate the remaining exposed leads and wrapped it around to secure.


Crude but effective. With the leads insulated, I placed heat shrink tubing over the cable, then placed the boot over the thermocouple.

I heated the tubing to seal the boot to the cable. Another larger piece of heat shrink to seal the whole thing into a single unit.


I pulled the clip back and put the probe back in the clamp under the bumper.
Now for validation. Ambient temperature about 82 F. Note that I let things stabilize for about 30 minutes before I checked this. I say that because even five minutes after I had done the heat shrink and all that it was still reading 135F!

Dash says:

Success!
I bought four of these probably 4-5 years ago and if I recall correctly they were a few bucks apiece. Looks like the price has gone up slightly.
Mouser 527-1003-3K NTC Thermistor
Dan

