

The lower rubber trim piece on my rear window was curling up on the sides so I tried to bend it back but noticed the riveted in place clips were broken. So I decided to see if I could replace the rubber strip, clips and rivets.
Amazingly the parts are still available from the dealer and a lot cheaper than I would have guessed. The rubber strip was only $20 and the seven clips were $16 total.
Harbor Freight makes a decent pop rivet gun that includes rivets for $6. I already had one from my recent windshield trim clip replacement project. The included small/medium rivets are exactly enough to do all the windshield clips and the rear rubber trim piece.
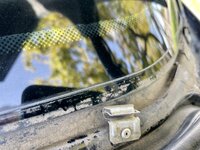
4 of my clips had broken rivets, 2 were loose, so only one decent clip remained holding the trim on. Awfully dirty under the trim piece too.
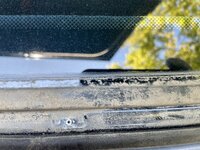
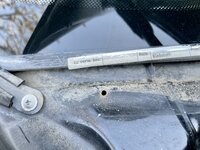
I recommend issuing a plastic trim tool to get the rubber trim out of the clips and off the car. I used a small drill bit to remove the last 3 rivets. After washing all the dirt and grime out I had a pretty bad water spot line all across the glass and used Sud Factory X2 Spotless on a microfiber cloth to remove the spots quickly by hand.
If you haven’t done pop rivets before they are very easy and the directions in the package were good. The toughest part is lining up the new rubber strip into the clips before pushing it down in place. Total time to do all of this was about 20 minutes.
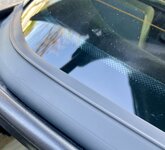
It looks much better overall and I’m glad to have sealed up the small leaks from the broken rivet holes too!
Amazingly the parts are still available from the dealer and a lot cheaper than I would have guessed. The rubber strip was only $20 and the seven clips were $16 total.
Harbor Freight makes a decent pop rivet gun that includes rivets for $6. I already had one from my recent windshield trim clip replacement project. The included small/medium rivets are exactly enough to do all the windshield clips and the rear rubber trim piece.
4 of my clips had broken rivets, 2 were loose, so only one decent clip remained holding the trim on. Awfully dirty under the trim piece too.
I recommend issuing a plastic trim tool to get the rubber trim out of the clips and off the car. I used a small drill bit to remove the last 3 rivets. After washing all the dirt and grime out I had a pretty bad water spot line all across the glass and used Sud Factory X2 Spotless on a microfiber cloth to remove the spots quickly by hand.
If you haven’t done pop rivets before they are very easy and the directions in the package were good. The toughest part is lining up the new rubber strip into the clips before pushing it down in place. Total time to do all of this was about 20 minutes.
It looks much better overall and I’m glad to have sealed up the small leaks from the broken rivet holes too!
Attachments
-
 39B99921-66FD-4274-BCF4-EC03033FEF31.jpeg3.1 MB · Views: 46
 -
 3115FA21-20AA-4832-BF82-5A6E2E7A097E.jpeg4.6 MB · Views: 41
 -
 B3FDC3A3-B1EC-422B-902E-71BD4EEF24F6.jpeg3.7 MB · Views: 42
 -
 C7B0484A-C9FC-42BA-B37E-7A3599186DE0.jpeg3.5 MB · Views: 45
 -
 4292CDF6-8080-4CD1-87C8-F9485E9389D2.jpeg2.6 MB · Views: 46
 -
 3573E4C3-FEB4-4505-9A1B-8477FF1692E9.jpeg7.5 MB · Views: 47
 -
 3501901D-3D7E-4906-8563-A2016DB11C9D.jpeg3.6 MB · Views: 39
 -
 39E1FA77-D3BF-46F6-90C7-33F9254A1DF5.jpeg3.2 MB · Views: 39
 -
 C63E4AF0-E545-49F9-AFD4-B6609D7BD67A.jpeg3.4 MB · Views: 38
 -
 A5D49E43-86CC-4B2B-944E-FD2F995E08AF.jpeg1.7 MB · Views: 41
 -
 74CE31A2-A74C-48C1-9046-C1F883BDE6F6.jpeg4.4 MB · Views: 37
 -
 0C2D4433-E41B-4CE4-84E3-5627705367E1.jpeg2.3 MB · Views: 41
 -
 9D8DCA1C-86B2-438C-BD29-82351BCD8813.jpeg3.1 MB · Views: 47


