Note: This writeup assumes you already have the B1 piston out of the transmission. Removal is a completely separate job not covered here.
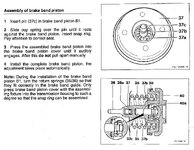
The FSM procedure (see attached image) for servicing the late-style, automatically-adjusting B1 piston is cryptic, at best. There is also no explanation of how to check if it is working properly. Early 722.3 transmissions used a B1 piston that has end play set manually via shims, and does not compensate for wear of the B1 piston. The automatically-adjusting piston was phased into production as of 08/1992, which is early in 1993 USA model year production. However, since many/most transmissions have been rebuilt by now, you must check your transmission to see which type is installed. Early/manual tensioners have a flat outer cover. Late/automatic tensioners have a raised "donut" in the center of the cover.
The outer cover of the automatically-adjusting piston assembly normally wobbles around, when holding the assembly in your hand. If you pull in/out on the outer cover, there should be something like 1-2mm free play (probably closer to 1mm), as the spring retainer in the cover floats in the groove on the center pin. However, the outer cover SHOULD NOT easily slip in/out of the piston. If the outer cover with center pin moves in & out of the piston like a slide whistle, with little or no resistance, the cup spring is defective and must be replaced. If the B1 band is replaced, the automatically-adjusting piston must be reset by pulling it apart, disassembling, and re-assembling as described below - even if the cup spring is good. The piston CANNOT be reset by forcing the outer cover into the piston, this will damage the cup spring and render it useless.
If the 2 pieces are firmly locked together, the cup spring should be serviceable. To reset the assembly, pull the 2 halves apart forcefully. It should take significant effort to pull them apart. You cannot remove the retainer clip which is visible between the 2 pieces. It LOOKS like you can just pull that clip out to release the pin, but this is unpossible! The retainer clip cannot pull past the pin diameter. The FSM does not explain this. Most parts can be re-used, but if the Teflon seal has any visible scoring, it's a good idea to replace it on principle (under $10 MSRP from the dealer). The cup spring can be re-used if it still grips the pin tightly. The retainer and snap ring can usually be re-used unless damaged.
Parts list:
Once the 2 pieces are pulled apart, first extract the pin from the outer cover. The FSM also does NOT explain this well. After fighting with this unsuccessfully, I noticed the FSM diagram showed pliers inserted into the bore next to the pin. I used a pair of external snap ring pliers with narrow tips, the type that spread apart when you squeeze the pliers. This spread the tips of the retainer clip just enough to allow the pin to be removed from the cover. I did not think to start taking pictures at that point, sorry! If/when I do this again I'll get photos of this procedure and add to this thread. You should now have the pin loose from the outer cover.
Next challenge is to remove the cup spring (toothed spring disc) from the piston center bore. The snap ring which locks the spring in place is difficult to remove. I used small screwdrivers to pry the edges out. The snap ring could be damaged (bent / distorted), so having a new one on hand is a good idea. With the snap ring removed, the cup spring can be extracted from the piston. Now you should have all parts loose as shown in the 3rd photo below, ready for assembly.
ASSEMBLY:
1) Insert the pin into the piston bore
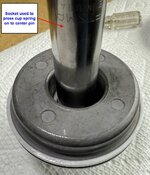
2) Lay the cup spring on the top of the pin so the outer edge sits LOWER than the inner edge
3a) Press the cup spring onto the pin with a suitable size socket. It should take quite a bit of force to push the spring onto the pin.
3b) If the spring pushes on to the pin very easily, with little force, the spring is defective and MUST be replaced
4) With the cup spring fully seated, install the snap ring / locking circlip that holds the cup spring into the piston bore
5) Press the 2 halves of piston together, it will click into place and lock into 1 assembly where the outer cover wobbles around
6) Verify the 2 halves do not easily pull apart (tug gently, the pin should NOT pull out of the piston more)
7) Optional, but recommended: Replace the Teflon outer seal
8) When installing, always install a new red/orange O-ring for the outer cover seal, and make sure the outer pin of the piston seats into the B1 band receiver bore
While the B1 piston may be removable from the transmission with the trans still in the car, this job is nightmare fuel on the 124 V8 due to extremely limited space between the B1 and the chassis - even with the transmission tilted downward. I would strongly recommend ONLY attempting this with the transmission on the workbench. In larger chassis (like the 140 or 126) the job may be easier with the trans in the car.
The FSM procedure (see attached image) for servicing the late-style, automatically-adjusting B1 piston is cryptic, at best. There is also no explanation of how to check if it is working properly. Early 722.3 transmissions used a B1 piston that has end play set manually via shims, and does not compensate for wear of the B1 piston. The automatically-adjusting piston was phased into production as of 08/1992, which is early in 1993 USA model year production. However, since many/most transmissions have been rebuilt by now, you must check your transmission to see which type is installed. Early/manual tensioners have a flat outer cover. Late/automatic tensioners have a raised "donut" in the center of the cover.
The outer cover of the automatically-adjusting piston assembly normally wobbles around, when holding the assembly in your hand. If you pull in/out on the outer cover, there should be something like 1-2mm free play (probably closer to 1mm), as the spring retainer in the cover floats in the groove on the center pin. However, the outer cover SHOULD NOT easily slip in/out of the piston. If the outer cover with center pin moves in & out of the piston like a slide whistle, with little or no resistance, the cup spring is defective and must be replaced. If the B1 band is replaced, the automatically-adjusting piston must be reset by pulling it apart, disassembling, and re-assembling as described below - even if the cup spring is good. The piston CANNOT be reset by forcing the outer cover into the piston, this will damage the cup spring and render it useless.
If the 2 pieces are firmly locked together, the cup spring should be serviceable. To reset the assembly, pull the 2 halves apart forcefully. It should take significant effort to pull them apart. You cannot remove the retainer clip which is visible between the 2 pieces. It LOOKS like you can just pull that clip out to release the pin, but this is unpossible! The retainer clip cannot pull past the pin diameter. The FSM does not explain this. Most parts can be re-used, but if the Teflon seal has any visible scoring, it's a good idea to replace it on principle (under $10 MSRP from the dealer). The cup spring can be re-used if it still grips the pin tightly. The retainer and snap ring can usually be re-used unless damaged.
Parts list:
- 140-993-14-26 = Cup spring - Round disc with teeth in the center
- 126-272-13-73 = Snap ring - Locking circlip that holds the cup spring into the piston center bore
- 126-277-29-73 = Retainer - Lock clip mounted inside the outer cover (not shown separately, only installed into outer cover center bore)
- 140-277-03-55 = Teflon seal for piston outer circumference
- 005-997-86-48-64 = O-ring (red/orange color) for transmission housing/bore (not shown in photos)
Once the 2 pieces are pulled apart, first extract the pin from the outer cover. The FSM also does NOT explain this well. After fighting with this unsuccessfully, I noticed the FSM diagram showed pliers inserted into the bore next to the pin. I used a pair of external snap ring pliers with narrow tips, the type that spread apart when you squeeze the pliers. This spread the tips of the retainer clip just enough to allow the pin to be removed from the cover. I did not think to start taking pictures at that point, sorry! If/when I do this again I'll get photos of this procedure and add to this thread. You should now have the pin loose from the outer cover.
Next challenge is to remove the cup spring (toothed spring disc) from the piston center bore. The snap ring which locks the spring in place is difficult to remove. I used small screwdrivers to pry the edges out. The snap ring could be damaged (bent / distorted), so having a new one on hand is a good idea. With the snap ring removed, the cup spring can be extracted from the piston. Now you should have all parts loose as shown in the 3rd photo below, ready for assembly.
ASSEMBLY:
1) Insert the pin into the piston bore
2) Lay the cup spring on the top of the pin so the outer edge sits LOWER than the inner edge
3a) Press the cup spring onto the pin with a suitable size socket. It should take quite a bit of force to push the spring onto the pin.
3b) If the spring pushes on to the pin very easily, with little force, the spring is defective and MUST be replaced
4) With the cup spring fully seated, install the snap ring / locking circlip that holds the cup spring into the piston bore
5) Press the 2 halves of piston together, it will click into place and lock into 1 assembly where the outer cover wobbles around
6) Verify the 2 halves do not easily pull apart (tug gently, the pin should NOT pull out of the piston more)
7) Optional, but recommended: Replace the Teflon outer seal
8) When installing, always install a new red/orange O-ring for the outer cover seal, and make sure the outer pin of the piston seats into the B1 band receiver bore
While the B1 piston may be removable from the transmission with the trans still in the car, this job is nightmare fuel on the 124 V8 due to extremely limited space between the B1 and the chassis - even with the transmission tilted downward. I would strongly recommend ONLY attempting this with the transmission on the workbench. In larger chassis (like the 140 or 126) the job may be easier with the trans in the car.
Attachments
-
 722.3_B1_piston_late01.jpg94 KB · Views: 13
 -
 722.3_B1_piston_late10.jpg229.4 KB · Views: 13
 -
 722.3_B1_piston_late09.jpg196.4 KB · Views: 13
 -
 722.3_B1_piston_late08.jpg167.1 KB · Views: 13
 -
 722.3_B1_piston_late07.jpg152.9 KB · Views: 12
 -
 722.3_B1_piston_late06.jpg134.5 KB · Views: 12
 -
 722.3_B1_piston_late05.jpg205.6 KB · Views: 12
 -
 722.3_B1_piston_late04.jpg184.6 KB · Views: 11
 -
 722.3_B1_piston_late03.jpg276.6 KB · Views: 11
 -
 722.3_B1_piston_late02.jpg254.2 KB · Views: 12


