This is not a step-by-step procedure or pictorial (sorry). It's some observations and tips to complement the FSM (Factory Service Manual) procedure, job 46-3400, see attached PDF file. This journey is not as fun as the travel brochure claims. Plan on 4-6 hours if everything goes smoothly, if you have all the tools, and if you don't need to clean/degrease much while it's apart. Otherwise, the time could be double if you need to do a lot of cleanup.
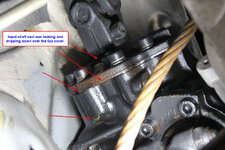
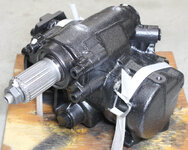
First, some background: In nearly 20 years of owning more than a dozen different 124.034 and 124.036 chassis, I have never experienced a leak from the steering gearbox at the input shaft... until now. A leak at the output shaft is very common, but that can be repaired without removing the steering box from the chassis (click here for details). However, the input shaft seal cannot be accessed with the gearbox in the car, and also requires complete disassembly of the box to replace. My wife's 1994 E420 developed a leak at the input shaft, necessitating tackling this job for the first time. Rather than attempt disassembling & reassembling the entire gearbox and risk screwing it up, I opted to buy a replacement steering gearbox, rebuilt by Mark at C&M Hydraulics.
Anyway, here are some tips to go with the FSM procedure:
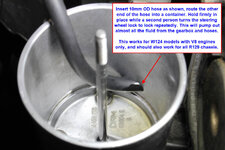
FSM step 1: After extracting the oil from the reservoir and removing the filter, you can insert a length of hose with ~10mm OD into the hole in the side of the reservoir bottom. Route the hose into a container, and have a second person turn the steering wheel lock to lock with the wheels off the ground, as you hold the hose firmly in place. This will pump out most of the remaining fluid from the hoses and gearbox, greatly reducing the resulting mess when you disconnect the hoses / fittings.
FSM step 3: If you have ANY excuse to change the engine mounts, this is the time to do it (OE mounts only, btw). With the driver side engine mount AND bracket removed, there is a lot more space to work and it makes accessing the 2 banjo bolts much easier. DO NOT attempt to remove the thin metal gearbox heat shield (item 23k in the drawing). It cannot removed with the engine in the car. The heat shield does not need to be removed, bent, cut, or otherwise modified. It will limit your visibility & access to the banjo bolts, but that's about it. If the engine is out of the car, go ahead and remove the heat shield. I've seen these shields butchered by previous mechanics - this is totally unnecessary.
FSM step 4: If you didn't pump the fluid out of the system as described above, plan on taking a bath in PS fluid when you remove the fittings. If the exhaust manifold interferes with tools for the banjo bolts, you can unbolt the engine mounts and lift the engine up 1-2 inches to create more clearance. Don't forget to re-install the engine mount bolts afterwards.
FSM step 5: I did not remove the coupling from the steering box, I detached it from the "square" steering column shaft instead. The FSM implies you must do it the other way with telescopic steering column (leave coupling on shaft, remove from gearbox), but that is not accurate. Step 10 says the same thing, again it's not needed, I don't know why the manual shows this.
FSM step 8: Facelift models with a contact spiral should not have the steering wheel turned more than 1 rotation in either direction, but it can move slightly if necessary. The warning here is not to spin it away from center position or the spiral can be destroyed. It doesn't mean the steering wheel cannot be turned at all. Use common sense. Pre-facelift models with contact ring can rotate freely without damage.
FSM step 9: Mark the center position of the steering box before removing the coupling from the box, if you will be re-installing the same one. If installing a replacement (new or used), verify the center position and mark this prior to installing the coupling. If the Pitman arm must be removed, measure the distance from bearing cover to arm and re-install at the identical location. Mine was ~17.3mm.
FSM step 10a: BEFORE installing the steering box back in the car, replace the short section of hose along the frame rail, hidden behind the heat shield. It will never be easier than right now. Although this hose was completely dry on my car (it must have been replaced by the PO), I changed it again anyway. The hose is 9.5mm ID, 17.5mm OD, MB p/n 201-997-03-82 sold by the meter. Aftermarket hose may be smaller OD, I preferred the OE/dealer hose. The EPC specifies 165mm but my old one was only 150mm. You'll have plenty of hose left over from the 1M length. Make sure the hose clamp at the pipe is FULLY TIGHT. You will not be able to tighten it further after the gearbox is bolted to the chassis. The corrugated silver heat shield can be re-used if undamaged; new corrugated shield is inexpensive and also sold by the meter.
FSM step 10b (Optional): When installing the box, optionally apply a blob of RTV sealant over the 2 exposed bolt holes, to prevent corrosion of the threads. The factory applied round adhesive paper (?) dots which will fall off and would need new adhesive to re-use, if undamaged. Instead, I opted to apply a blob of RTV over the upper bolt hole prior to installing the box, as you cannot access this area with the heatshield/engine in place. The lower bolt hole can have RTV applied afterward as shown in the photos below.
FSM step 13: You won't be able to get a torque wrench on the banjo bolts, unless (maybe) the engine mount+bracket is removed. Use your calibrated wrist as needed. The EPC specifies two aluminium seal rings 007603-012113 for M12 banjo bolt on the high-pressure fitting, and two copper seal rings 007603-014106 for the M14 banjo bolt on the return pipe. However the originals were all copper. I went with 2 of the M12 aluminium seals (per EPC) and it's been leak-free. If you want to use copper on the M12 banjo fitting, order a couple of 007603-012110 instead.
FSM step 16: Before filling the system, if any other hoses need replacement or the pump needs to be resealed, do that while the system is empty. After installing a new filter and filling the reservoir with Genuine MB power steering fluid (p/n Q-1-46-0001), turn the steering wheel lock to lock, refill the reservoir, repeat until the level does not go down. This will bleed and fill the system ~95% without starting the engine. You should not need more than 1 liter of fluid. When the engine is started the fluid level may drop 5-10mm or so. Check the level when the fluid has cooled down after a test drive and top off as necessary.
Not mentioned in the FSM: When the job is done (or, before starting), verify the steering wheel is aligned properly with the steering shaft, by checking that the turn signals cancel at roughly the same point when returning to center after turning past the detent, left & right. After the gearbox replacement, if the steering wheel is not centered when driving on a flat road, a dealer alignment is recommended. Make sure the alignment tech uses a spreader bar when setting toe. If you do need an alignment, first check all steering linkages with large pliers for play (should be zero, click here for details), and check the idler arm bushing for play (click here for details). Replace any questionable components before the alignment. Cost for dealer alignment in Boise, ID as of September 2021 was $200 at Lyle Pearson Mercedes.

First, some background: In nearly 20 years of owning more than a dozen different 124.034 and 124.036 chassis, I have never experienced a leak from the steering gearbox at the input shaft... until now. A leak at the output shaft is very common, but that can be repaired without removing the steering box from the chassis (click here for details). However, the input shaft seal cannot be accessed with the gearbox in the car, and also requires complete disassembly of the box to replace. My wife's 1994 E420 developed a leak at the input shaft, necessitating tackling this job for the first time. Rather than attempt disassembling & reassembling the entire gearbox and risk screwing it up, I opted to buy a replacement steering gearbox, rebuilt by Mark at C&M Hydraulics.
Anyway, here are some tips to go with the FSM procedure:
FSM step 1: After extracting the oil from the reservoir and removing the filter, you can insert a length of hose with ~10mm OD into the hole in the side of the reservoir bottom. Route the hose into a container, and have a second person turn the steering wheel lock to lock with the wheels off the ground, as you hold the hose firmly in place. This will pump out most of the remaining fluid from the hoses and gearbox, greatly reducing the resulting mess when you disconnect the hoses / fittings.
FSM step 3: If you have ANY excuse to change the engine mounts, this is the time to do it (OE mounts only, btw). With the driver side engine mount AND bracket removed, there is a lot more space to work and it makes accessing the 2 banjo bolts much easier. DO NOT attempt to remove the thin metal gearbox heat shield (item 23k in the drawing). It cannot removed with the engine in the car. The heat shield does not need to be removed, bent, cut, or otherwise modified. It will limit your visibility & access to the banjo bolts, but that's about it. If the engine is out of the car, go ahead and remove the heat shield. I've seen these shields butchered by previous mechanics - this is totally unnecessary.
FSM step 4: If you didn't pump the fluid out of the system as described above, plan on taking a bath in PS fluid when you remove the fittings. If the exhaust manifold interferes with tools for the banjo bolts, you can unbolt the engine mounts and lift the engine up 1-2 inches to create more clearance. Don't forget to re-install the engine mount bolts afterwards.
FSM step 5: I did not remove the coupling from the steering box, I detached it from the "square" steering column shaft instead. The FSM implies you must do it the other way with telescopic steering column (leave coupling on shaft, remove from gearbox), but that is not accurate. Step 10 says the same thing, again it's not needed, I don't know why the manual shows this.
FSM step 8: Facelift models with a contact spiral should not have the steering wheel turned more than 1 rotation in either direction, but it can move slightly if necessary. The warning here is not to spin it away from center position or the spiral can be destroyed. It doesn't mean the steering wheel cannot be turned at all. Use common sense. Pre-facelift models with contact ring can rotate freely without damage.
FSM step 9: Mark the center position of the steering box before removing the coupling from the box, if you will be re-installing the same one. If installing a replacement (new or used), verify the center position and mark this prior to installing the coupling. If the Pitman arm must be removed, measure the distance from bearing cover to arm and re-install at the identical location. Mine was ~17.3mm.
FSM step 10a: BEFORE installing the steering box back in the car, replace the short section of hose along the frame rail, hidden behind the heat shield. It will never be easier than right now. Although this hose was completely dry on my car (it must have been replaced by the PO), I changed it again anyway. The hose is 9.5mm ID, 17.5mm OD, MB p/n 201-997-03-82 sold by the meter. Aftermarket hose may be smaller OD, I preferred the OE/dealer hose. The EPC specifies 165mm but my old one was only 150mm. You'll have plenty of hose left over from the 1M length. Make sure the hose clamp at the pipe is FULLY TIGHT. You will not be able to tighten it further after the gearbox is bolted to the chassis. The corrugated silver heat shield can be re-used if undamaged; new corrugated shield is inexpensive and also sold by the meter.
FSM step 10b (Optional): When installing the box, optionally apply a blob of RTV sealant over the 2 exposed bolt holes, to prevent corrosion of the threads. The factory applied round adhesive paper (?) dots which will fall off and would need new adhesive to re-use, if undamaged. Instead, I opted to apply a blob of RTV over the upper bolt hole prior to installing the box, as you cannot access this area with the heatshield/engine in place. The lower bolt hole can have RTV applied afterward as shown in the photos below.
FSM step 13: You won't be able to get a torque wrench on the banjo bolts, unless (maybe) the engine mount+bracket is removed. Use your calibrated wrist as needed. The EPC specifies two aluminium seal rings 007603-012113 for M12 banjo bolt on the high-pressure fitting, and two copper seal rings 007603-014106 for the M14 banjo bolt on the return pipe. However the originals were all copper. I went with 2 of the M12 aluminium seals (per EPC) and it's been leak-free. If you want to use copper on the M12 banjo fitting, order a couple of 007603-012110 instead.
FSM step 16: Before filling the system, if any other hoses need replacement or the pump needs to be resealed, do that while the system is empty. After installing a new filter and filling the reservoir with Genuine MB power steering fluid (p/n Q-1-46-0001), turn the steering wheel lock to lock, refill the reservoir, repeat until the level does not go down. This will bleed and fill the system ~95% without starting the engine. You should not need more than 1 liter of fluid. When the engine is started the fluid level may drop 5-10mm or so. Check the level when the fluid has cooled down after a test drive and top off as necessary.
Not mentioned in the FSM: When the job is done (or, before starting), verify the steering wheel is aligned properly with the steering shaft, by checking that the turn signals cancel at roughly the same point when returning to center after turning past the detent, left & right. After the gearbox replacement, if the steering wheel is not centered when driving on a flat road, a dealer alignment is recommended. Make sure the alignment tech uses a spreader bar when setting toe. If you do need an alignment, first check all steering linkages with large pliers for play (should be zero, click here for details), and check the idler arm bushing for play (click here for details). Replace any questionable components before the alignment. Cost for dealer alignment in Boise, ID as of September 2021 was $200 at Lyle Pearson Mercedes.
Attachments
-
46-3400.pdf342.3 KB · Views: 30
-
 power_steering_reservoir_drain.jpg138.7 KB · Views: 68
 -
 steering_box_leak1.jpg181.9 KB · Views: 64
 -
 steering_box_leak2.jpg197.1 KB · Views: 64
 -
 steering_box_hole_cover1.jpg157.1 KB · Views: 57
 -
 steering_box_hole_cover2.jpg182.2 KB · Views: 58
 -
 steering_box_hole_cover3.jpg155 KB · Views: 59
 -
 steering_box_removed1.jpg144.7 KB · Views: 58
 -
 steering_box_removed2.jpg132.3 KB · Views: 58
 -
 steering_box_removed3.jpg135 KB · Views: 59
 -
 bolt_sealant1.jpg115.9 KB · Views: 59
 -
 bolt_sealant2.jpg103.4 KB · Views: 61
 -
 bolt_sealant3.jpg99.2 KB · Views: 61
 -
 box_ready_to_install.jpg155.3 KB · Views: 62
 -
 center_marks.jpg184 KB · Views: 67
 -
 hose_at_frame_rail.jpg291.8 KB · Views: 66
 -
 new_box_installed1.jpg168.3 KB · Views: 62
 -
 new_box_installed2.jpg159.8 KB · Views: 61
 -
 46-0232-B.jpg143.5 KB · Views: 75


![[500Eboard] steering_box_leak2.jpg](/forums/data/attachments/136/136019-91c338f4b429c76dc2d76c7c3d7e2647.jpg?hash=kcM49LQpx2)


