Navigation
Install the app
How to install the app on iOS
Follow along with the video below to see how to install our site as a web app on your home screen.
Note: This feature may not be available in some browsers.
More options
Style variation
-
Hi Guest !
Welcome to the 500Eboard forum.
Since its founding in late 2008, 500Eboard has become the leading resource on the Internet for all things related to the Mercedes-Benz 500E and E500. In recent years, we have also expanded to include the 400E and E420 models, which are directly related to the 500E/E500.
We invite you to browse and take advantage of the information and resources here on the site. If you find helpful information, please register for full membership, and you'll find even more resources available. Feel free to ask questions, and make liberal use of the "Search" function to find answers.
We hope you will become an active contributor to the community!
Sincerely,
500Eboard Management
You are using an out of date browser. It may not display this or other websites correctly.
You should upgrade or use an alternative browser.
You should upgrade or use an alternative browser.
OWNER Prometey (E320)
- Thread starter Prometey
- Start date

Dave, I think there were some fitment issues/gap of the center section...With stock fenders, why did the bumper need modifications?
...but the center went sharp and there was a very large gap between the hood grille. Yes, and the edges have become splayed. It was decided to cut in the center in order to relieve tension. ...
AMG kit making my friends from Ukraine.I was going to ask you, with all the aftermarket parts you offer, if you doing any body updates/upgrades to your W124! Always liked the look of the late AMG styled bumpers!
I made this bumper based on amg gen2, but with some modifications for fog lights from golf 3.What bumper is that? The design looks similar to AMG Gen 2, but the fog lights are different.
I already did this on my previous w124
Smart choice, MK3 fogs are readily available, very similar look as MB, also projectors (or alternate variations if one chooses). and very very cost effective!I made this bumper based on amg gen2, but with some modifications for fog lights from golf 3.
HellaSmart choice, MK3 fogs are readily available, very similar look as MB, also projectors (or alternate variations if one chooses). and very very cost effective!
Attachments


Perfect! Correct me if I'm wrong, but original gen2 AMG bumpers using W202 C36/R129 Sport package (facelift) fogs (and those are stupid expensive). Your MK3 projectors are great looking alternative!Hella
yes, amg fog light fit to w124, w202 and w140. price from 200$ and more.Perfect! Correct me if I'm wrong, but original gen2 AMG bumpers using W202 C36/R129 Sport package (facelift) fogs (and those are stupid expensive). Your MK3 projectors are great looking alternative!
Kit hella golf3 I bought new - 60$ in Russia
Original Gen2 AMG bumpers use W140 AMG auxiliary high beam lamps (long range / pencil beam), designed for standard 124 lights, to provide 2 fogs and 4 high beams.Perfect! Correct me if I'm wrong, but original gen2 AMG bumpers using W202 C36/R129 Sport package (facelift) fogs (and those are stupid expensive).
If a Gen2 AMG bumper is used with E500E headlights, then it needs W202 AMG C36 bumper lights which are fogs (wide/low beam pattern), to provide 2 fogs and 4 high beams.
However you do NOT use C36 bumper lights with standard 124 lights, this results in 4 fogs and 2 high beams.
Same applies to aftermarket/VW lights, the beam needs to complement the main headlight assemblies.


It is the third month since I started the Prince's transformation.
Today:
— Painted brake discs and calipers;
— Installed discs EVO in its rightful place;
— Installed on the rear shelf curtain.
Finally started moving with the installation of body kit.
Today:
— Painted brake discs and calipers;
— Installed discs EVO in its rightful place;
— Installed on the rear shelf curtain.
Finally started moving with the installation of body kit.
Attachments
-
 87CF4603-FD09-408E-8452-348AC1FB335F.jpeg3.2 MB · Views: 3
 -
 445F02F8-FE2E-4445-B027-EEE91BF1BAB8.jpeg3.5 MB · Views: 3
 -
 DCE8928A-0AA9-482D-9625-E405DB68892E.jpeg3.1 MB · Views: 4
 -
 BDE52EF6-6685-48DA-BC74-6D23BE6D7DAF.jpeg3.8 MB · Views: 6
 -
 382DF21A-0BF4-45FB-9660-7F85AB0A5E04.jpeg4.5 MB · Views: 7
 -
 B64C5E34-5F69-4951-9523-E6D8C9DCB75C.jpeg4.1 MB · Views: 8
 -
 0E663A6A-E8AC-4C73-B4AB-AA733D0C1ECA.jpeg3.6 MB · Views: 5
 -
 604736D1-2AEB-4823-B9D6-3923EA9F7DB3.jpeg3.6 MB · Views: 3
 -
 2883CF2F-A5CC-43BA-81B2-93732D06447B.jpeg4.3 MB · Views: 4
 -
 53425CCA-6863-4E8F-9F36-13B78C760239.jpeg3.8 MB · Views: 5
 -
 937AD57C-9FAF-49EC-B31A-82533C059B92.jpeg4 MB · Views: 7
 -
 0FEB9B2B-135E-4DDE-9645-5326E06B66AE.jpeg3.4 MB · Views: 8
 -
 12E7335B-56EC-46E0-A0F3-0E67318FF4A4.jpeg3.9 MB · Views: 9


I first made myself door sills without illumination. but then I decided to still put it with a blue backlight)
Attachments
-
 B6213E63-D3CF-4CEC-94FF-0A30DB97BED2.jpeg4.3 MB · Views: 5
 -
 3F949638-28D2-4807-B5E2-783772224AF1.jpeg2.7 MB · Views: 6
 -
 1535AE00-B7A2-47BA-BC63-0EC377A621EE.jpeg4.4 MB · Views: 6
 -
 03518FD4-EAA9-45A6-A738-CA500FFABB94.jpeg3.9 MB · Views: 6
 -
 F63F03C5-C1E1-49F3-8CD9-A9CDBD46A58C.jpeg3.4 MB · Views: 5
 -
 D585F07A-EE85-4BE0-9447-7B4B9CAE5F1F.jpeg5.3 MB · Views: 7
 -
 6807A5CA-A560-47CA-AC41-7B44E5ECD6EA.jpeg4.8 MB · Views: 8
 -
 FB20CE26-7BF8-49D1-B5BE-15C089CBE6AF.jpeg3 MB · Views: 8

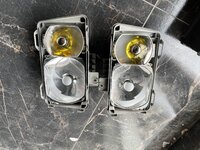
Worked on the headlights today.
Background...
I bought yellow caps for foglight reflectors on eBay. I began to study the issue of their installation, it turned out that without dancing with the button accordion, they are installed only on Bosch headlights.
I found a pair of Bosch headlights on eBay for the US market. (The difference from European ones: there is no vacuum headlight regulator and there is no hole for the size bulb - the dimensions are in the turn signals). As described "in excellent condition)...
The headlights came to me, and in them one mount was broken and the frames of the reflector mounts were also broken. Low beam reflectors didn't hold back from the word at all! I swore at the cunning German from eBay, but there is nothing to be done, there is no point in returning it.
I disassembled the Bosch headlights and sat on a chair, like a grandfather in a fairy tale with nothing. And began to think what to come up with. My Depo headlights lay next to me. I decided to disassemble them to compare the device. By observation, it was found that the device is very similar, and I decided to take a chance, disassemble the headlights to the spine, so to speak.
In general, I was pleasantly surprised that Depo copied Bosch headlights, and they are completely identical in design. The photo shows a comparison of the mounts. I broke the fragile mounts from the Bosch reflectors, removed the mounts from the Depo reflectors and replaced them. Luckily, everything came together in reverse order.
Next in line was the installation of yellow caps in foglight reflectors. He bent the mounts from the reflectors, took out the native caps and installed the caps in the reverse order.
The low beam reflector caps were not in very good condition, so they were cleaned, degreased and painted.
Then I washed the glass, washed the sealing gum and anointed it with silicone, wiped all the reflectors with a cloth for glasses.
Headlight assembled. It remains to solder the headlight mount from the donor and to the installation.
Attachments
-
 AC71DF07-B3F9-4EAC-A5B9-DAE548BA518B.jpeg3.4 MB · Views: 8
 -
 9149B4BF-EF78-4BEC-8F62-A7FC75556CF9.jpeg3.8 MB · Views: 11
 -
 221239B7-3410-4383-8D49-930C95D07EC7.jpeg3.5 MB · Views: 12
 -
 D82B93BC-9AD5-483C-B0A0-D7F107A736D5.jpeg2.9 MB · Views: 6
 -
 ACE53692-608B-49FD-8462-288AB57651DF.jpeg3.5 MB · Views: 6
 -
 5AA537E3-88AA-4965-A22E-E3A92E64E609.jpeg3.2 MB · Views: 5
 -
 4F36B1DC-66D7-40BA-AEDF-3CB9F4CE677D.jpeg3.1 MB · Views: 6
 -
 D9A1E9C3-B3E4-4902-8A84-AF1EE99E05AF.jpeg3.2 MB · Views: 6
 -
 0B512391-DD06-46EA-8E80-26201322DB51.jpeg3.5 MB · Views: 7
 -
 3AF4B464-68B9-4705-AF38-7111F4CFE56B.jpeg3 MB · Views: 7
 -
 B577732C-959B-4D39-93EB-577CC76208D8.jpeg3.7 MB · Views: 7
 -
 093B9BAE-8652-4B9F-B478-600095DE8EB3.jpeg3.9 MB · Views: 7
 -
 2F5196D6-8459-4546-B544-96B270485418.jpeg2.9 MB · Views: 7
 -
 9DAB18C8-89C9-41E8-BDA7-3E0EC87066EE.jpeg3.2 MB · Views: 7
 -
 75CC8021-CA00-41EE-B92D-C0964B1A6664.jpeg3.6 MB · Views: 7
 -
 AE505218-F34D-481B-A3C3-8C670C370158.jpeg3.9 MB · Views: 8
 -
 0BCEE07A-071C-47B4-B02B-28436ED414DD.jpeg3.8 MB · Views: 9
 -
 C7389DF8-83AA-4106-B08A-E7C156BB370B.jpeg3.6 MB · Views: 9
 -
 0482B1C8-3F5D-4D97-A5CB-1869B8C8107D.jpeg4.4 MB · Views: 13
And photo
Attachments
-
 3A4868C4-1F46-4BDF-B7C1-82AAA0DA7FB0.jpeg3.9 MB · Views: 4
 -
 A8E0198D-48FB-4C6E-9AF5-491514D08E4A.jpeg3.6 MB · Views: 4
 -
 81625313-FCDE-4064-8347-3B52C5A694BE.jpeg3.5 MB · Views: 4
 -
 83B5D88A-0F1A-4F2F-BDEB-15DD5CC0B369.jpeg3.2 MB · Views: 4
 -
 1FE20016-CE89-4962-BF45-C1C19A3D9FEB.jpeg3.2 MB · Views: 4
 -
 4AC6929F-1F6B-4F71-A193-DD110E8484A6.jpeg3.9 MB · Views: 4
 -
 A2FF81ED-2641-4DD1-A608-D07C1946F314.jpeg3.8 MB · Views: 4
 -
 86C8ECAA-8C8C-4FF3-825E-203A722D5835.jpeg3.9 MB · Views: 5
I'm already a little tired))Looking good, progress and progress!
?I need the help of those who have an electric blind and a third stop installed. Please measure the location of the third-party signal stand on the electric blind cover. distance from the edge of the lining to the stand.
Not sure I understand the dimension you need, can you draw lines on a photo or something?I need the help of those who have an electric blind and a third stop installed. Please measure the location of the third-party signal stand on the electric blind cover. distance from the edge of the lining to the stand.
Thank youNot sure I understand the dimension you need, can you draw lines on a photo or something?
Attachments


Does the third stop have to touch the rear window? or not required? Thank you.It's pretty close to centered but favors the forward portion. On my cars it's about 10-15mm at the front/roller blind side, 15-20mm at the rear/glass side. Difficult to measure! Only 2 screws were used on my car, not four.
View attachment 152894
I would like to install it correctly. but it is necessary to apply it in the assembled state, I don’t want to damage the third stop during the reverse analysis.
ideal if someone in the original versions would attach a ruler and accurately measure this distance. there is no such instance in my country.
The lamp assembly will touch the rear window when slid into place, there is a soft gasket/seal around the edge that touches the glass.
You install the base first (2 screws), then slide the lamp assembly into place.
The precise distance for the base screwed to the roller blind is not critical, as the lamp slides in/out and is held in place by serrations on the black plastic tabs. The distance is limited by the wiring since the holes must align and allow the wire to pass through. If your roller blind is not brand new, there should be existing holes where the original screws attached. Just use the old screw holes and everything should line up correctly.
the third stop was in my car without an electric blind. I bought a stand for the third stop of the version for the electric blind, installed the electric blind, there was no third stop on the bar, so there are no holes or marks for them.The lamp assembly will touch the rear window when slid into place, there is a soft gasket/seal around the edge that touches the glass.
You install the base first (2 screws), then slide the lamp assembly into place.
The precise distance for the base screwed to the roller blind is not critical, as the lamp slides in/out and is held in place by serrations on the black plastic tabs. The distance is limited by the wiring since the holes must align and allow the wire to pass through. If your roller blind is not brand new, there should be existing holes where the original screws attached. Just use the old screw holes and everything should line up correctly.
I'm not sure. I've never removed either the rear parcel shelf or the roller blind. I don't know where the wires are routed.Do I need to make a separate hole for the wire of the electric shutter?

Thank you. if the wires are not visible anywhere from the outside, then there is a hole inside)I'm not sure. I've never removed either the rear parcel shelf or the roller blind. I don't know where the wires are routed.
: падение:
reply to facebook)The lamp assembly will touch the rear window when slid into place, there is a soft gasket/seal around the edge that touches the glass.
You install the base first (2 screws), then slide the lamp assembly into place.
The precise distance for the base screwed to the roller blind is not critical, as the lamp slides in/out and is held in place by serrations on the black plastic tabs. The distance is limited by the wiring since the holes must align and allow the wire to pass through. If your roller blind is not brand new, there should be existing holes where the original screws attached. Just use the old screw holes and everything should line up correctly.
Attachments


Not sure if that will help but here is a horrible photo of the stop lamp in my car:
As @gsxr stated, the lamp sits up against the window, with the small rubber gasket pressing up against the glass. It also looks like the base is positioned so it sits against the kink in the deck forward of the rear edge.
As @gsxr stated, the lamp sits up against the window, with the small rubber gasket pressing up against the glass. It also looks like the base is positioned so it sits against the kink in the deck forward of the rear edge.
Attachments

Last edited:
You have a complete set without an electric shutter. what is most interesting in the rear shelf there are marks on the bottom to cut a hole for the electric blind and there are marks to cut out a place for the third stop. but there are no holes on the metal plate of the electric shutter. I read a lot of forums and watched the video, everyone put an eye on it). I want the distances to be as provided by the manufacturer. Thanks.Not sure if that will help but here is a horrible photo of the stop lamp in my car:
As @gsxr stated, the lamp sits up against the window, with the small rubber gasket pressing up against the glass. It also looks like the base is positioned so it sits against the kink in the deck forward of the rear edge.
many owners are looking for this information and follow my project. waiting for me to install the third stop along with the electric blind and also use this method. will be the first full record-instruction for their joint installation.)
Attachments


Plugged in an electric curtain. She stood with me for five years and still sticks a little when folded. With each lowering and raising, everything is easier and more evenly done. Didn't use headrest protection. Connected according to the standard factory scheme.
Get some silicone spray with a straw and lube the side rollers within the mechanism. That should resolve any blind sticking issuesPlugged in an electric curtain. She stood with me for five years and still sticks a little when folded. With each lowering and raising, everything is easier and more evenly done. Didn't use headrest protection. Connected according to the standard factory scheme.
Ok, thank youGet some silicone spray with a straw and lube the side rollers within the mechanism. That should resolve any blind sticking issues

Installed headlight wipers. I implemented their work through a separate button taken from the w124 station wagon.
Attachments
-
 D5E516A7-4811-4FE7-9491-5D12277C428A.jpeg3.8 MB · Views: 11
 -
 B9240655-966E-4AC4-BE45-E46EBE329798.jpeg3.8 MB · Views: 8
 -
 A8FA1B21-E942-459A-AAA3-0DBAED2274C0.jpeg4 MB · Views: 9
 -
 7B0164C5-C9B8-49E4-8AA9-1EFAC4D28EAB.jpeg5 MB · Views: 10
 -
 C943D77B-DEC6-472F-A49C-47AE94C05756.jpeg4.2 MB · Views: 13
 -
 64432CCE-27B6-4802-8ECF-935799CBE4CC.jpeg3.2 MB · Views: 11
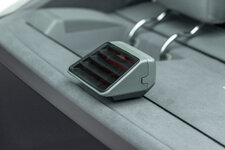
Post in thread 'Prometey (E320)'what is that 'gas can' switch to the right of the wiper switch?
OWNER - Prometey (E320) | Owners and Their Cars
It didn't translate well, but I think that's for an LPG conversion.what is that 'gas can' switch to the right of the wiper switch?

right, switches to two operating modes: gas [LPG/propane] or gasolineIt didn't translate well, but I think that's for an LPG conversion.
Last edited by a moderator:
removed the dark tinting film from the rear and rear side windows. pasted a mirror film 50%
Attachments
-
 92B7956B-09B9-4B80-A489-3B192B249825.jpeg3 MB · Views: 6
 -
 5E5FDE47-9817-4E0A-B97C-E833D9CCC503.jpeg2.2 MB · Views: 4
 -
 4CDB92BC-A6FC-490B-A322-1159C921C1FB.jpeg2.2 MB · Views: 4
 -
 6A8FC02F-1E6B-40E3-BDC5-E69BFC211A6B.jpeg3.4 MB · Views: 4
 -
 C152373D-ADCB-4929-B11F-FBF2E30CA460.jpeg2.6 MB · Views: 4
 -
 42FE80A9-D233-40AC-AF66-E4CD07E19D49.jpeg2 MB · Views: 6
 -
 FE578B40-24FF-4508-9280-B5859CFC4DD0.jpeg2.8 MB · Views: 6
Installation of the third brake light on the electric blind.
I began, therefore, to study the question of how the third brake light is installed on the electric blind cover. From the information I found one entry on the Russian-language forum, but the owner does not remember how he installed it, and then on the coupe. I also found a video on YouTube with a set stop, but there was no specific information anywhere.
I reviewed a bunch of photos from an Internet where a curtain and a third stop are installed, but visually, as if there are different distances everywhere.
It only remained to apply by eye, but I didn’t like this option because I had to assemble the entire system and disassemble it several times, for marking, drilling, etc., etc. Very fragile plastic and dreary.
Or… thanks to the internet and forums. On Russian-language platforms, the combination of a curtain and a stop is very rare, I turned to my Internet friends for help to measure the distance at which the support of the third stop stands. And one responded and sent the right photo with the right size.
By installation:
1. Determined the center on the bar, noted;
2. Marked the distance from the near edge to the beginning of the foot rest (stopped at 13 mm);
3. Marked the center at half time of the third stop;
4. Attached a stand and marked the necessary holes;
5. I drilled small holes for the self-tapping screws of the foot support;
6. With a rectangular hole for the plug, I messed around a bit: first, I drilled several holes with a large drill, then filed it with a file to the desired size, since the metal was soft and easily succumbed to grinding;
7. I screwed the stand to the curtain trim with screws;
8. Snapped the cover of the curtain to the curtain, after inserting the power plug.
Attachments
-
 9A34CDE4-A714-4151-9CB7-DE25275CFF04.jpeg3.5 MB · Views: 3
 -
 F8DED3D0-0988-456D-A759-EAB57D797359.jpeg3.4 MB · Views: 3
 -
 00004EF8-95FC-4761-B6AD-659EA9BFCC6B.jpeg6.2 MB · Views: 3
 -
 D10973B7-8909-4672-93B0-95576B180F8A.jpeg5.9 MB · Views: 3
 -
 9E86AC69-7C68-422C-8BC9-52E3F7AF913C.jpeg3.3 MB · Views: 3
 -
 82EABC6D-8960-4EC1-8396-695E620BDF22.jpeg1.6 MB · Views: 3
 -
 8E8939FA-B998-4EDA-A5F5-78B4DBD7E07F.jpeg4.7 MB · Views: 3
 -
 58CB4136-8485-438C-A800-B8E4B9CA8A52.jpeg4.1 MB · Views: 3
 -
 DE31CDAE-9F7A-464C-8419-8C49720D409B.jpeg3.4 MB · Views: 3
 -
 18CC3FF0-5B15-4A32-B1E8-E6E343178DFF.jpeg581.9 KB · Views: 3
 -
 3874500F-531B-4B5C-8A22-7DAE6DEFF7F5.jpeg602.6 KB · Views: 3
 -
 132B4575-A03F-42DF-BEBE-0444CAF55C4F.jpeg529.5 KB · Views: 3

I don't think there is a Mercedes color code for the silver paint used on wheels in the 80's and early 90's. (???) Search the forum, I think other people have mentioned that Würth has a paint which matches well?
1995 USA models all had the machined face with clearcoat, which would be nice to retain, but is difficult to refinish properly. I assume that's why you are painting instead.

1995 USA models all had the machined face with clearcoat, which would be nice to retain, but is difficult to refinish properly. I assume that's why you are painting instead.
these are 8J 16" wide rims from E500. They are machined and varnished. This is how I restored Evo rims. But I will use these rims only in winter, so I don't want to spend money on such a restoration.I don't think there is a Mercedes color code for the silver paint used on wheels in the 80's and early 90's. (???) Search the forum, I think other people have mentioned that Würth has a paint which matches well?
1995 USA models all had the machined face with clearcoat, which would be nice to retain, but is difficult to refinish properly. I assume that's why you are painting instead.
If you are not too particular, you can use Astral Silver (MB OE color) to spray paint your wheels.these are 8J 16" wide rims from E500. They are machined and varnished. This is how I restored Evo rims. But I will use these rims only in winter, so I don't want to spend money on such a restoration.
Similar threads
- Replies
- 6
- Views
- 1,813
- Replies
- 0
- Views
- 1,589