• Hi Guest !

    Welcome to the 500Eboard forum.

    Since its founding in late 2008, 500Eboard has become the leading resource on the Internet for all things related to the Mercedes-Benz 500E and E500. In recent years, we have also expanded to include the 400E and E420 models, which are directly related to the 500E/E500.

    We invite you to browse and take advantage of the information and resources here on the site. If you find helpful information, please register for full membership, and you'll find even more resources available. Feel free to ask questions, and make liberal use of the "Search" function to find answers.

    We hope you will become an active contributor to the community!

    Sincerely,
    500Eboard Management

OWNER jlaa (500E & w210 E320 & w220 S350)

They're truly the "Camry" of the Mercedes product line. I have two in the fleet right now but have owned a total of four at any given time. Great cars, very trouble-free, still easy to work on, and don't require anything special or fancy in most cases.

Welcome to the W210 Club!

Dan
 
I think you've done well on this W210, it's a lot of car for the money and plenty of life left in it! IMO, bullet proof engine and transmission combo! And as a bonus, junk yards have many of these for bits and pieces, and God knows MB made enough of them to get used parts if needed!
 
While I wait for the good stuff to arrive (shocks, brake pads, spark plugs, fuel/air/oil filters, tires, etc..) I decided to replace the HOT TOKYO NIGHTS Alpine radio. The previous owner had a "professional stereo shop" wire in this WIRING MONSTROSITY.

Just look at this HOT MESS 🤬 ---- KILL IT WITH 🔥🔥🔥.

Took me a few hours to correct this all ---- the cage was the most frustrating part of the install. Sounds good.

IMG_9900.jpeg IMG_9905.jpeg IMG_9910.jpeg IMG_9912.jpeg IMG_9913.jpeg IMG_9915.jpeg IMG_9920.jpeg IMG_9922.jpeg IMG_9925.jpeg IMG_9929.jpeg IMG_9933.jpeg IMG_9934.jpeg IMG_9935.jpeg IMG_9936.jpeg IMG_9940.jpeg
 
So with the Continental, do you retain factory steering wheel buttons without the need for an adapter?

maw
The Conti has a provision for steering wheel buttons but I believe this provision is more rudimentary (SWRC - resistive values) and not compatible with facelift 210s and CANBUS. So … my two buttons on the steering wheel …. Vol up/dn are useless now …… unless I figure some converter out…
 
Last edited:
Yes! On the topic of accumulating parts for it, I hope you are enjoying the Porsche leading edge hood foam for your w124 for your own hoarding purposes! :)

View attachment 178025 View attachment 178028 View attachment 178027 View attachment 178026
I'm fortunate that I replaced my foam center piece and rubber edge pieces with new MB product not that many years ago, when I lived in Texas. Mine is still in excellent condition all around, and I am grateful for this. The Texas climate is very very bad on soft parts, particularly foam and rubber items (think hood center pieces, serpentine belts, and so forth).

The wonderful Porsche-packaged leading edge hood foam, like the metal 500E tunk badges, front struts, jack-point lower-cladding covers, late front lower control arms, fuel tank level sender, transmission mount, headlight wipers, and many dozens of other parts is a long-term investment into the NLA parts world for the E500E. It is very fortunate that I have a large, shelved and organized basement in which to store these myriad parts in a fully climate-controlled environment.

Your front-end hood foam replacement will, however, never be fully complete without a full investigation into, removal, and replacement of all headlight bucket-area foam on your car. Also DO NOT FORGET the "MOT" valve for the fuel vapor control system -- yours has failed!!!
 
LOL! You know me better than that … it is new! 😎
You had better get out the 9V battery to double-check it!
200.gif

Also if you haven't replaced that vapor charcoal canister, you should. Those things bleed charcoal pellets into the MOT valves, rendering them useless.

P.S.
200.gif
 
Some Progress on the 210. Initial Oil Change. Mobil 1 0W-40 "Euro Car Formula" which meets MB 229.3 specifications. Note my Hazet filter wrench for my Sport Beetle works on the 210 filter housing. Replaced the junk O'Reily's Korean filter with a Hengst filter.

IMG_0001 Medium.jpeg IMG_0011 Medium.jpeg IMG_0013 Medium.jpeg IMG_0015 Medium.jpeg

Air Filter replacement - again Hengst. The existing air filter was an MB piece and actually looked to be in spectacular shape.

IMG_9994 Medium.jpeg IMG_9995 Medium.jpeg IMG_9997 Medium.jpeg

Fixed the POS sun visors / broken lid with w211 Turkish generic sun visor lids -- had to modify them a little with a dollop of hot melt glue on the switch and the actuating tab to make them light up.

IMG_0024 Medium.jpeg IMG_9984 Medium.jpeg IMG_9986 Medium.jpeg IMG_9985 Medium.jpeg IMG_0023 Medium.jpeg IMG_0022 Medium.jpeg
 
Last edited:
More w210 goodness. @RicardoD and I used my awesome sauce $35 spring compressor tool (being ultra facetious here but also somewhat relieved and surprised) and changed out the front shocks and front spring pads from 2pt to 1pt pads. In our usual style and in keeping with form, we underestimated the amount of time this would take by at least 1/4x. But the good thing is now we know how to use this internal spring-compressor to design now for the w124 (have only used external 2-clamp spring compressors before). Also got to use @RicardoD's awesome 5mmx8mm shock hold-the-rod tool.

IMG_0061 Medium.jpeg IMG_0062 Medium.jpeg IMG_0065 Medium.jpeg IMG_0066 Medium.jpeg IMG_0076-a Medium.jpeg IMG_0082 Medium.jpeg IMG_0084 Medium.jpeg IMG_0085 Medium.jpeg IMG_0086 Medium.jpeg IMG_0087 Medium.jpeg IMG_0088 Medium.jpeg IMG_0090-1 Medium.jpeg IMG_0094 Medium.jpeg IMG_0099 Medium.jpeg IMG_0100 Medium.jpegIMG_0108 Medium.jpeg IMG_0110 Medium.jpeg IMG_0111 Medium.jpeg IMG_0112 Medium.jpeg IMG_0124 Medium.jpeg
 
I have been working a lot on basic mechanical stuff on this w210, getting it ready for reliable daily operation. I find working on this car super enjoyable for two reasons. First, the car isn't worth very much so the anxiety level is super low going in to jobs that I am unfamiliar with / risk of breakage. Second, while working on this car, I marvel at how similar so many of the mechanical systems are both in layout and design with my 500E, and I am using this w210 as "practice" .... documenting all my jobs before doing the same on the 500E when it needs such service later on down the road.

Replaced front and rear brake pads. For the fronts I used low-dust Akebonos. For the rears I read about the Akebonos not fitting properly, so I used ATE Ceramic pads. No squeal and all have low dust. Interestingly, the front calipers are the single-piston sliding caliper design, whereas the rear are dual-piston.

IMG_0174 Large.jpeg IMG_0170 Large.jpeg IMG_0171 Large.jpeg IMG_0176 Large.jpeg

IMG_0279 Large.jpeg IMG_0278 Large.jpeg IMG_0267 Large.jpeg IMG_0266 Large.jpeg IMG_0265 Large.jpeg IMG_0269 Large.jpeg IMG_0262 Large.jpeg

Replaced rear shocks - Sachs OEM parts. Easy. I probably replaced the originals too soon. The originals still had pressure.

IMG_0215 Large.jpeg IMG_0216 Large.jpeg IMG_0228 Large.jpeg IMG_0230 Large.jpeg IMG_0253 Large.jpeg
 
Last edited:
Your solution for loosening/tightening the top of the shocks is clever, negating the need for the special tool referenced lately. Either I did not have the ratchet wrench with me or didn't think to use it when recently removing the same nuts tediously, with an open-end wrench.

The two chassis do have many similarities.
 
... Brake Fluid Flush --- documented results - fluid went from 1.2% to 0% moisture.

IMG_0290 Large.jpeg IMG_0378 Large.jpeg IMG_0387 Large.jpeg IMG_0385 Large.jpeg IMG_0393 Large.jpeg IMG_0410 Large.jpeg IMG_0411 Large.jpeg

Replaced fuel filter --- first time ever using these fancy ClicR hose clamp pliers. Of course I struggled with the right orientation while fuel poured out of the old fuel filter onto the garage floor. 🤦 I printed out the instructions and put them in the tool box next to the tool for next time.

IMG_0427 Large.jpeg IMG_0437 Large.jpeg IMG_0443 Large.jpeg IMG_0458 Large.jpeg IMG_0453 Large.jpeg IMG_0473 Large.jpeg
 
Yeah these Mercedes designs are "evolutionary" vs revolutionary, mainly because they almost always start with some Sonderklasse. And of course the 500E is in large part Sonderklasse. So 124, 126, 129, 140, 210, 220 will all be fairly similar when it comes to doing the work of servicing and replacing parts. I think you made a good decision with this car.

maw
 
Dropped transmission pan for the 722.6 "lifetime fluid" transmission 😂 and flushed out the transmission fluid using 13.5 liters of new fluid. I followed the advice of @LWB250 and @gsxr and another mutual friend and hooked up the line from the trans to the radiator using 1/2" inner diameter clear tubing to flush the trans fluid 2 quarts at a time by starting and running the car ~10 seconds at a time. I measured the ATF fluid with the special 722.6 measurement tool @ 25C and will drive the car more today and re-measure at 80C and top off if necessary.

IMG_0483 Large.jpeg IMG_0484 Large.jpeg IMG_0485 Large.jpeg IMG_0489 Large.jpeg IMG_0516 Large.jpeg IMG_0519 Large.jpeg IMG_0523 Large.jpeg IMG_0525 Large.jpeg IMG_0550 Large.jpeg IMG_0551 Large.jpeg IMG_0562 Large.jpeg
 
Last edited:
Your solution for loosening/tightening the top of the shocks is clever, negating the need for the special tool referenced lately. Either I did not have the ratchet wrench with me or didn't think to use it when recently removing the same nuts tediously, with an open-end wrench.

The two chassis do have many similarities.
Thanks. I used a cheaper special tool with the ratchet to hold the strut shaft - https://www.amazon.com/dp/B0C9WDZ7Z9

Screenshot 2023-11-26 at 9.00.28 AM.png

But yeah the flex head ratcheting wrench was GREAT to use instead of an open ended wrench on the nut. The long flex head ratcheting wrench was part of a set a picked up at @jhodg5ck ’s suggestion on this board some years ago!
 
Last edited:
NON-chlorinated brake cleaner? Really ?!?
He's in the PRK, Gerry! :teufel:

What jlaa is experiencing is the joy of working on a W210, the "Camry" of the Mercedes product line - at least the "standard" models. I dismissed these for years as I never cared for the "moony" looking headlights, but after I got my first one I couldn't stop. There are two in the fleet right now.

Dan
 
He's in the PRK, Gerry! :teufel:
I just came in from cleaning my boat's aluminum stern trim tabs. Heavily encrusted with a couple of (mostly ablated) layers of bottom paint + plenty of barnacles and marine growth.

Here's an "after" and "before" photo.
IMG_9266.jpeg

20 minutes and some light brushing in muriatic acid took care of all of it. Can you get muriatic / hydrochloric acid in the PRK?

Notice some slight corrosion along the top right (actually the port-side edge when mounted) and along the bottom (starboard-side edge when mounted) of the trim tab on the left. The tab will probably need to be replaced in a few seasons after it corrodes some more. Fortunately they are just sheets of aluminum, rolled at the edges. Not too expensive.

I love the smell of dissolving barnacles in the morning....
200.gif
 
He's in the PRK, Gerry! :teufel:

What jlaa is experiencing is the joy of working on a W210, the "Camry" of the Mercedes product line - at least the "standard" models. I dismissed these for years as I never cared for the "moony" looking headlights, but after I got my first one I couldn't stop. There are two in the fleet right now.

Dan
@LWB250,
Dan,
Explain what PRK means to a dumb person who lives here.:jono:
 
I was wiring the car for a rear view mirror monitor from @2phast for a backup cam ... and while waiting for that rear view mirror monitor, I decided "while I am in there" to wire up a control knob that came with my combo DSP/Amplifier that is in my trunk.

The knob is totally programmable in the DSP software settings and I programmed it to:

  • Inner Knob - Control the level of the 4x 6.5" midbass drivers in the doors (250 Hz and below)
  • Outer Knob - Control the level of the midranges and the tweeters together in the dashboard
  • Push on Knob - cycle between DSP presets as indicated by the LED which changes color. I so far have two presets - one which optimizes midbass delay L/R for the deepest bass for the driver of the car, and one which optimizes middbass delay L/R as a compromise-setting for all passengers in the car, no matter where they sit. I could make more presets corresponding to different colors --- but I will have to experiment.

Anyways - some notes -
  • The ashtray insert is made of some grey material that does not melt when dremeling it - it devolves into a powder. Hopefully not asbestos. 😅
  • The ashtray containment unit that flips in/out definitely melts when dremeling the black plastic behind the door.
  • 5mm thin plywood is too hard to make it look primo. Black flat paint helps. If I do a v2, I will use plastic or lexan and paint it flat black.
  • The knob requires CAT5 cable with RJ45 connections to connect to the DSP/Amp in the rear. I thought 15 feet would be enough. I was wrong. I have since learned from @jhodg5ck that he always uses 20 foot cable in the E500E when wiring up anything from the trunk. Thank goodness for RJ45 straight-through couplers.
  • The stupid white carpet clips work best using a tiny allen key to hammer them in. Don't just bash them in - they will deform.
 

Attachments

  • IMG_4918.jpeg
    IMG_4918.jpeg
    2.3 MB · Views: 12
  • IMG_4935.jpeg
    IMG_4935.jpeg
    1.8 MB · Views: 9
  • IMG_4945.jpeg
    IMG_4945.jpeg
    1.7 MB · Views: 7
  • IMG_4946.jpeg
    IMG_4946.jpeg
    2.1 MB · Views: 7
  • IMG_4947.jpeg
    IMG_4947.jpeg
    1.6 MB · Views: 7
  • IMG_4912.jpeg
    IMG_4912.jpeg
    1.7 MB · Views: 8
  • IMG_4916.jpeg
    IMG_4916.jpeg
    2.3 MB · Views: 10
  • IMG_4977.jpeg
    IMG_4977.jpeg
    1.8 MB · Views: 19
  • IMG_4985.jpeg
    IMG_4985.jpeg
    2.3 MB · Views: 18
  • IMG_4998.jpeg
    IMG_4998.jpeg
    2.6 MB · Views: 19
  • IMG_5003.jpeg
    IMG_5003.jpeg
    2.4 MB · Views: 17
  • IMG_5004.jpeg
    IMG_5004.jpeg
    2.4 MB · Views: 14
The w210 has been providing reliable daily operation. That said, the catalysts started rattling very loudly, so I did a little bit of digging --- the LHS catalysts were replaced in 2014 20K miles ago, but the RHS catalysts were original. Getting under the car and hitting the catalysts with my fist, I determined indeed it was the RHS catalyst that was rattling. I bought a complete RHS catalyst unit from MB (only $482 for a MB remanufactured unit after returning the core!!) and I lucked out even further as it appears I received a NEW part instead of a remanufactured part. Replacement of the RHS catalyst was straightforward and not even tedious - all the exhaust components came apart in this rust free car without hassle. Note the tool I had to rig up to get to the hard-to-access bolt where the downpipe connects to the exhaust manifold.
 

Attachments

  • EPC.jpeg
    EPC.jpeg
    632.6 KB · Views: 13
  • IMG_2230.jpeg
    IMG_2230.jpeg
    2.2 MB · Views: 12
  • IMG_2481.jpeg
    IMG_2481.jpeg
    2.2 MB · Views: 10
  • IMG_2489.jpeg
    IMG_2489.jpeg
    2.2 MB · Views: 10
  • IMG_2570.jpeg
    IMG_2570.jpeg
    2.3 MB · Views: 11
  • IMG_2584.jpeg
    IMG_2584.jpeg
    2.4 MB · Views: 10
  • IMG_2615.jpeg
    IMG_2615.jpeg
    2.6 MB · Views: 11
  • IMG_2626.jpeg
    IMG_2626.jpeg
    2.2 MB · Views: 13
  • IMG_2629.jpeg
    IMG_2629.jpeg
    1.5 MB · Views: 13
  • IMG_2640.jpeg
    IMG_2640.jpeg
    2.7 MB · Views: 14
  • IMG_2624.jpeg
    IMG_2624.jpeg
    2.6 MB · Views: 13
  • IMG_2639.jpeg
    IMG_2639.jpeg
    1.3 MB · Views: 13
Wow...so you have got yourself a w210? That is awesome. Car looks great..and i loooove the work you are doing :)
I havent checked out your thread in a while..but this was sure a fun and cool thread to come back to :) Greetings from the Norwegian Viking :)
 
The w210 interior fittings are not as robust as the w124 interior fittings. In particular, it seems that the plastic tabs that hold down the center console wood become fragile and brittle after repeated center console removal ... especially if the car sat in the hot sun for many years.

When I bought my w210, I observed that the previous owner / previous mechanics had attempted to secure the center console with strong double sided tape after breaking the clips. Of course this looked like azz and it didn't work very well as the double sided tape failed. As well, re-gluing the clips back to the original center console plastic frame that holds the center console wood proved impossible ---- the surface mating area for the clip is just too small to make a robust glue-repair job.

I figured out a way to glue the clip onto a wood block and then glue that block to the plastic frame --- much greater surface area for the glue to work. After several months, my center console wood has stayed in place and I am declaring success. Pictures below:
 

Attachments

  • IMG_2833.jpeg
    IMG_2833.jpeg
    3 MB · Views: 16
  • IMG_2809.jpeg
    IMG_2809.jpeg
    3.1 MB · Views: 16
  • IMG_2808.jpeg
    IMG_2808.jpeg
    3.1 MB · Views: 16
  • IMG_2807.jpeg
    IMG_2807.jpeg
    2.9 MB · Views: 16
  • IMG_2804.jpeg
    IMG_2804.jpeg
    2.2 MB · Views: 15
  • IMG_200 - 2.jpeg
    IMG_200 - 2.jpeg
    2.9 MB · Views: 13
  • IMG_200 - 1.jpeg
    IMG_200 - 1.jpeg
    2.9 MB · Views: 17
Today I learned about a Scuff Gauge.

In October I replaced by worn OE steering wheel with a recovered steering wheel obtained from a forum member. I was careful to align the teeth marks when swapping over the steering wheel from old to new.

IMG_9269.jpeg IMG_9229.jpeg

However, even though I was careful to do that, my steering wheel ended up being off just a little bit. It wasn't so far off that moving the steering wheel by one tooth would work though - that would have moved the steering wheel too much!

So I went to my favorite alignment place - Custom Alignment in Mountain View. There, they used a SCUFF GAUGE - I did not know this machine existed. I am such a whippersnapper! Apparently this machine was used for 2-wheel alignments a long time ago. The way it works is that you drive over the thing with your front wheels, which will cause those two little metal strips to both rotate and tilt. Somehow, completely mechanically, this then measure the difference in toe between the front wheels.

So the owner of Custom Alignment, Joe :

1) Road tested the car and confirmed that the steering wheel was off just a hair.
2) Drove over the scuff gauge to check toe
3) Adjusted the tie rods by 1/4 turn
4) Road tested the car again
5) Came back to the shop and checked the toe of the scuff gauge again
6) Adjusted the tie rods again by another 1/4 turn (1/2 turn total)
7) Road tested the car --- now the steering wheel was straight) !!

Scuff gauge here:

IMG_5209.jpeg IMG_5210.jpeg

Apparently this old old machine is a good way to check toe for 2 WHEEL alignments (cannot be used for 4 wheel alignments) and does not require setting up those lasers and reflectors and all that.


IMG_5205.jpeg IMG_5207.jpeg
 
Last edited:
The ladies in the family are out of town, so I decided to improve the stereo in my w210.

Firstly, I ripped out these JL Audio speakers ($129) that I installed in the front doors and installed these Rockford Fosgate ($99) speakers. All very inexpensive gear. The JL Audio speakers are absolutely terrible in the doors in this chassis. I have posted a video below where you can hear how terrible the JL Audio speakers are relative to the RF ones. My key learning here was --- always buy speakers from Crutchfield --- they have a 60 day return policy and I ended up getting a credit after returning the JL Audio speakers.

Video 1
Video 2

IMG_5339.jpeg IMG_5344.jpeg IMG_5345.jpeg IMG_5348.jpeg

Then I installed this MB Quart amplifier (4x50watt), replacing this Alpine Amplifier (4x45watt) installed by the previous owner.
The Alpine unit was terrible -- it would clip regularly on bass notes and used a 15 amp fuse (15 amps for 180W/13.5V = 13.3 Amps. Hmmmmm........ Inflated Specs?).
The MB Quart unit was less than $200, about 5x the size of the Alpine, and required a 40 amp (YIKES) fuse. It sounds much better because it doesn't clip.

IMG_5333.jpeg IMG_5304.jpeg IMG_5305.jpeg

Of course, my first attempts at installing the amplifier resulted the trunk hinge immediately crashing into it ---

IMG_5357.jpeg

So I had to get creative to save some space so that I could slide the thing forward more (wrestling that OE bracket in/out/in/out/in/out with the telematics module on top is kind of a PITA when I've already mounted 10 pounds worth of electronic gear on it) .....

IMG_5390.jpeg IMG_5391.jpeg IMG_5403.jpeg

An entertaining little project. That is all.

PS - I bought this hexagonal crimping tool for this project and it is a very satisfying tool to use to make nice wire ends.

IMG_5187.jpeg IMG_5190.jpeg IMG_5192.jpeg IMG_5201.jpeg
 
Last edited:
I installed a backup cam in my 500E. Finally! Thanks to @2phast for providing the display (rear view mirror)

I've wanted a backup cam on my 500E after getting used to this modern convenience ... but I always detested the aesthetics of cameras which are too bulbous and ungainly or the cams that protrude from the license plate frame like a big wart.

Screenshot 2024-06-16 at 10.06.07 AM.png 31BvAlZXH2L._AC_.jpg

What I really wanted is a backup cam that mounts in place of the rear license plate light like so ---- but no such premade device exists for a w124..... and the sample pictured below is still too bulbous anyways.

HTB1YZmDQFXXXXadXVXXq6xXFXXXl.jpg_640x640Q90.jpg_.jpeg

The issue with installing an OEM-like discreet backup cam is that there isn't enough room under the trunk handle of the prefacelift cars to mount a cam ---- the cam will always protrude rearward, proud of the handle, which is ugly. It was not until I reverted my 500E's trunklid from USA-spec to Euro-spec by deleting the USA license plate filler that I realized ---- there actually *is* room to mount a cam! The incremental 1/2" of depth gained by this reversion makes it possible!!

[500Eboard] IMG_2081.jpg [500Eboard] IMG_2089.jpg

See the room one has to work with here:

IMG_4600.jpeg

I obtained some spare license plate lights to butcher. I hogged out the middle to fit the body of this camera:

Screenshot 2024-06-16 at 10.28.28 AM.jpeg IMG_4634 Large.jpeg IMG_4641 Large.jpeg IMG_4656 Large.jpeg IMG_4668 Large.jpeg

I installed the camera in the light lens and used some JB Weld Steel Stick putty to space-down the camera because the circular camera body WILL NOT fit in the rectangular hole in the trunk lid meant for the light lens.

IMG_4677 Large.jpeg IMG_4683 Large.jpeg IMG_4688 Large.jpeg IMG_4721 Largeb.jpeg

I added back lighting functionality to the license plate light lens by hot-melt-gluing eight 1.8mm warm white LEDs (to approximate the original incandescent bulb color temp) into the lens. This produced a difference in light dispersion pattern between the left and right side lights (because the left side was still using the original incandescent festoon bulb), so I got another spare license plate light lens and modified that one to take eight warm white LEDs as well. Note that I had to disable the N7 bulb out warning relay to fit LEDs here.

IMG_4846 Large.jpeg IMG_4849 Large.jpeg IMG_5038 Large.jpeg IMG_5047 LargeCCC.jpeg IMG_8360 Large.jpeg IMG_8361 Large.jpeg IMG_8362 Large.jpeg

I wired the stuff up thusly .... and noted that I always have to put tape to mark where the plastic panel clips are on the back side of the trunk carpet ---- else I end up blindly pressing them in with my hand and breaking them. :-(

Installation of @2phast 's mirror was straightforward if somewhat tedious for the following reasons. Firstly, the mini-sun-visor, which is not supposed to have been re-installed by the dealer when installing the ceiling phone console (but I kept anyways because I like it) just makes things more fiddly to access. Secondly, the base plastic plate for the ceiling phone console was brittle and cracked along the mounting holes --- so steel washers + more JB Weld Steel Stick to the rescue:

IMG_5329 Large.jpeg IMG_5332 Large.jpeg IMG_5660 Large.jpeg IMG_5670 Large.jpeg IMG_5671 Large.jpeg

I used a set of Knipex water pump pliers (which I learned about here!) to compress the mirror's spring to insert the mirror mounting tool ... always so fiddly for me. I had to hog out the mounting plate for the review mirror because there's so little space up there and the rear view mirror with display just introduces more wiring bulk. So fiddly. Also I'm not really sure what the best way to grind cast aluminum is. My grinding wheels always get clogged with a thin film of aluminum when I run the wheels quickly. Running the wheels slowly seems to work better, but ugh, so tedious and takes so long. Somebody must know of the proper way (I must be doing it wrong.)

Anyways ---- all done!

IMG_5678 Large.jpeg IMG_5668 Large.jpeg IMG_5680 Large.jpeg IMG_5681 Large.jpeg IMG_5682 Large.jpeg
 
Last edited:
Today I learned about a Scuff Gauge.

In October I replaced by worn OE steering wheel with a recovered steering wheel obtained from a forum member. I was careful to align the teeth marks when swapping over the steering wheel from old to new.

View attachment 192806 View attachment 192807

However, even though I was careful to do that, my steering wheel ended up being off just a little bit. It wasn't so far off that moving the steering wheel by one tooth would work though - that would have moved the steering wheel too much!

So I went to my favorite alignment place - Custom Alignment in Mountain View. There, they used a SCUFF GAUGE - I did not know this machine existed. I am such a whippersnapper! Apparently this machine was used for 2-wheel alignments a long time ago. The way it works is that you drive over the thing with your front wheels, which will cause those two little metal strips to both rotate and tilt. Somehow, completely mechanically, this then measure the difference in toe between the front wheels.

So the owner of Custom Alignment, Joe :

1) Road tested the car and confirmed that the steering wheel was off just a hair.
2) Drove over the scuff gauge to check toe
3) Adjusted the tie rods by 1/4 turn
4) Road tested the car again
5) Came back to the shop and checked the toe of the scuff gauge again
6) Adjusted the tie rods again by another 1/4 turn (1/2 turn total)
7) Road tested the car --- now the steering wheel was straight) !!

Scuff gauge here:

View attachment 192808 View attachment 192809

Apparently this old old machine is a good way to check toe for 2 WHEEL alignments (cannot be used for 4 wheel alignments) and does not require setting up those lasers and reflectors and all that.


View attachment 192810 View attachment 192811
Uh, I resemble those remarks! I can recall being trained on one of these when I was in technical school. Even then it was a bit dated, but we had some old-school instructors that could show you stuff that was never documented, like handed down from one generation to another. The guy that did automatic transmissions was a wizard - he knew exactly what every little ball in the valve body did, and what it took to add/remove clutch discs in the clucthes to get better shifts...

Old technology is a great thing, and often amazingly simple! What we really need is to make sure the knowledge on how to properly use it is recorded and/or handed down.

Dan
 
Last edited:
Uh, I resemble those remarks! I can recall being trained on one of these when I was in technical school. Even then it was a bit dated, but we had some old-school instructors that could show you stuff that was never documented, like handed down from one generation to another. The guy that did automatic transmissions was a wizard - he knew exactly what every little ball in the valve body did, and what it took to add/remove clutch discs in the clucthes to get better shifts...

Old technollogy is a great thing, and often amazingly simple! What we really need is to make sure the knowledge on how to properly use it is recorded and/or handed down.

Dan
I know right? If I ever move / build a new house, I'm gonna try and install one of these scrub gauges into my garage! 😅
 
Well, I now have an officially licensed car-driving-teenager in the family. When I was 16, I and all my friends rushed as fast as possible to get a driver's license. However, these days, I have realized that many teenagers have no interest whatsoever in driving --- and doubly so for teenagers that grow up in dense urban areas. I am fortunate that my teenager desires to drive (even though my kid is not a gearhead...)

Well, my kid's car went kaput a week or two ago. See the below video. Look at that water pump pulley wobble and listen to that clanking!!!! @jhodg5ck advised me that "this is about the worst I have ever seen!!" .... and I don't think that was a compliment. 😅. Note that this water pump was original to my 2002 E320 with 63K miles on it. It sure seems like a short-lifespan for this thing!


Here is the play in the water pump bearing with the belt and pulley removed. @LWB250 and @gsxr advised to me to change it immediately.


I ordered a HEPU water pump, LITENS tensioner, INA idler pulley, WAHLER thermostat, and GATES serpentine belt from RM European. Much to my chagrin, after waiting all week for the my order to arrive from Pompano Beach, FL, to California, I received my order on Friday afternoon only to discover that the HEPU pump was broken.... no doubt due to poor packaging.

IMG_8132 Large.jpeg IMG_8133 Large.jpeg

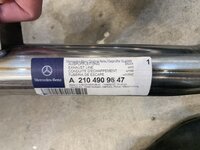
RM European Customer Service closes at 1pm Mountain Time on a Friday so .... my plans for replacing the water pump this weekend were dashed. My local independent to the rescue --- (Junipero Serra Porsche / MB) --- I bought a LASO water pump that they had on the shelf at 4PM on Friday afternoon -

IMG_8134.jpeg IMG_8135.jpeg IMG_8143.jpeg IMG_8144.jpeg

I drained out 8.25 qts of coolant (service records show it was last replaced by the previous owner @ 52K miles in 2017). My 2021 pandemic purchases of Zerex G05 and power-ratchet (which I have never really used) came in handy here. The water pump has 18 bolts and the klunky but value-priced Ryobi power ratchet saved me a ton of time.

IMG_8287.jpeg IMG_8289.jpeg IMG_8164.jpeg IMG_8199.jpeg IMG_8251.jpeg

Note the play in the bearings / impeller shaft of the OE pump ---- it was TERRIBLE!!! 😖


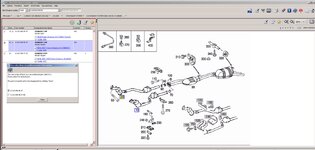
Having the WIS / EPC in a virtual machine ---- an esoteric tool that I would have never been able to obtain and learn to use had it not been for all the wonderful advice on this board ---- was invaluable in looking up bolt torque specifications.

IMG_8268 Large.jpeg IMG_8244 Large.jpeg IMG_8275 Large.jpeg IMG_8276 Large.jpeg

I carefully put everything back together and tapped two holes on the new pump housing for a bracket. These water pumps come with two gaskets - a rubber seal and a flat metal gasket - you must use one or the other, depending on what came with your car. My car came with the flat metal gasket.

IMG_8235 Large.jpeg IMG_8266 Large.jpeg IMG_8224 Large.jpeg IMG_8228 Large.jpeg IMG_8231 Large.jpeg IMG_8238 Large.jpeg

I only made one mistake which wasted an hour when I had to uninstall and re-install the new water pump:

IMG_8271.jpeg

Well, now I have a properly functioning water pump without any leaks and a new a smooth idler pulley and tensioner!!

IMG_8286.jpeg

 
Last edited:
Back
Top