• Hi Guest !

    Welcome to the 500Eboard forum.

    Since its founding in late 2008, 500Eboard has become the leading resource on the Internet for all things related to the Mercedes-Benz 500E and E500. In recent years, we have also expanded to include the 400E and E420 models, which are directly related to the 500E/E500.

    We invite you to browse and take advantage of the information and resources here on the site. If you find helpful information, please register for full membership, and you'll find even more resources available. Feel free to ask questions, and make liberal use of the "Search" function to find answers.

    We hope you will become an active contributor to the community!

    Sincerely,
    500Eboard Management

OWNER jlaa (500E & w210 E320 & w220 S350)

Wow! Whats the first thing you will clean? AND, knobs not digital keypad - smart man!!!
Well it turns out that the first thing I cleaned were heater hoses and metal heat / tube assembly on my 993! I had been procraaaaaaaaastinating like crazy to change the oil on this thing, and this is the year that I decided I should do it myself.
Now I know why professional shops charge $350+ (only labor - no parts!) to change the oil on these thing.

GEEZ! Remove rocker panel, drain oil tank, jack up right rear, remove RR wheel, remove and replace tank filter, re-install rocker panel, re-install RR wheel, put car back on ground, raise car with lift, remove L heat exchanger assembly, remove R heater hose, drain engine case, remove oil return tube, Instantly regret it because of re-recreation of Exxon-Valdez, remove and replace engine case oil filter, replace two o-rings in oil-return tube and re-install, assemble everything back together, put in 8 quarts of oil, remove Motronic relay and crank engine but don't start engine, replace Motronic relay, start car and wait for oil temp to get high enough to open oil cooler / oil cooler lines, shut off engine, add another 2 quarts of oil, re-start car, let engine idle, check dipstick while engine running ---- ok done! It took me EIGHT HOURS (including cleanup)

:omg:

Finally changed the oil after 18 months and 1400 miles. I'm gonna send the old oil to Blackstone to see if my 18 month interval was kosher or if it was bad juju. Bonus - Got to use my new ultrasonic cleaner AND my new Hazel oil filter wrench. I blame @RicardoD for spoiling me with his vast array of Hazet tools.

Note Bene - I changed the oil on the Toyota yesterday. That took me one hour. 😂

PS - new Mahle filter was made in China. Although I have no qualms whatsoever about where the filter was made (as long as it was made to Mahle specifications / processes), I was mentally disappointed.

IMG_5708.jpeg IMG_5720.jpeg IMG_5724.jpeg IMG_5735.jpeg
IMG_5737.jpeg IMG_5763.jpeg IMG_5765.jpeg IMG_5767.jpeg IMG_5770.jpeg IMG_5774.jpeg IMG_5779.jpeg
IMG_5790.jpeg IMG_5791.jpeg 848CAEA7-0912-4385-A67A-D2DABE819B25.jpeg 9212AD80-D3AF-4C28-96D4-8EC3211BAF2C.jpeg IMG_5796.jpeg
 
Last edited:
No after shots of the orange tubies in the zzz zzz machine!?!! Mean!
Heh. They got cleaner but not 100% clean. I think the machine did a better job on the metal pieces than the (silicone?) soft orange pieces. I cleaned them for 2x 30 min cycles and about 160F heat. All I used was water and some car wash soap. It looks like there's a learning curve to the ultrasonic cleaner.

I DID pour out THIRTY LITERS of ultra black water from the machine, so I know it got cleaner --- just not perfect. I wonder if I should have cleaned it for *hours* or used a different solution. Before and after below:
 

Attachments

  • IMG_5765.jpeg
    IMG_5765.jpeg
    3.7 MB · Views: 25
  • IMG_5786.jpeg
    IMG_5786.jpeg
    2.8 MB · Views: 25
Finally changed the oil after 18 months and 1400 miles. Im gonna send the old oil to Blackstone to see if my 18 month interval was kosher or if it was bad juju.
Jlaa, I'd expect the interval is fine, assuming TBN is above 1.0 level. I have yet to read a logical explanation why there's a time limit at all for oil changes. FWIW, once I had oil in an M119 for almost a decade (and 4kmi) between changes - the car was in storage most of the time, with exercising every year or two. Analysis came back with flying colors. With Red Line at >$16/gal now, I may be pushing OCI's further out... shoot, for yours, I probably would have gone another couple of years!

:hornets:
 
I DID pour out THIRTY LITERS of ultra black water from the machine, so I know it got cleaner --- just not perfect. I wonder if I should have cleaned it for *hours* or used a different solution.
Certainly is an improvement, but overall, maybe a different solution is needed? Particularly for the orange sections?
 
GEEZ! Remove rocker panel, drain oil tank, jack up right rear, remove RR wheel, remove and replace tank filter, re-install rocker panel, re-install RR wheel, put car back on ground, raise car with lift, remove L heat exchanger assembly, remove R heater hose, drain engine case, remove oil return tube, Instantly regret it because of re-recreation of Exxon-Valdez, remove and replace engine case oil filter, replace two o-rings in oil-return tube and re-install, assemble everything back together, put in 8 quarts of oil, remove Motronic relay and crank engine but dont start engine, replace Motronic relay, start car and wait for oil temp to get high enough to open oil cooler / oil cooler lines, shut off engine, add another 2 quarts of oil, re-start car, let engine idle, check dipstick while engine running ---- ok done! It took me EIGHT HOURS (including cleanup)

:omg:
Thank you for the visuals... Makes me appreciate 15 pumps and walk away for MB cars ever so much!!! :jono:
 
Last edited:
Heh. They got cleaner but not 100% clean. I think the machine did a better job on the metal pieces than the (silicone?) soft orange pieces. I cleaned them for 2x 30 min cycles and about 160F heat. All I used was water and some dish soap. It looks like theres a learning curve to the ultrasonic cleaner.

I DID pour out THIRTY LITERS of ultra black water from the machine, so I know it got cleaner --- just not perfect. I wonder if I should have cleaned it for *hours* or used a different solution. Before and after below:
interesting. I would have expected a better result. I'm wondering if the dish soap (while great on your hands...) just isn't enough for the grease.

You've got a big boy there, but I typically just use 100pct SGE in mine. Things typically come out clean enough to eat off of.
 
I had Brad Penn dino oil in my 560SEC which sat in my driveway undriven for 2.5+ years - changed the oil not too long after recommencing daily-driving it and the TBN was just fine, zero ill effects. I have to agree - I have yet to see why there is a time limit on oil, especially if it is not near the point of needing to be changed and laden with combustion by-products and contaminants.
 
Certainly is an improvement, but overall, maybe a different solution is needed? Particularly for the orange sections?

interesting. I would have expected a better result. Im wondering if the dish soap (while great on your hands...) just isnt enough for the grease.

Youve got a big boy there, but I typically just use 100pct SGE in mine. Things typically come out clean enough to eat off of.
Actually I mistyped my message and indicated that I used dish soap when I had actually used car wash soap. OK Next time I will upgrade from car-wash soap to dish-soap (cuts grease/fat better?) and see what happens ..... before I splash out the money on Simple Green Extreme. Thanks.
 
I had Brad Penn dino oil in my 560SEC which sat in my driveway undriven for 2.5+ years - changed the oil not too long after recommencing daily-driving it and the TBN was just fine, zero ill effects. I have to agree - I have yet to see why there is a time limit on oil, especially if it is not near the point of needing to be changed and laden with combustion by-products and contaminants.
Cool. I will report back the findings / TBN from Blackstone Labs....
 
Install looks top notch. Please share your cleaning experiences and cleaning solutions that work.

I need to clean out my tank after my BMW project is finished. Also my regular parts washer is so junked up with oil. I need to take it outside now, let the water evaporate, and then clean up the sludge with paper towels and dispose. The pump in my parts cleaner is jammed up. Need to take that apart now what is going on.
 
I need to clean out my tank after my BMW project is finished. Also my regular parts washer is so junked up with oil. I need to take it outside now, let the water evaporate, and then clean up the sludge with paper towels and dispose. The pump in my parts cleaner is jammed up. Need to take that apart now what is going on.
The takeaway from this, appears to be that BMW goo will gunk up your pumps!! :run:

:nobmw:
 
The dish soap should work significantly better. Car soap is formulated weak to avoid stripping wax.
You are right! See below. This post is titled - MURPHY'S LAW STRIKES AGAIN!
Back in February, @RicardoD helped me replace the clutch slave cylinder in my sport beetle. I have one of the "993" variety and @RicardoD has one of the "964" variety and he looked at his clutch slave cylinder and access didn't look to bad, do we decided to both buy the same aftermarket clutch slave cylinder (bigger piston, more fluid displacement, more pedal travel for same amount of clutch actuation = more easily modulated clutch and less effort).

Anyways we started with my car in Feb. BAD IDEA. My "993" has a shit-ton more suspension links in the back than Ricardo's "964" variety and access is a frolicking pain in the butt 'cos the thing is buried near the centerline of the car up at the top of the transmission and no one's arms are long enough to reach through all those gotttdam suspension links so the only way to access it was to go from underneath, BLIND, and totally by feel. Look for the red thing.

IMG_5822b.jpeg IMG_5822e.jpeg IMG_5822g.jpeg

So in my infinite, excuse, completely finite wisdom, I decided I never wanted to touch that damn thing again, and since bleeding the clutch requires touching it, I decided to extend the bleeder screw with a bleeder -> 3AN adapter and then run a 3 foot 3AN line to the engine bay in the back with a bleeder screw so that bleeding the clutch would be easy --- in the engine bay.

I ordered an aluminum bleeder -> 3AN adapter (cuz the clutch slave cylinder is aluminum) and I figured I was being clever, I mean idiotic, by avoiding dissimilar metal corrosion. I figured it would take me two hours max to take off the bleeder screw, screw in the aluminum adapter, then screw in the 3AN line and route it to the engine bay. You can see where this is going right?

I first screwed in the adapter with the slave installed in the car. Then I screwed in the 3AN line to the adapter.

IMG_5826.jpeg IMG_5831b.jpeg

OF COURSE HOLY MOTHER OF %$@%$@%!!!! What happened was that I was doing everything blind. I should have used two wrenches when screwing in the 3AN line - one to hold the aluminum adapter and one to crank down the 3AN line. But I didn't do that. I just cranked the 3AN line hex, which also rotated the adapter, which is aluminum and therefore soft, and it sheared off with a pice LEFT INSIDE THE SLAVE CYLINDER!!! ARGH.

So I had to uninstall and reinstall the clutch slave cylinder again. Myself. @RicardoD graciously texted me throughout the whole ordeal offering encouragement. The one thing I vowed never to do - to touch that damn slave again - I had to do .... because I had embarked on a project to avoid touching it!!!!!
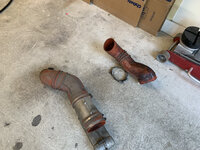
Anyways, I learned some tricks, like taking out the steel heater hose which gave more access. I was lucky and the adapter remnant came out easily:

IMG_5835.jpeg IMG_5836.jpeg IMG_5840.jpeg IMG_5841.jpeg

And look here @sheward and @a777fan and @Duh_Vinci ---- DISH soap works GREEEAAAATTT in the ultrasonic cleaner ! It took off almost all the cosmoline!

IMG_5853a.jpeg IMG_5853b.jpeg

And DISH SOAP cleaned up my engine under tray mounting bracket!

IMG_5822z.jpeg IMG_5825.jpeg IMG_5825b.jpeg IMG_5825c.jpeg

So now I tossed the alu adapter and used a steel one instead, dissimilar metal corrosion be damned:

IMG_5850.jpeg IMG_5852.jpeg

And I reinstalled in back in the car --- leaning from Ricardo's texts all the way --- this time cocking the slave cylinder on the threaded mounting studs so that it wouldn't shoot off in space with the internal spring (all blind):

IMG_5857.jpeg IMG_5858.jpeg

Of COURSE the 3AN line I ordered was too short:

IMG_5861b.jpeg

Which means now I need to order an additional 21" of line (NFW I am removing that slave cylinder again to install a longer line) and install the extension with a male 3AN to male 3AN adapter. Sigh.....
 
@Jlaa, What a clever boy! Looks like you’ve got it beat this time. Hopefully it’s the last time. See how much you’ve learned. Keep slugging you’re almost there.:)
 
Some progress notes.... Shiny heater tooooobz from the zzzzzzzz machine! It makes quick work of cosmoline!

IMG_5899.jpeg IMG_5900.jpeg IMG_5901.jpeg IMG_5904.jpeg

Fixed driver's door rattle that has been bugging me, with increasing irritation, for a decade ..... after 2 unsuccessful attempts at locating the rattle over the past 6 years, I finally got it! The issue was OE sound damping in the driver's door that curled up over time, and would make contact w/ the window mechanism in bumpy roads. I got to break out the new tub of MB gleitpaste to lubricate the windows tracks.

IMG_5942.jpeg IMG_5947.jpeg IMG_5950.jpeg IMG_5951.jpeg IMG_5956.jpeg IMG_5963.jpeg IMG_5970.jpeg IMG_5971.jpeg IMG_5972.jpeg IMG_5975.jpeg

Finally got the remote clutch slave cylinder bleeder all squared away after obtaining another 21" -3AN line and male-to-male -3AN coupler to extend my 36" -3AN line that I ran from the slave cylinder bleeder outlet. Works great! I bled the slave cylinder with not a single drop of brake fluid spilled. See my lazy-man's battery-pump WET power-bleeding setup.

IMG_6083.jpeg IMG_6071.jpeg IMG_6029.jpeg IMG_6037.jpeg IMG_6039.jpeg
 
Jlaa, Id expect the interval is fine, assuming TBN is above 1.0 level. I have yet to read a logical explanation why theres a time limit at all for oil changes. FWIW, once I had oil in an M119 for almost a decade (and 4kmi) between changes - the car was in storage most of the time, with exercising every year or two. Analysis came back with flying colors. With Red Line at >$16/gal now, I may be pushing OCIs further out... shoot, for yours, I probably would have gone another couple of years!

:hornets:

I had Brad Penn dino oil in my 560SEC which sat in my driveway undriven for 2.5+ years - changed the oil not too long after recommencing daily-driving it and the TBN was just fine, zero ill effects. I have to agree - I have yet to see why there is a time limit on oil, especially if it is not near the point of needing to be changed and laden with combustion by-products and contaminants.

Cool. I will report back the findings / TBN from Blackstone Labs....
Well, w/ 18 months and ~1400 miles on the Mobil-1 15W-50, the oil analysis came back with ....... flying colors. Next time I will try changing the oil at 4000 miles and however-long-that-is. Note TBN of 6.8 and strong Zinc numbers.

Screenshot 2023-04-28 at 8.01.10 PM.jpeg
 
This bracket has always bothered me in all of its disgusting crudeness and rustiness.
I dont know why these brackets seem to disintegrate more quickly than the rest of the car but .... I had to do something about it.

Yuck:
View attachment 163479 View attachment 163482

Of course what is any project, no matter how straightforward / simple, without some aggravation. Reverse drill bit to the rescue:
View attachment 163478 View attachment 163477 View attachment 163476

Removed - look at all that grossness!
View attachment 163475 View attachment 163481

After wire wheel, some grinding stone, and brake parts cleaner:
View attachment 163474 View attachment 163480

Painted with rustoleum rust converter, hit with a heat gun to accelerate drying, then VHT brake caliper paint, then more heat gun, then install. Much better. Ignore the corroded nuts --- waiting on those for delivery. But I wire wheeled the rest of the hardware and used anti seize this time around. Little wins made possible by QuickJack!
View attachment 163473 View attachment 163472

Love this! Had a similar rusty bracket holding a hose in my 560SEC. Small, but stuck out like a sore thumb to me. 20 minutes of wire wheel plus spray paint and Im sleeping easy at night. Paint the back of the fence, as Steve Jobs Dad used to tell him...

While working, Paul shared a piece of advice with Jobs: “Youve got to make the back of the fence, that nobody will see, just as good looking as the front of the fence,” Isaacson told “60 Minutes.” “Even though nobody will see it, you will know, and that will show that youre dedicated to making something perfect.”

Nice. I should point out that I wire-wheeled these nuts to remove corrosion. I dont know if wire-wheeling these removes any plating on these either, so Ive ordered new nuts too. When I receive the new nuts as well as the two new copper nuts that bolt onto the exhaust, I will drop and clean the cast aluminum transmission support bracket too.

View attachment 163530 View attachment 163531 View attachment 163532 View attachment 163533
Okay I finally received the extra trans mount bracket captive dual stud thing (129-490-00-44) and the nuts that go with it (140-990-07-50). I put it on and it is kind of disappointing because it feels like MB cheaped out on all the supersessions. The original nuts had copper sealing surfaces, if not entirely copper. The replacement nuts have no copper on them whatsoever (but have a larger mating surface). Copper is nicer. Oh well. I used some copper anti-seize on the nuts and it does look nice...

IMG_6458 Large.jpeg IMG_6461 Large.jpeg IMG_6463 Large.jpeg IMG_6462 Large.jpeg IMG_6465 Large.jpeg IMG_6466 Large.jpeg IMG_6468 Large.jpeg
 
I had the interior wood refinished in December 2016. The work was great. However, the vinyl backing for the rear console wood tambour door had become unglued and fell off. I think the glue they used was not compatible with the vinyl backing they used. That's the only reason I can think of --- the car is basically a garage queen in a climate controlled garage in a corner of the country that is basically always between 55F and 80F. The car never bakes in sunlight or heat.

The vinyl backing is important because it holds all the little strips together. Actually, the strips were still being held together by the glue that they had used to glue the vinyl to the strips..... all the glue had stayed on the strips and the vinyl had fallen off ---- and it was clear to me that none of the glue had stayed stuck to the vinyl. But, the only thing holding the strips together was the glue itself ---- there was no "rebar" (in this case the rebar would have been the vinyl backing) to give the glue any tensile strength.

I emailed Madera for help a few days ago but they didn't reply. Being too busy to chase them down by phone, I was annoyed and decided to just fix this sh*t.

Anywaysl because the vinyl fell off, there was no way for me to slide the tambour around 180 degrees to release the wood tambour from the plastic console because the vinyl would jam the movement of the tambour at the 180 degree u-turn. The only way to release the tambour was to cut the %$#@%$@# vinyl.

IMG_6659 Large.jpeg IMG_6681 Large.jpeg

After cutting the %$@%$@# vinyl I could release the tambour:

IMG_6678 Large.jpeg IMG_6677 Large.jpeg IMG_6675.jpeg IMG_6674 Large.jpeg

And then I as able to fashion my own "rebar" -- i.e. 5 layers of Frogtape painter's tape. Actually I think this is a perfect material for this application - thin, lightweight, and sufficiently strong enough for holding little strips of wood together. I bet this will adhere to the wood strips for a longer time than the vinyl. BTW you can see the 1/4" of black vinyl that still remains sandwiched between the black plastic the holds the first "master big strip" together......

IMG_6660 Large.jpeg IMG_6661 Large.jpeg IMG_6664 Large.jpeg IMG_6662 Large.jpeg
 
Ugh its been over 12 years since I did this and I cannot remember what adhesive I used but it is still holding fine. Also, it isnt a bad idea to lightly sand the edges of the wood that contacts the plastic. thousands of a 16th of a 10th of an inch is all it takes. The wood swells over the humidity and it can be tight. I also Q-tipped some gleitpast on the plastic channel and dry rubbed that wood a bit too - slides nicely.

Glad you found a solution that worked for you.
 
I have a spare front storage compartment tambour that has the same issue. I tried some sort of glue, i cant remember what, that would not bond to the vinyl. Thanks for the solution.
I want to say my 126 had fabric vs. vinyl and that I used contract cement to repair it once. Been too long to be sure.
I too have played around with this on replacement cubbies, when I converted the rear of the S55 to 4-seater look, a la .036. You have to be careful with the glues and fabrics because the glue can run and stick to the wood itself. I didn’t think of tape, but now that I see what @Jlaa has done it occurs to me there may be types of tape with spots of glue than can work for such a purpose. Madeira should be interested in this as a practice tip.

maw
Yeah having glue run was a concern of mine … that it would run and get into the little crevices between the slats. I thought about using 3M Super 77 spray used for medium duty upholstery work (I used it to glue down carpet in my sport beetle when I replaced all the carpeting) as a backup in case 5-layer-frogtape didn’t work.
 
This past weekend I replaced the motor mounts on my sport beetle. I have to give credit to @gsxr here for letting us all know about his ingenious procedure of using sockets as feeler gauges when trying to measure tight spots which are impossible to access with a normal measurement tool. I had purchased these motor mounts back in 2015 (when they were cheaper) and had procrastinated at installing them until 2023. Getting the Quickjack this past winter has enabled me to do all kinds of work that I would previously have been somewhat gun shy on doing with my not-very-tall jack stands. Anyways I should point out that OE Porsche hydraulic filled motor mounts are very expensive, and their prices seems to have really skyrocketed in the past decade as sport beetles have become fashion accessories for the Gram/TikTok/Reddit generation..... now people are hoovering up and fitting Üro mounts at $200/pair (instead of OE at $900/pair) which doesn't seem like a very good idea to me....

As sport-beetles are bass-ackwards cars, the mounts are in constant extension (as opposed to compression) and you have to lower the engine with a jack holding it up (as opposed to lifting the engine with a jack) to fit new mounts. One side was more irritating to do with more crap (nearly immovable AC lines) in the way.

IMG_6513 Large.jpeg IMG_6554 Large.jpeg IMG_6558 Large.jpeg IMG_6596 Large.jpeg


Here is the @gsxr approved method of measuring the amount of extension as-installed on old vs. new mounts:

IMG_6525 Large.jpeg IMG_6527 Large.jpeg IMG_6593 Large.jpeg IMG_6594 Large.jpeg

which resulted in me having to adjust to exhaust tips because the reduced engine-droop pushes the exhaust up in contact with the bumper:

IMG_6522 Large.jpeg IMG_6589 Large.jpeg

Also letting the motor "fall" a few inches allowed me to have room to disassemble and clean the idle stabilization valve, which was EZ to remove, but a bear to get back in because of all the tight rigid hose connections and lack of room. I had to take some notes to remind myself how to do it next time:

IMG_6533 Large.jpeg IMG_6536 Large.jpeg IMG_6569 Large.jpeg IMG_6582 Large.jpeg IMG_6583 Large.jpeg

Still loving the quickjack.

EDIT: I should also note that, with @gsxr as inspiration, I have also taken to keeping a photo-diary with annotation of all the work that I do to my cars for proper documentation so that I can refer to my work in the past when I want to remember how / what / when I did it. Some people write a journal / diary. I take pictures of DIY projects.
 
Last edited:
I had the interior wood refinished in December 2016. The work was great. However, the vinyl backing for the rear console wood tambour door had become unglued and fell off. I think the glue they used was not compatible with the vinyl backing they used. Thats the only reason I can think of --- the car is basically a garage queen in a climate controlled garage in a corner of the country that is basically always between 55F and 80F. The car never bakes in sunlight or heat.

The vinyl backing is important because it holds all the little strips together. Actually, the strips were still being held together by the glue that they had used to glue the vinyl to the strips..... all the glue had stayed on the strips and the vinyl had fallen off ---- and it was clear to me that none of the glue had stayed stuck to the vinyl. But, the only thing holding the strips together was the glue itself ---- there was no rebar (in this case the rebar would have been the vinyl backing) to give the glue any tensile strength.

I emailed Madera for help a few days ago but they didnt reply. Being too busy to chase them down by phone, I was annoyed and decided to just fix this sh*t.

Anywaysl because the vinyl fell off, there was no way for me to slide the tambour around 180 degrees to release the wood tambour from the plastic console because the vinyl would jam the movement of the tambour at the 180 degree u-turn. The only way to release the tambour was to cut the %$#@%$@# vinyl.

[ATTACH alt=IMG_6659 Large.jpeg]167621[/ATTACH] [ATTACH alt=IMG_6681 Large.jpeg]167620[/ATTACH]

After cutting the %$@%$@# vinyl I could release the tambour:

[ATTACH alt=IMG_6678 Large.jpeg]167622[/ATTACH] [ATTACH alt=IMG_6677 Large.jpeg]167623[/ATTACH] View attachment 167625 [ATTACH alt=IMG_6674 Large.jpeg]167624[/ATTACH]

And then I as able to fashion my own rebar -- i.e. 5 layers of Frogtape painters tape. Actually I think this is a perfect material for this application - thin, lightweight, and sufficiently strong enough for holding little strips of wood together. I bet this will adhere to the wood strips for a longer time than the vinyl. BTW you can see the 1/4 of black vinyl that still remains sandwiched between the black plastic the holds the first master big strip together......

[ATTACH alt=IMG_6660 Large.jpeg]167627[/ATTACH] [ATTACH alt=IMG_6661 Large.jpeg]167626[/ATTACH] [ATTACH alt=IMG_6664 Large.jpeg]167628[/ATTACH] [ATTACH alt=IMG_6662 Large.jpeg]167629[/ATTACH]
Funny, on my way back from California on Monday the exact same thing happened to my front stowage tambour door. Seems like Madera doesn’t do a proper job with that element when they refurb the trim (my pieces were redone in 2020). Will also go the painter tape route you outlined!
 
Finally I found a good use for the roof-mounted AMPS cellular phone control panel. I've been wanting to put a voltmeter in the car for some time...... so that I could:
  • Monitor voltage regulator output when driving - not too high (overcharge battery) or too low (undercharge battery).
  • Monitor battery charge when the car is OFF and not hooked up to the battery tender.
IMG_7355.jpeg IMG_7334 Large.jpeg IMG_7329 Large.jpeg

I popped out the LED status panel at the right of the unit, and then was able to file down the edges to pop in the generic voltmeter. As well, I drilled a hole where the microphone used to be for the on/off rocker switch and glued in the switch. The reason why I installed the rocker switch is because the voltmeter is pretty bright - I don't want it on all the time when I'm in the car, so the switch solves that issue.


At the same time, I didn't want to lose all the nifty backlighting for the phone membrane buttons. So, even though those buttons don't do anything, I hacked up a little circuit board (don't laugh at the crudeness or crappy soldering job) to light 6 AMBER/YELLOW LEDs in the same position as the original LEDs. In fact, I took this opportunity to change the LED color from stock green to AMBER/YELLOW to more evenly match the OE instrument lighting. The LEDs are also controlled by the rocker switch.

These are some pictures:

IMG_7300 1 Large.jpeg IMG_7300 2 Large.jpeg IMG_7303 2 Large.jpeg IMG_7304 Large.jpeg IMG_7305 Large.jpeg
IMG_7307 Large.jpeg IMG_7309 Large.jpeg IMG_7311 Large.jpeg IMG_7315 Large.jpeg IMG_7317 Large.jpeg
IMG_7320 Large.jpeg IMG_7323 Large.jpeg IMG_7326 Large.jpeg IMG_7327 Large.jpeg IMG_7331 Large.jpeg IMG_7329 Large.jpeg
 
Last edited:
Nothing too significant to report ... I have been hanging with the local w124 E500E Nerd Crew, replete hands on demos on disti cap diagnosis …. All made possible from the existence of this board through the efforts of @gerryvz ..

IMG_8631.jpeg IMG_8630.jpeg IMG_8622.jpeg IMG_8627.jpeg


… and HALLELUJAH! found an NLA part 124-542-22-40 ….. one of several brackets that have gone NLA years ago. I have been looking for this for some years now - it will prove useful when I drop my rear subframe far off in the future and refresh everything.

IMG_8975.png IMG_8974.jpeg
 
That's a nice wet cap right there! And you can see the carbon tracks to the wrong terminals. Now use the Dremel disc I referenced here to add the vent slots!

:sawzall:
 
Okay, so we have a soon-to-be-drivers on her learner's permit in the household! 😵‍💫 I wrestled for a loooooooooong time on adding a 2nd daily driver car (in conjunction with the BlandMobileToyota) to the household to be shared among mom, dad, and ThisTeenagerIsMine?™ For months, I was planning on purchasing a new (all safety features) VW Jetta 1.5T, because this is a pretty safe car which actually still comes in a stick-shift (want to teach ThisTeenagerIsMine?™ how to drive a stick) and is cheap for a new car (around 23K-24K).

After months of waiting and watching local inventory of stick shift Jettas amount to basically 3-4 at a time in a 200 mile radius, I gave up. The economizer in me also had a REALLLLLLLLLYYYY hard time spending 23-24K + tax + title + insurance costs on a brand new car.

So I decided to join the club here and get a cheaper used Mercedes project car that I could fix up and drive. After years of watching all you guys enjoy project cars, I decided that I needed more things to work on. Enter this w210 E320: 2002 Mercedes-Benz E320 w/58k Miles For Sale | The MB Market
_dsc2110.jpeg
At first glance on MB Market, it looks like a nicely kept w210 that hit $7,500 with reserve not met because of very mediocre presentation. I went and met the seller and realized that, like many many many many many many cars on auction sites these days, the car looks somewhat better in pictures than in person. In short, for a daily driver 21-year old car with 58K miles:

  • Exterior condition was about as expected - pretty nice for daily driver duties.
    • There has been some body work and paint/blending (have the receipts) - an older person used to own this. No parts have been changed --- just body work.
    • It seems the older original owner consistently would scratch up the front air dam and fender. Front air dam currently also has some scratches.
  • Interior condition was not-as-good-as-expected and didn't show as well as the MBMarket pictures would suggest
    • Upholstery was fine and nice
    • Jacked up center console trim
    • Temp display in dash not working
    • Interior lining of cubby falling apart from heat (Sacramento car - seasons are oven, oven, oven, and rain)
    • Jacked up sun visors need replacement
    • Missing end-caps on some of the metal rails for the seat-mountings
    • Broken middle seat belt buckle in the rear
    • Interior door locks working super strangely --- sometimes they worked, most of the time they didn't, and they would go up/down while driving for no apparent reason
    • Interior lighting seemed stuck on, so one had to manually turn them off and leave them off -- particularly irritating as we have short days now in November
    • Some kind of chocolate-super-sticky-liquid oil spill from many years ago spilled in the back seat. It was cleaned up but UNDER the rear seat was a sticky-ass mess and one could faintly detect chocolate odor...
  • Mechanical condition - seems pretty darn good!
    • Lots of service records!
    • Front main seal replaced
    • One of the catalysts were replaced.
    • Motor and transmission mounts in the last 18K miles.
    • Regular Service As and Bs.
    • Fastidious maintenance on brakes and rotors barely have a lip to them. Even the calipers are shiny.
    • Crank position sensor was changed.
    • Regulator for power window was changed.
    • Electronic Key ignition was changed and recoded with STAR.
  • Tires are 2010 date code Michelins (good sign). Need replacement. The spare has a hole in it and also needs replacement.
Looking underneath ---- Dang, I love me a California car. This car is in nicer shape underneath than anything else I own (newish Toyota excepted)!

05f0a70a35cbf7a5c7bb1fd6e2925b31ac0d1672-1 Large.jpeg7ae190fc510a220be639f06b4d550d8e61babac8-1 Large.jpeg08c253e7ccc9d376540036ec08cb72a6ec01b41f-1 Large.jpeg5311d65aa1936786dcc364865a247c3ae0b053fd-1 Large.jpeg9888db6bbcc7d6c7d176e3ca623b462db8d8d087-1 Large.jpeg1546616c38ce6d4bd49c2187bc08552dc2919807-1 Large.jpega493498367ed974a1233ff8734bdef4e8b15f175-1 Large.jpege12b1fdd43c36a6e5b336434fb9c65dc290e0cb1-1 Large.jpegf396deff5279983720d54a6c42a3f4f9abe3b569-1 Large.jpeg

I also noted that the seller had previously tried auction off a 500E without success and eventually exported it to Mexico.


Anyways, The E320 was a typical used car with lower than expected miles for a 21 year car. The wife has religion on low miles even though I do not. I have to compromise on some things to remain married. 😅

As the car got bid up to $7500 with reserve not met on MBM, I agreed with the seller to pay $7600 provided that he smog the car here in CA (car was titled in Oregon) and take me to his DMV-expediter so that I could get CA license plates and registration in 15 minutes instead of lining up at the DMV for hours and hours. 🤝 
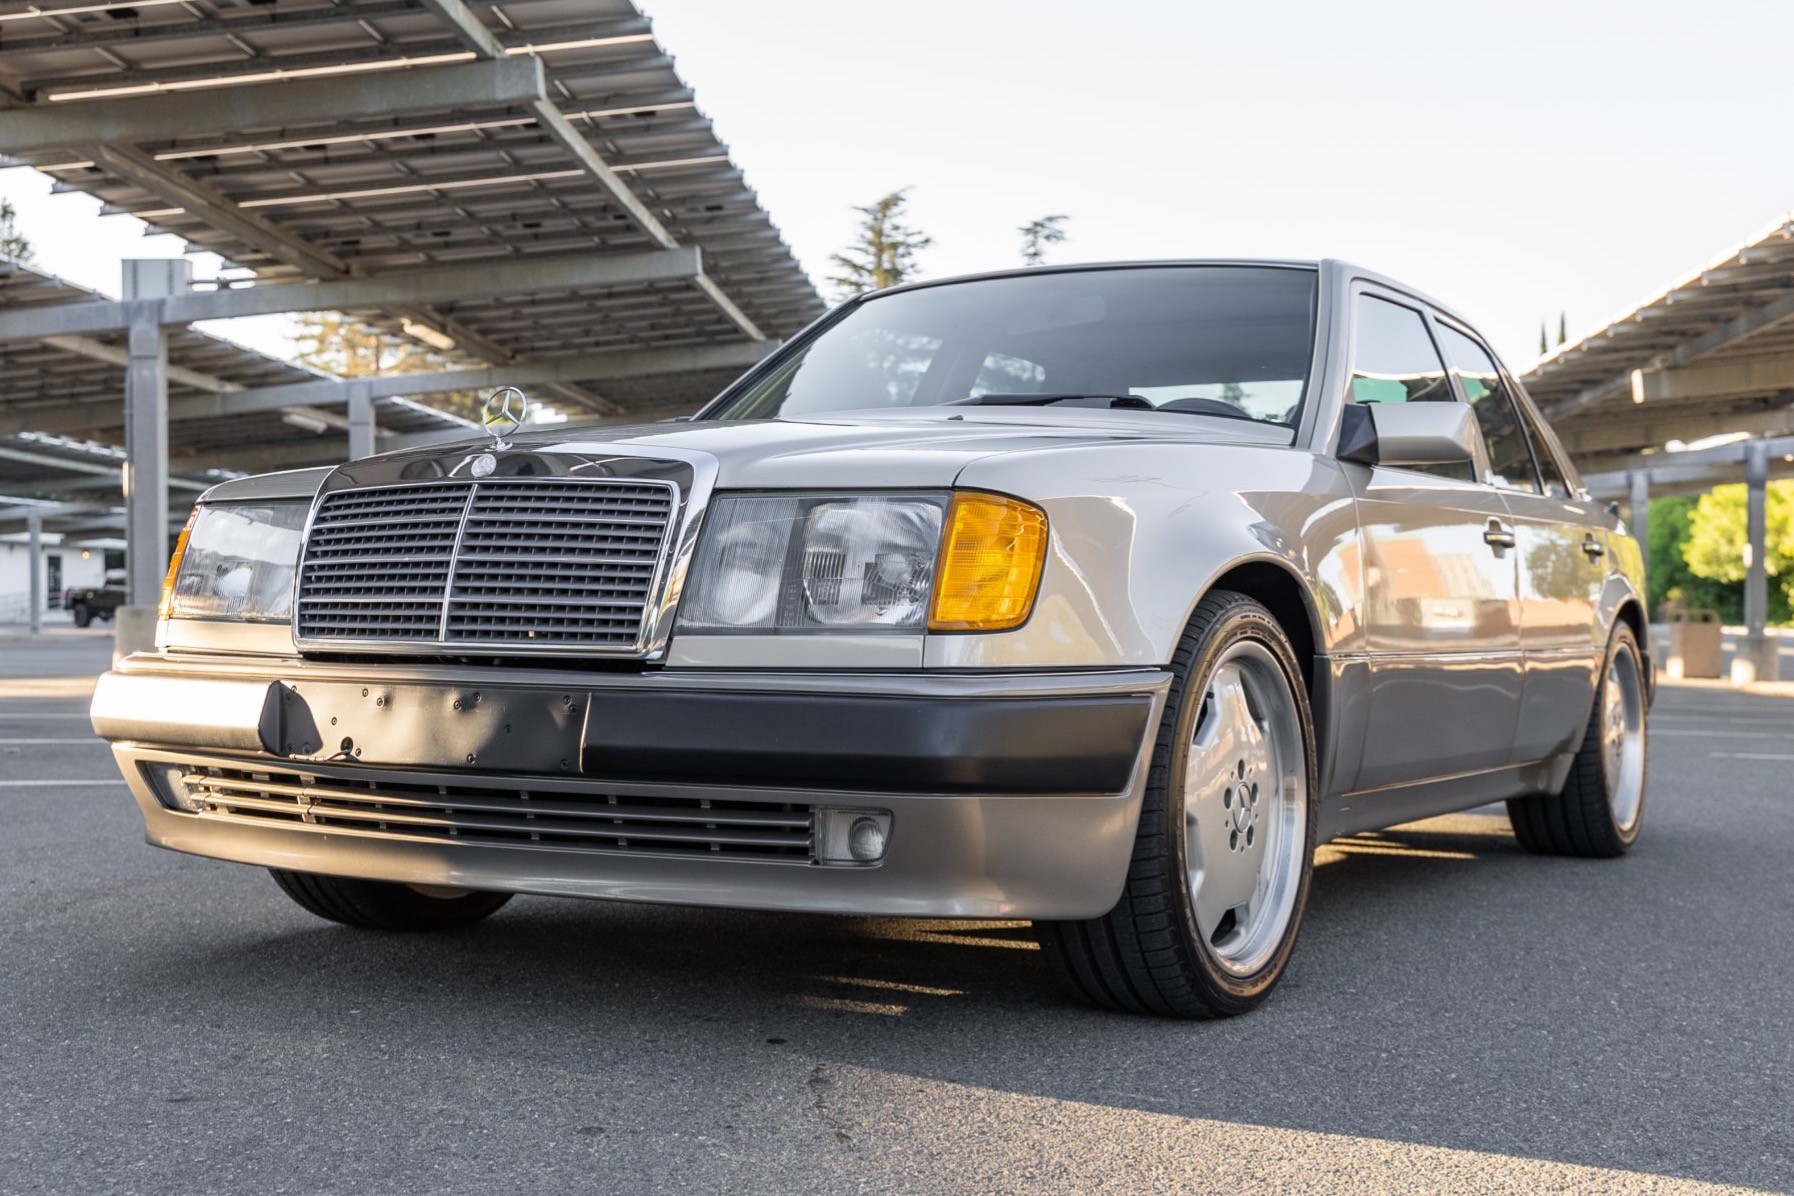
Done Deal, and now I have a new project!
 
Last edited:
Salvage Yard Day

Picked up a bunch of various trim bits and bits and bobs after finding an identical car in the yard near Travis Air Force Base.
Scored new grey seat belt buckle assembly (which is NLA in this color and not on ebay anymore).
Replaced door pin switch which solved the door locking and dome interior light issue.
Scored some "smoked" front side marker lights
Cleaned up the chocolate syrup lake under the rear bench seat. Simple Green to the rescue. Ugh. I couldn't understand why I initially couldn't remove the rear bench seat until I realized the chocolate syrup and literally GLUED the rear bench down, thus requiring me to use more force to yank it out!! 😂

IMG_9665 Large.jpeg IMG_9668 Large.jpeg IMG_9682 Large.jpeg IMG_9687 Large.jpeg IMG_9688 Large.jpeg IMG_9689 Large.jpeg IMG_9694 Large.jpeg
 
Back
Top