• Hi Guest !

    Welcome to the 500Eboard forum.

    Since its founding in late 2008, 500Eboard has become the leading resource on the Internet for all things related to the Mercedes-Benz 500E and E500. In recent years, we have also expanded to include the 400E and E420 models, which are directly related to the 500E/E500.

    We invite you to browse and take advantage of the information and resources here on the site. If you find helpful information, please register for full membership, and you'll find even more resources available. Feel free to ask questions, and make liberal use of the "Search" function to find answers.

    We hope you will become an active contributor to the community!

    Sincerely,
    500Eboard Management

Reinstalling camshafts

Kyiv

1993 400E | Azov мой кумир!
Member
Driver side camshafts (both) are in place, pinned, and have not been removed. I'm reinstalling passenger side camshafts:

-- First I reinstalled intake camshaft. It went nicely into its bed, I pulled chain over it, matching the marks. I snagged camshaft bridges hand-tight
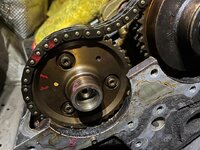
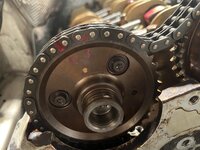
-- exhaust camshaft would not fit under the chain, so I used a Merc-branded camshaft key to turn the intake camshaft counter-clockwise (against the engine rotation direction:facepalm:) about 15-20 degrees to give me more chain to work with. That worked, although I heard something mildly clicked inside the valvetrain :shark:; I did not force anything, it rotated with very mild effort. With more chain available, I can just pull it over exhaust camshaft star, matching the marks here too:
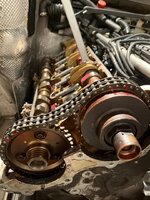
3.jpeg

However, the exhaust camshaft wont rest neatly in its bed with chain marks matching camshaft star marks, because lobes over exhaust lifters on cylinder number 3 (#1 being closest to the front of the car, #4 being closest to the fire wall) are pointing straight down into lifters, preventing the rear end of the camshaft from going into into its rear bed, at the end of cylinder head:
Inked2.jpg

Question: do I just evenly snug down exhaust camshaft bridges so that the pointing downward lobes compress the buckets, allowing the camshaft to properly sink into its bed OR am I doing something wrong here?
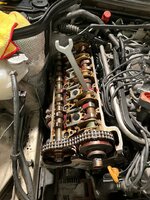

1.jpeg
 
Last edited:
I should add, that I can pin intake camshaft, so it's in its correct place
 
I’m thinking, I should install exhaust camshaft off mark with it neatly fitting into its bed, so that I’d need to rotate it clockwise (in the engine turning direction), THEN snug camshaft bridges hand tight, then lift the chain and rotate the camshaft clockwise via camshaft key until chain and camshaft star marks align?

IMG_1918.gif
 
So I followed WIS and reinstalled both camshafts with chain over their sprockets and torqued their bridges, but without chain and sprockets markers aligning (as per WIS). I can get intake camshaft speaker and chain marks to align by turning camshaft with Merc’s camshaft key, but not the exhaust camshaft — can turn it anymore via camshaft key.
IMG_1919.jpegIMG_2304.jpeg
So: would unbolting passenger side exhaust camshaft ⚙️ work in my case, such as was done by Gaffer below, in his situation

This afternoon I spent about an hour out in the shop, and did a couple of things.

First, I cleaned up the plastic headlight bucket/air scoop for the passenger side. It was dusty and dirty in a few places, but cleaned up quite nicely. I have the rubber drain (which had partially been eaten by rodents) on order from MB in Germany, and it should be here tomorrow or Friday. I ordered a second one for the other headlight bucket/air scoop for the drivers side.

Second, I was able to rotate the exhaust cam and get the exhaust cam sprocket properly lined up and pinned. So that now, all four cams are properly pinned.

To do this, first I removed the timing chain tensioner (again). I had, in my last installment, removed the top timing chain plastic guide. You can see a close-up of the timing chain tensioner in the first photo below. It is held to the bottom of the cylinder head by one 13mm bolt, and one 13mm nut. It was MUCH easier to access them by removing the headlight, as this gave a better angle.
View attachment 106191


Removing the timing chain tensioner from the car.
View attachment 106192


Next, with the chain loosened, I made a rookie mistake (again!) and played around with the chain, pulling it off of the exhaust cam sprocket a bit. Of course, with the cam being unpinned and under tension it rotated and got out of alignment by another two or three teeth!! You can see in the fist and second photos below, the further mis-alignment caused by this, with the pink fingernail polish on the chain and sprocket. You can also see the black arrow I scribed on the sprocket, to indicate the direction that the sprocket would need to rotate (originally two teeth, now FOUR teeth with the further slippage!) to come back to proper alignment.

So, I removed the three exhaust cam sprocket bolts which are T-30 Torx bolts. They came off relatively easily, as shown in the two photos below.
View attachment 106193 View attachment 106194


After loosening the sprocket, I was able to move it away from the end of the camshaft slightly. Then, as in the second photo below, I used my special MB cam wrench (which has a thin profile, to grab onto the flat areas of the cam) to rotate the cam backward. This allowed me to pin the cam properly with the fourth pin (shown in the third photo below).
View attachment 106195 View attachment 106196 View attachment 106197


After this, I was able to rotate the sprocket inside of the chain to get it aligned properly so that everything is in sync, and the positioning dowel on the end of the cam lined up with the hole in the sprocket. Also, all three of the mounting bolt holes in the sprocket lined up properly with the threaded holes in the exhaust cam.
View attachment 106198

All of this was a BIG relief, and I am happy that I was able to get the cam pinned and sprocket and chain in the proper positions. Ill mark these with another color of fingernail polish for final assembly.

I will leave the exhaust cam sprocket off of the cam for now, and the next step is to remove the intake cam adjuster and sprocket (while the intake cam and exhast cam remain pinned). This will relieve all tension on the chain, and allow me enough slack in the chain so that I can remove and replace that sides upper chain rail. Then Ill have to do the same thing on the drivers side (except that there are TWO rails on that side to remove and replace).
OR, I can remove exhaust camshaft and install it so that mark on chain and sprocket match, but this way the camshaft won’t react neatly in its bed, because two of its loves will be pressing down on a pair of lifter. I could snag the bridges down until those two lobes press a pair of lifters, so that the camshaft is properly resting in its bed? Need advice

@JC220
 
I should add, that intake camshaft must be installed such that it will need to be rotated counter-clockwise (opposite of engine rotation direction) in order for pinning hole to move in the right direction. So, then, must be the exhaust cam…? Right now it is installed so that I would need to turn in in the direction the engine turns, which is what WIS calls for…

IMG_1920.gif
 
For Plan A, I would loosen the chain to the point where the cam could be properly rotated so that the marks align, and then pin it down in the proper place. Have a "helper" hold the cam in place, so that when the chain is loosened, the cam doesn't quickly rotate, like what happened to me.

As a Plan B, I would probably loosen and remove the cam, rotate it, pin it, and re-install it by gradually snugging it down.
 
Each cams should be installed / bolts tightened in a position where they are pressing theleast amount on any valve lifter. AFTER torqueing to spec, do whatever is needed to rotate the cam to pinned position, pulling the chain into place as required.

:banana1:
 
@gerryvz, @gsxr, thanks for the pep talk!

So. I’ve removed exhaust camshaft’s star so that it would be easier to tinker with the camshaft, as otherwise the chain strives to catch on star’s teeth constantly, as there is just bare minimum of slack. The star has a locating dowel, so it will always attach to the camshaft in EXACTLY the same way. I then removed all of the bridges. I left intake camshaft untouched since installing it and pinning it 2 days ago.

With bridges removed, I rotated the exhaust camshaft in such a way, so that when it is properly fitted into its bed (no resistance of lobes pushing against lifters) it would be needed to be rotated OPPOSITE of the direction engine is turning, in order for star and chain marks to align. Previously I’ve installed it so that it would need to be turned in the direction of engine rotation, for the marking s to match up. After that I’ve reattached the star and put chain over it. Markings were about 6-8 teeth off. I then reinstalled and properly torqued bridges and proceeded to effortlessly turn the camshaft via Merc’s special key bit by bit, moving the chain over, until the marking matched up. I can’t yet pin it, because coolant expansion tank in the way of the camshaft turning key, so will need to remove that, in order to turn the exhaust camshaft just a tad more for the holes to align

IMG_2329.jpeg

I can say definitively that the job (of removing/installing camshafts) is scarier than it actually is. It’s no more complex than changing brake pads. But that first time though…


Phew! 🙂
 
Last edited:
at what mileage should the timing chain rebuilt? my 93 500E has 124k miles
You need to measure chain stretch and go from there. It requires taking off both valve covers. 2 degrees of stretch or so is acceptable. If more, then it could be a broken chain guide, repairing which could eliminate chain stretch or, if not, then a chain needs to be swapped.

My car is almost at 150 k mi and there was no chain stretch, but I’ve decided to proactively replace chain guides that are located in the engine V, and that requires taking off camshafts.
 
at what mileage should the timing chain rebuilt? my 93 500E has 124k miles
The M119 timing chain can last the lifetime of the engine, if maintained properly. The chain does not require periodic replacement like rubber timing belts. It only needs replacement if excessively stretched / elongated.

That said... the chain guide rails are plastic, and have an annoyingly short lifespan. Inspection requires pulling both valve covers and sometimes the lower oil pan too. Chain stretch measurements are only valid with all new/good rails; the chain can measure as "stretched" with broken rails - when new rails are installed, the measurement will change.

Anyway: If there is no record of chain guide rail replacement on your 500E with W124kmi on the odo, I'd highly recommend inspecting everything.

:klink:
 
And that should just about answer all M119 chain issues. If not mentioned, use MB tensioners where applicable to your chassis. As Boars Head tag line goes, ..."compromise elsewhere"
 
You need to measure chain stretch and go from there. It requires taking off both valve covers. 2 degrees of stretch or so is acceptable. If more, then it could be a broken chain guide, repairing which could eliminate chain stretch or, if not, then a chain needs to be swapped.

My car is almost at 150 k mi and there was no chain stretch, but I’ve decided to proactively replace chain guides that are located in the engine V, and that requires taking off camshafts.
To replace the upper guides you don’t need to take the cams off. Just remove the exhaust cam gear. Lower guides is a different story which requires removal of the cover. I’m tackling that job now.
 
To replace the upper guides you don’t need to take the cams off. Just remove the exhaust cam gear. Lower guides is a different story which requires removal of the cover. I’m tackling that job now.
To replace the upper inner guides, you also need to remove the intake cam adjuster mechanism. But yes, the camshaft can stay in place. I think the idea behind cam removal is to avoid disassembling the cam adjuster. (?)

Don't remove the lower (timing) cover unless there are confirmed broken guides down below that must be replaced... that's a high-risk job...

:duck:
 
To replace the upper guides you don’t need to take the cams off. Just remove the exhaust cam gear. Lower guides is a different story which requires removal of the cover. I’m tackling that job now.

To replace the upper inner guides, you also need to remove the intake cam adjuster mechanism. But yes, the camshaft can stay in place. I think the idea behind cam removal is to avoid disassembling the cam adjuster. (?)

Dont remove the lower (timing) cover unless there are confirmed broken guides down below that must be replaced... thats a high-risk job...

:duck:
Yes, I took this approach of not removing the cams, and rather removing the intake cam adjusters as well as the exhaust cam sprockets, in this thread linked below.

Removing, disassembling and then re-installing the intake cam adjusters isn't a technically difficult thing to do. However, if you go this route, I **HIGHLY** recommend you spend the $100+ and get the factory tool that allows you to install the adjusters. It's one of those tools that makes 3 minutes of work out of what is otherwise a very frustrating job, which is possible to do manually, but will take you many many tries to do it successfully.

As I always say (because nobody bothers to actually search for proper information on this forum), it's all here, step by step on the removal, assembly, and installation of adjusters, removal/installation of the sprockets, and removal/installation of new upper cam guides, in this thread:

 
So true! It’s also the first place I turn to for new projects. Though, I’m not the biggest fan of the one search box for sub-forums and global search functionality that has now become the norm on most forums. I still prefer the “search this forum” function. Yes, I know I’m old school 🙂
 
So true! It’s also the first place I turn to for new projects. Though, I’m not the biggest fan of the one search box for sub-forums and global search functionality that has now become the norm on most forums. I still prefer the “search this forum” function. Yes, I know I’m old school 🙂
Just FYI - another way to search, outside of the brilliant search box at the top right that Gerry implemented, is to go to the google website and type “thethingIamsearching site:500eboard.co”. That works well too (use .co, not .com)
 
So true! It’s also the first place I turn to for new projects. Though, I’m not the biggest fan of the one search box for sub-forums and global search functionality that has now become the norm on most forums. I still prefer the “search this forum” function. Yes, I know I’m old school 🙂
I'm not sure what you mean.

This forum has an extremely sophisticated search function, which is accessed by the "Search" button (with magnifying glass) at the upper right of your screen. Having this search capability is one of the primary reasons that this site was re-architected and migrated to the current XenForo software back in March of 2019, becuase previous forum software had only adequate search functionality.

The search function is powered by Elasticsearch, which is one of the most powerful search engines in existence. It indexes all posts (including new posts, as I type this) in real time. And it covers the entire forum.

If you use this search capbility, it also suggests -- AGAIN, IN REAL TIME -- related threads on the forum that change with every character that you type in, exactly like Google does. These suggestions for threads gets more accurate with the more characters that you type in. There is no better or more powerful search capability available for forums, and the implementation of this search capability is pretty much state of the art. Not to mention, VERY VERY VERY few other forums have implemented this type of real-time, and advanced "suggesting" search capability.

You can see here, typing in "ACC va" in real time (meaning ACC vacuum pods) it is already suggesting the pod replacement thread that I was aiming for. Five characters. Not bad.
Screenshot 2023-05-21 at 7.10.45 PM.jpg


When you type in the full set of words "ACC vacuum pod" you get several threads just on that topic alone ... just in the suggested threads.
Screenshot 2023-05-21 at 7.12.06 PM.jpg


When you type the words in, and actually hit the black "Search" button at the bottom, you get a date-relevant listing of all threads containing those words. Pages and pages and pages of individual posts containing those words.
Screenshot 2023-05-21 at 7.13.03 PM.jpg


So, I would beg to differ with you that the search capability of this site sucks. I have worked very very hard to set it up from a technical standpoint (and it requires almost as much server/compute power as the rest of the forum's software does to run), and make it reliable. It actually took me almost two years of technical troubleshooting to make the search capability reliable and not crash every day or two.


The "other" search function above the forum list, or sub-forums is merely a "Quick Search" function and IS NOT SPECIFIC to any one forum or sub-forum, but also rather to the entire site. It is also powerful, but doesn't hold a candle to the main search capability I describe above.

Here is an example of the "Quick Search" as I type in "ACC vacuum pod" -- it suggest also the correct thread I was aiming for, despite actually being IN THIS CURRENT THREAD ON CAMSHAFTS when I was doing the Quick Search. So this search box is NOT specific to just a thread or sub-forum.
Screenshot 2023-05-21 at 7.19.36 PM.jpg

However, you should just use the primary search function.
 
Gerry,

I did not mean to hit a nerve nor did I imply that the search function “sucks”. For the misunderstanding, I owe you an apology. I expressed a personal UI preference. In fact, for functionality, I endorsed @Jlaa’s comment to use the power of the search function. It’s my most used feature of every forum I use and I get annoyed when people post questions without first using it. So, no I don’t think the search function on this site sucks and as someone who was a member of this board before you took it over and revamped it into what it is today, your hard work can hardly be ignored!
 

Who has viewed this thread (Total: 1) View details

Who has watched this thread (Total: 2) View details

Back
Top