• Hi Guest !

    Welcome to the 500Eboard forum.

    Since its founding in late 2008, 500Eboard has become the leading resource on the Internet for all things related to the Mercedes-Benz 500E and E500. In recent years, we have also expanded to include the 400E and E420 models, which are directly related to the 500E/E500.

    We invite you to browse and take advantage of the information and resources here on the site. If you find helpful information, please register for full membership, and you'll find even more resources available. Feel free to ask questions, and make liberal use of the "Search" function to find answers.

    We hope you will become an active contributor to the community!

    Sincerely,
    500Eboard Management

OWNER Rouven036

Some proper pictures since i took the car out for a drive today.
 

Attachments

  • 20180701_123049.jpg
    20180701_123049.jpg
    1.8 MB · Views: 75
  • 20180701_123123.jpg
    20180701_123123.jpg
    2.4 MB · Views: 79
  • 20180701_123109.jpg
    20180701_123109.jpg
    2.1 MB · Views: 60
  • 20180701_123702.jpg
    20180701_123702.jpg
    1.4 MB · Views: 66
  • 20180701_123710.jpg
    20180701_123710.jpg
    1.5 MB · Views: 43
Last edited:
Yeah those brakes are not for kids. I looked at your install. Car looks great. I especially love the 18” take on a 16” period wheel. Good originality.

Cheers,

maw
 
Last edited:
Wasn't so happy with the underbody cleanliness, especially above the rear axle. The first owner had the car sprayed with extensive preservation wax from beneath, it's great to protect the car over the years when driving the car in winter and rain, the down side is that it will collect dirt like a magnet. So I decided to clean it up bit by bit over the next few months or whenever I find time to work on it. Anyhow doesn't drive it in winter and rain anymore.

Also while on it, replaced several parts, like prop shaft bearing, prop shaft center boot, cleaned and lubricated side brake mechanism, replaced sls lines between spheres and dampers,replaced fuel feed line to the pumps and breather/return hoses, replaced sls torsion bar u-bolt-bracket and strut, changed the diff oil with the Motul lsd diff oil (without friction modifiers suitable for the Wavetrac diff lock), cleaned the springs and damper struts etc.

Some more photos will follow, for now just one after dropping the axle once again and another one whilst working on it. Axles are basically new so nothing to do there in particular.
 

Attachments

  • 20180704_123556.jpg
    20180704_123556.jpg
    1.1 MB · Views: 42
  • 20180704_123603.jpg
    20180704_123603.jpg
    1,011.5 KB · Views: 41
Here some photos of the collected AMG parts to convert my car to a 6.0. I will remove the heads and replace valve stem seals all the timing chain and guides, oil pump, connecting rod/main bearings as well as the oil pan (engine came out of a W140). Since I got it together with the AMG modified transmission I will swap over the valve body to my newly overhauled one. As soon I start I will post photos here...
Only thing I m missing now is the E60 stabilizer bar and the AMG springs/shocks. Hopefully will find them sooner or later too!
To have all information suitable to the car, the new engine number and code 957 got already documented in the vehicle data card.
Also did some research with the Manufacturer and got the exact date of the engine conversion 19.07.1994

Looks nice! Any chance you could check the code numbers on the camshafts (see pics attached), and measure the cam lobes for intake & exhaust? I'm curious what you find for the lift measurements. If you could get measurements better than 0.05mm that would be great. Definitely would be nice to hear what Bernard recommends for tweaking the AMG 6L motor.

I had just remembered this but have not yet all measurements and the code numbers noted. However the intake cam measurements of my engine are:
Base circle 37.1mm
Lobe height 47.2mm
Lift = 10.1mm

Exhaust cam and both codes not checked. Will check this in about 2 weeks.
 
I had just remembered this but have not yet all measurements and the code numbers noted. However the intake cam measurements of my engine are:
Base circle 37.1mm
Lobe height 47.2mm
Lift = 10.1mm

Exhaust cam and both codes not checked. Will check this in about 2 weeks.
Awesome - thank you! Related question: Are the cam sprockets adjustable (slotted), or are they standard sprockets? I'm pretty sure they are standard on the .97x/.98x, but never have had my hands on a genuine AMG motor to see firsthand. Think only the tall-deck .960 had the adjustable/slotted setup.

:thankyou:
 
Took the 500E to go for a short vacation and just on the way home I had a chance to give the whole setup a trial for top speed. Remember, the car has a 2.65 diff, top speed governor removed, and still the slightly tweaked stock 5L (repair size 1 pistons, polished heads, ported intake and exhaust manifold, HJS 200cpi cats. Tire size is 245/40R18 on the 18"x 8" M800's, speedo is a original 300km/h AMG unit for the 2.65 diff. As the calculation goes it should be 269km/h @ 6000rpm. Car pulls into rev limiter @ 6300 and bounces back to slightly above 6000. It should be 278km/h @ 6300.
Here is a picture at 270:

Further I can say that the E60 bar makes a big difference in body roll as well as the heavy M800 make the ride a bit more uncomfortable.
 

Attachments

  • IMG-20180728-WA0015.jpg
    IMG-20180728-WA0015.jpg
    182.3 KB · Views: 71
I have no GPS readings however as per the calculation it should be quite accurate also the speedo setting is pretty much spot on. Don't know if a drift box or the like still up to date or is there any suitable mobile app available? Any recommendations?

Some further side notes after the almost 2000km round trip (car was parked almost 11 years):
- oil changed prior the trip, filled in 8L - no consumption noticeable on the dip stick
- I was a bit hesitant to take the car for the trip due to any issues coming up and eventually getting stranded on the way (for example a leaking water pump from a corroded shaft due to long parking time) but all good, no signs of leakages anywhere (any fluids). However coolant needs replacement these days due to the age
- brakes are really good but the amg pads develop ALOT of dust, even the rear wheels get a really good tint from the brake dust
- high speed losses: burnt the inner reinforcement edge of the rear bumper near the exhaust tips a little bit, in cold conditions the tips are about 6-7cm away! The fog light access hole in the left fender liner popped open but nothing damaged just needed to be pushed back in the lock. My bonnet is already pre- tensioned but at speeds over 240ish the front outer edges lift off about 1cm . That felt not so good, have to look at this again.
- I wish to have a oil temp gauge
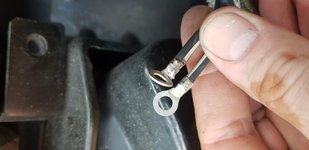
- noticed that the AC in low speeds and traffic jam got weak and engine temp going beyond 100 degrees Celsius. Found during the overall inspection this afternoon, that the upper wire on the Fan resistor is somehow corroded off or something. Have to get a new resistor and cable shoe at least (will remove the left head light and post some photos later on here). Fan fuse is all good.
- e500e's are overall awesome cars (I guess the most of you know already :-))
 

Attachments

  • 20180723_212431.jpg
    20180723_212431.jpg
    1.3 MB · Views: 52
  • 20180724_212255.jpg
    20180724_212255.jpg
    1.6 MB · Views: 41
Last edited:
My bonnet is already pre- tensioned but at speeds over 240ish the front outer edges lift off about 1cm . That felt not so good, have to look at this again.

Careful from that bonnet, the 124036 bonnet lock mechanism is a weak point at +270km/h.
The first owner of my Brabus 6.5 had the lock area reinforced, he also wired the blinkers after one of them flew off and scuffed the fender.

No one in this world had fun with a 124036 like he did :D
 
Careful from that bonnet, the 124036 bonnet lock mechanism is a weak point at +270km/h.
The first owner of my Brabus 6.5 had the lock area reinforced, he also wired the blinkers after one of them flew off and scuffed the fender.

No one in this world had fun with a 124036 like he did :D
Hi Ahmad! Yes indeed, the indicators are a known high speed issue of the W124. Two scenarios can happen: loosing the lens only or the whole indicator. I have new indicators and made sure the edge where the clip sits is in perfect condition as well while pushing the indicator in, make 100% sure it clips in position well. I lost once a white indicator years ago never ever since.
I really feel the need for a 2nd bonnet lock as in the newer cars. However will play with the adjustment a bit more and see what I will get. Also did MB safe a bit of money while not making a reinforced bonnet for the 034/036 cars like you can find in the W201 6 cylinder and 16V cars. It's not only the front outer edges getting pulled up but also the center area of the bonnet wobbles around, right there were the W201 m103/16V bonnets have the additional longitudinal reinforcement struts.
 
Last edited:
Hello Rouven, I am curious to know if the engine was “broken in” at constant low speed say 80-100 km/hr after you did your repair 1 size on the cylinder?
I may be wrong, but I remember from my high school days the Auto class teacher used to say that it’s not recommended to drive at max speeds after engine rebuild.
But I am sure you did some “normal” driving before you hit 275/hr.

If the car had the original 16” rims it would have gone more than 275/hr [emoji3].
Must have been exciting to feel the torque [emoji106]


Sent from my iPhone using Tapatalk Pro
 
Yes sure. The engine had covered in 2007 something like 1200km to 1500km of normal driving. On top comes some maybe total of 150km - 200km driving around before the trip and the approx 1000km on the way to our destination where I drove max to 4000 rpm. So there was sufficient brake in period.
 
Replaced the auxiliary fan pre-resistor and upper cable shoe. The original able shoe was corroded off and due to the excessive resistance the wire got also overheated the first 3cm or so. The cable is long enough to shorten it. Used two individual cable shoes instead, crimped and soldered. That will be a interim solution until the new body side engine wiring harness goes into the car together with the 6L engine. I would highly recommend to check this area and ensure that the contact surfaces are clean and the terminals are properly tightened. Along with this I also replaced the rear distributor caps [insulators] due to a sporadic idle misfire once the engine was hot.
 

Attachments

  • 20180802_125046.jpg
    20180802_125046.jpg
    1.9 MB · Views: 33
  • 20180802_125133.jpg
    20180802_125133.jpg
    2.6 MB · Views: 36
  • 20180802_114134.jpg
    20180802_114134.jpg
    2.4 MB · Views: 39
  • 20180802_114521.jpg
    20180802_114521.jpg
    2.3 MB · Views: 33
  • 20180802_112433.jpg
    20180802_112433.jpg
    1.7 MB · Views: 32
  • 20180802_111748.jpg
    20180802_111748.jpg
    2.1 MB · Views: 32
  • 20180802_105056.jpg
    20180802_105056.jpg
    2.4 MB · Views: 30
  • 20180802_114406.jpg
    20180802_114406.jpg
    2.4 MB · Views: 40
Just for completeness of my owners thread, stated the installation in a separate thread already.
Have installed the air guide panels situated on the inner sides of the head lights. They have not been there in my car and I m not really sure if these cars came with these installed. Found them while browsing the EPC and found them valid for the 036. So ordered them along the required clips and installed them.
Parts: 1x A1246281907, 1x A1246282007, 6x 2019900192

If the panels are not in place, air will flow from in front of the radiator package to the engine air intake housings. The plates will block this path mostly. Theoretically more air flows (maybe with a better flow) to the radiators. In my case combustion air is entering anyways through the lower head light panels air intakes.
Further found also two rubber seals which are sitting on the lower front edge of the air intake housings. This is the edge which sits tucked under the front bumper. Have to install these too.
My aim is to get the air flowing around and through the front end as it was designed with the target to reduce the lift effect on the bonnet front outer edges on high speeds.
All seals around the head lights and on the bonnet are in place and new.
 

Attachments

  • 20180802_114211.jpg
    20180802_114211.jpg
    2.2 MB · Views: 53
  • 20180802_122021.jpg
    20180802_122021.jpg
    2.5 MB · Views: 44
  • 20180802_121803.jpg
    20180802_121803.jpg
    2.5 MB · Views: 57
Last edited:
Another project currently is a further tweak of the 2.5-16 M102990 engine which I reconditioned about 2 1/2 years ago. As in one of the earlier posts mentioned I ordered a set of special pistons to raise compression from 9.7:1 to 10.5:1 in addition I requested to make them lighter than stock but still being durable and providing proper guidance in the cylinders with similar to stock length skirts. Further ordered a set of custom forged rods, capable of higher rpm. The car will get a full set of Evo2 controllers (EZL, CIS-E cu and FPR) and will then rev up to 7700 rpm. Saved in total almost 1kg of rotational mass in the crank assembly. Pistons are repair size 1 diameter (96mm). Also retrofitted oil jets for piston cooling.
 

Attachments

  • 20180802_223649.jpg
    20180802_223649.jpg
    2.7 MB · Views: 17
  • 20180729_162333.jpg
    20180729_162333.jpg
    3 MB · Views: 16
  • 20180729_151023.jpg
    20180729_151023.jpg
    2.7 MB · Views: 13
  • 20180729_152341.jpg
    20180729_152341.jpg
    2.7 MB · Views: 15
  • IMG-20171218-WA0042.jpg
    IMG-20171218-WA0042.jpg
    68.8 KB · Views: 14
  • IMG-20171218-WA0034.jpg
    IMG-20171218-WA0034.jpg
    66.3 KB · Views: 15
  • IMG-20171201-WA0059.jpg
    IMG-20171201-WA0059.jpg
    92.5 KB · Views: 27
  • IMG-20180801-WA0018.jpg
    IMG-20180801-WA0018.jpg
    172 KB · Views: 16
Last edited:
Also getting a supercharger upgrade from a v1 s-trim to a v7-ysi on the w123 done including a relocation of the formerly prominent under the front bumper located oil and low temperature circuit coolers. Those will be installed behind a amg front spoiler.
 

Attachments

  • 20180822_001846.jpg
    20180822_001846.jpg
    2.9 MB · Views: 26
  • 20180814_213426.jpg
    20180814_213426.jpg
    1.7 MB · Views: 18
  • 20180814_211607.jpg
    20180814_211607.jpg
    2.4 MB · Views: 18
  • 20180410_231335.jpg
    20180410_231335.jpg
    2.7 MB · Views: 21
  • 20180617_194313.jpg
    20180617_194313.jpg
    1.1 MB · Views: 24
Completed the heat exchanger relocation on the W123. The piping for the low temperature circuit heat exchanger and igger trans cooler is still to be done but that's not a big deal as well as the relocation of the right side horn.
 

Attachments

  • 20180830_212401.jpg
    20180830_212401.jpg
    2.6 MB · Views: 19
  • 20180830_230050.jpg
    20180830_230050.jpg
    2.5 MB · Views: 26
  • 20180830_230141.jpg
    20180830_230141.jpg
    2.7 MB · Views: 24
Got some more progress on the 123 AMG front spoiler done. Air ducts becoming fully functional.
 

Attachments

  • 20180908_232953.jpg
    20180908_232953.jpg
    3.2 MB · Views: 19
  • 20180908_233028.jpg
    20180908_233028.jpg
    3 MB · Views: 18
  • 20180910_232423.jpg
    20180910_232423.jpg
    2.2 MB · Views: 20
Last edited:
Some more 123 stuff, this time for my station wagon. Finally the new pistons arrived. The engine was seized so had to go slightly bigger. Also the amg spoiler for the saloon is about to be finished. Update will follow soon.
 

Attachments

  • IMG-20180929-WA0006.jpg
    IMG-20180929-WA0006.jpg
    310.4 KB · Views: 19
Bumper got painted. Put it for satisfactory reasons straight on the car. Has to be removed once again for installation of the coolers and other small things like painting the air ducts black from the inside. Love the outcome.
 

Attachments

  • 20181001_191541.jpg
    20181001_191541.jpg
    2.3 MB · Views: 21
  • 20181001_214017.jpg
    20181001_214017.jpg
    3 MB · Views: 21
  • 20181001_191604.jpg
    20181001_191604.jpg
    2.1 MB · Views: 21
  • 20181001_223816.jpg
    20181001_223816.jpg
    2.8 MB · Views: 25
  • 20181001_224029.jpg
    20181001_224029.jpg
    2.6 MB · Views: 22
Oops I did it again... Or better said I was actually forced to adopt a late (Dec '96) 722.6 equipped W202 C36 AMG. More details later.

On the other side I send the W123 out to get a decent window tint (20%) all around except windshield and a full polish with paint protection sticker applied. Also here further updates later.
 
Just some updates here. 19% M119 related... I utilize some different MB and also M119 belt drive components on my M117 supercharger and accessories belt-drive. Due to the bigger V7 YSI charger I installed in the summer, I had to tighten up the 8 rib belt a bit further which then was not so much liked by the early type M119 belt tensioner. Anyway got the thing used from a parts harvest few years ago and always suspected it to fail and finally it did as expected... As loyal as my car is, it did happen only in the drive way when starting the car and the belt squeaking like crazy. While removing, I found it was a non original item with no clear branding visible to me. So replaced it today. Of course only original MB only. Might work out something to support the tensioning by support of a valve spring aperature pressing on the arm.
Also installed a set of 130W rallye lights (also available in the same way back in the days from amg and in general period correct and fully reversible) to the front end on the Super-saloon. To be even more correct, I have some cibie, Hella and Bosch classic cover in the making by a friend who is a pro in such stuff. Also playing the thought to tint the lenses yellow - as the yellow fogs of the French headlights are anyway.
 

Attachments

  • 20190126_205448.jpg
    20190126_205448.jpg
    1.8 MB · Views: 15
  • 20190204_211852.jpg
    20190204_211852.jpg
    1 MB · Views: 11
  • 20190204_211901.jpg
    20190204_211901.jpg
    1.1 MB · Views: 12
Last edited:
Working on the station wagon since a few weeks. It has turned into a full madness project - again. Here a few pics:
Level valve, before and after (new internals)
20190413_123110.jpg

Clean your engine bay with paint remover they said, it will be fun they said!
20190413_184316.jpg

All axle stuff gets redone along with the rare and nice brakes
20190410_185242.jpg

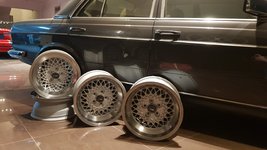
The BBS wheels must make space for my personal favorites on the 123 chassis: Staggered set of 7" and 9" x 16" Rial Type N aka Mesh rims:
20190410_205907.jpg

The body shell lost some weight everything else too:
20190329_005139.jpg

The block gets a bit bigger pistons:
20190417_195952.jpg

All V8 123s by AMG had up to my knowledge cast iron manifolds except the currently auctioned black wagon (I know the red Coupe, another wagon and 2 saloon, one of the saloon was a manual trans equipped car). The headers in the black wagon have a bit strange design fault in regards to the firing order (merging cylinder 1 with 2 and 3 with 4). However it must be 1 with 3 and 2 with 4. So dumped the cast ones and got it right.
20190419_225600.jpg

Will keep some updates coming in.
 
Last edited:
Some more progress on the M117 6L high compression K-Jet engine of the station wagon. Prior boring the cylinders got a stress plate made to ensure proper round cylinders during operation later on and also got all heab bolt threads bored out and reinforced the construction with heli-coils. A known soft spot in the M117. Took this best practice over from the M119. Then the stress plates were mounted and boring, honing and lapping was performed. Now cylinders are done, next is the installation of oil cooling jets for the pistons. Still figuring out what rods to get and then have to ship the crank abroad for balancing.
IMG-20190612-WA0003.jpgIMG-20190617-WA0010.jpgIMG-20190615-WA0002.jpgIMG-20190619-WA0009.jpg

Another project is possibly on it's way. Nothing completely new just an evolution. Run across a original M117 twin turbo kit. So playing with the thought to replace the supercharger by twin turbos in my W123 saloon. However i would implement some further upgrades besides new and more capable turbos of the latest design other things like engine relocation (further back to make room for the 850W brushless radiator fan of an SLS AMG, transmission upgrade, 4 arm prop shaft etc. at the same time which might be too big as a side project at least for now since the station wagon is number one car project.
 

Attachments

  • IMG-20190504-WA0031.jpg
    IMG-20190504-WA0031.jpg
    247.1 KB · Views: 18
  • IMG-20190416-WA0109.jpg
    IMG-20190416-WA0109.jpg
    155 KB · Views: 19
Last edited:
A little bit of fan boy stuff here. Had ordered a few key rings for some of the cars to make grabbing the right key easier...
#FirstWorldProblem

What material are the key rings made of? Did you have them custom made or can they be ordered online? They are very nice!
 
Indeed!

They are made out of carbon fiber in glossy or matt finish (I choose matt). On the backside I let them engrave them with my name.

Some of them have been available like the evos and 16v, the 500E, C36 and sl bs was a special order. However they have been made with no extra charge (same prices as the others in the webshop) and I think they will be easily reproducible. I ordered the ones available through the webshop. For the special orders, the guy send me an seperate bill and then they got made. Worked all super easy. Communication happened through Instagram direct message.
 
Just completed the most of the front axle restoration of the station wagon. New shocks and stainless braided brake lines are missing still. Up next is the reconditioning of the anti squat rear axle trailing arms.
 

Attachments

  • 20190824_172630.jpg
    20190824_172630.jpg
    1.1 MB · Views: 24
  • 20190824_231701.jpg
    20190824_231701.jpg
    4.6 MB · Views: 24
  • 20190912_070222.jpg
    20190912_070222.jpg
    1.8 MB · Views: 21
  • 20190914_140612.jpg
    20190914_140612.jpg
    4.2 MB · Views: 22
  • 20190912_070202.jpg
    20190912_070202.jpg
    1.4 MB · Views: 21
After completing the front axle, I have started working on the rear dependant. Didn't took much photos on the dismantling unfortunately but will write a how to on the assembly later on. The aluminum trailing arms are already sandblasted as posted earlier, they will receive a thin layer of paint during the process. For now I'm working on the anti-dive kinematics. Gave the big junks away for chemical paint removal, just finished to straighten out the dust shields which will go tomorrow for galvanising. The kinematic junks will get painted directly.
 

Attachments

  • 20191013_192416.jpg
    20191013_192416.jpg
    1.2 MB · Views: 12
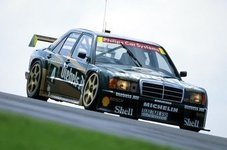
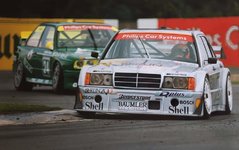
The race car progresses slowly but costly. Decided to sell my original evo dtm shell to someone who will complete it, well the work was in good progress until I had a chance to look at a late class1 shell and decided finally to go for the most complex version of W201 racers where only 6 cars have been ever made with at least one not existing anymore. Whats the difference? The evo's still had to be based on road/homologation models which was waived off for '93 season. For the early season races Mercedes couldn't get the full cars ready, so a few so called class 1a cars (converted '92 cars) have been out on the tracks. These cars are also quite unique but still suffer from the limits of the late evo2 cars. Especially being at the limit of kinematics on the rear axle. So in early mid season MB finally released the full class 1b cars, the short lived most radical 190 version. Sharing the dry sumped, pushed back in the chassis engine with the class 1a's, the real change took place in the rear end, where nothing on the chassis or axle setup reminds of its series derivates. So roughly it's more or less a tube chassis silhouette car. The ride level dropped once again significantly over the 92 cars, most visible on the rear wheel arch cut outs. One of these was used as a test bed for the 94 class active suspension driven by Bernd Schneider. Anyhow, to rebuilt such a car from scratch is basically impossible unless you get one of the cars on hand and that's what happened and the story took another turn. A Celette bench and a W201 jig set is the start point, then it needs to to get some more jigs fabricated to get the rear axle points set up. To get it right it needs also the homologation documents and the luck of having contacts to people who built and worked with these cars in the past.
Here some shots
 

Attachments

  • 20200108_150232.jpg
    20200108_150232.jpg
    1.4 MB · Views: 30
  • 20200119_214141.jpg
    20200119_214141.jpg
    283.7 KB · Views: 24
  • 20200801_230642.jpg
    20200801_230642.jpg
    232.8 KB · Views: 29
  • IMG-20200722-WA0013.jpg
    IMG-20200722-WA0013.jpg
    168.5 KB · Views: 26
  • IMG-20200722-WA0015.jpg
    IMG-20200722-WA0015.jpg
    176.1 KB · Views: 26
  • BL 94   (26).JPG.jpg
    BL 94 (26).JPG.jpg
    127 KB · Views: 23
  • dtm071.jpg
    dtm071.jpg
    34.4 KB · Views: 22
  • FB_IMG_1589099672285.jpg
    FB_IMG_1589099672285.jpg
    50.6 KB · Views: 24
  • FB_IMG_1590564965861.jpg
    FB_IMG_1590564965861.jpg
    71.6 KB · Views: 21
Last edited:
Something NOS and unexpected came across my way last night and i had to take the opportunity - wasn't searching for them in particular nor having the need but with skyrocketing prices for these NLA unicorns there wasn't much to argue about and to have is better than to be in need.

NOS pre-facelift LHD ROW headlights in old style boxes covered in thick desert dust, came along with "unfortunately white" but original indicators. I think they are a good investment. Just need to find a new original laminated rear glass next.
 

Attachments

  • 20200914_205238.jpg
    20200914_205238.jpg
    2.9 MB · Views: 32
  • 20200914_205513.jpg
    20200914_205513.jpg
    3.4 MB · Views: 31
  • 20200914_205421.jpg
    20200914_205421.jpg
    1.1 MB · Views: 28
  • 20200914_205435.jpg
    20200914_205435.jpg
    1.1 MB · Views: 25
Last edited:
Just 2 days ago the last pieces of my M117 (intercooler) intake manifold got ready.
Need to get it here and assembled (welded) together.
I m super excited to get this thing done.

The IC core is of the same thickness however way larger size. You can see the white outlined core size in the old setup vs the new core size.
 

Attachments

  • IMG-20201005-WA0009.jpg
    IMG-20201005-WA0009.jpg
    138.5 KB · Views: 11
  • 20200911_123910.jpg
    20200911_123910.jpg
    1.7 MB · Views: 11
Today was a very special day, I bolted up the intake manifold and supercharger pulley onto my M117. Everything just fits - I m so overwhelmed that I actually designed and constructed that from scratch... Turned out incredibly well in my opinion.
There is now a huge free space in between the block and manifold. I guess it might reduce heat transfer into the manifold, also the fact that the water passages are mostly detached from the intake ports. I have seen some photos of the group C car M117 and M119 engines and copied their additional water ports at the rear end of the heads to achieve more equal head temperatures, particularly on the rear cylinders. On the road cars, the driver side port is only used once you switch on the heater.
 

Attachments

  • 20201030_181531.jpg
    20201030_181531.jpg
    1.5 MB · Views: 16
  • 20201031_185304.jpg
    20201031_185304.jpg
    1,017.7 KB · Views: 17
  • 20201031_185543.jpg
    20201031_185543.jpg
    1.4 MB · Views: 16
  • 20201031_232958.jpg
    20201031_232958.jpg
    1.5 MB · Views: 17
  • 20201101_000144.jpg
    20201101_000144.jpg
    1.5 MB · Views: 16
  • IMG-20201031-WA0020.jpeg
    IMG-20201031-WA0020.jpeg
    935.1 KB · Views: 13
Last edited:
Forgot to amend, the item on the drainage infront of the car...
Going to attempt a tandem pump and M117 = electric p-steering pump in the trunk bye bye and hello to rear sls with 80L tank!
 

Attachments

  • 20201101_000929.jpg
    20201101_000929.jpg
    1.9 MB · Views: 11
Just got my first set of re-designed M117 fuel rails done, optional with fuel pressure/temperature sender port (amg M156 Sender unit). Original design I made back in 2014 or so.


Engine is out, need to make a new tandem pump carrier, non of the original bases is somehow adaptable. Might do a manual prototype then digitalizing, get it printed on my new 3d printer, verify fitment then cnc machining.
 

Attachments

  • IMG-20201116-WA0029.jpg
    IMG-20201116-WA0029.jpg
    126.9 KB · Views: 9
  • 20201117_235928.jpg
    20201117_235928.jpg
    1.1 MB · Views: 9
Handmade prototype tandem pump bracket done. Next, trying to digitalize the complex shape. Intermediate solution will be welding the oil reservoir and tensioner element onto the base plate.
 

Attachments

  • 20201121_194159.jpg
    20201121_194159.jpg
    1.3 MB · Views: 10
Some more W123 stuff!
Finished the electronic speedo conversion kits which utilize a W126 speedo as a start point. I have it available for the W123, W124 and W201. Was quite a task, especially to make the trip meter reset mechanism functional.
Also designed and printed a fuel catch tank so that both Bosch 044 pumps can draw fuel from that reservoir instead splitting the original 15mm ID tank feed hose in two. Fits perfectly on original mounting points and sits a bit higher then the diff and spare wheel tub. Got the individual sheets cut as per my file by water jet from 3mm aluminum sheet. Now only welding is left.
And last but not least, designed a shifter gate cover, since there was a gap in the wood trim. Amended an additional switch cut out and the controller for the engine data display.
 

Attachments

  • 20210223_223400.jpg
    20210223_223400.jpg
    588.3 KB · Views: 7
  • 20210201_012000.jpg
    20210201_012000.jpg
    2 MB · Views: 7
  • 20210213_101359.jpg
    20210213_101359.jpg
    829.1 KB · Views: 8
  • 20210213_161500.jpg
    20210213_161500.jpg
    1.2 MB · Views: 9
  • 20210221_211316.jpg
    20210221_211316.jpg
    663 KB · Views: 9
Last edited:
Back
Top