• Hi Guest !

    Welcome to the 500Eboard forum.

    Since its founding in late 2008, 500Eboard has become the leading resource on the Internet for all things related to the Mercedes-Benz 500E and E500. In recent years, we have also expanded to include the 400E and E420 models, which are directly related to the 500E/E500.

    We invite you to browse and take advantage of the information and resources here on the site. If you find helpful information, please register for full membership, and you'll find even more resources available. Feel free to ask questions, and make liberal use of the "Search" function to find answers.

    We hope you will become an active contributor to the community!

    Sincerely,
    500Eboard Management

timing guides and tensioner questions

samm

E500E Guru
Member
So guys Im about to replace the timing guides that are prone to breaking. Thanks to many useful posts on this site I have understood that the upper ones are the most prone to breaking. I managed to get all genuine items and the genuine valve cover gaskets for almost the same price as the other brands. The website is mbwholesale or something like that, out of Long Island.
Thanks to GSXR I have also ordered the oil screen thing, the larger one. In fact thanks a lot to GSXR because his useful thorough posts are so informative that I easily find out what I need to know.
The e420 engine only has 45k miles on it but its 22 years old. I am making this car my daily driver so I am addressing a few things that could easily fail.
You get a very low miles car but you also have to replace many things too for that very reason. They will fail sooner or later.
So I wanted to ask how many miles before a timing chain tensioner will fail? I am not planning on replacing mine now due to 45k miles only coupled with the fact that I would be putting a Febi one because the Genuine is way too expensive. What do you guys think?
 
Darvin, Gainsville Mercedes, has been an excellent resource for most parts the last few years.
They give us a discount and free shipping.
Darvin's phone is 352-642-1872
 
Not to freak you out but have you seen my thread: http://www.500eboard.com/forums/showthread.php?t=11814

Buy parts at mboemparts.com and use the free shipping 500EPROMO code.


Thanks for the link and code Ricardo. I already paid for the other stuff but I will check that out for next parts.

What should I be freaked out about Ricardo? Thanks for the heads up anyway...

I have the guide rail puller and the air pump, fan and radiator are out of the car.

I know I havent done a lot of work on m119 but I have done extensive engine work on m272 v6 before.

Any particular warnings you have for me? Much appreciated
 
I will be inspecting the upper rails so when I remove the valve covers I will be replacing several things before reinstalling... Will probably put aluminium cam oilers too...
 
What should I be freaked out about Ricardo? Thanks for the heads up anyway...

Oh, I see you are going all the way, will be removing the timing chain cover, and addressing all the timing chain guide rails and timing chain tensioner. Good for you. Photos please of your progress. Best of luck. Nothing to freak out about then.
 
Sounds like you got a nice car.

I'm sure there will be some kinks to work out with it being low mileage and not driven a bunch. But I'm sure there's a ton of miles awaiting your future. Did you see the old threads where someone in LA got 590,000 miles on his 500e before a headgasket started leaking?

Dave has a lot of experience with W124's and M119s. He owns a bunch!

Tom Hanson, I would think should be your best friend for parts if you want discount + quick because of location. Might go out of state to save on tax.
 
I personally would not worry about replacing the tensioner on a low-mile car. It should be fine. On a high-mile car (say, over 200k) it is probably a good idea. The tensioner is oil-pressurized and generally shouldn't "wear out".

Also, if it were my car, I'd probably skip pulling the timing cover to replace the lower rails with only 45kmi. The ROI is questionable, especially if there is no evidence the car had been overheated at some point. If you pull the timing cover, be VERY careful not to bugger up the oil pan or head gaskets. I've never done this but I've read horror stories from other people (on other forums). Not easy, not fun, and if you're going to attempt it I'd consider pulling the engine to do the job. Pulling the timing cover will probably double the number of hours you'll have invested.

:seesaw:
 
Thanks for the info re the tensioner GSXR. I actually was waiting for your confirmation, I just knew you would have a clear answer!

No I am not taking the timing cover off, from reliable sources I am very confident that the lower ones will be ok...

I am just changing the uppers...

Any body have the Cam tool or has any idea how I can make one out of a socket and perhaps some washers etc?

May be on to buying some cam oilers from a helpful forum member!
 
Sounds like you got a nice car.

I'm sure there will be some kinks to work out with it being low mileage and not driven a bunch. But I'm sure there's a ton of miles awaiting your future. Did you see the old threads where someone in LA got 590,000 miles on his 500e before a headgasket started leaking?

Dave has a lot of experience with W124's and M119s. He owns a bunch!

Tom Hanson, I would think should be your best friend for parts if you want discount + quick because of location. Might go out of state to save on tax.

Hey well its beautiful interior with original telephone radio etc. leather is in great shape.

Just unfortunately low mileage and 22 years means I have to replace many things. I am happy to do as long as the main items suvh as engine and transmission are ok for many miles.

suspension items will be replaced in due course. Not long before this car look very different. The skinny but lovely looking wheels will have to go at some point too!

I did not want to have to get a new car as a daily. I love W124s so Im putting in some effort now to tidy this up now and then gradually do more and more.

Sitting in this car feels very special. Not like any other w124 I have owned.
 
I will take pictures of the process for sure and upload. I know that many others visit this forum for help and so I would like to contribute too.

B the way I have finished putting together a complete new exhaust system from the down pipes all the way back. It may be a bit too loud though. Still havent started the car though!:gsxrock:


Anyone have that cam gear socket tool??
 
Ok from a bit more reading and checking the manual, I am going to just remove the whole camshaft without removing the adjuster.

I am ONLY replacing the 3 upper guide rails. So if anyone has any experience or warnings please let me know, much appreciated...
 
Anyone have that cam gear socket tool??
Someone posted in a thread a while ago that they were able to re-assemble the adjusters without the special tool. It is more of a convenience thing, it compresses the internal spring and makes assembly easier. I think it would be more work removing the entire camshaft but I've never done that so I can't say for certain.

:seesaw:
 
Thanks GSXR

I appreciate all of your effort on this and other forums.

I received all the upper guides and gaskets from Mercedes.
Will postpone doing this job for a.few weeks until I have everything else. Such as the air pump delete bracket. The tool maybe. Will probably change the tensioner.
I haven't even driven this car yet. Hopefully it is good and justifies the further expense.
 
Will postpone doing this job for a.few weeks until I have everything else. Such as the air pump delete bracket.
I assume you know the air pump delete will trigger a CEL on the dash, and also a code on the LH module? The engine will run fine but you'll either need to live with a permanent CEL, or pull the bulb, which will cause issues for emissions testing in CA. Depending on the test station you might have issues with visual inspection as well, if they know to look for the pump.

:cel:
 
Hi guys,

well a long delay resulted because I could not get the car to stay running above 60 degrees. If you happened to see my other thread, it turned out the crap Duralast ignition coils were the problem causing the EZL to cut off due to heat (thats the theory at the moment :).

So now I'm aiming to replace the timing guides and upper rails this weekend. I am planning on removing the Entire Camshaft (not just the adjuster alone).

I know I'll probably figure it out by looking at it, but I would like to know which Camshafts will need to be removed and whats the best way to ensure that the timing chain does not slip off the other gears?

I'm not taking the timing cover off by the way..I am hoping to change the oilers to ALuminium if I can agree a sale with Stevester
 
Thanks Ricardo,

Yes I am relieved to have read from many people's posts (or is it just many of Dave's posts :agree: ) that the lower ones are likely to be ok.

Getting started tomorrow hopefully.

Wish I had already bought my smog pump delete bracket, would have saved some time...
 
Timing chains life depends on oil changes and type of oil. They tend to last pretty well on synthetic oil. The OEM supplier is IWIS and that a good solution if you needed one- which I don't think you do. FEBI is a reboxer and some stuff is good.. some stuff is junk.
Generally, the MB stuff has great quality if it can be had for a reasonable price. Those guide rails- OE is the way to go. As you noted, the valve cover gaskets are nearly the same cost- and when you go to install them you'll be glad. They fit and seal better.
 
Hi thank you,

I did get all genuine plastic timing parts. I bought a Febi Timing tensioner though. I dont mind though because its much easier to change if I need to change it. My idea is that the life of the chain will be fine with new guides and a tensioner.

Hopefully I will be able to get through the job without sweating over the chain and sprocket position. Will properly mark it and take a pic just in case I start doubting myself :D
 
Guys
I wish I knew that the power steering pump had to be removed to access the timing guide rail pins on left engine.

The pump apparently is removed from behind?

Do I need to remove it completely? Or just get it out of the way?

Is the 2 rear bolts and one front Allen head?

Much appreciated


Sent from my SM-N950U using Tapatalk
 
I forget exactly, but you may have to remove the PS pump bracket from the engine, not just the pump? This is a real PITA (not to mention the whole chain rail job itself which is a separate PITA). The photos here may help a little, note there are 2 front bolts and 2 rear bolts which attach the pump to the bracket, then separate bolts which attach the bracket to the engine block:
http://www.w124performance.com/images/M119/PS_pumps/

I forget if there are 2 or 3 separate bolts which attach the bracket to the block, scroll down to "tandem_pump" photos here:
http://www.w124performance.com/images/cars/93_500E_Garnet_Red/restoration/

If you need to remove the smog/air pump bracket, don't forget to use anaerobic sealant on the 3 bolt threads as shown here, or you'll get a nice oil leak above the alternator:
http://www.w124performance.com/images/cars/93_500E_Garnet_Red/restoration/cleaning3.jpg

Couple more pics which may be useful if you haven't seen them:
http://www.w124performance.com/images/cars/93_500E_Garnet_Red/restoration/chain_rails3.jpg
http://www.w124performance.com/images/cars/93_500E_Garnet_Red/restoration/chain_rails4.jpg


While the P/S pump is out, at least change the short hose between reservoir and pump, and I'd change the S-shaped hose too.
http://www.w124performance.com/images/M119/PS_pumps/ps_hose1.jpg
http://www.w124performance.com/images/M119/PS_pumps/ps_hose3.jpg


:sawzall:
Wow Dave
Thank you for putting so much effort into your response.

I am on a side street doing all this stuff. I really should have waited to do it in a garage in a few weeks time. Now I have to go under the car to get the PS bracket bolts off.

I am also replacing the air conditioning Compressor.

So far none of the rails look damaged. But I bet they are close being 22 years old. All oilers are in tact as you had previously suspected.

I'm thinking I just remove the bracket from the car and the pump would be attached to the bracket? I'm scared to dismantle the pump accidentally by removing the front 13mm bolts!

By the way I pinned the cams but I had to move the crank until it reached approx 40 BTDC to be able to pin the cams with some m6 bolts I had. So this means it's 5 degrees off? Seems pretty big difference to me for 45k miles.

Sent from my SM-N950U using Tapatalk
 
Here is a pic when all 4 cams are pinned. Supposed to be 45 BTDC. But it went to 40 btdc

20180407_101711.jpg

Sent from my SM-N950U using Tapatalk
 
Yes, you can remove the pump+bracket together, but don't forget to remove both hoses. I think there are 2 bolts on the back side, and both are difficult to access. You can see both here:
http://www.w124performance.com/imag...993_500E_engine_loaded/full_engine05_left.jpg

The pump is held to the bracket with two 13mm hex bolts up front, and two Allen / socket-head bolts on the back side. There's no issue removing the pump from the bracket, but don't take the pump apart unless the front shaft seal is leaking (pretty common leak, btw).

For the chain stretch, it's unusual to be able to pin all 4 cams at the same time with an old chain and guides. Generally the driver side exhaust cam pins first, but opposite side (passenger exhaust) will pin last and require more movement. The very rough guide is to rotate just barely enough to pin the passenger exhaust cam, and read the balancer. In this position the driver exhaust cam (and/or either intake cam) may not be pinnable. Your photo does show 5° stretch, however if the inside guides have the lower portion snapped off (can't tell until you remove them), that may be part of the reason.

I believe up to 3-4° stretch is normal for a used chain with all guides intact, measured via the method above. As a reference, my '93 with 190kmi on it measured 4-5° off at the passenger exhaust cam, with some broken guides. I replaced the guides but did not replace the chain. With only the guides replaced, the chain measured 2° off at the passenger exhaust, and almost zero off at the other three cams. Unfortunately I don't know if the chain was ever replaced by a PO.

:scratchchin:
Thanks again for the great info Dave.

I have a habit of starting major work when I'm not in the best position to.do So.

The power steering pump removal totally threw me today and I wasted a good couple.of.hours trying to figure it out. I stopped for.the day and will continue in the morning.

I have released the tensioner but yet the chain.still is not properly coming off the right exhaust cam sprocket. I'm removing the whole camshaft, not wanting to mess with the adjuster.

I guess I will have wiggle more again tomorrow.

Do we really have to rotate the camshafts to release tension? I've never done this before. I just gently start loosening the bolts on the cam bearing thing starting from the centre and working outwards.

Hoping I don't mess it up

Sent from my SM-N950U using Tapatalk
 
That's pretty impressive that you had very little stretch at almost 200 k miles Dave.

Now that I am actually doing the job, I'm kind if hoping that it was not a waste of time. Maybe the 5 degree difference is a partially damaged guide. Will see tomorrow as long as I get that PS pump off!

Sent from my SM-N950U using Tapatalk
 
Ok got the power steering bracket off.
Took out
sway bar
That plastic pipe to cool engine mounts one 8mm one 10mm
Took out AC compressor as I'm changing it anyway. 4 13mm bolts plus a 6mm bolt for the metal hose. Unclup wire from top.

My car has two 13mm bolts from the rear and one 6mm Allen from front. Of course because I took so many things out I did not need to use any extensions to remove these bolts.

Sent from my SM-N950U using Tapatalk
 
Guys I've removed all the camshaft caps that hold the right exhaust camshaft down. But the camshaft will not come out.
I'm right in the middle of finally making progress with doing these timing rail guides and now yet another complication!

Please if u have advice let me know! It's Sunday and I need to do a lot of the work today. Then start putting things together again tomorrow and Tuesday.

Thanks in advance

Sent from my SM-N950U using Tapatalk
 
The exhaust camshaft should not need to come out... just unbolt the sprocket. I assumed you wanted to remove the intake camshafts to avoid disassembling the advance mechanism.

Can you post a photo? Make sure none of the cam lobes are pressing down on a lifter, or you risk damaging (breaking) the camshaft.

:duck:
 
Ok I managed to get the cams out. Needed to rotate clockwise a tiny bit with chain off of course

Sent from my SM-N950U using Tapatalk
 
Great now the guide rail puller tool just snapped as I took out the drivers side inner (closest to intake) rails pins. I think I will be unable to remove the drivers side exhaust side timing guide rail. So all that removing the PS pump and now I'm screwed.

By the way none of the guides are broken or cracked in any way. I'll post up pics in the evening as I'm really in a difficult spot.

So I just leave that guide alone seeing as it's not broken or do I wait and buy another tool with express shipping. Car is on the street so I really need to get on..

Sent from my SM-N950U using Tapatalk
 
Well I'm going to buy another tool to.remove that pin from the last guide I'm going to change. I just think that if i can receive the tool by Tuesday or even.wednesday I can remove that last pin and replace the last guide. I mean I've already got the PS pump.and air con compressor disconnected.


Wow what a mess this job is. Not to mention doing it on the street.

Taking off the cams was really no drama. I had been very worried but truthfully all you need to do is start just lightly loosening the bolts holding the cam down starting from the middle and working out. I paid attention to a particular lobe near that had pressure on it. So I loosened that slightly more than the others. Then continue loosening the others to make sure the camshaft is not being bent at all.

That was it. Mark or take pictures of the cam bearing numbers and put them in the exact space you removed it from. Do not mix and match.

Anyway I will write a longer post in a few days when I've finished.

There are a few steps in the process of replacing the timing chain guides that need to be made very clear for people. Before they get a fat shock and realise there is a lot more work to do..

Sent from my SM-N950U using Tapatalk
 
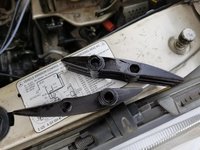
Old guides. There are the 2 identical ones. No cracks whatsoever.

New air con compressor.

Last pic showing the 3rd guide that I'm yet to remove. When I buy the special tool again then I will remove in next couple of days

20180408_174116.jpg 20180408_144812.jpg

20180408_144806.jpg 20180408_144717(0).jpg

Sent from my SM-N950U using Tapatalk
 
3 cams removed. Will be removing the last when I get the tool to remove the rail again.

20180408_133712.jpg

Sent from my SM-N950U using Tapatalk
 
Made my own tool that worked perfectly.

So now I've replaced all 3 upper rails.

This 3rd one on drivers side nearest exhaust had some deep wear on on portion that would eventually crack the rail. I'll try to remember to take a pic tomorrow

20180409_184015.jpg

Sent from my SM-N950U using Tapatalk
 
So I had a long route to finally getting my anaerobic sealant.

I thought the Renzonplast sealant would do the job. Ordered it and waitied a few days but it is not the anaerobic flange sealant that I needed. Great quality item but not for the timing covers though.

Maybe someone can tell me where I can use this in a Benz:

http://datenblatt.reinz.de/web1/en/produkte/Dichtmassen/reinzoplast/td_reinzoplast_e.pdf?bct=21


So ended up buying 51531 Permatex anaerobic flange sealant.
 
for anyone seeing this in future:
The tool I made was:
80mm long M6 bolt with 1.0 thread pitch. As strong as you can find, do not use weak metal.

M6 nut

Various washers, two of each. I think I had M7, M9 and M11 or something. You just need to ensure that it evenly distributes the pressure.

A 13mm socket 1/4 inch, not very long or short. Please see pic above.

All from Home Depot
 
GUYS could anyone please tell me of the upper passenger side guide rail is installed with the wider part at the top pin or the lower pin?

I can't get the chain to pass just one more tooth onto the correct spot. So I'm thinking I have put the guide on wrong

20180410_192333.jpg

Sent from my SM-N950U using Tapatalk
 
GUYS could anyone please tell me of the upper passenger side guide rail is installed with the wider part at the top pin or the lower pin?

I can't get the chain to pass just one more tooth onto the correct spot. So I'm thinking I have put the guide on wrong
From memory... the guides are designed such that they cannot be installed backwards.

:?:
 
Thats what I think as well. I tried installling it with the wider part DOWNWARDS but it would not go in properly.

SO Im curuious why there is one tooth that I can not get the chain onto. Head-scratching time.

All 3 cams (excluding the passengerside exhaust, last one to install) are pinned and the chain is at the correct spot as before removal...
 
YEs the tensioner is not installed yet. Im putting that in last.

When you say backwards you mean Upside down right? Becuase I mean upside down. I know the smooth part faces the chain. Just checking...
 

Who has viewed this thread (Total: 2) View details

Back
Top