• Hi Guest !

    Welcome to the 500Eboard forum.

    Since its founding in late 2008, 500Eboard has become the leading resource on the Internet for all things related to the Mercedes-Benz 500E and E500. In recent years, we have also expanded to include the 400E and E420 models, which are directly related to the 500E/E500.

    We invite you to browse and take advantage of the information and resources here on the site. If you find helpful information, please register for full membership, and you'll find even more resources available. Feel free to ask questions, and make liberal use of the "Search" function to find answers.

    We hope you will become an active contributor to the community!

    Sincerely,
    500Eboard Management

W124 HEATED SEATS WIRING

August Forster

Active member
Member
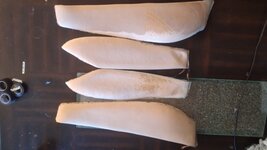
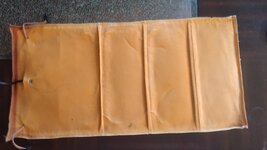
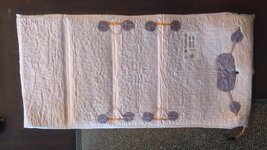
Hello everyone! I'm adding heated seats to 1994 E320. The heating elements are going to be from another chassis.
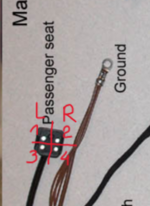
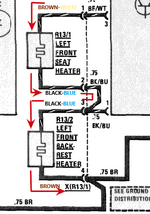
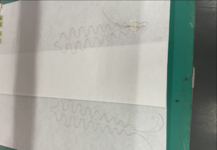
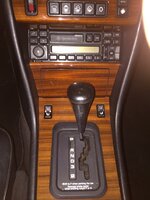
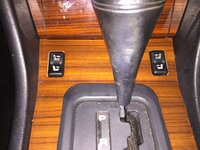
Therefore, I need to find out the distribution (bottom/back & +/-) of the mother plug-in cable. I have marked each of them in the attached below screenshots.
If you know the wiring distribution in this circuits please share. Thank you so much in advance!
 

Attachments

  • Screenshot (98).png
    Screenshot (98).png
    63.6 KB · Views: 9
  • Scre2 (98).png
    Scre2 (98).png
    64.8 KB · Views: 9
Looks like seat and back-rest are connected in series. Is it the correct interpretation below? (I may indicate wrong direction of the current)
I'm not 100% certain. Note that the factory seats have SIX separate heating elements. The bottom has a left, center, and right element... ditto for the backrest. I vaguely recall that on low heat these are somehow run in series, and on high heat they are in parallel, but I haven't looked at this stuff in 10+ years. I upgraded my 1987 300D to heated seats (all factory parts, with '94 E500 seats) something like 15 years ago. Works great but I wasn't messing with aftermarket elements.

:tumble:
 
Happy Thanksgiving Day to all US based members!
Does anyone have a good idea on how to clean seat heating elements.? I have removed them and wanted to give them good clean before stitching in in order to remove odor and oily/sweaty residue build up. Central elements are embedded in fine sponge layer, the side panels are thicker.
 

Attachments

  • 20221124_100943 (1).jpg
    20221124_100943 (1).jpg
    1.8 MB · Views: 10
  • 20221124_100903.jpg
    20221124_100903.jpg
    2.7 MB · Views: 10
  • 20221124_100643.jpg
    20221124_100643.jpg
    710.7 KB · Views: 10
  • 20221124_100838.jpg
    20221124_100838.jpg
    1.6 MB · Views: 10
  • 20221124_100730.jpg
    20221124_100730.jpg
    1.1 MB · Views: 10
Happy Thanksgiving Day to all US based members!
Does anyone have a good idea on how to clean seat heating elements.? I have removed them and wanted to give them good clean before stitching in in order to remove odor and oily/sweaty residue build up. Central elements are embedded in fine sponge layer, the side panels are thicker.
How did the upgrade go? Was it an easy project?
 
How did the upgrade go? Was it an easy project?
The upgrade is successful. It is not really difficult project. It requires patience and hand sewing skills (this is how I did it). I did not completely separate the backrest cover from the metal spring frame - so it was the most challenging part in terms of access to the stitching field, particularly the upper 1/3 section. Also, I decided not to use the original side panel elements. Because firstly they were very dirty, secondly it is really impossible to trim them because one cant see where the wiring is running (unlike the major elements which are thin and transparent); and thirdly since they are thick stitching together two thick foam edges would have created a very protruding grove with possible undesirable cosmetic effects on the outside of the leather. So, I ordered from China custom-size wire elements on a felt layers (with corresponding resistance) and placed them on top of the side panel foams right beneath the leather.
The only thing that I'm not fully happy is that there is about 1 minute delay between switching heater on and before I start feeling heat. Maybe it is normal, but I would like to feel immediate response from the elements. But when it heats up in maximal mode it is very comfortable.
Hope, this would help you!
P.S. I'll check if I have left over of those customized side panel elements and will attach photos.
 
The only thing that Im not fully happy is that there is about 1 minute delay between switching heater on and before I start feeling heat. Maybe it is normal, but I would like to feel immediate response from the elements.
This is normal. You will never feel immediate heat from the elements, and it will take even longer in cold weather when you are wearing thicker clothing and/or more layers of clothes.

🔥


200.gif
 
everything has been done as if it was made in MB factory in Stuttgart (I replaced the central console wood panel as well)
 

Attachments

  • WhatsApp Image 2023-05-21 at 22.37.33.jpg
    WhatsApp Image 2023-05-21 at 22.37.33.jpg
    86 KB · Views: 8
  • WhatsApp Image 2023-05-551 at 22.37.33.jpg
    WhatsApp Image 2023-05-551 at 22.37.33.jpg
    117.9 KB · Views: 8
Where did you source the heated seat parts? I'm considering this eventually for my 94 e420
I bought all equipment from eBay sellers.
1)wiring harness (included switches/fuse)
2)relay
3)leather covers with heating elements
4) side panels I ordered from Chinese manufacturer (again on eBay)
========================================
It is not a difficult job at all. Just requires patience. Remember, that W124 heating elements are integrated part of the leather covers. Therefore you will need to carefully cut the donor covers along the suture lines in order to remove all elements intactly. Or, alternatively, if you do not wish to stitch elements into your own leather covers you may just install the heated covers into your seats. The bottom seat cover is easy to separate from its steel frame+cushioning pad made of coconut and horse hair. But the backrest cover is difficult to separate from the frame at the top and also it may irreversibly wrinkle the leather on the corners of the seats.. In my case, since I was installing elements into my covers, I separated them (my backrest cover and it's frame) partially which gave me enough space to access the farthest upper 1/3 compartment of the backrest inner foam layer (there is also the outer thick foam layer which serves as insulation and cushioning - you need to cut it along three sides in order to open them (all three compartments) like a window in order to gain access to the thin foam layer) cut it out leaving about 5-8 mm free edges along the perimeter and stitch it together with the foam edges (along the entire rectangular perimeter) of the donor heating element with running suture. And this is done in every three compartment of the backrest cover. The connecting wirings between compartments I fed through outer thick foam layer then through the incision in the fabric that holds steel rods (those that clip the cover to the hair pad layer).
Good luck with the project!
 

Who has viewed this thread (Total: 1) View details

Who has watched this thread (Total: 3) View details

Back
Top