Background
I'm embarrassed to admit how many years it's been since I replaced my brake fluid on my E500, but it's probably been triple the MB-specified maintenance interval. Seeing as I had my Motive Power Bleeder out recently to do my 560SEC brake fluid change, it made sense to leave it out in the garage as motivation to (finally) change & bleed the brakes on my E500 as well.
I could see that the fluid, through the opaque brake fluid reservoir, was around the color of Coca-Cola ... damn dark. I've been meaning to do this job probably for the past two to three years, at least.
This HOW-TO procedure is for all E500E models, as well as 400E/E420 models with ASR. For the average DIYer, it requires approximately one hour of time. On a 1-10 scale of difficulty, this job is rated as a 2-2.5.
Tools Needed
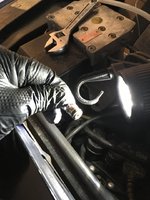
The first step in this job is proper preparation. You need to put a fender cover over the driver's side fender of the car, and preferably cover it with a second layer, say an old beach towel or other thick rag. Also, place a few rags directly around the brake fluid reservoir, and one underneath the rear edge of the ABS/ASR pump to catch errant fluid.
See the photos below for how I placed these items in and around the engine bay.


Next, remove the cover from the ABS/ASR pump. It is a black plastic cover and it just pulls straight up and off. There are a couple of weak catches on the underside of the cover, but if you flex it at the ends with your fingers, the catches will release and you can easily lift off the cover.


Here is the top of the ABS/ASR pump, exposed. Note in the second photo, the "SP" bleeder valve, at the rear left (passenger side) corner as you are in front of the car looking down at the pump.


Remove the small, blue plastic cap from the "SP" bleeder valve. As you can see, it is a hinged cap and the hinge part broke when I pulled off the cap. Set the blue plastic cap aside, perhaps inside of the ABS/ASR pump plastic cover sitting on top of the airbox.


Remove the driver's side air intake tube. Be careful and don't rip or crease the foam -- doing so will significantly, and negatively, impact your chick magnetism !!!

Place your brake fluid catch container down between the engine and the frame of the car, and prepare to attach your bleeder attachment to the bleeder valve.


Attach the bleeder hose and insert the end of it into the catch container. With your 11mm open end of your combination wrench, slowly open the bleeder valve. It will let loose with a spray and stream of brake fluid into the container. Let it drain as much as it can into the container.


Here's the amount of brake fluid that drained into the catch container from the ABS/ASR pump. When it's drained, close the bleeder valve with your 11mm wrench.

Next, it's time to turn your attention to the brake fluid reservoir. First, clean the top of it off with a rag, and ensure that you have rags placed all around it to catch any brake fluid drips. Loosen and remove the cap, and with your fingers remove the inner screen. Place them also inside the up-turned ABS/ASR pump cover on the airbox.


With a small hand pump, or turkey baster (what I used), remove brake fluid in the reservoir until the level is at least down to or slightly below the "MIN" mark in the reservoir. DO NOT remove ALL of the brake fluid from the reservoir -- you want to have a little bit in the bottom of the reservoir! Transfer your old brake fluid from the reservoir to the clear container.

Here's the cumulative fluid from the ABS/ASR pump and the reservoir.

Next, it's time to turn your attention to the power bleeder, and getting it set up correctly. First, you need to attach the cap of the power bleeder to the top of the reservoir, as below.


Then, add at least one liter of brake fluid to the power bleeder, and screw the cap on the top of the power bleeder. Use the pump to pump it up to ~25 psi.


When you pump up the power bleeder, you'll see just a bit of fluid begin to creep up the hose from the bleeder reservoir to the brake reservoir. This is normal.

Now, it's time to begin bleeding each of the calipers. Start at the passenger side rear wheel, and using your 9mm wrench, follow the normal bleeding procedure. Make sure you remove enough fluid so that you have a clear stream of new fluid (in my case, blue fluid) coming through the caliper and into the reservoir. Then tighten the bleeder valve back up.
Proceed from the passenger side rear caliper; go to the driver's side rear caliper; then to the passenger side front caliper; and end up at the driver's side front caliper. You should bleed out just about one liter of fluid from all of the calipers, collectively.


I broke out a fresh liter of ATE Super Bloo fluid, just in case I needed it....

The next step is to start up the car, and while it's idling, use your 11mm wrench and bleeder hose to re-bleed the ABS/ASR pump. You want to open that pump bleeder valve and let it flow into the bottle, until a clear stream of new fluid is running into your collection container. When this happens, tighten the bleeder valve back up on the pump, and turn the car off.
After doing this, carefully de-pressurize your power bleeder reservoir, and remove the bleeder cap from the top of the reservoir. Get into the car, and step on the brake pedal a few times. It will be a bit spongy at first, but should firm up quickly.
Then, check the level of the brake fluid in the reservoir. Ensure it's at or near the "MAX" mark on the reservoir. Replace the screen and cap onto the top of the reservoir.


Replace the small blue cap onto the end of the ABS/ASR pump bleeder valve (I need to find a new one, if available .. though mine is still serviceable). Replace the black plastic cover on the top of the pump. Replace the driver's side intake foam air hose, and you are done with the job.


Lastly, take the car for a short test drive, to ensure there are no leaks and that the brake pedal feels correct. You're done !!
I'm embarrassed to admit how many years it's been since I replaced my brake fluid on my E500, but it's probably been triple the MB-specified maintenance interval. Seeing as I had my Motive Power Bleeder out recently to do my 560SEC brake fluid change, it made sense to leave it out in the garage as motivation to (finally) change & bleed the brakes on my E500 as well.
I could see that the fluid, through the opaque brake fluid reservoir, was around the color of Coca-Cola ... damn dark. I've been meaning to do this job probably for the past two to three years, at least.
This HOW-TO procedure is for all E500E models, as well as 400E/E420 models with ASR. For the average DIYer, it requires approximately one hour of time. On a 1-10 scale of difficulty, this job is rated as a 2-2.5.
Tools Needed
- Motive Power Bleeder (or other commercial or home-made pressure bleeder)
- 11mm combination wrench
- 9mm combination wrench
- Large clear water or soda bottle
- 3-4 shop rags
- Towels or other fender cover (to protect paint from brake fluid spills)
- 1-2 liters of DOT4-spec brake fluid
The first step in this job is proper preparation. You need to put a fender cover over the driver's side fender of the car, and preferably cover it with a second layer, say an old beach towel or other thick rag. Also, place a few rags directly around the brake fluid reservoir, and one underneath the rear edge of the ABS/ASR pump to catch errant fluid.
See the photos below for how I placed these items in and around the engine bay.
Next, remove the cover from the ABS/ASR pump. It is a black plastic cover and it just pulls straight up and off. There are a couple of weak catches on the underside of the cover, but if you flex it at the ends with your fingers, the catches will release and you can easily lift off the cover.
Here is the top of the ABS/ASR pump, exposed. Note in the second photo, the "SP" bleeder valve, at the rear left (passenger side) corner as you are in front of the car looking down at the pump.
Remove the small, blue plastic cap from the "SP" bleeder valve. As you can see, it is a hinged cap and the hinge part broke when I pulled off the cap. Set the blue plastic cap aside, perhaps inside of the ABS/ASR pump plastic cover sitting on top of the airbox.
Remove the driver's side air intake tube. Be careful and don't rip or crease the foam -- doing so will significantly, and negatively, impact your chick magnetism !!!
Place your brake fluid catch container down between the engine and the frame of the car, and prepare to attach your bleeder attachment to the bleeder valve.
Attach the bleeder hose and insert the end of it into the catch container. With your 11mm open end of your combination wrench, slowly open the bleeder valve. It will let loose with a spray and stream of brake fluid into the container. Let it drain as much as it can into the container.
Here's the amount of brake fluid that drained into the catch container from the ABS/ASR pump. When it's drained, close the bleeder valve with your 11mm wrench.
Next, it's time to turn your attention to the brake fluid reservoir. First, clean the top of it off with a rag, and ensure that you have rags placed all around it to catch any brake fluid drips. Loosen and remove the cap, and with your fingers remove the inner screen. Place them also inside the up-turned ABS/ASR pump cover on the airbox.
With a small hand pump, or turkey baster (what I used), remove brake fluid in the reservoir until the level is at least down to or slightly below the "MIN" mark in the reservoir. DO NOT remove ALL of the brake fluid from the reservoir -- you want to have a little bit in the bottom of the reservoir! Transfer your old brake fluid from the reservoir to the clear container.
Here's the cumulative fluid from the ABS/ASR pump and the reservoir.
Next, it's time to turn your attention to the power bleeder, and getting it set up correctly. First, you need to attach the cap of the power bleeder to the top of the reservoir, as below.
Then, add at least one liter of brake fluid to the power bleeder, and screw the cap on the top of the power bleeder. Use the pump to pump it up to ~25 psi.
When you pump up the power bleeder, you'll see just a bit of fluid begin to creep up the hose from the bleeder reservoir to the brake reservoir. This is normal.
Now, it's time to begin bleeding each of the calipers. Start at the passenger side rear wheel, and using your 9mm wrench, follow the normal bleeding procedure. Make sure you remove enough fluid so that you have a clear stream of new fluid (in my case, blue fluid) coming through the caliper and into the reservoir. Then tighten the bleeder valve back up.
Proceed from the passenger side rear caliper; go to the driver's side rear caliper; then to the passenger side front caliper; and end up at the driver's side front caliper. You should bleed out just about one liter of fluid from all of the calipers, collectively.
I broke out a fresh liter of ATE Super Bloo fluid, just in case I needed it....
The next step is to start up the car, and while it's idling, use your 11mm wrench and bleeder hose to re-bleed the ABS/ASR pump. You want to open that pump bleeder valve and let it flow into the bottle, until a clear stream of new fluid is running into your collection container. When this happens, tighten the bleeder valve back up on the pump, and turn the car off.
After doing this, carefully de-pressurize your power bleeder reservoir, and remove the bleeder cap from the top of the reservoir. Get into the car, and step on the brake pedal a few times. It will be a bit spongy at first, but should firm up quickly.
Then, check the level of the brake fluid in the reservoir. Ensure it's at or near the "MAX" mark on the reservoir. Replace the screen and cap onto the top of the reservoir.
Replace the small blue cap onto the end of the ABS/ASR pump bleeder valve (I need to find a new one, if available .. though mine is still serviceable). Replace the black plastic cover on the top of the pump. Replace the driver's side intake foam air hose, and you are done with the job.
Lastly, take the car for a short test drive, to ensure there are no leaks and that the brake pedal feels correct. You're done !!


") neil
neil