• Hi Guest !

    Welcome to the 500Eboard forum.

    Since its founding in late 2008, 500Eboard has become the leading resource on the Internet for all things related to the Mercedes-Benz 500E and E500. In recent years, we have also expanded to include the 400E and E420 models, which are directly related to the 500E/E500.

    We invite you to browse and take advantage of the information and resources here on the site. If you find helpful information, please register for full membership, and you'll find even more resources available. Feel free to ask questions, and make liberal use of the "Search" function to find answers.

    We hope you will become an active contributor to the community!

    Sincerely,
    500Eboard Management

M119 timing chain rail replacement question

I did get the timing cover removed a couple days ago. Not the easiest task – it’s a tight fit! Taking the upper sum pan off is almost essential I would say. That’s how I got mine off. Note that the upper sump pan comes off then the oil pump comes off.

Interesting at 45 degrees before TDC the oil level sender will NOT come out. The con rod big end cap blocks it from coming out. So that sucks – you must then move the crank to get the single pin plug out of the block. I preferred doing that than taking off the other end of the sender unit at the oil pump and risk breaking the wire.

Then a small copper faced dead blow hammer was used to knock the timing cover free. Do take the crank bolt off and the oil pump chain just hangs there – you can’t get it off the sprocket. So the timing cover is taken off and tilted out and down to clear the oil pump chain.

The new Febi timing chain kit arrived today, was made in Germany and has a Swag tensioner with IWIS chain. All looks good and OEM quality. I did check the chains and they are a match albeit you can just see the older chain is a tiny fraction longer due to wear. Good idea to be changing it then. It sure is nice to be replacing all of the guides.

Note also that the new IWIS timing chain came as one piece – therefore if you do not take the timing cover off I think you might have to split a link and re-crimp it :sawzall: However since my timing cover is off the chain will set in there and go where it needs to with ease as one piece.

Also – there was old guide shrapnel in inaccessible areas behind the timing cover so it is good to give it a thorough clean up. Waiting on the 2x new O rings and sealant from the dealer (With a huge laundry list of sundries) before I can fit the timing cover back on. But I might also wait until I have the valve stem oil seals changed as I will need to be turning the crank to do that and I do not want the chain binding up behind there.

20190615_165306.jpg 20190615_165310.jpg
 
I am also going to carry out a leak down test on this engine before deciding if I should pull the heads at this stage for valve lapping etc. I have a quality leak down tester coming in the post this week. As a point of reference has anyone carried out a leak down test on an m119 and if so do you recall the % drop?

I have read that generally speaking (aka not Mercedes specific!!!) 5 - 10% is very good - top condition. 10 - 20% is a worn but acceptable engine. Anything under that is regarded as repair needed.

I am most interested in determining If any valves are leaking and could do with lapping..... would be nice to clean up all carbon too. A familiar slippery and expensive slope :blink:
 
For those who never wondered, the reason the engine timing is set up at 45degrees before TDC is because all pistons are down out of the way of the valves just enough in the event the cams turn during head / chain install you dont have valves making contact with the pistons.

20191105_204936.jpg
 
That block looks mighty dirty ... :stickpoke:

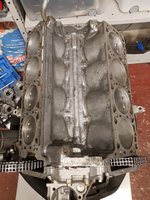
Indeed it needs a clean up from sitting around before the heads go back on tomorrow. I'm just glad you didn't mention the timing cover sealant :ignore:
 
Indeed it needs a clean up from sitting around before the heads go back on tomorrow. I'm just glad you didn't mention the timing cover sealant :ignore:
Be glad you don't have an M104. The upper timing cover on the M104 (aka the "Bermuda Triangle" as three dissimilar pieces fit together here) requires a couple of different types of timing cover sealant. One of the timing cover sealants is made partly from Japanese satsumas and Australian koala-bear claws.

 
Be glad you don't have an M104. The upper timing cover on the M104 (aka the "Bermuda Triangle" as three dissimilar pieces fit together here) requires a couple of different types of timing cover sealant.


Yes good point not easy on m104s either BTDT (FWIW I have 6x m104s :scratchchin: ) An m119 timing cover re-seal in the car would be very difficult.
 
...6+16 can be easily changed.

Inner rails 8+14 require removal of the intake cam sprockets / advance mechanism and is a RPITA. However, these are often broken, and should be closely inspected, particularly the bottom portion which can snap off and drop into the timing cavity. Use a flashlight to check for pieces floating around that don't belong.
So for 8 and 14 - basically what's involved is what @gerryvz is demonstrating in this post 270 RESTO PROJECT: M119 / W124 / E500 Engine Top-End Refresh | Member Roadtrips and Project Journals
 
So for 8 and 14 - basically what's involved is what @gerryvz is demonstrating in this post 270 RESTO PROJECT: M119 / W124 / E500 Engine Top-End Refresh | Member Roadtrips and Project Journals
Correct. To replace these rails on the driver's side, you must remove the bracket that holds the tandem pump so that you can access the pins that hold the lower chain rail on. And you have to remove/disassemble the intake cam variable timing adjuster, re-assembly/installation of which requires an MB special tool.

I have read that people have re-installed the adjuster without the special tool, using homemade tools and/or hand pressure, but I tried for several hours and was ultimately unsuccessful, and bought the tool from MB. That allowed it to be re-assembled and installed in under 5 minutes. This tool also works for M104 intake cam adjuster reassembly.
Do you happen to know the part numbers for these 2 tools needed (pin extractor and the intake cam) so I can "prepare" better prepare myself for possibility of tackling the project?
 
Pin extractor is available cheaply on eBay, or you can make one yourself from a long bolt and a socket, and some washers. Easiest just to buy the extractor, though.

Uncle Kent sells a tool setup for like $13.00. On eBay you typically see them for around $25-30.

The intake cam tool is more expensive, and only from MB. MB part number 111 589 01 40 00

:update:

Oy! The tool has been discontinued!!! I just bought mine last year when doing my job, it was 2020 manufacture.
Screen Shot 2021-10-17 at 9.45.17 AM.jpg


Although it seems that some RevParts sites are still showing it as available....

Screen Shot 2021-10-17 at 9.47.44 AM.jpg
 
A quick update on my used m119 motor with 12.5 degrees chain stretch. This was due to broken upper guide rails. The chain was actually just beginning to kiss the metal slide pin in one location - since the lower sections of both upper middle slide rails were totally MIA!

83809-861e56653022ade26c68b4aabb1355e1.jpg 83810-5dacd5328ad4a74e1e5a275bb9d32320.jpg 83811-8c9db19d9fd56057a1f6e0341bcac1b1.jpg
Joe, can these rails be visually checked with valve covers off with a 100% certainty? My understanding is that the ones you are holding are #110 and I'm asking about them.

Is #113 a known offender? Can it be visually assessed with valve cover off as well?

Thanks!

image_2022-06-04_204546416.png
 
Both #110 can be assessed with the VC's removed. I think you can see #113 as well but #113 is less of a concern/failure, I believe, although if you have everything apart to replace the 110's then the 113 is easy.

:banana2:
 
Again, check my Top-End Refresh thread in the Project Journals forum. I talk about the tool as well as replacing all of the chain rails and what is required for each, and what can be done with and without special tools. It’s all in that thread.
 
Again, check my Top-End Refresh thread in the Project Journals forum. I talk about the tool as well as replacing all of the chain rails and what is required for each, and what can be done with and without special tools. It’s all in that thread.
Thanks! I remember your thread and it's where I'm going to plunge for the core
 
Joe, can these rails be visually checked with valve covers off with a 100% certainty? My understanding is that the ones you are holding are #110 and I'm asking about them.

Is #113 a known offender? Can it be visually assessed with valve cover off as well?

Thanks!

View attachment 148004
Pretty much what Dave said! Do you have records of these being renewed inside the past 10 years? If not I would just go ahead and get a full upper guide set and go ahead to plan on renewing them proactively. If one or more is not already damaged they will be soon so just renew them when you can and keep the records with the car.

The lower chain guides behind the timing cover generally never require replacement unless it is a super high mileage engine. The chain may have a little stretch but you can measure this before and after your upper guide replacement and see where it is at.
 
Both #110 can be assessed with the VC's removed.
Do you have records of these being renewed inside the past 10 years?
I pulled passenger valve cover. One can't really see #110, just the tip of it. Anyways, I've used a valve cover bolt, which is I understand is an M6 and both camshafts pinned perfectly at about 44 degrees :banana1:. This tells me that #110, at least on the passenger side, is intact. Odometer is at 148,500 mi

Screenshot_20220605-163244.jpg

2-3 years ago, when doing valvetrain cover gaskets, I've replaced left & right upper guides that are between the sprockets and they were fully intact, but started to break while being removed. Generally, it appears when I bought my car in 2014 with 98k mi in the odometer that it was untouched and nothing was worked on. Valvetrain cover gaskets were original (hard as rock), wiring harness turned to dust upon replacement (but did not cause any issues), and so on and so forth

Question: is it possible that with a proper Mercedes pinning tool the stretch will be radically (4-5 degrees) different vs M6 valve cover bolt?
 
Last edited:
Question: is it possible that with a proper Mercedes pinning tool the stretch will be radically (4-5 degrees) different vs M6 valve cover bolt?
The valve cover bolts are OK to use for this. Don't need the official MB pins will make no difference.

I bought an aftermarket MB timing tool set which includes 2 pairs of dual pins with chains so you can't drop them down the crankcase I would recommend something like that for a DIYr but in a pinch the bolts or drill bit etc is fine.

20191107_211604.jpg20191107_211618.jpg
 
Last edited:
Most everyone's top end looks clean, silver in color. Mine got a "Castrolized" look 🙂

PXL_20220605_214139754.jpg
 
Most everyone's top end looks clean, silver in color. Mine got a "Castrolized" look 🙂
Pure silver color generally indicates long-term full-synthetic use (maybe since new), combined with no OCI's beyond what the oil could safely withstand. I've seen a few M119's that look like this but I wouldn't say it's common, nor most M119's.

The yellow-ish look is perfectly normal and nothing to be concerned about. What you don't want is thick brown sludge, which is a Very Bad Thing (click here).

:jono:
 
Pure silver color generally indicates long-term full-synthetic use (maybe since new), combined with no OCI's beyond what the oil could safely withstand. I've seen a few M119's that look like this but I wouldn't say it's common, nor most M119's.

The yellow-ish look is perfectly normal and nothing to be concerned about. What you don't want is thick brown sludge, which is a Very Bad Thing (click here).
Since I bought it, at 98k mi, I was using synthetic oil, or, as for the last 2 runs, a semi-synthetic (LM 10W40 MoS2). Right now I have mineral 20w50 in sump 🙂. So that golden color emerged over the first 98k mi of the car's life
 
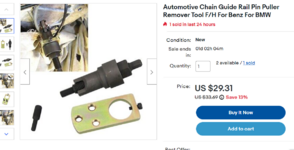
You'll need a chain rail pin puller tool, about $30 on eBay
That quote of yours above is from a 2010 :D (post #3). It seems they are still $30 on ebay 12 years later :). Will this one suffice for the upper V located timing guide replacement (#110 in the diagram, in post #63 above)?


1654577915351.png
 
Pure silver color generally indicates long-term full-synthetic use (maybe since new), combined with no OCI's beyond what the oil could safely withstand. I've seen a few M119's that look like this but I wouldn't say it's common, nor most M119's.

The yellow-ish look is perfectly normal and nothing to be concerned about. What you don't want is thick brown sludge, which is a Very Bad Thing (click here).
Gah… the prices discussed in that thread … 😭
 
That quote of yours above is from a 2010 :D (post #3). It seems they are still $30 on ebay 12 years later :). Will this one suffice for the upper V located timing guide replacement (#110 in the diagram, in post #63 above)?
I haven't done this job in nearly 10 years, but IIRC, yes - that type of tool should work ok. Make sure the pin threads are clean and that you have lots of threads engaged before you start pulling. It should come out with minimal effort.
 
That pin puller will work fine. If you can get one on eBay that is listed specifically for Mercedes, even better. They are cheap and can be used for all kinds of engines - M119, M117, M104, etc. It's a tool worth keeping and not selling if you plan to do any engine work over time. I've used mine on those three engines mentioned above. Actually, I have two of them -- one I received from a retired Mercedes dealership mechanic as part of a large group of tools and parts that I bought from him.
 
Man, gotta start finding out when nearby MB mechanics are retiring.

Did the Rh valve cover gasket, chain guide, and oil separator on my car a few weeks back at 242k mi. These were done w the chain at 150k mi in 2002 and I was worried the guides would be shot but they were totally fine. I thought the engine looked pretty good too - I use Castrol GTX 20W-50 mostly now, Mobil 1 15W-50 occasionally. The fact that it looked so good removed some of the urgency to do the LHS (and I was shipped the wrong gasket in the correct PN box).
 

Attachments

  • 31080A26-6FD0-4270-9FDF-B6581CE15EE5.jpeg
    31080A26-6FD0-4270-9FDF-B6581CE15EE5.jpeg
    1 MB · Views: 19
  • 56D3803D-AB64-477C-9B65-4E36781633D0.jpeg
    56D3803D-AB64-477C-9B65-4E36781633D0.jpeg
    875.4 KB · Views: 19
  • 7FD7F159-1197-43A9-83B6-DC85B63E59D5.jpeg
    7FD7F159-1197-43A9-83B6-DC85B63E59D5.jpeg
    1 MB · Views: 19
  • 4AA48089-1B43-4E2B-B6AD-0E15DEA15F69.jpeg
    4AA48089-1B43-4E2B-B6AD-0E15DEA15F69.jpeg
    989.5 KB · Views: 16
  • AF71A9A8-F33D-4B8F-9369-2FE186A8F83F.jpeg
    AF71A9A8-F33D-4B8F-9369-2FE186A8F83F.jpeg
    939.7 KB · Views: 19
I pulled passenger valve cover. One can't really see #110, just the tip of it. Anyways, I've used a valve cover bolt, which is I understand is an M6 and both camshafts pinned perfectly at about 44 degrees :banana1:. This tells me that #110, at least on the passenger side, is intact. Odometer is at 148,500 mi

View attachment 148042

2-3 years ago, when doing valvetrain cover gaskets, I've replaced left & right upper guides that are between the sprockets and they were fully intact, but started to break while being removed. Generally, it appears when I bought my car in 2014 with 98k mi in the odometer that it was untouched and nothing was worked on. Valvetrain cover gaskets were original (hard as rock), wiring harness turned to dust upon replacement (but did not cause any issues), and so on and so forth

Question: is it possible that with a proper Mercedes pinning tool the stretch will be radically (4-5 degrees) different vs M6 valve cover bolt?
My 29+ year old, 148k mi car is "annoying". I pulled driver side valvetrain cover and everything pinned at 44 degrees on it as well. On Monday I'll receive this tool, which I think is a tad more precise(?) vs an M6 valvetrain cover bolt, and, I have a feeling, everything will pin at 45 degrees. The camshaft seal on the passenger side looks to be original (made by BRUSS) and is bone dry and, I suspect and will shortly check, this will be the case as well on the driver side:
viber_image_2022-06-11_15-19-59-855.jpg

I've also removed the magnet from the passenger side. All of the circled areas are grimly (oil and dirt), including the electrical connecter that plugs into the magnet (it looks clean in the picture as I already sprayed it liberally with electronics cleaner). What is the most common point for the oil to escape from the magnets? Or could it be the metal cover itself?
PXL_20220611_184303886_LI.jpg
 
Pinning at ~44° is a Very Good Thing. This indicates that both the chain is fine, and the rails are mostly still intact. It's not common to have everything pin at 45° unless both the chain and rails are all brand new. The FSM implies that 1-2° deviation is normal after ~20kmi (20kkm?) break-in.

The magnet leaks from the halves of the metal body, and the electrical connector, in addition to the flanged sealing surface. You can either dismantle the magnet and attempt re-sealing (as detailed by @JC220 and someone else), or replace the magnet along with the new-style armature.

:bbq:
 
You can either dismantle the magnet and attempt re-sealing (as detailed by @JC220 and someone else), or replace the magnet along with the new-style armature.
I have new magnets and appropriate armatures on order.
 
Driver side camshaft seal, at 148k mi is also bone dry, just like the passenger side 😃. I'm wondering if I even should remove camshaft and replace upper V chain guides 🤔

Screenshot_20220611-162519.png
 
Since your cams are pinning at 44°... if you can see down the valley with a flashlight and confirm those guides are intact, you could skip replacement for now. I'm guessing they were already replaced at some point in the past (extremely doubtful originals from 1992-ish would be intact 30 years later). Only down side is that you'll want to pull the VC's again in 30-50kmi and re-inspect.

:seesaw:
 
I pulled passenger valve cover. One can't really see #110, just the tip of it. Anyways, I've used a valve cover bolt, which is I understand is an M6 and both camshafts pinned perfectly at about 44 degrees :banana1:. This tells me that #110, at least on the passenger side, is intact. Odometer is at 148,500 mi
I bought an aftermarket MB timing tool set which includes 2 pairs of dual pins with chains so you can't drop them down the crankcase I would recommend something like that for a DIYr but in a pinch the bolts or drill bit etc is fine.
Today I received this tool, which is what I think you have, Joe. It goes through the pilot holes in the camshaft bridge and camshaft sprocket more snuggly vs M6 valve cover bolt:

1655175960367.jpeg
1655175967786.jpeg

All 4 camshaft pinned:
1655176135578.jpeg

At a ..cking 45 degrees :yayo::
1655176232868.jpeg

About 148,500 mi on the odometer. The guides between the sprockets were replaced about 2 years ago by me and although they were completely intact, they crumbled up upon disassembly. I doubt the chain was ever replaced. I got the car with 98k mi on the clock and just about everything I've replaced on the car in my ownership was original (fan clutch, valve cover gaskets, water pump, and so on and so forth)

:124fast:
 
Last edited:
All 4 camshaft pinned @ 45 degrees :yayo::

About 148,500 mi on the odometer. The guides between the sprockets were replaced about 2 years ago by me and although they were completely intact, they crumbled up upon disassembly. I doubt the chain was ever replaced. I got the car with 98k mi on the clock and just about everything I've replaced on the car in my ownership was original (fan clutch, valve cover gaskets, water pump, and so on and so forth)
Sweet. Just confirms my theory that the M119 chain rarely stretches enough to require replacement, and that the typical cause for "stretch" is actually broken rails. You have no visible broken rails down the valleys, correct?

The top/upper "fingered" guides between the sprockets get the most heat and often break upon removal. While 2 years is a pretty short lifespan, the 50kmi may explain it. I assume they were intact until you touched them, and broke when you pried up the fingers for removal.

:duck:
 
The top/upper "fingered" guides between the sprockets get the most heat and often break upon removal. While 2 years is a pretty short lifespan, the 50kmi may explain it. I assume they were intact until you touched them, and broke when you pried up the fingers for removal.
I'll never master the ability to express myself clearly in English 😁. What I meant to say is that when I was replacing "fingered" guides 2 years ago, although they were intact, they've crumbled upon disassembly - which means they were originals from 1993. If those "fingered" guides were original, it's a near certainly that the chain is too, along with the other guides - that's what I meant 🙂.

The new fingered guides that I've installed 2 years ago, although I haven't removed them yet, I'm sure are fine and will NOT break up when disassembled. Sorry 🙂
 
I had replaced my brown fingered top guides some years ago when I lived in Texas. They did not crumble or break when I removed them when I did my Engine Bay Refresh job. They are good for some years and many heat cycles, I think. Just be careful in unhooking them and you will be fine.
 
Fiiiiinaly, after delays, got some goodies today. Will try to find time to tackle camshafts removal over the weekend:

PXL_20220701_203526837.jpg


This $100+ 26.5/27.5 wrench has been waiting for 14 long years to get a taste of some fine camshaft for once:
PXL_20220701_203903315.jpg
 
I did get the timing cover removed a couple days ago. Not the easiest task – it’s a tight fit! Taking the upper sum pan off is almost essential I would say. That’s how I got mine off. Note that the upper sump pan comes off then the oil pump comes off.

Interesting at 45 degrees before TDC the oil level sender will NOT come out. The con rod big end cap blocks it from coming out. So that sucks – you must then move the crank to get the single pin plug out of the block. I preferred doing that than taking off the other end of the sender unit at the oil pump and risk breaking the wire.

Then a small copper faced dead blow hammer was used to knock the timing cover free. Do take the crank bolt off and the oil pump chain just hangs there – you can’t get it off the sprocket. So the timing cover is taken off and tilted out and down to clear the oil pump chain.

The new Febi timing chain kit arrived today, was made in Germany and has a Swag tensioner with IWIS chain. All looks good and OEM quality. I did check the chains and they are a match albeit you can just see the older chain is a tiny fraction longer due to wear. Good idea to be changing it then. It sure is nice to be replacing all of the guides.

Note also that the new IWIS timing chain came as one piece – therefore if you do not take the timing cover off I think you might have to split a link and re-crimp it :sawzall: However since my timing cover is off the chain will set in there and go where it needs to with ease as one piece.

Also – there was old guide shrapnel in inaccessible areas behind the timing cover so it is good to give it a thorough clean up. Waiting on the 2x new O rings and sealant from the dealer (With a huge laundry list of sundries) before I can fit the timing cover back on. But I might also wait until I have the valve stem oil seals changed as I will need to be turning the crank to do that and I do not want the chain binding up behind there.

View attachment 84033 View attachment 84034
I'm looking for the part number for the crankcase guide rail shown in the photo, also the part numbers for the o-rings.
 
That lower chain rail (#101 in the diagram) is part number 119 052 12 16.

Screenshot 2023-03-17 at 11.11.05 AM.jpg


The o-ring seal (#8 in the diagram below) is part number 120 997 03 46. [front crankshaft seal]

There are two rubber o-rings that fit on the back side of the crankcase cover (between the cover and the front of the block), part numbers 621 997 00 40 and 004 997 80 48. TWO of each of these are required. They are collectively indicated by #23 in the diagram below. The photos from JC220 show these o-rings with the front crankcase cover removed.


Screenshot 2023-03-17 at 11.12.29 AM.jpg
 
Last edited:
Thanks Gerry. I looked for your thread on head gasket and timing chain guides replacement but don't see it. Is there an easy link to it? Compression test and leak-down test showed dramatic pressure loss at #1 cylinder seemingly from the intake valves, #5 cylinder was also low pressure, the rest were around 205psi. 1994 E420 with 145,000 miles, had the car since 2006.
 
My thread is in the Projects sub-forum. However, I did not remove the heads from the block -- no need to. I did remove and rebuild the intake manifold stack and everything else on top of the engine.

This job also included the top three timing chain rails that fit between the cylinder heads and covers. But I also did not do the lower timing chain rails.
 
I'd try to resolve valve sealing issues without removing the cylinder head first... only pull the heads if absolutely necessary.

:duck:
 
However, 7° difference can be cause by broken chain rails, even if the chain is new. I would start by replacing all the upper chain rails and then measuring chain stretch again. If it measures within 2-3° of spec with new rails, leave the chain alone.
Would a broken chain rail between cam sprockets cause the timing to be off, Dave, or is it the lower banana rails you are referring to here. While on the subject, I’ve replaced the cam sprocket rails on both cars but it was well over ten years ago. Any recommendation on change intervals for these? Ditto with the tensioners.
Please don’t say they are NLA.
 
Would a broken chain rail between cam sprockets cause the timing to be off, Dave,
Jon, I don't believe the "top" rails between the sprockets will cause an error in timing. However if the top rails are missing, the chain can intermittently rub against the valve cover, causing other issues.


or is it the lower banana rails you are referring to here. While on the subject, I’ve replaced the cam sprocket rails on both cars but it was well over ten years ago.
I believe it's primarily the 2 rails at the inside of the heads, the "V" area of the chain path. Rails #8 and #14 in the diagram at this post. The lower banana rail (#3) seems to last a very long time, and although I've never attempted it, allegedly can be replaced without removing the timing cover. The only rail that requires timing cover removal is #29, so pray that never breaks.


Any recommendation on change intervals for these? Ditto with the tensioners. Please don’t say they are NLA.
Great question on chain rail change interval. I suspect it's a combination of time/miles, age, and heat load. Assuming the engine doesn't see high temps (100°C+) regularly, I'd wild guess they should last 75-100kmi or more. Might be a good idea to pull one or both valve covers to inspect them starting around 75k or so? But pulling valve covers is a PITA... and then, how often do you repeat afterwards, every 25kmi? Alternately you could drop the lower oil pan and check for rail debris but that's no picnic either, and lack of plastic bits doesn't guarantee no broken rails. I'm curious what @Klink would recommend for rail inspection / replacement.

The tensioner does not need periodic replacement, AFAICT. It is still available new, but the metal-shim OE gasket is NLA. Re-use the old metal gasket. Worst case, cut a new one from bulk fiber sheets of gasket material of similar thickness.

All the rails are still available new from Mercedes, however prices on some have increased substantially, for example the 'fingered' clips have doubled in price vs 5+ years ago, and the one rail below the exhaust sprocket has increased 4x (+300%). Interestingly, the Chinese Febi rails are not much cheaper than OE. Also, the rubber seals between the top rail and the valve cover are both NLA, re-use the old ones.

:wormhole:
 
Great information, Dave. It’s been years since the valve covers were removed. I have the gaskets but not sure if I want to use them just to inspect the chain rails between the sprockets, especially since neither car is leaking right now. I replaced the timing chain tensioner on only one car circa 2010. I’m thinking aside from a new chain, the tensioner is the best way to prevent jumping a tooth.
 
Forgot to mention - the tensioner uses oil pressure (in addition to an internal spring) to maintain pressure on the chain. My understanding of the design is that it seems unlikely the chain would ever lose tension unless both the internal spring broke, and there was near zero oil pressure. The chain should have a very hard time jumping a tooth if the top chain rails are intact, wrapping around the chain between sprockets.
 

Who has viewed this thread (Total: 3) View details

Who has watched this thread (Total: 2) View details

Back
Top