Moderator edit: To replace with new solenoids/magnets instead of repairing, order 2 each of the following items:
============================================================================
Preamble
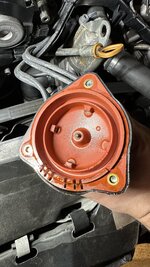
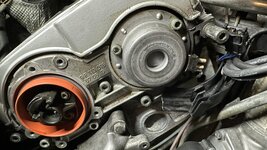
A common problem on many 1990's Mercedes is engine oil weeping out of the edges of the Cam Magnets - necessitating their renewal. This is something my 1992 500E was suffering from in a big way with both magnets leaking oil all over the front of the engine. Fitting new magnets is an option - but I chose to rebuild mine since the new Magnets may also leak again eventually.
This is my method to re-seal the Magnets for what is a more permanent fix. It involves dissembling the magnets and using a quality high temp RTV sealant to bond the original gaskets in place creating a permanent Oil tight seal.
It appears the OE seals shrink somewhat over time and exposure to Oil / heat. Thus the Oil makes it’s way out from the edges of the Magnet casing. I prefer to retain the factory seals inside and use the RTV to bond & 100% reseal them in place. 4 very small gaps require sealing with this method - hence why 4 beads of sealant are needed. You could also totally replace the seals with new suitable thickness neoprene gasket material cut to the correct shape - or remove the seals altogether if you have a suitable gap filling high temp sealant / glue - but the chance of success is much higher when you only need to seal 4 tiny gaps (>.01mm) rather than 2 large gaps (>2.5mm).
This is what you find when you first open a magnet – saturated with Oil inside.

The magnet itself is a solid cast sealed plastic unit & takes no harm from the exposure to Oil. Therefore the only issue is the Oil seepage - which is why repairing a Magnet like this is a good option and it will likely outlive it's new replacement!
The removal / refitting of the magnets has been discussed here before - see Gerry's DIY here. (Post #49)
I will try to keep this DIY clear and concise - thus I will detail the re-seal of the magnet only for clarity.
You will need:
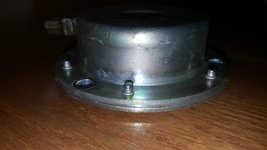
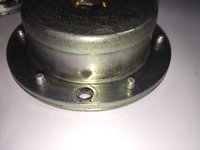
Step 1 - Use a 3.2mm drill bit to drill out all 6 rivets from behind. There is a concave shape to the rear side of the rivet which self centres the drill bit nicely.

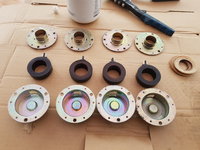
Step 2 - The rear plate will now come off the magnet. Remove the magnet from within and the 2 seals. Clean everything up with a clean rag and brake cleaner. All traces of oil must be removed.

Step 3 - Use a countersink drill bit in the rear plate face to allow the rivets to sit flush. (Rivet must be flush or slightly lower than the face of the plate)

Step 4 - Give all parts a final thorough de-grease / clean. Lay 4 neat beads of RTV sealant, re-assembling the magnet in stages as shown in the photos. (I missed one step above the magnet itself but there are 4 beads of sealant in there)


Step 5 - Place all Rivets into their seats to align the rear plate accurately & clamp rear plate tight. Now pop all rivets into place.

Step 6 - Wipe away excess sealant from inside the magnet body - I used a screwdriver wrapped with a clean rag to get right into the centre gap where the cam solenoid goes in.

Allow a minimum of 48 hours for the RTV to set up before re-installing the magnets. Enjoy!
NOTE:
Do not be tempted to use RTV to fit the magnets back onto the Engine. The correct anaerobic MB sealant should be used as per Gerry's DIY (Or Loctite 574).
.
- 119-051-00-77 magnet/solenoid, $109 MSRP
- 111-051-00-43 new style armature, $10 MSRP
- 104-990-10-04 single-use armature bolt, $3 MSRP
============================================================================
Preamble
A common problem on many 1990's Mercedes is engine oil weeping out of the edges of the Cam Magnets - necessitating their renewal. This is something my 1992 500E was suffering from in a big way with both magnets leaking oil all over the front of the engine. Fitting new magnets is an option - but I chose to rebuild mine since the new Magnets may also leak again eventually.
This is my method to re-seal the Magnets for what is a more permanent fix. It involves dissembling the magnets and using a quality high temp RTV sealant to bond the original gaskets in place creating a permanent Oil tight seal.
It appears the OE seals shrink somewhat over time and exposure to Oil / heat. Thus the Oil makes it’s way out from the edges of the Magnet casing. I prefer to retain the factory seals inside and use the RTV to bond & 100% reseal them in place. 4 very small gaps require sealing with this method - hence why 4 beads of sealant are needed. You could also totally replace the seals with new suitable thickness neoprene gasket material cut to the correct shape - or remove the seals altogether if you have a suitable gap filling high temp sealant / glue - but the chance of success is much higher when you only need to seal 4 tiny gaps (>.01mm) rather than 2 large gaps (>2.5mm).
This is what you find when you first open a magnet – saturated with Oil inside.
The magnet itself is a solid cast sealed plastic unit & takes no harm from the exposure to Oil. Therefore the only issue is the Oil seepage - which is why repairing a Magnet like this is a good option and it will likely outlive it's new replacement!
The removal / refitting of the magnets has been discussed here before - see Gerry's DIY here. (Post #49)
I will try to keep this DIY clear and concise - thus I will detail the re-seal of the magnet only for clarity.
You will need:
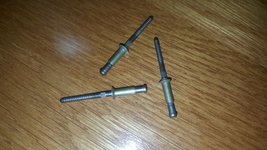
- 12no 3.2mm diameter x 10mm closed end countersunk pop rivets + riveter
- 1 tube of High quality, high temp RTV sealant
- A 3.2mm HSS drill bit
- A HSS Countersink drill bit
- A drill press preferred especially for the countersink drilling
- Clean rags & a can of brake cleaner
Step 1 - Use a 3.2mm drill bit to drill out all 6 rivets from behind. There is a concave shape to the rear side of the rivet which self centres the drill bit nicely.
Step 2 - The rear plate will now come off the magnet. Remove the magnet from within and the 2 seals. Clean everything up with a clean rag and brake cleaner. All traces of oil must be removed.
Step 3 - Use a countersink drill bit in the rear plate face to allow the rivets to sit flush. (Rivet must be flush or slightly lower than the face of the plate)
Step 4 - Give all parts a final thorough de-grease / clean. Lay 4 neat beads of RTV sealant, re-assembling the magnet in stages as shown in the photos. (I missed one step above the magnet itself but there are 4 beads of sealant in there)
Step 5 - Place all Rivets into their seats to align the rear plate accurately & clamp rear plate tight. Now pop all rivets into place.
Step 6 - Wipe away excess sealant from inside the magnet body - I used a screwdriver wrapped with a clean rag to get right into the centre gap where the cam solenoid goes in.
Allow a minimum of 48 hours for the RTV to set up before re-installing the magnets. Enjoy!
NOTE:
Do not be tempted to use RTV to fit the magnets back onto the Engine. The correct anaerobic MB sealant should be used as per Gerry's DIY (Or Loctite 574).
.
Attachments

Last edited by a moderator:


")