All:
For those of us with later (MY 1994) cars, MB made a significant addition to the HVAC system (this also applies to all 1994 and 1995 W124 cars with ACC, not just the E500). This running change was the addition of a two-filter system in the fresh-air (HVAC) intake just ahead of the CC fan.
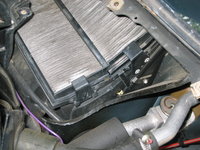
These ACC filters sit on top of the cabin air intake and are located directly below the front windshield wiper. After some years they tend to get pretty laden with dirt and grime, tree needles, etc.
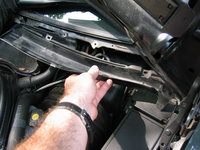
The filters are kind of a pain in the butt to get at, and I approached the job with some trepidation knowing this. Basically you have to disassemble the entire top of the engine area behind the engine and below the windshield. The actual replacement of the filters, once you get the HVAC air intake exposed, is quite easy.
Here is my photographic essay on the replacement. Use this as a guide, as well as the general instructions below. A light to medium DIYer ought to be able to knock this out of the park pretty easily.
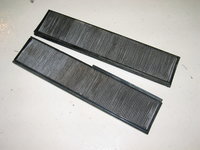
Part number for the ACC filters is 124 830 01 18 and they retail for around $29. The filters are available on the aftermarket (set of 2) for around $19-20. Manufacturer is VEMO or Bosch of Germany.

Tools needed for the job include the following:
Philips head screwdriver, medium
Small flat-blade screwdriver
Shop vac
Glass cleaner and detailing spray (if Afshin is your mentor)
My filters were the original ones that shipped with the car, and had the MB star and part number 124 835 00 47 on them. As you can see from the photos, they were quite dirty. I would recommend changing them approximately every 5 years.
A tip before you start: activate the windshield wiper so that it is turned completely to the passenger side of the windshield, as far as it will go to that side. You can do this by turning the key to the "ACC" position and activating the wiper; then turning the ignition off when the wiper is in the desired spot on the windshield.
Next, you start with the rubber gasket on the inner partition and the rubber gasket on the engine partition. Also take up the windshield trip piece along the bottom of the windshield, on both sides working inward from the edges of the car, all the way to the wiper. Then flip up the ends onto the windshield.
Then you remove the inner partition panel, which is held on by only two clips. The driver's side clip can be a pain in the butt, so you need to take it easy (loosen the passenger side first) and carefully work it out and off. Remember this plastic is 10+ years old now and has been thoroughly baked under there, so it's prudent to take care with it. You can use your thin flat-blade screwdriver to help it if needed.
Next you need to remove the rain gutter pieces, starting with the driver's side and then continuing with the passenger's side. Once you have those pieces off you need to remove the plastic mesh pieces on the driver's and then passenger's side. Then the center piece under the windshield, which is held in by a few screws.
Only after all of this stuff is off, will you find the filters well-exposed. Remove the old filters and carefully put in the new ones, sliding the first one in and then to the top position, and the second one directly underneath the first. Make sure they are seated well and have the little "angle" I indicate in the photo.
Pretty much everything's screws that hold it onto the car are self-apparent. Everything is a Philips-head. If you have trouble, wait 10 minutes, take a breath, and come back to it.
Next, it's "Afshin" time. Once the filters are in, it's time to clean. Take some glass cleaner and clean the bottom of the windshield underneath the trim strip on each side. This collects a lot of dirt.
Next take some detailer spray and clean each of the plastic pieces, cleaning them good. Then take your handy shop vac and vacuum in the crannies and nooks under both sides of the hood, under the fuse box and under and around the CAN box area. There will undoubtedly be leaves and various mung under there, with the exception of Afshin's car. Clean it all up, and clean the hoses and plastic that is under the rain gutters with some detailing spray -- likely that you won't be in there for another 5 years !!
Next you put everything back together the way you found it. You will start out with a lot of screws, but they go back on quick and before you know it you'll be close to done.
The last step is important -- you need to seat the trim strip that sits at the base of the windshield. Before you put it back on, clean the underside of it and then study it, and study the contours of the windshield base and the pieces that the trim strip's various flanges fit into. Once you generally get it into position, you can bang it with medium pressure with the heel of your hand and it should knock right into place. Check the edge of it with your fingers to ensure a good seal. Work from the wiper outward on both sides. If it is sticking up above the windshield (not laying completely flat against the windshield in any area, it's not seated correctly. Lift the lower edge of the strip and push the offending edge into its correct slot. This takes about 5 minutes per side to do correctly.
Lastly, go over everything with some "back to black" or detail spray to make it all look nice, and enjoy the fresh(er) air that you'll be breathing.
Total time is 1-2 hours. Take your time, be careful, don't force anything.
Then have a beer. Preferably a Sierra Nevada Pale Ale or some sort of IPA.
Cheers,
Gerry
For those of us with later (MY 1994) cars, MB made a significant addition to the HVAC system (this also applies to all 1994 and 1995 W124 cars with ACC, not just the E500). This running change was the addition of a two-filter system in the fresh-air (HVAC) intake just ahead of the CC fan.
These ACC filters sit on top of the cabin air intake and are located directly below the front windshield wiper. After some years they tend to get pretty laden with dirt and grime, tree needles, etc.
The filters are kind of a pain in the butt to get at, and I approached the job with some trepidation knowing this. Basically you have to disassemble the entire top of the engine area behind the engine and below the windshield. The actual replacement of the filters, once you get the HVAC air intake exposed, is quite easy.
Here is my photographic essay on the replacement. Use this as a guide, as well as the general instructions below. A light to medium DIYer ought to be able to knock this out of the park pretty easily.
Part number for the ACC filters is 124 830 01 18 and they retail for around $29. The filters are available on the aftermarket (set of 2) for around $19-20. Manufacturer is VEMO or Bosch of Germany.
Tools needed for the job include the following:
Philips head screwdriver, medium
Small flat-blade screwdriver
Shop vac
Glass cleaner and detailing spray (if Afshin is your mentor)
My filters were the original ones that shipped with the car, and had the MB star and part number 124 835 00 47 on them. As you can see from the photos, they were quite dirty. I would recommend changing them approximately every 5 years.
A tip before you start: activate the windshield wiper so that it is turned completely to the passenger side of the windshield, as far as it will go to that side. You can do this by turning the key to the "ACC" position and activating the wiper; then turning the ignition off when the wiper is in the desired spot on the windshield.
Next, you start with the rubber gasket on the inner partition and the rubber gasket on the engine partition. Also take up the windshield trip piece along the bottom of the windshield, on both sides working inward from the edges of the car, all the way to the wiper. Then flip up the ends onto the windshield.
Then you remove the inner partition panel, which is held on by only two clips. The driver's side clip can be a pain in the butt, so you need to take it easy (loosen the passenger side first) and carefully work it out and off. Remember this plastic is 10+ years old now and has been thoroughly baked under there, so it's prudent to take care with it. You can use your thin flat-blade screwdriver to help it if needed.
Next you need to remove the rain gutter pieces, starting with the driver's side and then continuing with the passenger's side. Once you have those pieces off you need to remove the plastic mesh pieces on the driver's and then passenger's side. Then the center piece under the windshield, which is held in by a few screws.
Only after all of this stuff is off, will you find the filters well-exposed. Remove the old filters and carefully put in the new ones, sliding the first one in and then to the top position, and the second one directly underneath the first. Make sure they are seated well and have the little "angle" I indicate in the photo.
Pretty much everything's screws that hold it onto the car are self-apparent. Everything is a Philips-head. If you have trouble, wait 10 minutes, take a breath, and come back to it.
Next, it's "Afshin" time. Once the filters are in, it's time to clean. Take some glass cleaner and clean the bottom of the windshield underneath the trim strip on each side. This collects a lot of dirt.
Next take some detailer spray and clean each of the plastic pieces, cleaning them good. Then take your handy shop vac and vacuum in the crannies and nooks under both sides of the hood, under the fuse box and under and around the CAN box area. There will undoubtedly be leaves and various mung under there, with the exception of Afshin's car. Clean it all up, and clean the hoses and plastic that is under the rain gutters with some detailing spray -- likely that you won't be in there for another 5 years !!
Next you put everything back together the way you found it. You will start out with a lot of screws, but they go back on quick and before you know it you'll be close to done.
The last step is important -- you need to seat the trim strip that sits at the base of the windshield. Before you put it back on, clean the underside of it and then study it, and study the contours of the windshield base and the pieces that the trim strip's various flanges fit into. Once you generally get it into position, you can bang it with medium pressure with the heel of your hand and it should knock right into place. Check the edge of it with your fingers to ensure a good seal. Work from the wiper outward on both sides. If it is sticking up above the windshield (not laying completely flat against the windshield in any area, it's not seated correctly. Lift the lower edge of the strip and push the offending edge into its correct slot. This takes about 5 minutes per side to do correctly.
Lastly, go over everything with some "back to black" or detail spray to make it all look nice, and enjoy the fresh(er) air that you'll be breathing.
Total time is 1-2 hours. Take your time, be careful, don't force anything.
Then have a beer. Preferably a Sierra Nevada Pale Ale or some sort of IPA.
Cheers,
Gerry
Attachments
-
 IMG_2216.JPG618.9 KB · Views: 6
 -
 IMG_2217.JPG663.5 KB · Views: 7
 -
 IMG_2219.JPG495.3 KB · Views: 7
 -
 IMG_2220.JPG682 KB · Views: 9
 -
 IMG_2221.JPG581.4 KB · Views: 7
 -
 IMG_2222.JPG614.2 KB · Views: 6
 -
 IMG_2223.JPG631.6 KB · Views: 6
 -
 IMG_2224.JPG625.2 KB · Views: 5
 -
 IMG_2225.JPG579.4 KB · Views: 4
 -
 IMG_2226.JPG494 KB · Views: 4
 -
 IMG_2228.JPG424 KB · Views: 2
 -
 IMG_2230.JPG353.3 KB · Views: 3
 -
 IMG_2232.JPG682.2 KB · Views: 5
 -
 IMG_2233.JPG401.1 KB · Views: 4
 -
 IMG_2234.JPG304.5 KB · Views: 3
 -
 IMG_2237.JPG431.2 KB · Views: 5
 -
 IMG_2238.JPG266.2 KB · Views: 3
 -
 IMG_2239.JPG560.7 KB · Views: 3
 -
 IMG_2240.JPG649.1 KB · Views: 7
 -
 IMG_2218.JPG646.9 KB · Views: 6
 -
cabin_filters.pdf55.8 KB · Views: 3