• Hi Guest !

    Welcome to the 500Eboard forum.

    Since its founding in late 2008, 500Eboard has become the leading resource on the Internet for all things related to the Mercedes-Benz 500E and E500. In recent years, we have also expanded to include the 400E and E420 models, which are directly related to the 500E/E500.

    We invite you to browse and take advantage of the information and resources here on the site. If you find helpful information, please register for full membership, and you'll find even more resources available. Feel free to ask questions, and make liberal use of the "Search" function to find answers.

    We hope you will become an active contributor to the community!

    Sincerely,
    500Eboard Management

HOW-TO: 500E Transmission Gear Selector Shaft Seal Replacement

DerFuror

500E Terminus Illuminatus
Member
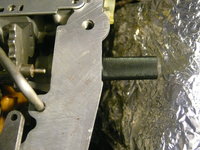
Background: After extensive white paper towel testing, I finally was able to prove to myself that a substantial transmission fluid leak which took place while the car was parked for winter storage emanated from the gear selector shaft (aka Range Selector Control Shaft) seal located midway on the driver side of the transmission housing.

Selector Shaft 002.jpg

The shaft rotates within the circumference of this radial seal every time you move the center console mounted gear selector. Vehicle service documentation states my car’s transmission was overhauled for front pump & seal replacement in 2008 just prior to my ownership, but no evidence confirmed whether or not this particular seal was also replaced at that time.

The bottom-line: The selector shaft seal needed replacement now.

I ordered two new OE selector shaft seals (p/n# 006 997 01 47) along with various replacement orings & sealing rings for other transmission-attached parts whose condition would be inspected.

Selector Removal.jpg

I would also install a First Gear Start valve body since the car would already be up on stands with the transmission pan removed.

FGS VB 003.jpg

An exhaustive web-search found only one semi-informative thread on this seal replacement subject. It was a seven step procedure for a pedestrian Benz 722.3xx tranny. The author alleged a 1.5 hour ability to replace the seal in situ without lowering the transmission. Oh happy day!

…Unhappy day. The procedure is not applicable to the 500E. The procedure became a no-go at step 6 of 7. Tranny tunnel clearance is too tightly constrained for selector shaft removal. The shaft butts against the tunnel before it can exit its tranny housing bore.

I then took more time to research the use of some specialized seal-pulling tools to remove the seal with the shaft in place. Nope, still not gonna work in this particular situation. If even fortunate enough to remove the old seal with the shaft in place, it is still highly improbable to successfully drive-in & seat a new seal because of space limitations.
Shaft Seal Puller.jpg

Leading into this project, I always knew that the proper procedure would be a whole lot of FSM 27-600 Removing and Installing Transmission, plus some other pre & post-requisite procedures. But for just one little seal, I really didn’t want to go thru all that work required to lower the tranny down the few necessary inches for the selector shaft to clear the tunnel constraint. My Master Mechanic/Doctor of Motors dad used to do foreign trannies all the time with his eyes closed. I would watch & help with this intimidating endeavor. I learned how to properly do aspects of transmission work without necessarily liking to do it. I hadn’t done any in a real long time… Therefore I had a severe avoidance complex.

There’s got to be a short cut!

So I further procrastinated the inevitable until an epiphany occurred during a trip to the junk yard. I saw cars with floor & tranny tunnel access hole plugs! What’s the chances the 500E has one directly inline with the selector shaft? And if not, maybe I can drill/cut out an access hole thru the tunnel area directly opposite from the selector shaft which will then allow me to pull said shaft clear from the tranny housing? Racers do this stuff all the time. The access hole would be drill/cut to precisely mate with an OEM floor plug liberated from a donor Benz. Replace shaft seal, re-insert shaft, weatherize & plug access hole for a factory look, replace carpet. Done. No other removal, replacement, re-torqueing, readjusting or unintended debasing of anything else required. I like this kind of work. Yay!

Boo. Location, location, location. An access hole is a neat idea, but not applicable in this particular situation. No short cut. Got to do it the right way.

The right way is a long way.

(to be continued)
 
Re: 500E Transmission Gear Selector Shaft Seal Replacement

I feel your pain and sympathize. Good luck!
 
Re: 500E Transmission Gear Selector Shaft Seal Replacement

Did this on my previous E420 (click here). NOT a fun job with the trans in the car!

:duck:
 
Re: 500E Transmission Gear Selector Shaft Seal Replacement

I feel your pain and sympathize. Good luck!

Thanks. The job was completed last week. The car is back on the road & doing very well. :checkeredflag:

NOT a fun job with the trans in the car!

... at two feet off the ground, rolling on a creeper. Good thing I'm still flexible & in decent shape.
 
Re: 500E Transmission Gear Selector Shaft Seal Replacement

I did it on a lift and it was still somewhere between root canal and a prostate exam. I can't imagine attempting this without a lift. But now we know it's possible!!!

:deniro:
 
Re: 500E Transmission Gear Selector Shaft Seal Replacement

(Note: This topic will precede the actual project procedure)

Lessons learned:

  • The most difficult & time consuming aspect of the job for me besides getting started was reinstalling the exhaust system by myself (i.e. the main exhaust pipe to the right side exhaust manifold). I used rolling hydraulic jacks with blocking to help position the assembly for attachment & an erector set of a ½” drive ratchet with a wobbly socket adapter and lengthy series of extensions to reach & bolt the flange back up to the exhaust manifold.


  • Undisclosed by FSM 27-600, there is no propeller shaft clamping nut on the 124.036; therefore there is no real need to remove the entire exhaust system & heat shield covering the driveshaft unless you want to. The crossover pipe removal alone is sufficient. Exhaust system & heat shield removal, however, did allow me the ability to learn a lot more about the car & to perform a thorough inspection & cleaning of everything below-decks. Removal also may provide unimpeded access for other r&r jobs that are on the wishlist. Yet, if any similar “next time” is required, the main exhaust system will remain attached.


  • Fan shroud detachment is advised, but the bottom half of the fan shroud may not need to be removed. As the engine pivots back on its loosened motor mounts while lowering the tranny, the upper fan shroud risks contact with the cooling fan blades. Thoroughly spray-lube the three 8mm hex bolts a day ahead of time to minimize the risk of seizing (which 2 of 3 did). I briefly applied direct heat to the bolt head which then travelled downstream to soften the plastic that its attachment nut is imbedded in. I then pulled the entire bolt assembly straight out. After separating/cleaning/lubing bolt and nut, I pressed/re-embedded the nut into its location along with some aggressive glue coating its outside surface. It was a semi-interference fit. Worked fine.


  • I have destroyed my transmission phobia. I am now completely confident that if need be, I can remove the 500E transmission in its entirety & do most of the servicing it may ever require. I, and I alone, was doing this job. On principle in honor of my father, outsourcing was never an option. Regarding this procedure, one needs to thoroughly gather the existing documentation & noodle thru the process in their mind first. Then gather the documentation that was missed the first time around. Take pictures of items before removing them! Pictures are a great reference for making sure replaced items are reinstalled properly (no one can remember every minute yet often critical detail). Once underway, question the procedures. Some of the steps may not be needed. Often, no 124.036 specific steps exist in the FSM. Need help deciding?..ask specific questions to people who may have done it before & will share their experience. I made printed copies of procedure pages. At each step, I note fastener sizes or specific tools or tool combinations used to complete the step (this makes reassembly that much faster). Take your time. Leave when tired or frustrated before screwing it up. Often a problem is conquered after a good night’s sleep.

Of course, having proper tools & a protected place to work is the crux of this critical path to DIY repair. A lift would be nice (I still dream of the mega-ton lift my Dad had in his service station…oh, the things I would do if I had that monster now…), but this r&r job can be done up on jackstands.
 
Re: 500E Transmission Gear Selector Shaft Seal Replacement

I discovered there's a shortage of good used fan shrouds, so I repaired mine.

  • Fan shroud detachment is advised, but the bottom half of the fan shroud may not need to be removed. As the engine pivots back on its loosened motor mounts while lowering the tranny, the upper fan shroud risks contact with the cooling fan blades. Thoroughly spray-lube the three 8mm hex bolts a day ahead of time to minimize the risk of seizing (which 2 of 3 did). I briefly applied direct heat to the bolt head which then travelled downstream to soften the plastic that its attachment nut is imbedded in. I then pulled the entire bolt assembly straight out. After separating/cleaning/lubing bolt and nut, I pressed/re-embedded the nut into its location along with some aggressive glue coating its outside surface. It was a semi-interference fit. Worked fine.

PS. Upon inquiry, Hendy replied that gsxr just took his last good fan shroud, to which I replied...

[video=youtube;k9_8YxDQYCo]http://www.youtube.com/watch?v=k9_8YxDQYCo[/video]
 
Last edited:
Removal Procedure (Range Selector Control Shaft Seal)

NOTE: pics will be added as I get to them

Removal Procedure (Range Selector Control Shaft Seal):
1. Disconnect negative cable on battery (FSM 27-600 step 1).

2. Remove the two-piece Fan Shroud (FSM 20-4200 Removing and Installing Radiator).


  • Thoroughly spray-lube the three 8mm hex bolts a day ahead of time. They are prone to seize because of prolonged exposure to the elements.
  • The shroud is made of plastic. Support the opposite side of the shroud with your free hand to prevent it from distorting & possibly breaking while removing the bolts.
  • Lift the top shroud piece up off its latching tabs that connect it to the bottom piece. With the top off, I was able to verify the make & mfg date of the car radiator (Behr 2002).
  • Lying on your back underneath the car, carefully lift bottom piece to release bottom latching tabs, then rotate the bottom piece clockwise up thru the top between the upper hose & radiator.
  • Protect the radiator cooling fin surface from risk of damage when tilting the engine to lower the transmission. A scrap piece of thin wood paneling or robust cardboard works fine.

3. Remove Air Filter Housing (FSM 09-0015).


4. Disconnect Control Pressure Cable ball from its socket. Move cable to a spacious yet reachable location & flip the ball-lever 180 degrees out of the way (FSM 27-600 step 3).

NOTE:
The necessity of this step is debatable, but I wasn’t taking unnecessary risks.


5. Safely lift & secure the car (the higher the better). My back tires rested on 9.5” tall platforms. The front rail jackpads were supported 24” high on jackstands. I had no functional “workspace” issues performing this r&r job while using a semi-low profile creeper.


6. Remove bottom Engine Compartment Panel (Maintenance Manual 6190).


7.Thoroughly clean the transmission housing surfaces prior to removing any transmission attachment parts.


8. Remove the Connecting Member attached to the front axle subframes (6mm socket head screw, 13mm nut). (FSM 27-600 step 5).


9. Remove leftside exhaust Cross-over Pipe (Cross-over pipe to Manifold = 13mm bolts. Cross-over to Main Pipe = 13mm bolts, 12mm nuts). Using the Manifold end as the axis, rotate the Main Pipe end of Cross-over down & clockwise about 90 degrees to allow removal. Take the opportunity to clean the hardware or replace. (FSM 27-600 step 9).

NOTE:
see my Lessons Learned comments regarding exhaust system in my previous post.


10. Remove Heat Shield assembly (two-pieces) covering idler arm bushing. Replace bolt in its bore to prevent loss. This will allow access to the right-side exhaust pipe to manifold bolts (13mm).


11. Drain transmission fluid. (FSM 27-600 step 6).


12. Detach right-side Exhaust Pipe from manifold (FSM 27-600 step 9).

NOTE: Use safety glasses & gloves when handling the exhaust pipe & beware of pinch points. The pipes can be heavy & unwieldy.


13. Detach exhaust system from rubber support rings (2 in middle + 2 in rear) & carefully lower to ground (FSM 27-600 step 9). Inspect & replace rubber support rings if necessary.

Selector Removal 018.jpg

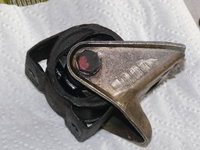
14. Remove Crossmember with Rear Engine Mount (FSM 27-600 step 10, FSM 22-2120). Inspect the mount condition & replace if necessary.

Rear Mount.jpg

15. Remove Exhaust System Heat Shield (8mm nuts). The nuts are made out of aluminum. Do not strip them.


16. Back off, but do not remove Oil Filler Pipe Support Bracket (17mm nut) located above starter bell housing. The bracket is slotted & will slide off its mounting stud (FSM 27-600 step 19).


17. Remove 5mm Screw from base of oil filler pipe to tranny housing. (FSM 27-600 step 19).


  • Push pipe up away from housing.
  • Replace screw back into its hole so it doesn’t get lost.
  • Inspect/replace oring.

18. Unscrew the left & right Tranny Fluid Cooler Line Clamps from the tranny housing. Replace the petrified clamp buffers. Cut-to-size scrap rubber strips will work fine if you don't go OEM replacement.

Remove the left & right Tranny Fluid Cooler Line Connections from the tranny housing (17mm). Some fluid may dribble out. Replace sealing rings prior to reinstallation.


19. Support the transmission, then detach Driveshaft from Flex disc (10mm socket hex head & 19mm nut). I was able to remove the most distant upper bolt assembly using wobbly ratchets on each end of the fastener (FSM 41-050 Propeller Shaft). Inspect the Flex Disc & consider replacing if material deterioration is exhibited.


  • Use moderate force to carefully pry driveshaft off centering bushing away from flex disc. An 18” spooned pry bar worked very well.
  • Push driveshaft back away from flex disc.
  • Coat centering bushing with never-seize prior to reassembly.

Disc_Shaftl 001.jpg Selector Removal 016.jpg


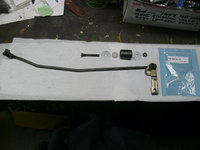
NOTE: this job also provides the perfect opportunity to replace the two Shifting Linkrod Bushings.

Shift Linkrod 006.jpg

20. Pull Plug out of Solenoid Valve. Remove Solenoid Valve (19mm) & inspect oring condition (FSM 27-600 step 9, (AT Repair Manual 27.51 page 4.5/1).

NOTE:
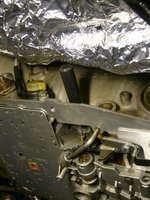
prior to removing any of the attachment components facing the transmission tunnel, I lined the tunnel walls with aluminum foil to protect the transmission from any dislodging insulation blanket debris & to improve visibility/brightness.


21. Remove Speed Governor from its top rear leftside location & inspect oring condition (5mm socket head). Replace the screw into its bore to prevent loss.

Speed_Gov_Location.jpg

22. Remove Neutral Safety Switch Plug from NSS switch (AT Repair Manual 27.51 page 4.7/1).


23. Detach Overload Protection Switch Plug from OPS (take this opportunity to replace the plug boot if needed).


24. Detach Vacuum Line from Modulator Valve (AT Repair Manual 27.51 page 4.6/1). NOTE: This step is debatable, but I wasn’t taking unnecessary risks. Secure all detached wiring together & away from tranny housing.


25. Liberally loosen, but do not remove, the four Engine Motor Mount bolts (FSM 22-2110).


26. Slowly & carefully lower transmission while pushing up on engine pan until selector shaft just clears tranny tunnel. Be conscious of any strange noises or interference, especially with the fan to radiator & throttle control linkages to rear engine compartment wall. I used a 2 inch thick treated lumber scrap (which was slightly larger than the engine oil pan) on my large rolling floor jack. No deformation.


27. Shift Gear Selector to neutral (N) position, then remove Shift Linkage from selector shaft (AT Repair Manual 27.51 page 4.7/1).


28. Remove Neutral Safety Switch (AT Repair Manual 27.51 page 4.7/2).


29. Remove Tranny Pan (AT Repair Manual 27.51 page 4.8/2).

TFC_002.jpg

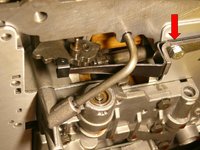
30. Remove Tranny Filter (AT Repair Manual 27.51 page 4.8/2). Take time to observe the now-visible selector shaft assembly internals. Take pictures because this is the same way the assembly should look when the job is done (aka: correct gear alignment).

Selector Removal 007.jpg

NOTE: this is also the perfect opportunity to install a FGS valve body.

FGS VB 008.jpg

31. With the Shift Gear Selector to neutral (N) position, the 5mm socket head selector shaft clamping bolt (aka Combination Bolt) is facing straight down for removal accessibility.

Selector 009.jpg

(NOTE: Combination Bolt N 914020 006002 has been superseded by N 007984 006036 & includes a change in hex socket & head size and material). This new bolt was special ordered from Germany.

Combo_Bolt.jpg

32. Remove the Combination Bolt (AT Repair Manual 27.51 page 5.1/14). This task may not be as straight-forward as it seems. The material change of the superseding part may be in response to this task.

The original bolt was torqued in there...excessively by the feel of it...which made me believe the seal had been replaced in 2008...& too tightly (or Loc-titely) at that. It also frightened me because I couldn't get the bolt to move at all. The hex socket began rounding. Progress was delayed until I obtained this tool which allowed me to move forward once again.


33. Loosen Mount Bracket / Leaf Spring bolt & turn assembly to the side & loosely reinstall bolt so it doesn't get lost (AT Repair Manual 27.51 page 4.9/1).

Selector Shaft 008.jpg

34. Pull Selector Shaft completely out of transmission housing (AT Repair Manual 27.51 page 5.1/14). Clean & inspect shaft for abnormalities.

Selector Shaft 007.jpg

I used a fine steel wool to polish the shaft smooth prior to refitting.

35. Carefully remove old Radial Seal (AT Repair Manual 27.51 page 5.1/15). I used a pick axe style seal puller. The old seal came out on the 3[SUP]rd[/SUP] pull (its sealing surface was petrifying, allowing the leaking condition).

Selector Removal 011.jpgSelector Removal 012.jpg

Thoroughly clean housing hole to accommodate new seal. I used brake cleaner spray, being careful to avoid non-metallic surfaces.

Selector 002.jpg

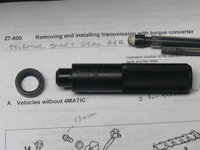
36. Use corresponding seal driver to insert & seat new radial seal (with tapered edge facing inside) into housing (AT Repair Manual 27.51 page 5.1/43). NOTE: The factory driver tool (Drift Pin p/n# W 722 589 02 15 00) is the best choice for a safe, easy & precise fit.

Selector 004.jpg

I couldn't believe how easily the seal goes in using this tool. Eventually I did believe it & shook my head thinking it's a shame I had to perform 35 steps before I could replace it!

Selector 005.jpg Selector 006.jpg

37. Reverse procedure to reassemble everything else back into place using recommended torque specs & new sealing washers/orings.

Selector 008.jpg


38. Refill transmission fluid & watch for static leaking. Then perform white paper towel dynamic leak testing with a series of short test drives.

Selector Removal 020.jpg

If the repair & everything else around it is dry…rejoice. You just saved well over $1000 & gave yourself something seriously to be proud of. Get driving! :e500launch:
 
Last edited:
Re: Removal Procedure (Range Selector Control Shaft Seal)

Pictures added to Procedure text :geek:.
 
Re: 500E Transmission Gear Selector Shaft Seal Replacement

Excellent write up DerFuror, thanks for posting! Hopefully I won't ever have to do this job, looks like a PIA!

BTW, I'm heading up your way (at least I think it's your way?) today to stay on the NY side of Lake Champlain around Plattsburg.

Love stretching the E500 legs on the Northway past Albany when it opens up, can do 90mph with no worries...
 
Re: 500E Transmission Gear Selector Shaft Seal Replacement

Good stretches of road to stretch the legs on. Watch out for deer at dusk. Check out downtown Essex on the way up or down. Quaint Lakeside eateries.
 
Re: 500E Transmission Gear Selector Shaft Seal Replacement

Additional info added to steps 18, 31 & 32.
 
Re: 500E Transmission Gear Selector Shaft Seal Replacement

OK, OK ... this HOW-TO friggin puts anything I've ever done completely to shame.

Good work Derf !
 
Re: 500E Transmission Gear Selector Shaft Seal Replacement

Undisclosed by FSM 27-600, there is no propeller shaft clamping nut on the 124.036; therefore there is no real need to remove the entire exhaust system & heat shield covering the driveshaft unless you want to.

Is this true of the 124.034 as well?

Awesome writeup, Derf! I think you were just a few bolts away from having the whole transmission out.
 
Re: 500E Transmission Gear Selector Shaft Seal Replacement

I was. I really was. But I didn't need (or want) to go there unless required.
 
Re: 500E Transmission Gear Selector Shaft Seal Replacement

Is this true of the 124.034 as well?
From what I can tell, the nut was eliminated somewhere around late 1992 or early 1993 (USA model year). My mid-93-build parts car is nutless. Not sure if this applies to 036 only, or also 034...

:scratchchin:
 
Re: 500E Transmission Gear Selector Shaft Seal Replacement

From what I can tell, the nut was eliminated somewhere around late 1992 or early 1993 (USA model year). My mid-93-build parts car is nutless. Not sure if this applies to 036 only, or also 034...

:scratchchin:

"as of 07/92" is the listed change date. I didn't find a listing for .034, but IRRC, it occurred at the same time.
 
Re: 500E Transmission Gear Selector Shaft Seal Replacement

This car probably has two nuts since it's kicked my ass on this idle hiccup for the past month. Just threw some new coils on and it's still doing it. Nothing left to replace.
 

Who has viewed this thread (Total: 1) View details

Back
Top