Some time ago, I purchased a set of the Jimbonian™ brand vented headlight wiper panels. You can see earlier threads referencing the subject here and here.
Now that the summer heat has [largely, but not quite] disappeared here in Houston, I can attend to most of the deferred tasks I've been putting off since around 1-May-2012. One of those tasks has been the installation of the Jimbonian™ brand vented wiper panels.
Here is a step-by-step overview of the process. This process also generally works for removing/installing/replacing any W124 under-headlight panels.
I hope you find this helpful. I'm heading out to the highway after I finish this article for some righteous butt-dyno tests of my new panels, to evaluate the significant horsepower and torque gains induced by the panels' "ram-air" effect into the intake air stream. Wish me luck !!
Cheers,
Gerry
P.S. This is also an EXCELLENT time to replace your (undoubtedly fossilized) headlight wiper blades. More information on this is here.
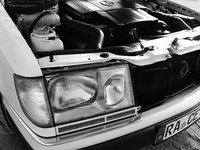
Here are before and after shots of the passenger-side headlight unit:


Before the job is started and after it's done (driver's side):


First, open the hood, and remove the air intake tubes, and the plastic backing panels for the headlights. Slide the backing panels upward vertically to remove them. Be sure to unplug the intake air temperature sensor from the driver's side backing plate before lifting up !!
Next, unbolt the inboard sheet metal screw next to the inboard side of the headlight. This requires a 1/4" ratchet and an 8mm socket. A 2-inch extension makes the job a little easier, but is not absolutely required. Remove the sheet metal screw and set it aside. There is a metal washer/rubber backing combo (which the sheet metal screw passes through) that may or may not come off with the screw. Be sure to remove it either from the screw or from the metal panel, and set it aside with the screw.


Next comes the headlight wiper assembly. CAREFULLY pull off the rubber headlight washer hose from the plastic nozzle as illustrated. Often the rubber hose and/or nozzle is brittle, so they may break off. It may be a good idea before you even start this job to order a pair of new nozzles and a length of new rubber hose. Then, flip up the hinged cover over the headlight wiper retaining bolt as shown. Next, use your 8mm socket to unbolt the headlight wiper retaining screw from the splined shaft. The wiper may be "on" the shaft quite hard, so you may need to CAREFULLY wriggle it back and forth slightly, to work it off the wiper motor shaft.


Then, you have to remove the turn signal/parking light lens. You have to do this from behind the headlight/lens area, by pulling the gray lens retaining tab slightly toward you so that it unhooks from its retaining tang. Do this CAREFULLY so that you do not break the gray plastic tab on the back of the turn slgnal lamp -- it is quite brittle and gets a lot of weather and heat exposure in the engine bay. Once loosened, slide the turn signal lens straight out toward the front of the car and remove it. Unplug the electrical plug from the rear of the turn signal.


Then, it's time to unbolt the "inner" 8mm sheet metal screw from the edge of the car, underneath where the turn signal lens was. You'll clearly see the screw. For this one, the 2" extension can come in handy to get a good "bite" on the head of the sheet metal screw with the socket. From there, you can CAREFULLY wriggle the panel free of the car, working the edge out between the bottom outer edge of the leadlamp and the edge of the fender. TAKE YOUR TIME! The wiper panels will then only be attached to the car by the washer fluid hose on the back-side of the plastic nozzle. CAREFULLY work the end of the hose off the nozzle by working it back and forth. The nozzle can be quite brittle, so don't force anything. You may also want to consider cutting 3/4-1" off of the end of the hose (particularly if it's rather dark brown or feels "petrified" in your hand" so that you have a tight fit when you re-attach the hose to the nozzle when reassembling things.


From there, the panel will come free. You will need to remove the bottom rubber sealing piece, the nozzle (as before, BE CAREFUL in pressing together the plastic retaining tangs on the back of the nozzle, as they will break VERY easily), and the round rubber piece that goes around the wiper motor splined shaft.


While you've got the turn signal lens out of the car, take some Speed Shine or other quick detailer product, and a rag, and clean out the inevitably dirty area where the turn signals reside. One of those "while you're in there" types of things....

Here's what the car looks like with the panel removed. And a close-up of painted and stock panels...


Installation is exactly the reverse of removal, for each side.
Be sure to re-install the intake air temperature sensor on the driver's side rear-headlight panel !!
Here's the completed job, both sides:

Now that the summer heat has [largely, but not quite] disappeared here in Houston, I can attend to most of the deferred tasks I've been putting off since around 1-May-2012. One of those tasks has been the installation of the Jimbonian™ brand vented wiper panels.
Here is a step-by-step overview of the process. This process also generally works for removing/installing/replacing any W124 under-headlight panels.
I hope you find this helpful. I'm heading out to the highway after I finish this article for some righteous butt-dyno tests of my new panels, to evaluate the significant horsepower and torque gains induced by the panels' "ram-air" effect into the intake air stream. Wish me luck !!
Cheers,
Gerry
P.S. This is also an EXCELLENT time to replace your (undoubtedly fossilized) headlight wiper blades. More information on this is here.
Here are before and after shots of the passenger-side headlight unit:
Before the job is started and after it's done (driver's side):
First, open the hood, and remove the air intake tubes, and the plastic backing panels for the headlights. Slide the backing panels upward vertically to remove them. Be sure to unplug the intake air temperature sensor from the driver's side backing plate before lifting up !!
Next, unbolt the inboard sheet metal screw next to the inboard side of the headlight. This requires a 1/4" ratchet and an 8mm socket. A 2-inch extension makes the job a little easier, but is not absolutely required. Remove the sheet metal screw and set it aside. There is a metal washer/rubber backing combo (which the sheet metal screw passes through) that may or may not come off with the screw. Be sure to remove it either from the screw or from the metal panel, and set it aside with the screw.
Next comes the headlight wiper assembly. CAREFULLY pull off the rubber headlight washer hose from the plastic nozzle as illustrated. Often the rubber hose and/or nozzle is brittle, so they may break off. It may be a good idea before you even start this job to order a pair of new nozzles and a length of new rubber hose. Then, flip up the hinged cover over the headlight wiper retaining bolt as shown. Next, use your 8mm socket to unbolt the headlight wiper retaining screw from the splined shaft. The wiper may be "on" the shaft quite hard, so you may need to CAREFULLY wriggle it back and forth slightly, to work it off the wiper motor shaft.
Then, you have to remove the turn signal/parking light lens. You have to do this from behind the headlight/lens area, by pulling the gray lens retaining tab slightly toward you so that it unhooks from its retaining tang. Do this CAREFULLY so that you do not break the gray plastic tab on the back of the turn slgnal lamp -- it is quite brittle and gets a lot of weather and heat exposure in the engine bay. Once loosened, slide the turn signal lens straight out toward the front of the car and remove it. Unplug the electrical plug from the rear of the turn signal.
Then, it's time to unbolt the "inner" 8mm sheet metal screw from the edge of the car, underneath where the turn signal lens was. You'll clearly see the screw. For this one, the 2" extension can come in handy to get a good "bite" on the head of the sheet metal screw with the socket. From there, you can CAREFULLY wriggle the panel free of the car, working the edge out between the bottom outer edge of the leadlamp and the edge of the fender. TAKE YOUR TIME! The wiper panels will then only be attached to the car by the washer fluid hose on the back-side of the plastic nozzle. CAREFULLY work the end of the hose off the nozzle by working it back and forth. The nozzle can be quite brittle, so don't force anything. You may also want to consider cutting 3/4-1" off of the end of the hose (particularly if it's rather dark brown or feels "petrified" in your hand" so that you have a tight fit when you re-attach the hose to the nozzle when reassembling things.
From there, the panel will come free. You will need to remove the bottom rubber sealing piece, the nozzle (as before, BE CAREFUL in pressing together the plastic retaining tangs on the back of the nozzle, as they will break VERY easily), and the round rubber piece that goes around the wiper motor splined shaft.
While you've got the turn signal lens out of the car, take some Speed Shine or other quick detailer product, and a rag, and clean out the inevitably dirty area where the turn signals reside. One of those "while you're in there" types of things....
Here's what the car looks like with the panel removed. And a close-up of painted and stock panels...
Installation is exactly the reverse of removal, for each side.
Be sure to re-install the intake air temperature sensor on the driver's side rear-headlight panel !!
Here's the completed job, both sides: