While it's not something that you might do often, replacing the leather cover(s) of your front seats is a major undertaking, and can be quite difficult if you've never done it before. I would put this as a 6 or 7 difficulty on a scale of 1-10 for a competent DIYer with the proper tools.
As for tools, you're going to need:
3/8" ratchet, extensions and universal joint
10mm socket
Phillips head screwdriver
Plastic panel tools
Mercedes instrument cluster hook
Razor or XActo knife
Flashlight
I've sourced near perfect OE leather covers from a guy I've known for some years named Craig Schoenemann. He's on eBay and can be reached directly via email at mschoen4@sbcglobal.net . Great guy, very responsive, has beautiful stuff and has never disappointed me with the covers I've gotten from him. I highly recommend him. Cost? It certainly depends on the model, color and age of the car, but the set you'll see me installing on my 1993 400E was $300 shipped to me for both front seats.
This "HOW-TO" is a little light on pictures, but very descriptive. If you read through it carefully before undertaking the work, everything will make sense as you go through it.
On to the fun:
1.) Move the seat as far to the rear as it will go. This will expose the bolts holding the front of both seat rails. Loosen, but don't completely remove them using your 10mm socket.

2.) Move the seat as far forward as it will go. Remove the two 10mm bolts holding the rear of the seat rails to the floor. Due to their location you're probably going to have to use an extension and a universal joint to get to them.

3.) Remove the cover from the seat belt retainer track that is located on the driveshaft tunnel near the rear seat. Pry it off from the rear and it will come loose. With your 10mm socket, unscrew the bolt holding the track to the tunnel. Note that there is a bell shaped washer between the track and the tunnel. It may fall into the gap between the carpet and the chassis, so be sure to fish it out. Pull the track back as far as possible, which will disengage it from the seat belt receiver bracket.
4.) Move the seat all the way to the rear. Tilt the seat back about halfway in its travel, about 45 degrees. Raise the headrest as far as it will go, then remove it from the seat while pushing in on the release button on the seat back. This shows up as a small bump in the upholstery on the seat back above the map pocket words the outside of the seat. Holding the front edge of the seat bottom with one hand, remove the front bolts. The seat will want to tip back, which is a good thing.

5.) Let the seat tip back. This will expose the bottom of the seat. You'll see some wiring harnesses going into the bottom of the seat. On the front of the seat below the cushion is a fabric cover that wraps around the bottom of the seat. Pull down on this and you will release it from its position. It is held in place with springs, so let go of it carefully. This will expose the connectors on the wiring harness.
6.) Remove the connectors and free the wiring harness from the seat bottom. There may be a couple of reusable tie wraps holding them in place.
7.) With a helper, lift the seat and gradually rotate it 90 degrees while taking it out of the door opening. You might want to put a blanket or other protection on the door sills, as it's easy to drag the seat rails across the sill while removing it. Put the seat on a workbench or work area where you can get to it easily from all sides. Gag when you see all the cruft that's under the seat. Ugh.
8.) Carefully remove the plastic trim covers from the hinges. If you gently pull the inside edges at the rear, they will release. Then it's a matter of sliding them towards the rear to disengage the hooks on the front. The cover on he seat belt receiver will come off - if you look closely there is a gap in the slot that will allow you to slip it over the seat belt receiver bracket and wire. There are two phillips head screws on the bottom of the seat back. Remove them. Lay the seat back down so it is flat on your work surface. Press down on the front of the seat back to compress the cushion. With the cushion compressed, pry the edge of the fabric out of the groove on the seat back using a panel tool. Start at one end (top or bottom) and once it's released the rest of the fabric will come out easily. Repeat for the other side. Once the fabric is out of the grooves the seat back will come free from the seat. Set it aside.
9.) With pressure applied to the seat back bottom, pull out on the fabric along the bottom of the seat back where it wraps around from the front. There is a cardboard strip stitched into the fabric that is folded over and placed in a metal groove on the seat back frame. When the seat back cushion is compressed, the fabric can be pulled out of this groove, freeing the cardboard strip and fabric.
10.) Facing the seat back from the rear, you're going to see a mess of springs and wires. Look carefully at the horsehair pad, which will have a number of slots and holes cut into it. Some of these will have wires projecting out of them with nylon tabs or hooks holding them. Starting at the top of the seat back, take the instrument cluster hook and hook it into one of the wire loops where you see a nylon tab. Pull out on the wire loop using the hook, relieving the pressure on the nylon tab. Slide the tab out of the loop and set it aside.

11.) Work from the outside edge in, then down. With the nylon tabs removed from each side on the top, move towards the center of the seat where there will be a nylon rod of sorts with three hooks on it, center and one on either side. Using the cluster hook, hook each loop and pull to relieve pressure and over/off the hook. Repeat for the other two hooks on the nylon rod. It will stay in place as it has clips holding it to the seat frame.
12.) Repeat this process until all of the tabs and hooks are removed. Pay close attention to the very top and bottom of the seat pad, as some of the nylon tabs might be obscured but the seat pad folds.
13.) Move to the top of the seat back. The upholstery that wraps around the back of the top of the seat is held in place with a wide cardboard strip that is folded up in place behind the seat frame. Reach up and feel the cardboard strip. Pull down on it on one side, "flipping" the cardboard down. Work your way across the fabric to the other side of the seat, freeing this edge. At this point the seat cover will be free of the frame with the exception of the top of the cover.
14.) Carefully peel the seat cover off of the top of the seat frame. The only remaining anchor is the plastic grommets that form the holes for the headrest rods. These are held in place with nylon rings that are pressed over the grommets. I have not found a way to remove or release them in place, so I carefully pull the cover up so I can expose the grommets, then use a sharp razor knife to cut the seat padding away from them. When the new cover is in place these are tightly anchored anyway, so I haven't found the lack of the rings making a difference in operation or appearance.

15.) At this point you should be able to lift the seat back cover off of the seat back.
16.) Moving to the seat bottom cushion, position yourself behind the seat, facing the seat back. Compress the seat bottom cushion along the back edge and release the material from the retention groove just as you did with the seat back fabric.
17.) Move around to the front of the seat. Starting at one corner near the hinge, compress the seat cushion to release the material from the retention groove. You'll need to work your way around the front of the seat to the other side to completely release the cover. Lift the edges of the cover to expose the horsehair seat pad on each side.
18.) From the side of the seat starting at the rear, reach under the horsehair pad and pull the edges down and out to release them from the spring frame. Move forward about halfway towards the front of the seat. Once about half of the cushion has been released, stand in front of the seat, grasp the seat cover and cushion, and pull forward. The seat pad and cover will come off the seat spring frame and be free of the seat.
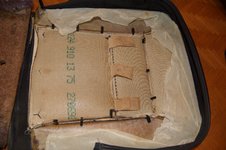
19.) Move to a work surface or table in a well lit area. Place the bottom seat cover and pad upside down so you can see the bottom of the pad. Note that there are a number of holes in the pad with wires through them. On those wires are hooks that clip over the wires to anchor the seat cover. The hooks are in an inverted "J" shape with a flat plastic clip that "closes" the hook. Using the cluster removal hook, carefully hook one of the plastic hooks and pull it up and off the wire. Repeat for the remaining hooks.


20.) Depending on the age and construction of the seat bottom, there may be several cloth strips coming through the holes in the seat pad, stapled to the bottom of the pad. Carefully remove the staples. This should free the cover from the pad. Set the cover aside where you see it for reference.
21.) At this point you need to inspect your new bottom cover. There are two different means of securing the cover to the seat pad, and they are different. The more common arrangement seems to be the plastic hooks as previously described. There is also an arrangement using a similar style of hook, only it's a part of a flat plastic "butterfly" that holds the seat pad in place. If you've gotten this far you've figured out how everything is attached. If you have the same arrangement with the new seat cover, great! If not, you may have to swap the plastic hooks over from the old pad to the new pad. If you do this, use the old pad as a pattern for where the hooks are placed, as they must line up with the holes in the seat pad. If you have to swap hooks, you may have to make small cuts in the fabric that holds the wires to the seat cover. I like to put the hook in place on the wire over the fabric, then use my razor knife to carefully just a slot in the fabric for the hook to slip through.


22.) With the hooks in place on the cover, turn it good side down on your work surface. Place the seat pad over it, lining up the hooks with the holes as best as possible. Starting at the front of the seat pad, use the cluster removal hook to hook the plastic hook, pull it up and over the wire to secure it to the wire. Work from the inside out, front to back. With all of the hooks clipped over the wires, you're done.
23.) Move back to the seat and get your seat back cover ready to install. Carefully pull the cover down and over the seat back frame, taking care to position it properly. Check the fit on the corners and edges around the top of the seat and adjust the position as necessary. Once done, take the cardboard strip on the back edge of the seat fabric and "flip" it up into the seat back frame, securing the cover.
24.) Facing the seat back from the rear, starting at the top of the seat on the outer edge, take the cluster removal hook, place it into one of the slots in the seat back cushion and "hook" the wire loop in the seat cover. If you can't reach or locate the loop, reach your hand up and under the cover to locate the wire loop that corresponds to that location. Reach through the hole from the back with the cluster removal tool and guide it to the loop with your hand. Pull the loop through the seat pad and have a nylon tab ready to place in the wire loop. Once done, release the wire loop and the tension will hold the tab in place. Move to the other side of the seat and hook that loop, then move to the center of the seat and hook each of the three loops onto the nylon rod's hooks.
NOTE: As you get more wires hooked, the cover will come into position. The farther down the cover you get, the closer the wire loops will be to the corresponding holes in the seat cushion.

25.) With all of the wire loops hooked, pull the bottom edge of the cover fabric through so it is visible from the back of the seat. Apply pressure and compress the bottom of the seat back, which will allow you to hook the cardboard strip and seat cover fabric into the retention groove on the seat back frame.
26.) Get the seat bottom cover and pad. Paying attention to the slots in the seat pad, line them up with the spring frame and push the pad and cover to the rear of the seat as far as possible. Note that you will not be able to push the pad all the way to the back of the seat frame. Reach under the side of the seat frame and pry the seat pad edges down and over the spring frame. Once this is done, the seat pad and cover and be pushed all the way to the rear.
27.) Applying pressure to the bottom seat cushion to compress the springs. This will allow you to hook the cardboard strip into the retention groove in the seat bottom frame. Start at once corner and work your way around.
28.) Move to the back of the seat. Compress the rear of the seat bottom cushion and secure the cardboard strip and fabric into the retention groove on the back of the seat bottom frame.
29.) Locate the seat back panel. Put it in place and push upwards to engage the top edge behind the seat back. Install the two phillips head screws in the bottom of the seat back frame. Note that your new seat cover fabric may not have holes in the same locations as these were self drilling screws, so be prepared to "search" for the screw holes in the seat back frame.
30.) Lay the seat on its back. Apply pressure to compress the seat back cushion to allow the plastic strip and fabric to be pushed into the groove on the seat back panel sides. Start at the top and work your way down. Repeat for the other side. Clean the hinge trim covers and reinstall.

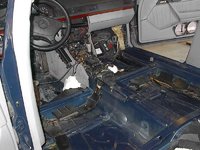
Installation of the seat is the reverse of removal. Again, be careful putting the seat back in the car as it's easy to do some damage in the process. Having a helper for this part is a big plus. Before you do it, sweep and clean the carpet under the seat. It's the right thing to do, as it probably won't see daylight again for another 10-15 years. It should go from this:

To this:

Dan
As for tools, you're going to need:
3/8" ratchet, extensions and universal joint
10mm socket
Phillips head screwdriver
Plastic panel tools
Mercedes instrument cluster hook
Razor or XActo knife
Flashlight
I've sourced near perfect OE leather covers from a guy I've known for some years named Craig Schoenemann. He's on eBay and can be reached directly via email at mschoen4@sbcglobal.net . Great guy, very responsive, has beautiful stuff and has never disappointed me with the covers I've gotten from him. I highly recommend him. Cost? It certainly depends on the model, color and age of the car, but the set you'll see me installing on my 1993 400E was $300 shipped to me for both front seats.
This "HOW-TO" is a little light on pictures, but very descriptive. If you read through it carefully before undertaking the work, everything will make sense as you go through it.
On to the fun:
1.) Move the seat as far to the rear as it will go. This will expose the bolts holding the front of both seat rails. Loosen, but don't completely remove them using your 10mm socket.
2.) Move the seat as far forward as it will go. Remove the two 10mm bolts holding the rear of the seat rails to the floor. Due to their location you're probably going to have to use an extension and a universal joint to get to them.
3.) Remove the cover from the seat belt retainer track that is located on the driveshaft tunnel near the rear seat. Pry it off from the rear and it will come loose. With your 10mm socket, unscrew the bolt holding the track to the tunnel. Note that there is a bell shaped washer between the track and the tunnel. It may fall into the gap between the carpet and the chassis, so be sure to fish it out. Pull the track back as far as possible, which will disengage it from the seat belt receiver bracket.
4.) Move the seat all the way to the rear. Tilt the seat back about halfway in its travel, about 45 degrees. Raise the headrest as far as it will go, then remove it from the seat while pushing in on the release button on the seat back. This shows up as a small bump in the upholstery on the seat back above the map pocket words the outside of the seat. Holding the front edge of the seat bottom with one hand, remove the front bolts. The seat will want to tip back, which is a good thing.
5.) Let the seat tip back. This will expose the bottom of the seat. You'll see some wiring harnesses going into the bottom of the seat. On the front of the seat below the cushion is a fabric cover that wraps around the bottom of the seat. Pull down on this and you will release it from its position. It is held in place with springs, so let go of it carefully. This will expose the connectors on the wiring harness.
6.) Remove the connectors and free the wiring harness from the seat bottom. There may be a couple of reusable tie wraps holding them in place.
7.) With a helper, lift the seat and gradually rotate it 90 degrees while taking it out of the door opening. You might want to put a blanket or other protection on the door sills, as it's easy to drag the seat rails across the sill while removing it. Put the seat on a workbench or work area where you can get to it easily from all sides. Gag when you see all the cruft that's under the seat. Ugh.
8.) Carefully remove the plastic trim covers from the hinges. If you gently pull the inside edges at the rear, they will release. Then it's a matter of sliding them towards the rear to disengage the hooks on the front. The cover on he seat belt receiver will come off - if you look closely there is a gap in the slot that will allow you to slip it over the seat belt receiver bracket and wire. There are two phillips head screws on the bottom of the seat back. Remove them. Lay the seat back down so it is flat on your work surface. Press down on the front of the seat back to compress the cushion. With the cushion compressed, pry the edge of the fabric out of the groove on the seat back using a panel tool. Start at one end (top or bottom) and once it's released the rest of the fabric will come out easily. Repeat for the other side. Once the fabric is out of the grooves the seat back will come free from the seat. Set it aside.
9.) With pressure applied to the seat back bottom, pull out on the fabric along the bottom of the seat back where it wraps around from the front. There is a cardboard strip stitched into the fabric that is folded over and placed in a metal groove on the seat back frame. When the seat back cushion is compressed, the fabric can be pulled out of this groove, freeing the cardboard strip and fabric.
10.) Facing the seat back from the rear, you're going to see a mess of springs and wires. Look carefully at the horsehair pad, which will have a number of slots and holes cut into it. Some of these will have wires projecting out of them with nylon tabs or hooks holding them. Starting at the top of the seat back, take the instrument cluster hook and hook it into one of the wire loops where you see a nylon tab. Pull out on the wire loop using the hook, relieving the pressure on the nylon tab. Slide the tab out of the loop and set it aside.
11.) Work from the outside edge in, then down. With the nylon tabs removed from each side on the top, move towards the center of the seat where there will be a nylon rod of sorts with three hooks on it, center and one on either side. Using the cluster hook, hook each loop and pull to relieve pressure and over/off the hook. Repeat for the other two hooks on the nylon rod. It will stay in place as it has clips holding it to the seat frame.
12.) Repeat this process until all of the tabs and hooks are removed. Pay close attention to the very top and bottom of the seat pad, as some of the nylon tabs might be obscured but the seat pad folds.
13.) Move to the top of the seat back. The upholstery that wraps around the back of the top of the seat is held in place with a wide cardboard strip that is folded up in place behind the seat frame. Reach up and feel the cardboard strip. Pull down on it on one side, "flipping" the cardboard down. Work your way across the fabric to the other side of the seat, freeing this edge. At this point the seat cover will be free of the frame with the exception of the top of the cover.
14.) Carefully peel the seat cover off of the top of the seat frame. The only remaining anchor is the plastic grommets that form the holes for the headrest rods. These are held in place with nylon rings that are pressed over the grommets. I have not found a way to remove or release them in place, so I carefully pull the cover up so I can expose the grommets, then use a sharp razor knife to cut the seat padding away from them. When the new cover is in place these are tightly anchored anyway, so I haven't found the lack of the rings making a difference in operation or appearance.
15.) At this point you should be able to lift the seat back cover off of the seat back.
16.) Moving to the seat bottom cushion, position yourself behind the seat, facing the seat back. Compress the seat bottom cushion along the back edge and release the material from the retention groove just as you did with the seat back fabric.
17.) Move around to the front of the seat. Starting at one corner near the hinge, compress the seat cushion to release the material from the retention groove. You'll need to work your way around the front of the seat to the other side to completely release the cover. Lift the edges of the cover to expose the horsehair seat pad on each side.
18.) From the side of the seat starting at the rear, reach under the horsehair pad and pull the edges down and out to release them from the spring frame. Move forward about halfway towards the front of the seat. Once about half of the cushion has been released, stand in front of the seat, grasp the seat cover and cushion, and pull forward. The seat pad and cover will come off the seat spring frame and be free of the seat.
19.) Move to a work surface or table in a well lit area. Place the bottom seat cover and pad upside down so you can see the bottom of the pad. Note that there are a number of holes in the pad with wires through them. On those wires are hooks that clip over the wires to anchor the seat cover. The hooks are in an inverted "J" shape with a flat plastic clip that "closes" the hook. Using the cluster removal hook, carefully hook one of the plastic hooks and pull it up and off the wire. Repeat for the remaining hooks.
20.) Depending on the age and construction of the seat bottom, there may be several cloth strips coming through the holes in the seat pad, stapled to the bottom of the pad. Carefully remove the staples. This should free the cover from the pad. Set the cover aside where you see it for reference.
21.) At this point you need to inspect your new bottom cover. There are two different means of securing the cover to the seat pad, and they are different. The more common arrangement seems to be the plastic hooks as previously described. There is also an arrangement using a similar style of hook, only it's a part of a flat plastic "butterfly" that holds the seat pad in place. If you've gotten this far you've figured out how everything is attached. If you have the same arrangement with the new seat cover, great! If not, you may have to swap the plastic hooks over from the old pad to the new pad. If you do this, use the old pad as a pattern for where the hooks are placed, as they must line up with the holes in the seat pad. If you have to swap hooks, you may have to make small cuts in the fabric that holds the wires to the seat cover. I like to put the hook in place on the wire over the fabric, then use my razor knife to carefully just a slot in the fabric for the hook to slip through.
22.) With the hooks in place on the cover, turn it good side down on your work surface. Place the seat pad over it, lining up the hooks with the holes as best as possible. Starting at the front of the seat pad, use the cluster removal hook to hook the plastic hook, pull it up and over the wire to secure it to the wire. Work from the inside out, front to back. With all of the hooks clipped over the wires, you're done.
23.) Move back to the seat and get your seat back cover ready to install. Carefully pull the cover down and over the seat back frame, taking care to position it properly. Check the fit on the corners and edges around the top of the seat and adjust the position as necessary. Once done, take the cardboard strip on the back edge of the seat fabric and "flip" it up into the seat back frame, securing the cover.
24.) Facing the seat back from the rear, starting at the top of the seat on the outer edge, take the cluster removal hook, place it into one of the slots in the seat back cushion and "hook" the wire loop in the seat cover. If you can't reach or locate the loop, reach your hand up and under the cover to locate the wire loop that corresponds to that location. Reach through the hole from the back with the cluster removal tool and guide it to the loop with your hand. Pull the loop through the seat pad and have a nylon tab ready to place in the wire loop. Once done, release the wire loop and the tension will hold the tab in place. Move to the other side of the seat and hook that loop, then move to the center of the seat and hook each of the three loops onto the nylon rod's hooks.
NOTE: As you get more wires hooked, the cover will come into position. The farther down the cover you get, the closer the wire loops will be to the corresponding holes in the seat cushion.
25.) With all of the wire loops hooked, pull the bottom edge of the cover fabric through so it is visible from the back of the seat. Apply pressure and compress the bottom of the seat back, which will allow you to hook the cardboard strip and seat cover fabric into the retention groove on the seat back frame.
26.) Get the seat bottom cover and pad. Paying attention to the slots in the seat pad, line them up with the spring frame and push the pad and cover to the rear of the seat as far as possible. Note that you will not be able to push the pad all the way to the back of the seat frame. Reach under the side of the seat frame and pry the seat pad edges down and over the spring frame. Once this is done, the seat pad and cover and be pushed all the way to the rear.
27.) Applying pressure to the bottom seat cushion to compress the springs. This will allow you to hook the cardboard strip into the retention groove in the seat bottom frame. Start at once corner and work your way around.
28.) Move to the back of the seat. Compress the rear of the seat bottom cushion and secure the cardboard strip and fabric into the retention groove on the back of the seat bottom frame.
29.) Locate the seat back panel. Put it in place and push upwards to engage the top edge behind the seat back. Install the two phillips head screws in the bottom of the seat back frame. Note that your new seat cover fabric may not have holes in the same locations as these were self drilling screws, so be prepared to "search" for the screw holes in the seat back frame.
30.) Lay the seat on its back. Apply pressure to compress the seat back cushion to allow the plastic strip and fabric to be pushed into the groove on the seat back panel sides. Start at the top and work your way down. Repeat for the other side. Clean the hinge trim covers and reinstall.
Installation of the seat is the reverse of removal. Again, be careful putting the seat back in the car as it's easy to do some damage in the process. Having a helper for this part is a big plus. Before you do it, sweep and clean the carpet under the seat. It's the right thing to do, as it probably won't see daylight again for another 10-15 years. It should go from this:
To this:
Dan
Attachments
-
 Bottom cover pastic hook in place.jpg1.9 MB · Views: 82
 -
 Bottom cover plastic hooks.jpg1.9 MB · Views: 76
 -
 Bottom seat cover with plastic hooks on wires.jpg1.8 MB · Views: 88
 -
 Seat bottom pad & cover.jpg1.9 MB · Views: 84
 -
 Seat back cover removed 2.jpg1.9 MB · Views: 73
 -
 Wires embedded in bottom seat pad.jpg1.8 MB · Views: 79