• Hi Guest !

    Welcome to the 500Eboard forum.

    Since its founding in late 2008, 500Eboard has become the leading resource on the Internet for all things related to the Mercedes-Benz 500E and E500. In recent years, we have also expanded to include the 400E and E420 models, which are directly related to the 500E/E500.

    We invite you to browse and take advantage of the information and resources here on the site. If you find helpful information, please register for full membership, and you'll find even more resources available. Feel free to ask questions, and make liberal use of the "Search" function to find answers.

    We hope you will become an active contributor to the community!

    Sincerely,
    500Eboard Management

HOW-TO: Replace Idler Arm Bushing

I think it may come to that.

R
A relaxed, straight lines, 60 Km drive this afternoon and all perfect. The first REAL pleasure for quite a while.

EXCEPT the shudder.

My son's meeting up with MB tomorrow for some of his usually heavily discounted quotes.

We've going to leave it for a while to see if the existing discs bed in. If not, we all know the next step.

R
 
RayH, a couple of comments:
Idler Arm Bushings- if we're talking about the M104 motor it is not necessary to remove any part of the exhaust system. Rather one removes the 2 cross member motor mount bolts and raises the engine a couple of inches. Don't forget to remove the 2 piece fan shroud prior. You'll have adequate room to get the bolt out and insert a new one. Drive out the bushings with a piece of steel pipe you can buy at any hardware store in their plumbing dept.

Brake Pad Pins-If the pins supplied were the proper ones and installed correctly I just don't see how they could pop out. The tension from the spring clip would prevent this. The head of the pin must be driven flush with or even slightly recessed from the caliper surface.


Regards,


Peter
 
The tension from the spring clip would prevent this. The head of the pin must be driven flush with or even slightly recessed from the caliper surface.
We thought exactly that. But the spring clip did not seem solid and came loose. My local expert reckons they are of poor quality. We shall compare with the MB ones. And we drove the pins in until they sounded as if they'd reached the end - they had.

The local guy I'm talking about is in his 60s and about 500 meters from where I live. The reason I've started using him is that I saw his Land Rover. He restored it from nuts and bolts upwards and it's stunning. He's also got a client with an E-Type that he restored the body on and sprayed.

And yes, it is the M104.98x motor. I have read similar elsewhere so I take your point 100%. If/when we decide to change it, we'll doubtless use that technique. Thanks.

RayH
 
Last edited:
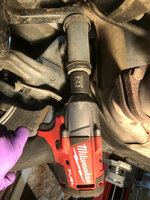
I just did this job on our beater 1995 E420 yesterday. If the nut is not seized, an impact wrench SHOULD work to remove the nut. Make sure to connect the socket directly to the impact wench, without any extensions - this is critical! Extensions absorb some of the impact / hammer action, and transmit less torque to the nut. If the nut doesn't want to loosen, verify your impact wrench (air or electric) is set to the highest torque setting. For air impact only, make sure your regulator is not turned down, you want 100-120psi at the wrench.

I used a 24mm standard-depth 6-sided socket, with a Milwaukee 1/2" mid-torque (not high-torque) impact wrench, on the medium setting (#2 of 3) and the nut zipped off after a few seconds of hammer action. Air impacts often have a "power" setting, I am wondering if Ricardo accidentally had his air impact set to "low torque"...? This nut should not put up a fight.

The bigger problem was getting that giant 24mm open-end wench on the top hex head of the bolt. There's just no space up there. A smaller adjustable/Crescent wench may fit better. Use a 24mm stubby if you have one available, or possibly a crow-foot 24mm. A quick online search only turned up an S-K 24mm stubby for $33 (link) which is spendy for a single wrench you may rarely use. NAPA offers a "Commination" (sic) 24mm stubby for $15 (link). :LOL: A 1" SAE might suffice, and is only $10 (link) from Sunex, or Most metric sets of stubby wenches don't include sizes above 19mm.

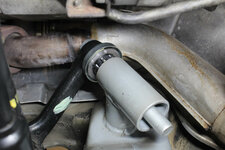
The bushing kit is NLA, but the bushings are still available separately. Photo below. Although the nut came off easily, the bushings didn't want to slide out without a fight. It's definitely easier to R&R the bushings with the center bolt removed, but that requires pulling the catalyst pipe. Clearance is VERY TIGHT, but the bolt+bushings will come out eventually. New bushings will slide into place without additional lubricant applied.

The old bushings had 252kmi and there was very noticeable movement when pushing/pulling the idler arm up/down. With new bushings, there is zero movement. I couldn't tell any difference while driving, but now I know the new bushings should be good until 500kmi or so.

Total time from removing the engine splash shield to lowering the car off the lift: 45 minutes.

:banana2:
 

Attachments

  • idler_impact.jpg
    idler_impact.jpg
    221.9 KB · Views: 13
  • idler_arm_bushings_129-.jpg
    idler_arm_bushings_129-.jpg
    120 KB · Views: 13
Found these photos from summer 2021, when I did a major suspension/steering refresh on my wife's 1994 E420. Before/after details of that job are in this thread which shows how to measure idler arm play with a dial gauge. I had forgotten to upload those pics to my website, or to this forum, ooops. Well, 3.5 years later....

:jelmerian:
 

Attachments

  • idler_arm_V8_a.jpg
    idler_arm_V8_a.jpg
    110.4 KB · Views: 13
  • idler_arm_V8_b.jpg
    idler_arm_V8_b.jpg
    132.5 KB · Views: 13
  • idler_arm_V8_c.jpg
    idler_arm_V8_c.jpg
    115.9 KB · Views: 13
  • idler_arm_V8_d.jpg
    idler_arm_V8_d.jpg
    122.1 KB · Views: 13
  • idler_arm_V8_e.jpg
    idler_arm_V8_e.jpg
    135.6 KB · Views: 13
I remember that job, nut was welded on there, not even my air impact could get it off. Took a few blades but I cut her off over a few days.
 
I used a 24mm standard-depth 6-sided socket, with a Milwaukee 1/2" mid-torque (not high-torque) impact wrench, on the medium setting (#2 of 3) and the nut zipped off after a few seconds of hammer action. Air impacts often have a "power" setting, I am wondering if Ricardo accidentally had his air impact set to "low torque"...? This nut should not put up a fight.
Hi Dave. I have a 1/2” Milwaukee Fuel impact wrench with four settings and I’m curious why you wouldn’t want to use it on the highest setting.
 
Hi Dave. I have a 1/2” Milwaukee Fuel impact wrench with four settings and I’m curious why you wouldn’t want to use it on the highest setting.
Jon, my older mid-torque impact (#2861-20) is mostly used for wheel lug bolts, and I usually leave it on the middle setting (2 of 3) unless I run into a particularly stubborn fastener. I don't have a logical explanation for why I do this. Sometimes it's interesting to see when a fastener won't break free on #2 but does break free when bumping up to #3.

I also have the high-torque wrench (#2863-20) but I've almost never used it! The mid-torque will remove almost everything I've tried. The high-torque might be needed for crank hub bolts, rear axle bolts with threadlock, etc. The BigBoy® has 4 settings available.

:sawzall:


Photo of the 3 settings on my mid-torque:

1735395121239.png
 
Thanks Dave. I thought it might have had something to do with rounding the bolt head. When I first got my wrench it took a few failed (disappointing) attempts at removing lug bolts before I realized there were adjustable settings. Pressing in on the number which is also an LED wasn’t too intuitive.
 
Back
Top