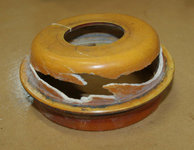
In my ongoing quest to sort out the 400E I recently acquired, one of the issues I noted in my initial inspection was a severely worn/damaged distributor insulator on the right distributor. While this typically does not prevent the car from running, in the climate I live in (west central Florida) the presence of humidity and dampness can affect the M119 distributors to the point of preventing the car from starting or cause it to run quite poorly. I had previous experience with an M119 equipped W140 that if parked for more than 4-5 days would idle and run poorly until the engine was warmed up enough to drive out the condensation that would accumulate in the distributors. Having intact insulators goes a long way to keep the distributors sealed from dirt, dust, oil and condensation.
If I was to rate this job on a scale of 1-10 for a competent DIY'er I would say it's maybe a 3 or 4. Nothing terribly difficult, but it does require some careful work to avoid damage to fasteners, areas in which I will point out.
Tools Required:
3/8" ratchet with short (3"-4") extension
3/8" drive 5mm hex bit
3mm hex wrench or ratchet bit if you have one
Paper towels or shop rags
Brake cleaner or cleaning solvent
Part(s) Required:
1 or 2 distributor insulators/dust shields - Mercedes 119 158 01 88 or Bosch 1230500240 (verify part numbers with the EPC or dealer using your VIN)

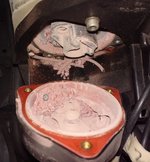
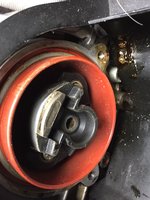
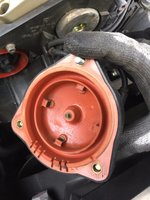
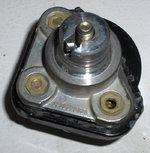
1.) Begin by removing the plastic cover over the distributor and spark plug cables. There is a tab at the lower edge towards the outside of the engine you must release to lift the cover off. This is often broken or missing.

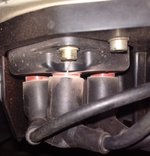
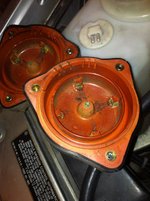
2.) With the cover removed, locate the three 5mm socket head cap bolts that hold the distributor cap in place. Using your 3/8 ratchet, short extension and 5mm driver, loosen all three bolts. They are captive in the distributor cap, so they can't be removed nor will they fall out. Due to the difficulty getting the ratchet drive and extension through and around the spark plug cables, I prefer to break the bolts loose with the ratchet then use a long 5mm hex wrench to spin them loose.

3.) With the distributor cap carefully removed and moved out of the way, get your 3mm driver and loosen the three 3mm bolts on the distributor rotor. NOTE: DO NOT use a "ball end" hex driver for this! It will almost certainly strip the sockets in the bolts. I prefer the "tap and snap" approach to these - get your hex wrench inserted in the bolt head, tap the wrench a few times to make sure it's firmly seated in the recess, and "snap" the wrench to break the bolt loose. These bolts are captive as well, so you can't lose them and they won't fall out. Once loosened completely, remove the rotor and place it out of the work area.

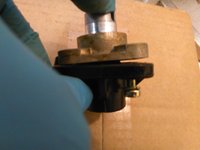
4.) With the rotor removed you will see the rotor drive. In the center of the rotor drive is a 5mm socket head bolt. Using your 5mm bit and ratchet, loosen and carefully remove the bolt. Note that there is a flat washer under the head of the bolt. It may not come out with the bolt and remain in the recess where the bolt was located. Retrieve it as necessary and place on the bolt.


5.) Carefully grasp the rotor drive and wiggle/pull out on it. It may be tight, so be patient and work it over. I like to use a set of instrument cluster hooks to pull this out. When it comes out make note of the position of the drive and the notch in the back of it, as this will need to index over the two pins on the drive when you install it.


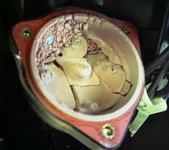
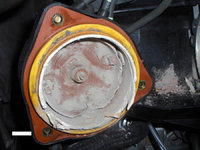
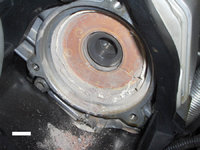
6.) With the rotor drive out, you can lift the distributor insulator out of the recess. Once you do so, get a shop rag or paper towel(s) with a solvent or cleaner and wipe the area clean. If you're lucky the seal behind the distributor will be intact and there will be little dirt or oil in this area.


7.) With the area clean, place the new insulator in the distributor housing. There is nothing that holds it in place other than the rotor drive.

8.) Taking note of the pins on the distributor drive, place the rotor drive on the distributor drive and start the 5mm socket head bolt. The rotor drive can only go on to the shaft in one position, so fit it carefully and check to make sure it is fixed in place. Run down the bolt and torque to a value of approximately 9 Nm. NOTE: I prefer to use thread locking compound (LocTite (blue) or equivalent) on this bolt. The torque value is relatively low, and you certainly don't want it rotating out while the engine is running.
9.) Replace the rotor and tighten the 3mm bolts. I also advise the use of thread locking compound on these bolts as well. Be gentle here, there's no reason to do the "strong man" approach on these, it's not necessary and will make it that much more difficult for the next time you have to remove the rotor.
10.) Carefully position the distributor cap over the distributor and rotor, and tighten the bolts.
11.) Replace the plastic cover over the distributor and spark plug cables. Take note that there is a "tab" that slides into a slot near the center of the engine on the cover. This anchors the inboard edge of the cover. The outboard edge will slide into the bottom half of the cover and latch on the tab that projects out from it. Congratulate yourself on a job well done and enjoy a cold beverage of your choice.
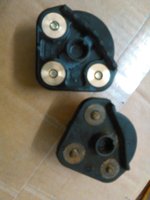
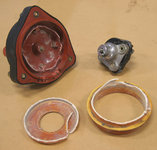
Note that I took photos as I assembled the distributor, so the new insulator is present in the disassembly photos. Sorry for any confusion this might cause. To give you an idea of how bad one of these insulators can be, I have included photos of the old insulator below. Not only was it cracked and full of holes, the sealing ring had at least one split in it.


If you have corrections or additions to this, please let me know and I'll update the post.
Dan
If I was to rate this job on a scale of 1-10 for a competent DIY'er I would say it's maybe a 3 or 4. Nothing terribly difficult, but it does require some careful work to avoid damage to fasteners, areas in which I will point out.
Tools Required:
3/8" ratchet with short (3"-4") extension
3/8" drive 5mm hex bit
3mm hex wrench or ratchet bit if you have one
Paper towels or shop rags
Brake cleaner or cleaning solvent
Part(s) Required:
1 or 2 distributor insulators/dust shields - Mercedes 119 158 01 88 or Bosch 1230500240 (verify part numbers with the EPC or dealer using your VIN)
1.) Begin by removing the plastic cover over the distributor and spark plug cables. There is a tab at the lower edge towards the outside of the engine you must release to lift the cover off. This is often broken or missing.
2.) With the cover removed, locate the three 5mm socket head cap bolts that hold the distributor cap in place. Using your 3/8 ratchet, short extension and 5mm driver, loosen all three bolts. They are captive in the distributor cap, so they can't be removed nor will they fall out. Due to the difficulty getting the ratchet drive and extension through and around the spark plug cables, I prefer to break the bolts loose with the ratchet then use a long 5mm hex wrench to spin them loose.
3.) With the distributor cap carefully removed and moved out of the way, get your 3mm driver and loosen the three 3mm bolts on the distributor rotor. NOTE: DO NOT use a "ball end" hex driver for this! It will almost certainly strip the sockets in the bolts. I prefer the "tap and snap" approach to these - get your hex wrench inserted in the bolt head, tap the wrench a few times to make sure it's firmly seated in the recess, and "snap" the wrench to break the bolt loose. These bolts are captive as well, so you can't lose them and they won't fall out. Once loosened completely, remove the rotor and place it out of the work area.
4.) With the rotor removed you will see the rotor drive. In the center of the rotor drive is a 5mm socket head bolt. Using your 5mm bit and ratchet, loosen and carefully remove the bolt. Note that there is a flat washer under the head of the bolt. It may not come out with the bolt and remain in the recess where the bolt was located. Retrieve it as necessary and place on the bolt.
5.) Carefully grasp the rotor drive and wiggle/pull out on it. It may be tight, so be patient and work it over. I like to use a set of instrument cluster hooks to pull this out. When it comes out make note of the position of the drive and the notch in the back of it, as this will need to index over the two pins on the drive when you install it.
6.) With the rotor drive out, you can lift the distributor insulator out of the recess. Once you do so, get a shop rag or paper towel(s) with a solvent or cleaner and wipe the area clean. If you're lucky the seal behind the distributor will be intact and there will be little dirt or oil in this area.
7.) With the area clean, place the new insulator in the distributor housing. There is nothing that holds it in place other than the rotor drive.
8.) Taking note of the pins on the distributor drive, place the rotor drive on the distributor drive and start the 5mm socket head bolt. The rotor drive can only go on to the shaft in one position, so fit it carefully and check to make sure it is fixed in place. Run down the bolt and torque to a value of approximately 9 Nm. NOTE: I prefer to use thread locking compound (LocTite (blue) or equivalent) on this bolt. The torque value is relatively low, and you certainly don't want it rotating out while the engine is running.
9.) Replace the rotor and tighten the 3mm bolts. I also advise the use of thread locking compound on these bolts as well. Be gentle here, there's no reason to do the "strong man" approach on these, it's not necessary and will make it that much more difficult for the next time you have to remove the rotor.
10.) Carefully position the distributor cap over the distributor and rotor, and tighten the bolts.
11.) Replace the plastic cover over the distributor and spark plug cables. Take note that there is a "tab" that slides into a slot near the center of the engine on the cover. This anchors the inboard edge of the cover. The outboard edge will slide into the bottom half of the cover and latch on the tab that projects out from it. Congratulate yourself on a job well done and enjoy a cold beverage of your choice.
Note that I took photos as I assembled the distributor, so the new insulator is present in the disassembly photos. Sorry for any confusion this might cause. To give you an idea of how bad one of these insulators can be, I have included photos of the old insulator below. Not only was it cracked and full of holes, the sealing ring had at least one split in it.
If you have corrections or additions to this, please let me know and I'll update the post.
Dan
Last edited:


")

")