• Hi Guest !

    Welcome to the 500Eboard forum.

    Since its founding in late 2008, 500Eboard has become the leading resource on the Internet for all things related to the Mercedes-Benz 500E and E500. In recent years, we have also expanded to include the 400E and E420 models, which are directly related to the 500E/E500.

    We invite you to browse and take advantage of the information and resources here on the site. If you find helpful information, please register for full membership, and you'll find even more resources available. Feel free to ask questions, and make liberal use of the "Search" function to find answers.

    We hope you will become an active contributor to the community!

    Sincerely,
    500Eboard Management

HOW-TO: Replacing M119 Electronic Throttle Actuator (ETA)

emerydc8

E500E **Meister**
Member
I replaced my ETA with a $200 used ETA from Ebay. Thanks to Dave who pointed out that the date tag, 02M11, meant that this was a unit that was made in November 2002, with the good insulation -- not the crap MB used to make the originals.

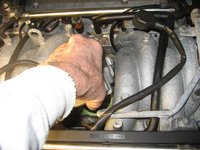
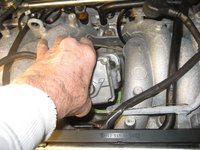
The job was much easier than I anticipated. It took about 90 minutes and I even took my time. The hoses were all brittle and broke as they came off, as expected, so I had the new ones ready to go.

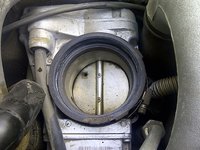
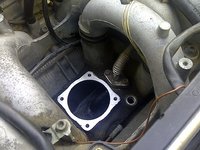
I used a long screwdriver to loosen the large hose clamps on the rubber collar between the MAF and ETA. The vertical brake vacuum pipe comes off in two pieces. The bottom piece has an aluminum washer where it mates up to the intake manifold. I was able to use my 19 mm crow's foot wrench, which was the first time I ever found a use for it.

I read Jim Forgione's post about losing the throttle linkage spring, so as soon as I popped off the throttle cable I secured the spring with a few large rubber bands. He said he spent a few hours trying to reattach the spring because it came off on him. I can see how difficult it would be to try to find where the other end of that spring connects under the intake runners towards the front of the engine.

So far, there are no problems, other than an intermittent idle problem that popped up last night before I even changed the ETA. For some reason, when I move the gear selector to drive or reverse, the idle bounces +/- 200 RPM with a frequency of about one second. Put it back in neutral and the idle is smooth as glass.

Since it happened with the old ETA, I have ruled the ETA out as a problem and I suspect it may be the Neutral Safety Switch, which I replaced about two years ago, but I bought it from AutohausAZ and I don't know about the quality of the part. I plan to order a factory NSS this week. This idle problem occurred on my old 400E about ten years ago and it was the NSS that ultimately fixed it.

Well, here are some pictures. Sorry this post is nowhere near as detailed and professional as GVZ's.
 

Attachments

  • Tucson-20130323-00787.jpg
    Tucson-20130323-00787.jpg
    338.7 KB · Views: 150
  • Tucson-20130323-00788.jpg
    Tucson-20130323-00788.jpg
    428.8 KB · Views: 149
  • Tucson-20130323-00793.jpg
    Tucson-20130323-00793.jpg
    450.2 KB · Views: 151
  • Tucson-20130323-00798.jpg
    Tucson-20130323-00798.jpg
    366.4 KB · Views: 154
  • Tucson-20130323-00800.jpg
    Tucson-20130323-00800.jpg
    420 KB · Views: 155
  • Tucson-20130323-00801.jpg
    Tucson-20130323-00801.jpg
    405.8 KB · Views: 145
Last edited:
Re: ETA Replacement

Well, here are some pictures. Sorry this post is nowhere near as detailed and professional as GVZ's.

It's a good write up with good advices, Jon! Any info is good IMHO. ETA replacement is something absolutetly ALL OF US will have to go through sooner or later. It's in the same category as the upper wiring, bad vacuum lines, NSS, kick down switch etc.. all will fail at some point, but they are reasonable DIYs to overcome - but with necessary advices though.

:roadrunner:
 
Re: ETA Replacement

I found this on ebay. http://www.ebay.com/itm/94-95-Merce...Parts_Accessories&hash=item4d0acfe23f&vxp=mtr

The date tag looks like 03M03 (Mar. 2003). I'm not sure if it will fit you car though. It looks like part number 000 141 89 25, which is the same unit I just installed on my car. It works even though the epc calls for a different part number (000 141 94 25). Maybe Dave can chime in and see if it's worth making an offer on it.
 
Re: ETA Replacement

Have the same idle issue, actually had it before changing the ETA, now am going to check fuel pressure, change filters, perhaps the pressure regulator and fuel pumps. Run a little seafoam too. I Also heard that idle issue may be related to the Over Voltage protection or OVP. specially after harness replacement as the OVP has compensated for deficiency's in the wiring. I have a great salvage yard near me they practically give me parts so I am going to grab some relays from a low mileage 124. Does anyone have any issues that were fuel system related with regards to idle? Also the car needs to relearn after ETA replacement as well as adjust the linkage, and there is a procedure for that. I found that made a difference also replacing ignition components IE caps and rotors wires. Got to love these cars when they are running!
 
Last edited:
Re: ETA Replacement

The .034/.036 chassis do not have an OVP relay. That is a 4/5/6 cylinder item only. The OVP function is embedded into the Basic Module (aka General Module).

:mushroom:
 
Re: ETA Replacement

Yes, OVP relays were only used with KE-injected gas motors (4, 6 and 8-cylinder). It was eliminated as a separate relay with the advent of LH injection, and ME injection I believe. I don't know about Diesel motors.
 
Re: ETA Replacement

UPDATE: I hope I don't jinx myself here, but I haven't had the surging idle problem since the day after I installed the new (used) ETA. I have no idea what caused it to begin with, but it did it with the old ETA and, for a day, the new one.

Now that the ETA replacement was a success, I felt confident enough to tackle this next job -- one that I have been dreading for years but finally got the courage to overcome -- the dreaded air intake hose.
 

Attachments

  • AirIntakeBoot.jpg
    AirIntakeBoot.jpg
    11.2 KB · Views: 29
Re: ETA Replacement

The ROI on air-intake hoses is almost unbeatable.

There's a full HOW-TO article posted on the forum somewhere, with detailed replacement procedure.

Cheers,
Gerry
 
Re: ETA Replacement

UPDATE: I felt confident enough to tackle this next job -- one that I have been dreading for years but finally got the courage to overcome -- the dreaded air intake hose.
Sir, you are a brave man indeed and as you step into the darkness, just remember "though I walk through the valley of the shadow of death, I will fear no evil..."
 
Re: ETA Replacement

Thanks, guys. I'm exhausted. I don't know what I'd have done without that HOW-TO article. I only did the driver's side tonight because it was getting dark and I simply didn't want to get stuck in the middle of the passenger-side installation. Some things are better left to professionals. This is not a job for the neophyte.
 
I've added some pictures to this thread that may be helpful. Thanks, Jon.

This series of pictures attempts to show the positioning and sequence of how to orientate the ETA to install or remove.

The main obstacle to extracting or inserting the ETA is the vacuum hose at it's base. It can be installed with this hose attached provided the hose is soft and pliable. Without the hose attached the ETA moves into and out of position quite easily. With the hose attached it takes some force and compression / manipulation of the hose. The ETA can be installed without the hose attached however attaching the hose afterwards (with a clamp) can be very difficult. There are tips for this procedure elsewhere under ETA information.

Lastly, I recommend installing the MAF without tightening the screw clamps tight and running the car to make sure the ETA replacement has cured the problem. Then tighten the clamps, which can be a bit difficult to access.

drew
 

Attachments

  • IMG_8857.JPG
    IMG_8857.JPG
    486.1 KB · Views: 75
  • IMG_8858.JPG
    IMG_8858.JPG
    517.2 KB · Views: 71
  • IMG_8859.JPG
    IMG_8859.JPG
    536.8 KB · Views: 71
  • IMG_8860.JPG
    IMG_8860.JPG
    557.8 KB · Views: 72
  • IMG_8861.JPG
    IMG_8861.JPG
    505.3 KB · Views: 75
Great pictorial. The trick, as you described, is getting the darn thing in & out with the rear PCV hose attached. I gotta figure out a workaround... maybe insert w/o hose, but then attach the hose before bolting down, so it's easier to access the rear clamp?

:scratchchin:
 
I just did this job and agree about the challenge of the large rubber hose. I wonder if it could be cut somewhere in the middle and rigged with some sort of union such that you could remove the top half to make the install easier?

Getting the ETA out is finally a piece of cake. After removing the metal vac tube at the front of the ETA, just tilt the front edge up and lift it out. I didn't find it necessary to do any rotating, just tilting. As mentioned, the install is not as easy with that rubber hose that has to be compressed/moved around.
 
The other day, as soon as there was information that late actuators were discontinued in Japan, some vendors and users bought them all. Some are for resale. I think it will be sold at a very high price in the future. I will be sad.
 
I just did this job and agree about the challenge of the large rubber hose. I wonder if it could be cut somewhere in the middle and rigged with some sort of union such that you could remove the top half to make the install easier?

Getting the ETA out is finally a piece of cake. After removing the metal vac tube at the front of the ETA, just tilt the front edge up and lift it out. I didn't find it necessary to do any rotating, just tilting. As mentioned, the install is not as easy with that rubber hose that has to be compressed/moved around.
Posting here to keep the threads together...
In replacing the throttle actuator, I kept some tension on the spring, but apparently not enough to prevent it from detaching itself from the form mounting point. I now have spring in hand and a rebuilt TBA ready to go in. Is it at all possible to reattach the spring under the intake manifold without removing the intake manifold?
 
No need to remove the intake manifold, AFAIK... should be able to get it re-attached through the space where the ETA lives?

:scratchchin:
 

Who has watched this thread (Total: 2) View details

Back
Top