• Hi Guest !

    Welcome to the 500Eboard forum.

    Since its founding in late 2008, 500Eboard has become the leading resource on the Internet for all things related to the Mercedes-Benz 500E and E500. In recent years, we have also expanded to include the 400E and E420 models, which are directly related to the 500E/E500.

    We invite you to browse and take advantage of the information and resources here on the site. If you find helpful information, please register for full membership, and you'll find even more resources available. Feel free to ask questions, and make liberal use of the "Search" function to find answers.

    We hope you will become an active contributor to the community!

    Sincerely,
    500Eboard Management

HOW-TO: Replacing the twin electric auxiliary cooling fans

gsxr

.036 Hoonigan™, E500E Boffin, @DITOG
Staff member
I happened to notice that one of the electric auxiliary cooling fans on my wife's 500E was intermittently not working. The one fan would be whirring away, but the other was silent. It would jump to life if I whacked it though. I figured the brushes were worn in the motor, and that it needed replacement.

The FSM procedure (83-560 section C - click here) was not very helpful. I especially did not like the first step, which was to disconnect the condenser! I had no intention of discharging a properly functioning AC system. So, I figured I'd try to do it with the condenser attached.

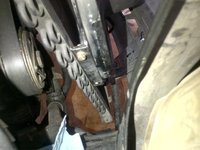
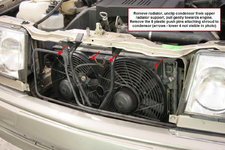
It's not a fun job, but not terrible either. The biggest nuisance is removing the radiator, which makes a nice mess. The fan clutch also must come out. This allows room for the condenser to move towards the engine far enough to allow the fans to slide out, as seen in the photos below. You do not need to unbolt the power steering cooling loop, and there are 8 push pins attaching the shroud, not 6. Otherwise the FSM procedure is straightforward. Before re-installing, clean the condenser as best you can using brushes, a vacuum, and compressed air. Clean the radiator using the same methods before re-installing. You might be surprised at the amount of debris that comes out.

Oddly, the intermittent fan that I removed had brushes that looked like new - same as the other fan. Both were originals, dated 1991. I replaced both of them anyway, as I wanted both working properly, and this was NOT a job I wanted to repeat in the future. The new fans have been working great.

New fans are part number 000-500-85-93. Pricing as of July 2021 is $472 MSRP, $320-$350 each from discount dealers.


Aftermarket Febi and ACM are available for $60-$90 each but IIRC, @M104-AMG reported fitment issues with the non-OEM fans.

:banana2:
 

Attachments

  • auxiliary_fan_removal1.jpg
    auxiliary_fan_removal1.jpg
    169.8 KB · Views: 146
  • auxiliary_fan_removal2.jpg
    auxiliary_fan_removal2.jpg
    164.3 KB · Views: 133
  • auxiliary_fan_removal3.jpg
    auxiliary_fan_removal3.jpg
    152.4 KB · Views: 132
  • auxiliary_fan_removal4.jpg
    auxiliary_fan_removal4.jpg
    154.3 KB · Views: 121
  • auxiliary_fan_removal5.jpg
    auxiliary_fan_removal5.jpg
    148.1 KB · Views: 128
Re: How to: Replacing the twin electric auxiliary cooling fans

Dave,

Nice photos=0) What software are you anotating and adding the arrows with?
 
Re: How to: Replacing the twin electric auxiliary cooling fans

Thanks, Michael! The annotations are from a nifty program called SnagIt from a company called TechSmith. I use an older version (v8), I tried a newer version with more bells & whistles (v10) but I actually preferred the older version instead. The older version was simpler and faster, and did everything I needed. Probably doesn't help that I'm using dinosaur computers (circa 2003-2004?), the newer version probably is quicker when used with newer/faster hardware.

:stickpoke:
 
Re: How to: Replacing the twin electric auxiliary cooling fans

Thanks for the write-up!

For those doing ANY work there at all, I'd like to recommend what Dave already wrote: clean the condenser as best you can using brushes, a vacuum, and compressed air. Don't use water, it'll only make big lumps of the tiny bits of dust and gunk. Be sure to do this outside - you'll be amazed at the amount of junk that comes out! Easiest way is by using an air compressor, a normal vacuum cleaner won't have enough suction strength, and those little compressed air bottles don't have enough air in them :)
 
Re: How to: Replacing the twin electric auxiliary cooling fans

I started with a shop vac on both sides, to remove the larger chunks of debris, then I used a toothbrush to gently go over the fins, and finally used compressed air. Like Jelmer said, there's a lot of crud that gets trapped in there...

:5150:
 
Re: How to: Replacing the twin electric auxiliary cooling fans

Ever try cleaning it with a no-rinse evaporator/condensor cleaner? Soak it down, then use the hose to rinse it 5-10 minutes later.

How about some hints on not making a mess R&R the radiator?


Michael
 
Re: How to: Replacing the twin electric auxiliary cooling fans

I only use the no-rinse foaming cleaners on the evaporator, since there is very limited access. For the condenser and radiator, compressed air works better. However you could use the cleaners as a final touch after the brush/vacuum/compressed air treatment.

For the radiator R&R, clamp off the ATF cooler hoses before disconnecting them. But otherwise there's not much you can do to avoid making a mess during removal.

:(
 
Re: How to: Replacing the twin electric auxiliary cooling fans

Great write-up! I was going to try this years ago on my 400E because I thought the fans were getting weak, but I too didn't want to break open a perfectly fine a/c system. I'm curious whether you replaced them with factory fans or did you use an aftermarket supplier.
 
Re: How to: Replacing the twin electric auxiliary cooling fans

To help contain the mess I use a plastic mortar tub that you find at Home Depot/Lowes. I have two sizes and they come in handy for trans work as well.
 

Attachments

  • 1f7cb577-c880-4ffd-a3fb-5c9408ecd5a7_300.jpg
    1f7cb577-c880-4ffd-a3fb-5c9408ecd5a7_300.jpg
    8.6 KB · Views: 284
Re: How to: Replacing the twin electric auxiliary cooling fans

Ever try cleaning it with a no-rinse evaporator/condensor cleaner? Soak it down, then use the hose to rinse it 5-10 minutes later.

How about some hints on not making a mess R&R the radiator?


Michael

I would advice against it. The stuff that gets stuck there is mostly dust, sand, bugs, etc. Getting it wet converts it into a porridge which is nearly impossible to get off. Like you said, it also makes a mess - using only air doesn't.
 
Yes what price is that fan assembly? Any aftermarkt solutions or can you get the electrical motors standalone and fix the unit for yourself?
 
Yes what price is that fan assembly? Any aftermarkt solutions or can you get the electrical motors standalone and fix the unit for yourself?

Parts.com lists the fans at $235 each. There are much less expensive aftermarket options available from various manufacturers including ACM, Meyle and URadOdo (URO). I'm considering original used units myself but I'm on the fence because I don't want to do the same job twice.

:spend:
 
Dave, thank you. Followed your procedure and everything was good. At the end I had a little surprise - my new ACM fans were spinning in a wrong direction (CCW). Fan connectors are not accessible after reassembly, so I had to reverse polarity common connector X64/4. Had to break a key pin to be able to connect.
 
Just did this job. The symptom was that the fan was cutting out intermittently and very weak when I held it by hand. The other symptom -- and I didn't think one weak fan would have caused it -- was that the a/c compressor kept cutting out. When I hooked the gauges up to it I observed the pressure rising until the overpressure cutout switch disconnected the compressor. When I drove the car, the ac would not work well until I was moving forward at 40+ MPH, then it would finally stay engaged and start cooling.

Like Myarmar, the fan initially turned backwards when connected as per the pin on the connector. I had to break it off and switch the plug to get it to spin correctly. I was aware of this and tested them before mounting it back on the car. That saved me some time to read this string before doing the job.

Attached are some pics of the bolts for the condenser and fan mount bracket. Thanks, Dave, and all who contributed to this How-To.
 

Attachments

  • Driver Side Fan Bolts.jpg
    Driver Side Fan Bolts.jpg
    977.7 KB · Views: 30
  • Upper Center Fan Bolts.jpg
    Upper Center Fan Bolts.jpg
    1.1 MB · Views: 31
  • Lower Center Fan Mount Bolt.jpg
    Lower Center Fan Mount Bolt.jpg
    936.3 KB · Views: 28
  • Passenger Side Fan Bolts.jpg
    Passenger Side Fan Bolts.jpg
    815.7 KB · Views: 30
Last edited:
What's the "trick" in removing the push-pins that hold the shroud to the frame ? Mine are so tight!

Also, what's the correct fan configuration ? I know it's suppose to spin "clockwise", but are the fans "pushing" air INTO the condenser, or "pulling" air OUT of the condenser ?

:-) neil
 
Last edited:
I can't remember about the push pins. Are they 2-piece, where you need to pull out the center first?

The fans should push air into the condenser, towards the engine. Same direction airflow as the mechanical fan/clutch.

:rugby:
 
Dave, Just a quick tks for the How-To write up on the aux. fan job. Was hot here last week so AC was running when I noticed an uptick in temp. needle in my E320. Popped the hood, drivers side fan was dead.
Bought two fans from dealer. Very $$$ even with 100 bucks discount per fan.
Very tedious job, for me anyway. To summarize [note this is on M104 / E320] :

  • Fan clutch-- spent $3 on a steel rod to make the locking tool. Cleaned front of engine below pulley so I could see the small channel and also removed the short coolant hose for better access. Darn hard to see that channel but put tool in it and locked the pulley in short order.
  • Radiator-- piece of cake to remove, no commentary needed.
  • Condenser-- easy to dis lodge and move backwards but watch you don't bend the cooling fins.
  • Aux fan shroud-- what a pain to remove those 6 (only six on an m104) plastic fasteners. I broke two and damaged one even using a trim tool. Luckily Advance Auto stores have an excellent selection of those plastic push rivets and I found an exact fit.
  • Fan Bracket-- tedious to R & R fans from the condenser.

Anyhow new fans are in and working fine. No issue with the wiring as my two pin connectors can only snap together in one orientation.

Regards,

Peter Weissman
 

Who has viewed this thread (Total: 2) View details

Who has watched this thread (Total: 3) View details

Back
Top