This is just a small how-to regarding the insulators caps and how you can make them live a bit longer. Now I didn't plan on making a how-to on this, so I do not have any before pictures.
There are a few requirements:
1. A good insulator to start with, that means that the insulator cant be broken, have cracks or anything like that. If your insulator have any such issues, get new ones (or refurbish a better one following this how-to).
2. Cleaning solvent of a kind that wont harm the plastic. Basically any soap will do, we want to remove grease. Do not use alcohol based products.
3. Lacquer, preferably one made for circuit boards and high temperatures. Enamel or even nail polish will probably do, but I'm a bit skeptical on the heat resistance. I'd go for a circuit board lacquer, many of them will sustain temperatures around 150 degrees C/300 degrees F.
-------------
1. Clean the insulator thoroughly, several times in soapy water. Make sure they're really clean. I'd recommend at least to clean them twice, you want them free of any grease and dirt. The water may turn yellow, that's from grease, copper residue and possibly the old coat of lacquer. Let them dry completely.
2. Check that they are really clean. With your fingers they should feel bone dry. Now is also the time to inspect them closely for any small cracks. You will probably see that the surface is uneven and spotty, but that is ok as long as they are not broken in any way. If you have a magnifying glass, examine them closer whilst gently trying to bend the insulator, to try to find any cracks. If there are cracks, discard it and get a new or better used one.
3. Wipe them off with a lint free cloth/blow them clean with compressed air.
4. Apply the lacquer. Two or three thin layers of lacquer each side, make sure that you get the sides as well. Let the lacquer set between each coating. Let them dry, and you are done!
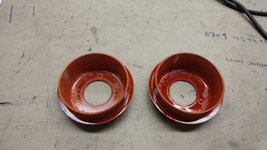
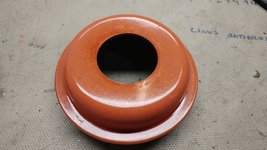
I have saved three sets with this method. Two sets made in 1992, and one set made in 1994. The pictures attached are of the 1994 set that came from a friends SL 500. He bought new ones and gave me his old insulators.
There are a few requirements:
1. A good insulator to start with, that means that the insulator cant be broken, have cracks or anything like that. If your insulator have any such issues, get new ones (or refurbish a better one following this how-to).
2. Cleaning solvent of a kind that wont harm the plastic. Basically any soap will do, we want to remove grease. Do not use alcohol based products.
3. Lacquer, preferably one made for circuit boards and high temperatures. Enamel or even nail polish will probably do, but I'm a bit skeptical on the heat resistance. I'd go for a circuit board lacquer, many of them will sustain temperatures around 150 degrees C/300 degrees F.
-------------
1. Clean the insulator thoroughly, several times in soapy water. Make sure they're really clean. I'd recommend at least to clean them twice, you want them free of any grease and dirt. The water may turn yellow, that's from grease, copper residue and possibly the old coat of lacquer. Let them dry completely.
2. Check that they are really clean. With your fingers they should feel bone dry. Now is also the time to inspect them closely for any small cracks. You will probably see that the surface is uneven and spotty, but that is ok as long as they are not broken in any way. If you have a magnifying glass, examine them closer whilst gently trying to bend the insulator, to try to find any cracks. If there are cracks, discard it and get a new or better used one.
3. Wipe them off with a lint free cloth/blow them clean with compressed air.
4. Apply the lacquer. Two or three thin layers of lacquer each side, make sure that you get the sides as well. Let the lacquer set between each coating. Let them dry, and you are done!
I have saved three sets with this method. Two sets made in 1992, and one set made in 1994. The pictures attached are of the 1994 set that came from a friends SL 500. He bought new ones and gave me his old insulators.