• Hi Guest !

    Welcome to the 500Eboard forum.

    Since its founding in late 2008, 500Eboard has become the leading resource on the Internet for all things related to the Mercedes-Benz 500E and E500. In recent years, we have also expanded to include the 400E and E420 models, which are directly related to the 500E/E500.

    We invite you to browse and take advantage of the information and resources here on the site. If you find helpful information, please register for full membership, and you'll find even more resources available. Feel free to ask questions, and make liberal use of the "Search" function to find answers.

    We hope you will become an active contributor to the community!

    Sincerely,
    500Eboard Management

OWNER jlaa (500E & w210 E320)

I had new cream-beige GAHH leather upholstery installed on the front seats. The first two pictures are "Before." The third picture is a GAHH picture after installation on the seat frame/cushion but BEFORE heating/steaming. The fourth and fifth pictures are the GAHH covers after heating/steaming.

In my experience, leather upholstery installation is one of those things that professionals often can do much better than amateurs (or perhaps just much better than myself.....I gave up work involving hog ring pliers 2 decades ago..... :-) ). Part of that is knowing how / where to apply heat / steam to the leather and how to stretch the leather so that non-factory upholstery looks as "tight" as possible. Non-OE leather will always be a little bit loose in some areas, but a professional can really make a non-OE cover looks darn good.

The difference between picture 3 and picture 4/5 represents that level of professional care.

Also note --- old leather will always appear shinier/smoother because leather shrinks over time and the heat from the sun conspires to "Bake" leather smooth.

@Jlaa

1. What was the cost of GAHH leather covers for both seat?
2. What was the labor charge in SF to install?
3. Did you remove seats yourself or the shop?
4. Did you do anything to seat pads or spring base?

Thanks
 
Last edited:
jlaa,

1. What was the cost of GAHH leather covers for both seat?
2. What was the labor charge in SF to install?
3. Did you remove seats yourself or the shop?
4. Did you do anything to seat pads or spring base?

Thanks

@kiev - I cannot believe I am looking this up. :)

1) $1,700 - both front seats including headrests
2) $500 - labor charge for both front seats w/ headrests in SF.
3) I had the shop do it (Val's Upholstery in SF, which was mentioned in some other thread here)
4) I replaced the bottom horsehair pad of the driver's seat with a new horsehair pad.
 
Last edited:
@kiev - I cannot believe I am looking this up. :)

1) $1,700 - both front seats including headrests
2) $500 - labor charge for both front seats w/ headrests in SF.
3) I had the shop do it (Val's Upholstery in SF, which was mentioned in some other thread here)
4) I replaced the bottom horsehair pad of the driver's seat with a new horsehair pad.

Thanks! Do you recall if any/what hardware is needed to be purchased with horsehair pad for proper installation
 
1800 PER SEAT???

Are you getting this quoted directly or through an upholstery shop (dealer)? My quote was through the upholstery shop.
 
I believe that is $1800 for the pair of front seats, Sportline / 036 only. Their new website is truly awful...

GAT has standard 124 front covers for $500/set... at that price it might be worth the gamble:
 
I believe that is $1800 for the pair of front seats, Sportline / 036 only. Their new website is truly awful...

GAT has standard 124 front covers for $500/set... at that price it might be worth the gamble:

It’s showing as $850 for the leather from GAT. The $500 appears to be the Tex seats. For that price I’m still hunting for some decent used seats or possibly having mine re-covered in some kind of period correct cloth pattern.
 
It’s showing as $850 for the leather from GAT. The $500 appears to be the Tex seats. For that price I’m still hunting for some decent used seats or possibly having mine re-covered in some kind of period correct cloth pattern.
You are correct... the price updates on the web page as you choose options, selecting leather increases the price:

$1800 = pair of Sportline/500E front seat leathers from GAHH
$895 = pair of Sportline/500E front seat leathers from GAT
$850 = pair of standard W124 front seat leathers from GAT
$495 = pair of standard W124 front seat MB Tex from GAT

@LWB250 knows a guy who can find you nice used ones but those may still be $400+ for a pair.
 
Update --

It took me about nine months of fiddling to get the bass correct in this car. I do not use a subwoofer because for my own tastes, I wish not to compromise the interior aesthetics of the car so car. After installing the audio equipment in August 2019, I fiddled with the setting for a solid two months and then stopped. I was over the moon with the ”staging” and expansiveness of the sound. However I was a little frustrated that somewhat-deep-bass around 40-60 Hz just wasn't ample enough for my liking. No amount of equalization could fix it. Four 6.5” midbasses should be plenty —- so why the heck was the bass a bit disappointing?!

Then I recently just realized that if I moved my head to the front passenger seat, WOW, I could hear that deep bass. And if I moved to the rear seats, I could REALLY hear the deep bass. It just so happened that I couldn't hear it in the driver's seat. What the heck?!

Perhaps it had something to do with reflections unique to the driver's seat. Some kind of cabin-comb-filter that conspired to drain 40-60Hz deep bass away...... or something like that. I *knew* the drivers were capable of it because I could hear it --- just in the wrong seat.

So after lots of playing around with the delay, I found out that adding an additional 4.90 ms of delay to the woofer pair in the driver's door (yellow box) did two things:

a) It really beefed up the 40-60Hz bass in the driver's seat - BIG time.
b) It reduced some of the boom in the 100 Hz range.

I re-equalized the mid basses by ear (the pink line), and presto, sounds good to me! Note —- 4.9 ms is a lot! Sound travels about 5 feet in 4.9 milliseconds!

My guess is that this is all due to the “midbass firing into the seat cushions” design that MB took. I bet all that sound from the passenger side midbasses go directly into the seat cushions and reflect/bounce around the cabin so much that it takes an additional 4.9 ms to get to your ears. Now the driver side midbasses are interesting - yes they fire into the seat cushion as well, but they also have straight shot to the driver’s ear because of the angle. So..... if you don’t delay the driver side midbasses by that much, then the signal from L/R arrives at your ears at different times enough such that around 40-60hz the signals start to cancel each other out. At 100 hz the signals start to combine and boom a bit much (cuz velocity = wavelength * freq). That’s my guess as to what was happening.

The brute force way to solve this issue is to use a subwoofer - but I did not want to brute force it.... and it worked!

One other thing to note that I found critical ----- I found that in order to force the "sense of stage" to be correct and make it sound like the singing is coming from in front of you, that it is critical to make sure NO VOICE WHATSOEVER is coming from the mid basses. Therefore, you can see from the green box that I run the mid basses in the doors from 30Hz - 250Hz, both with 48 dB/octave slopes. You can also see that I run the ScanSpeak midranges drivers in the dashboard from 250Hz - 4500Hz!

1589085885336.png
 
Last edited:
Somehow I missed your audio install post from last year. Really amazing setup and documentation. I dream to do same in the future but all money getting diverted to Porsche. My Alpine head unit (the horror!) sounds amazing with just the stock speakers and it obviously the tine alignment feature + parametric eq. Love how you kept everything stock looking.
 
So after lots of playing around with the delay, I found out that adding an additional 4.90 ms of delay to the woofer pair in the driver's door (yellow box) did two things:

a) It really beefed up the 40-60Hz bass in the driver's seat - BIG time.
b) It reduced some of the boom in the 100 Hz range.

I re-equalized the mid basses by ear (the pink line), and presto, sounds good to me
Well, Kind sir... 9 month...? Kudos to you for not giving up! Impressive determination! Amazing how complicated vehicle's interior design becomes obstacles that we don't need to know/think about at home. Delay took care of it, huh :detective:

Regards,
D
 
Somehow I missed your audio install post from last year. Really amazing setup and documentation. I dream to do same in the future but all money getting diverted to Porsche. My Alpine head unit (the horror!) sounds amazing with just the stock speakers and it obviously the tine alignment feature + parametric eq. Love how you kept everything stock looking....

Well, Kind sir... 9 month...? Kudos to you for not giving up! Impressive determination! Amazing how complicated vehicle's interior design becomes obstacles that we don't need to know/think about at home. Delay took care of it, huh :detective:


Thanks. If I am honest with myself the problem is ---- TOO MANY KNOBS TO FIDDLE WITH ---- I can't seem to control my hands from fiddling with knobs. :-) :-)
 
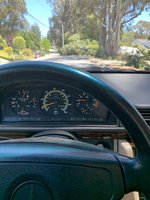
Twas a fine day - Memorial Day, 2020. I rolled right past the big 70 on the odo, 88F here in Northern CA, listening to old blue eyes Frank Sinatra belt out “My Way”. Somehow it seemed apropos.

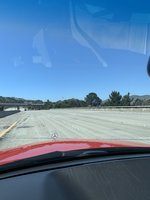
Shortly thereafter I went north on I-280. Haulin’ Ass on a very lightly trafficked 280 (cuz of Shelter in Place), it was very nice to see our American flag🇺🇸 flying high above the cemeteries in Colma, CA (to the right).

21984894-231D-411C-B9D0-DD855DDFD677.jpeg 0A4C1359-D238-4810-A304-3378CA96E71F.jpeg
 
Living in San Bruno I often enjoyed I-280 as a place where I could "stretch my legs" so to speak. Lovely drive on the weekends.

Colma, what an interesting place. "City of the Dead". Loved driving through it.

Dan
 
File this under "Nothing to do at home so I am making up shit to do...."

I tried to use a +12 Acc signal from my Yatour "CD Changer" to activate a relay to make the antenna go up and down.
Unfortunately, it didn't work, because the Acc signal from the Alpine MBUS protocol (which the Mercedes Benz MX3192 translates) is at +12 whenever the Becker 1432 system is on..... no matter if the input source is AM, FM, Cassette, or CD.

I did map out the connections between the Alpine MBUS 8-pin DIN connector (on the MB MX3192) and the Yatour "CD changer" --- posted here for posterity:

Yatour-M07-Digital-Media-CD-Changer-For-Alpine-_1.jpg IMG_8188.jpeg

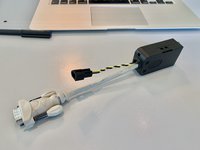
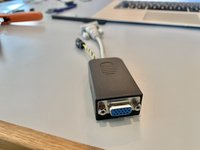
I made a cable adapter to "steal" +12v and ground from the MX3192 --- and used nice Molex connectors. My first time using Molex a connector crimping tool. THIS THING IS AWESOME. Why didn't I get one earlier?
IMG_8161.jpeg IMG_8164.jpeg

Note for posterity ---- especially for @darek_u - The MX3192 spits out +12V on Alpine MBUS DIN pin 6 at all times, regardless if the car is on or off. Pin 7 (Acc) spits out +12V when the Becker 1432 is turned on (and doesn't matter what source is selected).

Now that I got all Molex Crimping tool happy, though, I didn't want to waste my efforts. In search of something to do, I decided to replace the Yatour bluetooth receiver, seen here:
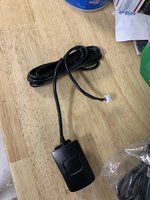
IMG_8220.jpeg

I was always slightly annoyed that it had a tiny bit of noise. 100% of the time when driving, I did not hear any induced noise. 95% of the time when listening to audio in the car, I did not hear any induced noise. However, when sitting in a quiet garage with the car off, and when listening to a quiet passage (say, Mozart's Mass, Barbara Bonney / Claudio Abbado, Berliner Philharmoniker - 1991 - Track 1 from 2.00min - 3.00min) I could hear noise. It was a subtle static overlaid with a "dit dit dit dahhh" type of noise. Irritating.

1590729689957.png

I deduced that it was the Yatour bluetooth receiver causing the noise, because when I jacked my phone into the 1/8" audio input into the "CD Changer," the noise disappeared. Enter the JL Audio MBT-RX. This thing is well received by many for its superlative sound quality.
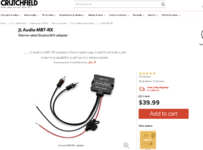
1590729880155.png

Note that the original Yatour bluetooth receiver uses a 4 pin connection --- the Yatour bluetooth receiver can handle not only audio but also phone calls, and has provisions for a microphone and an extra control button. I was not using the Yatour receiver to place/receive phone calls, so I decided that I could just jack the JL Audio MBT-RX into the 1/8" audio input. And, of course, the whole reason for doing so (aside from eliminating noise) was so that I could crimp on more Molex connectors and not let my cable adapter go to waste..... my 2-pin molex connector pulling +12v (on pin 7) and ground from the MX3192 to power the MBT-RX.
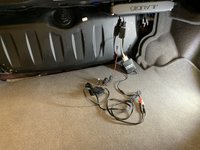
IMG_8217.jpeg IMG_8218.jpeg IMG_8223.jpeg

Result -- not only did the noise go away, but I noticed a great deal better stereo separation! I was quite surprised! Lesson learned - Bluetooth Receiver quality makes a big difference. You get what you pay for. There is a BIG BIG difference in bluetooth receivers wrt sound quality.
 
Last edited:
Great stuff, Jlaa! I now feel much better about being a Ludd and having my old iPod with spinny mini HDD direct-wired into my HU aux input. No blue teeth with dit-dit-dit-dahhs or muddy stereo separation!! I also still use next-gen vinyl (physical CD's) in the ol Nak CD700 too...

:gsxrock: :deniro: :gor-gor:

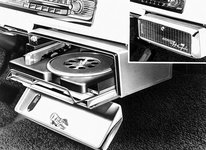
Hmm. Perhaps next I should figure out how to fit a record player in the car so as to avoid having to store music in newfangled "digital" form.

Chrysler-Highway-Hi-Fi-car-record-player.jpg 33737.jpg

 
Great stuff, Jlaa! I now feel much better about being a Ludd and having my old iPod with spinny mini HDD direct-wired into my HU aux input. No blue teeth with dit-dit-dit-dahhs or muddy stereo separation!! I also still use next-gen vinyl (physical CD's) in the ol Nak CD700 too...

:gsxrock: :deniro: :gor-gor:

Like these?

IMG_2617 copy.jpeg

They both still work, too...

Dan
 
Apparently I don't have pics of the actual Pod, just the location. It can be tucked into the center rolltop, but I keep it just outside for easy access. I leave it on shuffle all the time, but sometimes skip ⏩ or ⏪ .

Blitzsafe_TPM_install6.jpg Blitzsafe_TPM_install7.jpg
 
Not much to report other than miscellaneous bits and bobs. I haven't driven my 500E much this year --- the C19 pandemic has contributed to that.

  • It is time for the yearly oil change. However, in looking at my records, I previously changed the oil in September 2019, 1,150 miles ago. I last used Mobil-1 15W-50. I think I will leave the oil in the car for another year. I recognize that Mobil-1 is not Group 5 base stock, but heck I figure 1,150 miles isn't a whole lot, and my climate is quite temperate.

  • As well, since I haven't been doing much driving in the past year, I've been casually increasing my stock of spare parts. In the past year I've accumulated two new front control arms, heater monovalve, a whole bunch of rubber fuel lines (thanks @RicardoD) (although I've already replaced the high pressure hose), a new throttle cable (thanks @gerryvz), Turkish repro-headlight-wiper blades, new Lemfoerder tie rods, 30 MB spark plugs (thanks @gsxr), a new spare horse-hair seat pad, and of course some sets of headlight lenses.

  • Tried to JB-weld the stress-cracks / fractures in my original CHMSL housing --- I deemed the results unsatisfactory, so I bought a new CHMSL unit.
    IMG_9772.jpeg IMG_9773.jpeg IMG_9774.jpeg IMG_9849.jpeg IMG_9850.jpeg

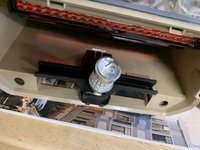
  • This led to me wanting to preserve the new CHMSL housing from the common-dreaded-w124 "lens melt effect" --- putting a low-heat LED bulb in the CHMSL. The big roadblock to doing this has always been tripping the dashboard bulb out warning light. Some folks just remove the bulb in the dashboard, but I find that approach to be too "brute-force" for my tastes. Removing the bulb in the dashboard means you would always be reminded of that "hack" when you go to start the car, because that warning light wouldn't light up when you rotated the ignition to the "ON" position. After some research, I discovered that you can modify a European-spec N7 bulb out warning relay-module (126.542.03.32) (these are cheaper on ebay than US ones too!) and tell the car not to monitor the CHMSL for a bulb out warning! Success! More details here: HOW-TO: Prevent 3rd brake light (CHMSL) from melting by using a European-spec N7 Bulb Out Warning Relay and an LED | "HOW-TO" Tutorial Articles
    IMG_9967.jpeg 2.jpeg 3.jpeg 4.jpeg 5.jpeg 6.jpeg 7.jpeg 8.jpeg

  • The European Spec N7 bulb out warning relay lacks the provision to light up US rear sidemarker lights (and it doesn't monitor them for being burnt out either!) so I rewired the US rear taillamp units to light the rear sidemarkers. An alternative approach would be to fit European rear taillamp unit lenses which lack the lens for the the rear sidemarkers, but that is a very spendy approach for a barely perceptible change in visual difference. More details here: HOW-TO: Prevent 3rd brake light (CHMSL) from melting by using a European-spec N7 Bulb Out Warning Relay and an LED | "HOW-TO" Tutorial Articles
    IMG_0110.jpeg

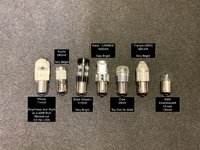
  • Measured current @ 12v (which is fairly proportional to heat produced) of some commonly found LED bulbs:
    Comparison of LED Bulbs.jpeg

  • Finally I improved the mechanical mounting of the Jehnert door boards by replacing one of the long self-tapping screws that did not go into door sheet metal with a long machine screw and nut --- this way the Jehnert doorboard is at least mechanically fastened to the upholstered doorpanel at this mounting provision. The rest of the mounting provisions go straight into sheetmetal. As well, heeding @gsxr's advice, I put blue loctite on all the screws / fasteners. As well, liberally applied Mercedes felt to various areas of vinyl-vinyl contact between the door handle / Jehnert door board / door panel to minimize "vinyl creaking noise."
    IMG_9174.jpeg IMG_9178.jpeg
 
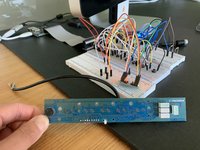
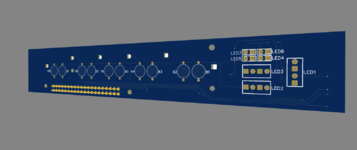
I have also been designing a new control board to go into the legacy phone-control-panel. The legacy phone-control-panel controls the very old analog AMPS phone system - which of course is no longer supported by any major carriers anymore. My goal is to redesign the control board to interface with a Raspberry Pi so that I can use the overhead phone-control-panel to control calls with my modern iPhone.

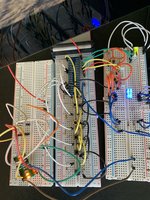
I finished the software development back in July, and have been stress testing my mockup hardware design via breadboard. Stress testing with bluetooth speakerphone calls led me to iterate the hardware from a Pi-ZeroW (smallest form factor, least powerful), to a Pi-4B (most modern, most powerful) and then finally down to a Pi-3B (not as powerful, but more stable wireless chipset), all in the name of solving driver conflicts that prevented echo-cancellation from working properly. I actually learned a lot about echo cancellation and the sophisticated techniques used to quash speakerphone echo --- I have a newfound respect for all the behind-the-scenes processing that has to go on for a clear speakerphone call!! Simple bluetooth music streams is way way way simpler!

I also iterated through multiple microphone options to solve gain/feedback issues, and am finally settling on a discrete commercially available "Olympus ME52" microphone. The Pi-3B with the Olympus ME-52 microphone and my mockup breadboard control board have controlled my iphone for the past 2 months with all my speakerphone calls and I'm satsified with the way it works.

I am a complete novice at hardware design, however, and it has taken me quite some time to measure everything with the old Motorola board and duplicate that in Board Design and Layout Software (EasyEDA). As well, since my hand-soldering skills are really rudimentary, it took me a while to solder teeny tiny 602-package reverse-mount LEDs onto a test board for prototype testing ..... those reverse mount LEDs are quite difficult to find, and Motorola used them originally to shine through the silicone keypad to provide backlight illumination. You can see in my photograph that I tried two colors - yellow and orange. I prefer the yellow. I should also mention that hunting down the original rectangular LEDs used on the original Motorola board was not that easy. Those rectangular LEDs were originally HP parts. Now they are manufactured by Broadcom/Avago..... but they do not come in blue (for bluetooth status) so I will use other LEDs for bluetooth status.

Now I will submit my board design to some fabrication houses to see how much it costs to make this design...... and see if I want to proceed any further.

1601236131738.png
IMG_0147.jpeg Screen Shot 2020-09-27 at 12.13.23 PM.png Screen Shot 2020-09-27 at 12.13.42 PM.png
IMG_0148.jpeg Screen Shot 2020-09-27 at 12.12.24 PM.png
IMG_0149.jpeg IMG_0150.jpeg IMG_0151.jpeg IMG_0152.jpeg IMG_0153.jpeg
 
Last edited:
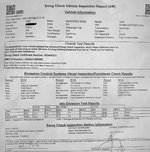
It has already been 2 years since the last smog check! With the pandemic going on, traffic is very light. It is only a 30 min drive all at freeway speeds to my fav smog place - Holly Smog in San Carlos. If anyone needs a smog in the Bay Area, Andrew and Luis at Holly Smog are pros. When they lift the hood, the first that they do is actuate the latch to make the hood go 90* so that heat doesn’t build up while performing the tests. Actually this is one side benefit of a 90s car with non defeatable traction control —- in CA, the only smog test needed is the stationary sniffer test. No dyno run needed. 👍

The car passed w good results, and we chatted about Andrew’s Dodge Conquest w LS swap and the 240SX on his lift that he’s stripped and is restoring.

B06E21E8-820C-473C-A673-89B16FE82E8C.jpeg

Aside from that, I finally received the last of the LEDs for the rear light cluster. Just an observation - returning items on Amazon is so easy!!! Throughout this little LED experiment I have returned DOZENS of LEDs that were unsatisfactory —all super easy! The reverse LEDs have now made the reversing light super blinding. 😎

I measured the current for all the LEDs I am using at the rear - this all works with no bulb warning lights and no high frequency flashing. A regular 7506 (used in the signal, brake, and rear fog) consumes 1.75 Amps of current and a regular 5008 (used in the taillight and sidemarker) consumes 730mA. You can see which LEDs have built in resistance to mimic an incandescent bulb and fool the N7 bulb out relay just by looking at the current each one consumes. In such cases, the size of the heatsink is also a dead giveaway.

6FB96F43-24AE-4A19-9678-5FD60BE15E73.jpegBE4A8216-76DA-4E90-A77F-B6CBBB9DD428.jpeg
 
Last edited:
Your emissions are super low. Limits where I live are 220 HC and 1.20% CO, but single digits for HC is crazy low.

Traffic here is terrible. I think half of PRK moved to Boise during MMXX. The infrastructure was already inadequate before the influx.

:bananadeath:
 
Your emissions are super low. Limits where I live are 220 HC and 1.20% CO, but single digits for HC is crazy low.

Yeah, in post 180 I have the emission results from 2018 where HC @ idle and 2500 were also at single digits. So 2018 wasn’t a fluke!

Traffic here is terrible. I think half of PRK moved to Boise during MMXX. The infrastructure was already inadequate before the influx.

so THAT’S where everyone is!! Seriously traffic is fantastic now. I am loving it. Driving anywhere is so easy. You can keep all those PRK emigres! :stickpoke:
 
Nothing big to report. I have lately received a number of goodies like @2phast's dimming mirror, replacement headlight switch, fuel system lines, assorted top end rubber parts, etc etc... but all these parts are not urgent, just waiting for me to get the time/inclination to install.

In the mean time, I drove from San Francisco to Silicon Valley (Sunnyvale) to take advantage of a "Black Friday Season" Deal --- a 7 1/4" sliding chop saw with laser marking for only $99. Dang, that's dirt cheap ..... and it will be good to have a relatively light-weight chop saw to lug around instead of those 100-lbs monsters.... https://www.lowes.com/pd/Kobalt-Com...e-Bevel-Sliding-Compound-Miter-Saw/1000553513

Just a couple of things to note:

  • SF <-> Silicon Valley --- on Sunday morning with little traffic, is such a delight to drive.
  • Even then, it felt like a looooooooong drive (45 minutes each way). This is probably because the pandemic has really curtailed my driving. My frame of reference is off.
  • As such, jeez, looking back on it, I don't know how I did that commute for over a decade WITH traffic. I was younger then. 🤷🏻‍♂️

  • I'll note that it is such a joy to drive the 500E at speed --- not that many pleasure cars that you can enjoy and throw a honking miter saw in the back. That's certainly not possible in something like a sport-beetle! 🚗
  • I really enjoy looking at the lines of this car. Compare it, for example, to the w140 parked in the distance that one of my neighbors uses as a daily driver. The w124 doesn't have that jumble of lines effect that the w140 has below the door-moulding line. As well, unlike the w140, the w124 wheel well arches are nearly the same height. Finally, with monochrome (non 2-tone-paint) the thin chrome line that bisects the doors @ the door-moulding line is really perfect. Just the right amount of ornamentation ---- and the chrome strip in the door handles really complements it all.

IMG_0701.jpg
 
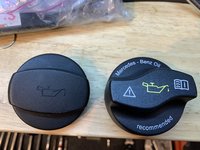
I replaced the oil cap today.
Like @LWB250 mentions here: OWNER - LWB250 (E420) | Owners and Their Cars , I hate that %$#@%$ OE oil cap that requires 1000-lb-ft of finger torque and channel locks to remove. Why is it so effing difficult to remove?

Conventional wisdom says to use 000 010 13 85, which has a list price of $13.50.
I used 000 010 16 85, which has a list price of only $2.50. You can get it discounted for the absurdly low price of $1.22 from places like EdHicksImports.

The only difference between the two is that the 000 010 16 85 has "Mercedes Benz Oil Recomended" printed on it, whereas 000 010 13 85 does not. For an $11.00 difference, I can live with the additional text.

Anyways, OE Filler cap BE GONE!

IMG_0770.jpeg IMG_0771.jpeg IMG_0772.jpeg IMG_0773.jpeg IMG_0774.jpeg
 
Last edited:
that "Mercedes-Benz oil recommended" would gall me every time I opened the hood. Happy to have paid the extra $10 not to have to see it....

But dang, that is a good price nonetheless !! Congrats.

:sawzall:
Yeah, that text miiiiiiight be removable with a magic eraser or something, but geez, for less than the price of nearly *anything* (I got a key copied yesterday for $1.25 which I thought was a great deal, but this oil cap was even cheaper!) I couldn't resist.....
 
I think a little chlorinated red-can brake cleaner would take that text off the cap in a short.

View attachment 118578

@Jlaa I might have a friend near you that has a case of this stuff in his California garage

HAHAHAHAHAhahah. The red brake cleaner is a great suggestion! I mean, you could always sand off the text with some super-fine sandpaper, but you'd have to be absurdly messed up in the head to obsess over such a detail. Luckily, I don't know anyone like that. :whistling2:

1605661649590.png
 
Last edited:
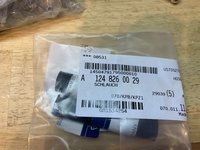
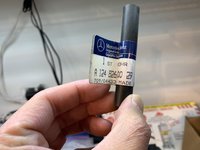
I also installed the rubber-tube-doohickey that vents the Yurro headlight assembly OUT of the headlight housing ...... @gsxr indicates this was done so that the headlight assembly does not have moisture-laden air forced into it from engine-intake-air being slightly pressurized into the headlight assembly.

The passenger's side headlight-housing had a rubber grommet that I could knock out.
The driver's side headlight-housing did not! There is a circular impression of the black plastic of the headlight housing, but it is solid plastic. No rubber grommet! Interesting.

[500Eboard] BB3F757A-6DEF-4EF6-B897-5F5C5902732B.png

I ordered 2x part 124.826.00.29. Note that I tried generic vacuum hose first from the autoparts store but those generic hoses are all too stiff and have too-thick wall thickness .... they don't bend enough to work. The MB hose is extra pliable and flexible.

Also note that 124.826.01.29 is no longer available. 😬

IMG_0775.jpeg IMG_0776.jpeg IMG_0777.jpeg IMG_0778.jpeg IMG_0779.jpeg IMG_0780.jpeg IMG_0781.jpeg IMG_0782.jpeg IMG_0786.jpeg
 
Last edited:
HAHAHAHAHAhahah. The red brake cleaner is a great suggestion! I mean, you could always sand off the text with some super-fine sandpaper, but you'd have to be absurdly messed up in the head to obsess over such a detail. Luckily, I don't know anyone like that. :whistling2:

Jlaa,

I wouldn’t use any brake cleaner on your new cap. It would definitely take off the writing if it really bugs you but at the same time the stuff will ruin the finish on the cap. It will melt the plastic before you can wipe it off.

Who cares if it says “Use Mercedes Oil”
It’s a Mercedes
 
If you are using red-can cleaner in CA, be extra watchful for the frequent police patrolling the neighborhoods looking for parties and gatherings of more than a few people.
 
If you are using red-can cleaner in CA, be extra watchful for the frequent police patrolling the neighborhoods looking for parties and gatherings of more than a few people.

No Worries, I think the Gov sprays the stuff in a paper bag and snorts it out. He’ll never find out!
 
I have also been designing a new control board to go into the legacy phone-control-panel. The legacy phone-control-panel controls the very old analog AMPS phone system - which of course is no longer supported by any major carriers anymore. My goal is to redesign the control board to interface with a Raspberry Pi so that I can use the overhead phone-control-panel to control calls with my modern iPhone.

I finished the software development back in July, and have been stress testing my mockup hardware design via breadboard. Stress testing with bluetooth speakerphone calls led me to iterate the hardware from a Pi-ZeroW (smallest form factor, least powerful), to a Pi-4B (most modern, most powerful) and then finally down to a Pi-3B (not as powerful, but more stable wireless chipset), all in the name of solving driver conflicts that prevented echo-cancellation from working properly. I actually learned a lot about echo cancellation and the sophisticated techniques used to quash speakerphone echo --- I have a newfound respect for all the behind-the-scenes processing that has to go on for a clear speakerphone call!! Simple bluetooth music streams is way way way simpler!
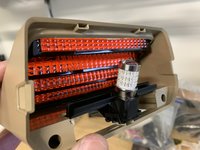
I also iterated through multiple microphone options to solve gain/feedback issues, and am finally settling on a discrete commercially available "Olympus ME52" microphone. The Pi-3B with the Olympus ME-52 microphone and my mockup breadboard control board have controlled my iphone for the past 2 months with all my speakerphone calls and I'm satsified with the way it works.

I am a complete novice at hardware design, however, and it has taken me quite some time to measure everything with the old Motorola board and duplicate that in Board Design and Layout Software (EasyEDA). As well, since my hand-soldering skills are really rudimentary, it took me a while to solder teeny tiny 602-package reverse-mount LEDs onto a test board for prototype testing ..... those reverse mount LEDs are quite difficult to find, and Motorola used them originally to shine through the silicone keypad to provide backlight illumination. You can see in my photograph that I tried two colors - yellow and orange. I prefer the yellow. I should also mention that hunting down the original rectangular LEDs used on the original Motorola board was not that easy. Those rectangular LEDs were originally HP parts. Now they are manufactured by Broadcom/Avago..... but they do not come in blue (for bluetooth status) so I will use other LEDs for bluetooth status.

Now I will submit my board design to some fabrication houses to see how much it costs to make this design...... and see if I want to proceed any further.

View attachment 114606
View attachment 114596 View attachment 114600 View attachment 114601
View attachment 114597 View attachment 114599
View attachment 114598 View attachment 114602 View attachment 114603 View attachment 114604 View attachment 114605


Jlla, you are one talented individual, but since you are a Hong Konger, I guess that makes you just average 😁
 

Who has viewed this thread (Total: 6) View details

Back
Top