• Hi Guest !

    Welcome to the 500Eboard forum.

    Since its founding in late 2008, 500Eboard has become the leading resource on the Internet for all things related to the Mercedes-Benz 500E and E500. In recent years, we have also expanded to include the 400E and E420 models, which are directly related to the 500E/E500.

    We invite you to browse and take advantage of the information and resources here on the site. If you find helpful information, please register for full membership, and you'll find even more resources available. Feel free to ask questions, and make liberal use of the "Search" function to find answers.

    We hope you will become an active contributor to the community!

    Sincerely,
    500Eboard Management

OWNER Kridre (400E)

Yep, that's a proper G-wagen.

They got quite soft starting in 1996 and after ... I call them L-wagen (Ländwagen) ... or "rural vehicle" instead of "off-road vehicle" (Geländewagen)
 
@gsxr Just some glass compound and started to polish by hand with felt pad. Well at least this is the easier side to get second hand. Finding left side electric heated mirror glass would be a challenge.
 
I wonder why the glass failed like that. The reflective surface is on the back side... you should be able to polish the front. I'm confused.

:brudda:
 
Hello, few things happened. First of all I replaced rear bearings in family citroen C3 they were completely shoot and didn't give any signs of being bad, they had play in every possible direction. Of course my press was too small for the job, so I my idea was to press out the bearings with the threaded rod. Worked fine for one side, but for the other I couldn't get the bearing out no mater what, so I quickly drove to my friend's shop to use a proper press.

20230428_090433.jpg20230428_090509.jpg20230428_092959.jpg

Coming back to my 400E, front end is almost ready, only thing is now to weld the last big patch.

20230429_125829.jpg20230429_154207.jpg20230429_154213.jpg

20230429_154201.jpg20230429_154225.jpg20230429_171738.jpg20230429_171742.jpg

20230430_170321.jpg20230430_175344.jpg20230430_183350.jpg20230430_190256.jpg

20230502_113239.jpg20230502_133916.jpg20230502_133925.jpg

I fited the plastic fender liners to see how well they fit now and here is also the last piece of the puzzle.

20230502_144747.jpg20230507_190314.jpg

I'm also trying to figure out how to attach the bolts that hold the washer fluid tank and expansion tank. I don't wont to weld them so I used 2K epoxy for one of them, but it didn't hold up sadly.

20230429_165022.jpg20230429_165419.jpg20230429_170241.jpg20230429_170431.jpg20230429_170438.jpg

I disassembled the front and rear bumper for painting and having all the chrome parts free I decided to polish them up a bit. I already polished the rear's 4 years ago so I only needed to do the fronts. The left side turned out almost perfect, but the right one put up a fight. I think it was replaced at some point with aftermarket junk. There was no way to polish it out, and I just striped the chrome plating... I will have another one on Monday from junkyard.

Before.

20230503_125439.jpg

After, only the chrome at the right is polished.

20230503_132705.jpg

Also, the parts buying madness doesn't stop with so many "while I'm in there", I picked up brand new missing impact strips and this rubber drain (only 2 left in Germany, well now there is only one left). Sticker suggests that the last run for this part was in the 90's or 2000's.

20230506_163808.jpg20230506_164449.jpg

That's almost all, the big issue is now how the heck I weld this hole in the passenger side floor. I really wasn't prepared for this, and I can't open the right door to get any good access for a welder. Well, I will probably figure something out.


20230429_114025.jpg20230429_114028.jpg20230429_190007.jpg

I almost forgot, I went to the junkyard yesterday and picked up all the "chrome" strips around the windows and roof. I will be calling some companies and maybe get them re-anodized in reasonable price. Having some NLA rubber with them is also a nice addition, I'm trying to make them as soft as posible with some rubber care product. I also got full wiper assembly with rubber seal and right outside sill plastic, mine is broken.

20230507_190355.jpg
 
Aaaaannnd that's it, welding in the engine bay is DONE! Now it's time for final round of blasting and I'm ready to lay down some paint. This U shaped reinforcement is 124.034/036 specific I think, I couldn't find it anywhere in the EPC. I really hope that this welds are good. I had a little bit of a struggle to get good welds doing it from the bottom, I hit few of them 3 times to be sure I got good penetration. If not then I will know for sure when I hit first big pothole and the strut will go thru the hood 😅.

20230508_194950.jpg
20230508_194945.jpg20230508_195034.jpg20230508_195025.jpg20230508_195003.jpg20230508_195016.jpg20230514_133050.jpg20230508_194957.jpg20230514_133038.jpg20230514_133045.jpg20230514_153146.jpg
 
Epoxy primer stage finished ✔️
 

Attachments

  • 20230521_125403.jpg
    20230521_125403.jpg
    3 MB · Views: 22
  • 20230521_125414.jpg
    20230521_125414.jpg
    2.6 MB · Views: 19
  • 20230521_125423.jpg
    20230521_125423.jpg
    2.4 MB · Views: 14
  • 20230522_075801.jpg
    20230522_075801.jpg
    2.8 MB · Views: 15
  • 20230522_075810.jpg
    20230522_075810.jpg
    2.5 MB · Views: 17
  • 20230522_075821.jpg
    20230522_075821.jpg
    2.2 MB · Views: 17
  • 20230523_081518.jpg
    20230523_081518.jpg
    2.1 MB · Views: 23
Few more pictures. My under body sealer application was not perfect, and I'm not proud of it, but well it is what it is. There is no way to gently remove it after application anyway.

Today, if everything goes well, the engine compartment will be painted in body color.
 

Attachments

  • 20230525_123051.jpg
    20230525_123051.jpg
    1.1 MB · Views: 21
  • 20230525_123059.jpg
    20230525_123059.jpg
    1.1 MB · Views: 19
  • 20230526_140609.jpg
    20230526_140609.jpg
    1.2 MB · Views: 18
  • 20230527_115942.jpg
    20230527_115942.jpg
    1.2 MB · Views: 17
  • 20230528_093024.jpg
    20230528_093024.jpg
    1,017.6 KB · Views: 20
Aaaannd it's done. I will leave it with no clear coat on top of it. I think this is how these cars came from the factory. Base coat have 20% hardener added to make it a bit stronger.

Front bracket wasn't painted on purpose, I will deal with it later.
 

Attachments

  • 20230528_122726.jpg
    20230528_122726.jpg
    1.2 MB · Views: 20
Last edited:
I wasn't happy with the finish that I got so I scuffed up the engine bay and repainted it again. After that I painted top reinforcement along with the hood lock.

Of course there is some dust in the clear coat ,but I don't plan to open the hood that often to see it anyway.
 

Attachments

  • 20230603_180433.jpg
    20230603_180433.jpg
    2.2 MB · Views: 12
  • 20230603_180414.jpg
    20230603_180414.jpg
    2.8 MB · Views: 12
  • 20230603_180406.jpg
    20230603_180406.jpg
    2.5 MB · Views: 11
  • 20230530_133116.jpg
    20230530_133116.jpg
    2.6 MB · Views: 12
  • 20230530_133110.jpg
    20230530_133110.jpg
    2.3 MB · Views: 12
  • 20230530_133055.jpg
    20230530_133055.jpg
    2.7 MB · Views: 11
  • 20230530_133101.jpg
    20230530_133101.jpg
    2.7 MB · Views: 12
Hello, I'm now reassembling the engine bay and doing everything to get the engine back in the car this month. Before that I painted and reseal the output shaft of the steering box. I repainted the box with our European equivalent of POR-15. I bet it it's not as good, but POR-15 just don't exist here.

20230610_155856.jpg20230610_195319.jpg

When I was fitting the top strut mount the paint just lifted of, I really don't know what went wrong here, but this is how it is sometimes. I blasted old paint and repainted it again. After that I had zero issues with the paint.

20230604_164604.jpg20230604_183407.jpg20230605_184338.jpg

Front suspension reassemble, I set the front hub bearing following the FSM. Repainted calipers blend really well, they don't stick out and this is exactly what I was going for. Full sleeper mode, only someone who knows what to look for will know what is under the hood. Rear badge will be not reinstalled for this exact reason.

20230612_084508.jpg
20230612_094935.jpg20230612_100547.jpg

After that there was time for all the wiring harness and other accessories to go back where they belong. This is how I was organizing everything when I was disassembling this car.

20230606_152924.jpg20230606_152938.jpg

One of the brake lines snapped of so I ordered band new one from the MB and I just need to bend it to shape of the old one.

20230610_184939.jpg20230610_195008.jpg20230610_195012.jpg

Engine bay almost reassembled. I forgot how tight fit everything is in there.

20230615_080848.jpg20230615_080858.jpg

I flushed whole AC system with the brake cleaner to get as much of the metal shavings ot out if as possible. Here is how I did it and how much crap came out of the AC condenser.

20230615_114938.jpg20230615_114944.jpg

After two cans of the brake cleaner it looks much better.

20230615_115354.jpg

I disassembled the fan brackets in preparation for painting. Old powder coating just flakes of after 30 years. Glad that this parts are aluminium and not steel. I will sand blast them and paint with black epoxy paint.

20230615_121433.jpg20230615_122413.jpg20230615_124751.jpg

That's it for now. Next time I write I hope the engine will be back in the car and running. After that it will be finally time to attack the rust at rear side of the car.
 
This is very nice detail. I am about to remove my OE radiator in favor of a new, BEHR / South Afrrica version. I am expecting to find a a/c unit equally as plugged up. I have two large aerosol cans of coil cleaner and will thoroughly clean this from the back side with the blasted cleaner and compressed air before installing the new radiator.
 
Transmission tunnel insulation was of course in bad condition.

20230612_213643.jpg20230612_213638.jpg

So I made a new one myself. I think it turned out pretty well.

20230623_124740.jpg20230623_131919.jpg20230623_132630.jpg

Before installing the insulation I used wax on the transmission tunnel and few other places.

20230617_165420.jpg20230617_165444.jpg20230623_135044.jpg20230617_165415.jpg

Now the engine bay is ready.

20230623_074817.jpg
 
@TerryA Thank you. I hope that everything will go well and there will be no oil leaks that's what I'm most concerned about.

I will not be able to start the engine until I finish rear end of the car.

Today I removed rear subframe. It appears that I had that custom two piece front bushings. 😂

20230701_172653.jpg20230701_172734.jpg20230701_172658.jpg20230701_172701.jpg20230701_173504.jpg20230701_173509.jpg

One thing that I'm quite happy about is that the subframe mounts in the body are mostly intact. I will see it better after good clean, but I was prepared for much worse.

20230701_173519.jpg

Also the quality of the old bolts on this car is just amazing. Zero issues with the removal. Nubmer of snapped bolts until this point = 0 (I'm not counting exhaust bolts).

20230701_173634.jpg
 
Hello, sadly, a few bad news.

One of the axle nuts was impossible to remove, so I needed to cut it. After that, I found out why it was hard to remove, the thread on the axle was damaged by someone someday... Nothing major, but the nut needed to be forced onto the threads. I borrowed a thread die and just re-cut it. All of that would be fine if not for one small issue. Both axles have a lot of play, and I knew about it, but I figured out I would only be able to rebuild at least one inner joint; nope, it's NLA. What is worse is that the joints bind at some point when I move them around, so I will just ride them until they blow up until I find two new/used axle shafts. The price for ONE axle from MB in Europe is $2176 vs. the US price of $698.40. I don't even know what to say anymore... These cars are not that common in Poland, so finding good used 400E ASR/500E axles will be a challenge.

20230704_154736.jpg20230704_161335.jpg

Now with the rear bearings and hubs. I pressed them out yesterday, and one of the hubs is destroyed, the outer bearing race must have seized at some point, and when doing so it destroyed the shaft that the bearing presses on to. It measures 49.9 mm instead of 50 mm, and if that wasn't enough, this hub has 0.07 mm of run out. Can anyone tell me if all the rear hubs were the same on all 124? I found these three part numbers under the MAPCO rear hub.

  • 124 350 07 46
  • 129 350 00 46
  • 201 350 06 46

20230706_164405.jpg

Here is another issue, not long ago I replaced the rear lower joints along with the all the arm bushings, and now the joints need to be replaced again. On one of them, the rubber boot wasn't seated correctly, and one is cut in one place; maybe I did cut it by mistake? I don't have the factory tool, so I don't know how I will be able to press them out, but I think I will just make my own tool on the lathe. Also, the shop that did it for me didn't replace the whole arms ,but only the bushings leaving the old arms in place. I don't feel like replacing good parts, so I will just paint the old arms. Maybe I wasn't clear on what I requested.

20230705_181340.jpg20230705_181346.jpg20230705_193439.jpg

The rear shocks are also due for replacement. This turned out to be a lot more work than I initially hoped for.
 
Hurry with the rear shocks - they were a dozen or so away from being NLA about a month ago.

Unfortunately the rear axles that are coming off my car right now are already spoken for, but maybe check with @Jlaa if he would be willing to sell you his axles when he puts on his new axles.
 
Last edited:
Hurry with the rear shocks - they were a a dozen or so away from being NLA about a month ago.

Unfortunately the rear axles that are coming off my car right now are already spoken for, but maybe check with @Jlaa if he would be willing to sell you his axles when he puts on his new axles.
What type of shocks? I believe the regular Sachs shocks are still plenty in stock, or am I mistaken?

I don't think that shipping rear axle shafts is even an option. Shipping costs would probably be too high. Maybe the axles from the R129 will fit? They are more common here and sell for around $30.
 
036 rear SLS hydrolegs / shocks may be nearing NLA, but standard (non-SLS) shocks are still available last I checked, and there are plenty of aftermarket options.

Axle shafts are different between ASR and non-ASR (the ASR are thicker). Since your 400E has ASR, you need the thicker axles. Donors are 124.034 with optional ASR, any 124.036, and early R129.066 with optional ASR... these all use the same axle shafts. The R129 donor MUST be an early model 500SL (.066) with ASR. It can't be the .067 version.

I didn't realize shipping from USA to Poland was so expensive, but for heavy items, it looks like hundreds of dollars via USPS... probably need to ship each axle separately, roughly $250 USD shipping each. Yikes. Better to source used axles in Europe!

😧
 
If shipping costs to Poland from the US are a concern - Have a look at these guys. I have used them to get my *ahem* Bavarian struts to Nagengast for rebuild.


They were by far the cheapest option.
 
If shipping costs to Poland from the US are a concern - Have a look at these guys. I have used them to get my *ahem* Bavarian struts to Nagengast for rebuild.

They were by far the cheapest option.
WOW, that is a lot cheaper! $280 for 1 week delivery, $250 for 2 weeks, or $140 for 1-2 months.

:jono:
 
Kridre try to contact a forum member ottoolar , he was parting out an ASR 420E in Hungary. I got my rear diff from this gentleman, I think it is worth to try him first before shipping parts from US.
 
Now with the rear bearings and hubs. I pressed them out yesterday, and one of the hubs is destroyed, the outer bearing race must have seized at some point, and when doing so it destroyed the shaft that the bearing presses on to. It measures 49.9 mm instead of 50 mm, and if that wasn't enough, this hub has 0.07 mm of run out. Can anyone tell me if all the rear hubs were the same on all 124? I found these three part numbers under the MAPCO rear hub.
  • 124 350 07 46
  • 129 350 00 46
  • 201 350 06 46

124-350-07-46 is correct for the 400E and also fits most 124's, except the 500E and S124 wagon/estate. This appears to still be available new from Mercedes, ~$100 USD in USA.

129-350-00-46 is for the 500E and R129. I'm not sure what is different vs the standard 124 hub. Also still available new, a bit more expensive.

201-350-06-46 is for the W201.

The S124 hubs are different than sedan/coupé/cabrio, they are designed for larger/reinforced bearings.
 
Weird thing is that all of this three numbers are listed under the same MAPCO hub. I was thinking about buying 201 number from MB because it was the cheapest. In the end I didn't risk it and I got 123-350-07-24. I will have it next week. Price $150 with 10% discount.

I painted the rear diff with the same paint that I did the steering box. I'm curious how long this paint will last.

20230707_211410.jpg20230708_163103.jpg

I also did the miserable job of cleaning the rear underside of the body. Before and after shots side by side. Just small holes and few rust spots, nothing major.

20230701_172653.jpg20230708_161415.jpg

I made a little bit of a mess.

20230708_154336.jpg20230708_155030.jpg

All cleaned up. Now I have a choice what to do next. Blasting the rear suspension components or do all welding that is needed. I'm looking forward to neither of them.

20230708_161423.jpg

In the meantime another care package arrived. I should have ordered SKF wheel bearings instead of FAG. I had a little bit of hope that supplied hardware for the rear axles will fit, but of course it's useless. At least the bearing is FAG branded, made in Slovakia.

20230708_125623.jpg20230708_181839.jpg

@darek_u If I remember correctly the part number for thre rear bearing for the 500E is the same as for my 400E, so I believe it's just another misinformation.
 
Hello,
Today I received brand new hub from MB and for a pice of mind I decided to check it for runout. Brand new hub 0.1mm of runout and it seems that it is exactly where the cantering pin for the rotor is.

I will check it again at work using CMM machine if i get the same results this hub is going back to the MB for a warranty. My old hub was better than this...

20230712_223247.jpg20230712_223244.jpg20230712_223256.jpg20230712_223757.jpg20230712_223806.jpg
 
I was at the MB today and this is basically what they told me.

I need to bring the whole car to them so they can check if my warranty claim is correct. I asked them how I can do that if my car has no suspension and it can't be driven on public roads. I was told that I have 2 years to bring the car after the purchase.

Then I began to question them who will pay for disassembly, new bearing etc. I was told that I will need to pay for new bearing and all the work will be covered by warranty.

After that I asked what if MB denied my warranty claim saying that this was my own assembly error or maybe the hub was damaged because I didn't used OEM bearing and who will pay for the work.

From the look on guys face I assumed that it would be me. After all of that I said that I will check the hub again and if I get the same results I want my money back and I will just buy Chinese hub for cheaper. They said that because this hub was ordered from Germany I can't return it, but they can try and ask anyway.

So here it is... Basically my whole life of trying to warranty f**ing anything in this country.
 
It is not true factory parts coming from Germany cannot be returned. Yes the dealer does need to obtain approval from MB USA but this should not be a problem. Might take a week or so to get the OK. Recently I had to return the rear glass I ordered due to my error with the part number. Glass was shipped from Germany. Dealer got the OK to send it back and I received full credit on my credit card.

ps I work pt at our local MB dealer. Guys told me MB warehouses take parts back all the time. Only sub $20 parts can’t be returned.

Regards,

Peter
 
Today I received brand new hub from MB and for a pice of mind I decided to check it for runout. Brand new hub 0.1mm of runout and it seems that it is exactly where the cantering pin for the rotor is.
0.1mm is still a big improvement over 0.7mm! Note the FSM (job 35-130) says 0.03mm is "nominal" value... 0.10mm is close enough that I'd use the new hub.


I will check it again at work using CMM machine if i get the same results this hub is going back to the MB for a warranty. My old hub was better than this...
Did you check with the CMM machine yet?
 
Old hub had 0.07mm runout not 0.7mm.

I just checked it on CMM. Hub is 0.02mm flat and 0.022mm perpendicular to the shaft. I can't get more accurate than this. So it turns out that maybe my measurements at home were off somehow? Well it turns out that I can only get 100% accurate reading after I will press the hub in place. I will be using new hub.

I also decided to use old shafts for now. I bought new rubber boots probably made in China but they passed the smell test. I don't feel like buying new OEM rubber and putting them on shafts that I will replace sooner or later. Only thing that I will not use from this kit are of course metal clamps, they are garbage.

20230713_122127.jpg20230713_122058.jpg20230713_122028.jpg

I received rear bearing press that I found for good price.

20230713_121915.jpg
 
Well, it seems that my father and I will be sealing most of our collection, if you can call it that. Maybe someone who is watching this thread is interested in buying them? I know that this is mostly a US forum, but you never know. Every one of them was 100% restored, mostly by my father. It will be really sad to see them go, especially my blue simson S51 my first road-legal bike that I was driving when I was 13 years old. The red Ford Taunus is also a beautiful car. The reason for selling them is that we simply don't have the time to drive them anymore. I don't think they've even done 200 miles combined in the last 5 years. It's sad to let them go, but even more sad to see them sit collecting dust.

I can write something more about them if someone is interested, also maybe someone knows a good international site to list them in Europe? I don't think that we have something like BaT in here.
 

Attachments

  • 20230715_125430.jpg
    20230715_125430.jpg
    3.5 MB · Views: 8
  • 20230715_123352.jpg
    20230715_123352.jpg
    1 MB · Views: 8
  • 20230715_123122.jpg
    20230715_123122.jpg
    2.9 MB · Views: 8
  • 20230623_161838.jpg
    20230623_161838.jpg
    4.5 MB · Views: 8
  • 20230623_152515.jpg
    20230623_152515.jpg
    3.8 MB · Views: 8
It truns out that I do need to replace the rear subframe mounts... Interesting thing is that I think my 400E have full reinforcements at the mountings points. This is not how things should look like on normal 124. Now the question is how to get them out.
 

Attachments

  • 20230719_180908.jpg
    20230719_180908.jpg
    2.6 MB · Views: 21
  • 20230719_180825.jpg
    20230719_180825.jpg
    2.1 MB · Views: 17
  • 20230719_180718.jpg
    20230719_180718.jpg
    3.1 MB · Views: 18
  • 20230719_180710.jpg
    20230719_180710.jpg
    2.3 MB · Views: 21
  • 20230719_171950.jpg
    20230719_171950.jpg
    1.5 MB · Views: 21
  • 20230719_171954.jpg
    20230719_171954.jpg
    1.2 MB · Views: 21
Rear subframe and LCA's went for sandblasting and cataphoresis. Now they will probably receive one layer of polyurethane paint. I will first paint one LCA to see if I need to scuff up the surface before painting and to see how well the paint adhered to the surface. In one place on the subframe must have been air bubble when they dipped it in the tank.

20230722_154812.jpg20230722_154815.jpg

Subframe mount is almost fully welded on. I don't have many pictures of the process ,but all I can say is that the right mount is staying how it is. I will just weld patch panel where the hole is and that's it. Getting this out of the body was such PITA that I started to question my life choices at some point. One interesting thing is that even with all of this reinforcements from factory there was a small crack in the chassis rail. Pictures of the process and reinforcement bracket that goes inside the car.

20230719_201816.jpg20230720_163125.jpg20230720_163129.jpg20230722_151443.jpg20230722_151448.jpg

I also checked if I got good penetration to be 100% sure.

20230722_152956.jpg
20230722_152953.jpg

I'm also starting to think that I would rather rip out the engine 4 more times than having to deal with all of this rust.
 
Another update.

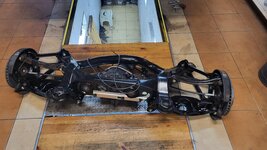
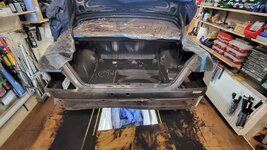
I painted almost everything that was in the need of fresh paint: rear axle's, subframe, rear suspension arms, and rear sway bar.

20230723_132541.jpg20230723_190356.jpg20230724_175330.jpg

Subframe conveniently drying under the car. The service pit has limitless use cases, it seems. Now, besides drying freshly painted parts, I also use it to store a spare transmission and M117 engine that is not really a spare, but more like junk. Also my air compressor is in there.

20230724_185231.jpg


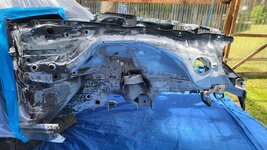
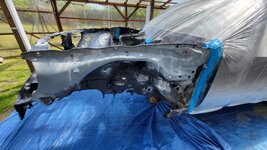
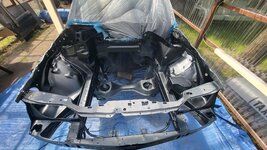
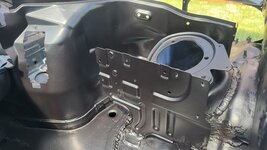
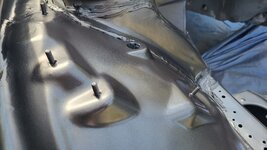
After that, I attached the rear subframe with brand-new bushings to help me align the plate where the subframe mounts to the body. I tack welded it, checked for level and made sure that the measurements are correct. Being 100% sure that nothing moved, I fully welded the plate to the body, and I call that job complete. Now I need to get to welding 10 different things.

20230726_211156.jpg20230726_212104.jpg20230726_212131.jpg20230726_212211.jpg20230726_212241.jpg20230728_084145.jpg

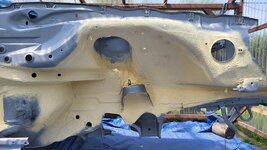
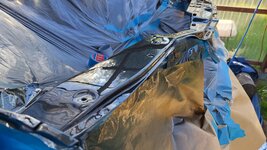
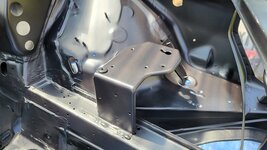
Keeping the momentum going, I repaired: right subframe mount, started to cut rusted out metal where the trunk seal is pressed, and repaired other rust spots.

20230728_084900.jpg20230728_092348.jpg20230728_092334.jpg20230728_092321.jpg20230729_184222.jpg20230729_184237.jpg20230729_185655.jpg20230729_191713.jpg20230729_201058.jpg20230729_202209.jpg20230729_202220.jpg20230729_204052.jpg20230729_213241.jpg20230729_213301.jpg20230729_214008.jpg20230729_214021.jpg

Giving myself a break from welding, I disassembled the fuel pump package and discovered that one of the pumps was 100% dead, so two new pumps are on the order list.

20230730_234336.jpg

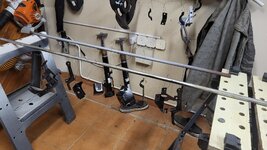
With that now done, here is, I hope, the last batch of parts that will go for zinc plating next week. Also, quick note: I will not be plating bolts that are grade 10.9 and higher. I read somewhere that galvanizing that type of fasteners can make them brittle, and they can snap. I know this is how MB did it in the 90s ,but to do this, they must have followed a few additional steps that no one will be bothered to do today. This is why all new bolts from MB use flake zinc instead of regular yellow or white zinc plating.

20230801_031010.jpg

I know this is not that much, but I'm really struggling to motivate myself to work on this car. I hope that I can get this car done before September, so I can send it for paint over the winter. If everything goes well, next spring I will be happily cruising in this car to the MB and Porsche museums in Germany.

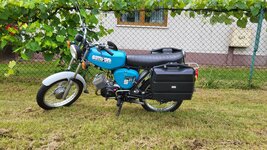
Side note. After almost 5 years of ownership W124 260E was sold today 😢. I will really miss this color. I wish my 400E was finished like this. It was also amazing in doing a lot of corners sideways, because of the lack of ASR and having 195 tires.

20171111_153304.jpg

It's sad to see this car go, as always, but trying to upkeep even one MB right now is a hard task for me, not to mention two of them. The gas mileage was also the same as my 400E while having less power. It was mostly a winter car, but I think that I will get another daily driver after I finish my 400E. I'm thinking about something that doesn't rust; this would be a good starting point. :ROFLMAO: Also, RWD is a must for the winter for obvious reasons.
 
I blasted the rear end of the body. Of course, there is much more rust than I initially saw. Especially in the passenger side foot well... Just when I see the end of cutting and welding, something always pops up again.
 

Attachments

  • 20230805_190409.jpg
    20230805_190409.jpg
    1.2 MB · Views: 15
  • 20230806_152614.jpg
    20230806_152614.jpg
    1.1 MB · Views: 15
  • 20230806_152618.jpg
    20230806_152618.jpg
    999.6 KB · Views: 14
  • 20230806_152628.jpg
    20230806_152628.jpg
    999.3 KB · Views: 15
  • 20230806_174656.jpg
    20230806_174656.jpg
    1.2 MB · Views: 14
  • 20230807_212724.jpg
    20230807_212724.jpg
    1 MB · Views: 15
  • 20230807_212727.jpg
    20230807_212727.jpg
    1.2 MB · Views: 15
Hello!

I had 4 days off work, so there is much-needed progress. I can now officially announce that welding, cutting, and grinding are finally done! I also scraped all the old sound insulation off the passenger floor; it took me only 4 hours. I was wondering if maybe I should use new insulation on the whole car, but nope. I will not be doing something like this if I don't need to. There is no easy way of doing this. Only a heat gun and a lot of scraping work, and when doing that, you also damage the OEM paint. So to install new insulation, I would need to paint the whole floor inside the car.

20230811_222621.jpg20230813_133632.jpg20230813_133639.jpg20230813_140604.jpg20230813_142326.jpg20230813_153521.jpg20230813_172312.jpg20230813_174820.jpg20230813_190017.jpg20230813_194951.jpg20230814_193653.jpg20230814_195227.jpg20230815_171722.jpg

I also received all the bolts and brackets from zinc plating. Everything looks good, but there was a small issue. Because they couldn't attach the wire to the nut that screws on to the fuel pump, they decided to just screw it on to the screw... Now I have only two bolts that I need to plate again. I will also buy brand-new nuts from MB because I don't like the look of the old ones.

20230814_132127.jpg20230814_133452.jpg20230814_133526.jpg20230814_133554.jpg

There was also time to finally press back the hubs. I used the press that my uncle have. Everything went smoothly, but I of course decided to check the runout of the new hub and surprise, surprise, there was 0.2 mm of runout. I was almost ready to go to the MB again and argue with them, but I also decided to check the runout of the inner race on the bearing itself. I measured 0.02 mm and everything became clear: something must have gone wrong when I pressed the hub, or there was an issue with the bearing itself. I pressed the hub out, destroying the bearing, and now I'm waiting for a new bearing to arrive.

20230811_161432.jpg20230811_161254.jpg

The question is, did I mess something up? Or did I just get unlucky and received a bad bearing?

Also the rear view mirror in my father's W126 decided to disintegrate. :blink:

20230809_202816.jpg20230809_202820.jpg
 
The question is, did I mess something up? Or did I just get unlucky and received a bad bearing?
I'm not sure... but when you receive the new bearing, put it in the freezer overnight to make installation easier. Take it out of the freezer and *immediately* install. Make sure to only press against the outer shell when pressing the bearing into the wheel carrier, and when pressing the hub into the bearing, you *must* support the center/rear of the bearing while pressing.

I use the Miller equivalent of the factory tool for the bearing work. Photos at this link.

:banana1:
 
Thank you @gsxr for great suggestion with the freezer, I totally forgot about it.

Thanks to that I was able to tap the new bearing with a hammer and by using old bearing. I also heated up the rear wheel carrier to make the installation even easier.

I did the same with the hub and I was able to install it without the need for hydraulic press. I used old inner race and the tool for the LCA bearing.

20230820_003646.jpg20230820_003556.jpg

Everything went smoothly, now I have 0.02mm runout. 👌 So something must have gone wrong before.

20230820_003603.jpg

I also did some painting. Floor inside the car I painted with the brush to avoid making a mess. For the trunk I just used spray gun.

20230820_004008.jpg20230820_003956.jpg20230820_003951.jpg20230820_003943.jpg

Fuel pump is ready to be installed.

20230817_114153.jpg

Yuuuup I did cheep out on the fuel hoses. I didn't bought new OEM, but I did bought the most expensive aftermarket hose (Cohline and Semperit) that I could find. I didn't had any trouble with them before so I do believe everything will be fine, but I will keep an eye on them just in case.
 
Some steady progress. Seam seller was applied and painted, trunk is also finished, rear subframe is reinstalled. I still need to tighten all of the bushing bolts.

Now I'm doing everything to install the fuel tank back in so I can finally start this engine and see how many leaks will appear. Now I'm applying new sound insulation and adding a little bit more than it was before. I always heard a little bit more noise coming from rear wheels so I hope this will help a bit.
 

Attachments

  • 20230823_194910.jpg
    20230823_194910.jpg
    1.9 MB · Views: 16
  • 20230823_183844.jpg
    20230823_183844.jpg
    2.3 MB · Views: 16
  • 20230822_181401.jpg
    20230822_181401.jpg
    2.1 MB · Views: 17
  • 20230822_200222.jpg
    20230822_200222.jpg
    1.5 MB · Views: 15
  • 20230822_200206.jpg
    20230822_200206.jpg
    1.9 MB · Views: 14
  • 20230821_195314.jpg
    20230821_195314.jpg
    2.2 MB · Views: 11
  • 20230821_195252.jpg
    20230821_195252.jpg
    2.1 MB · Views: 11
  • 20230821_195215.jpg
    20230821_195215.jpg
    2.2 MB · Views: 11
  • 20230821_195247.jpg
    20230821_195247.jpg
    2.4 MB · Views: 13
  • 20230821_195210.jpg
    20230821_195210.jpg
    2.5 MB · Views: 15
  • 20230824_193359.jpg
    20230824_193359.jpg
    2.4 MB · Views: 17
Back
Top