• Hi Guest !

    Welcome to the 500Eboard forum.

    Since its founding in late 2008, 500Eboard has become the leading resource on the Internet for all things related to the Mercedes-Benz 500E and E500. In recent years, we have also expanded to include the 400E and E420 models, which are directly related to the 500E/E500.

    We invite you to browse and take advantage of the information and resources here on the site. If you find helpful information, please register for full membership, and you'll find even more resources available. Feel free to ask questions, and make liberal use of the "Search" function to find answers.

    We hope you will become an active contributor to the community!

    Sincerely,
    500Eboard Management

OWNER Kridre (400E)

Hello, I need help...

Today I started the engine but I have absolutely 0 oil pressure. Nothing is coming in to the oil filter housing. I removed the oil pump and it is working like it should no issues there. I didn't remove oil filter housing when doing this job. I it possible that something is stuck?

What is going on??? I don't want to trash this engine...
 
Can you elaborate at bit? What do you mean when you say no oil is getting into the oil filter housing, but the pump is working as it should. How did you confirm both of these things?
 
I removed the pump, blocked the intake with my hand and I just was spinning the pump manually. I could feel the pump drawing air with my hand.

I removed the oil filter to see if there is anything in there and after cranking the engine there is nothing coming in to the oil filter housing.

So maybe the return check valve is stuck? I don't know what else could be bad.

I also cracked open the oil pressure sensor and there is no oil coming in there either.
 
Issue solved, 3bar of oil pressure.

What was the cause? Me being a dumb moron. I should have cranked the engine a little bit more before tearing everything apart... But after cranking it for 20 seconds and not getting anything I was a little bit scared.
 
Everything is almost sorted out. I even have two gears! One forward and one reverse, so transmission is working.

Now that I know I have oil pressure, I will need to do the lower oil pan gasket again because it was leaking even before I removed the oil pan. I will also change the oil filter housing gasket that I was almost sure I had somewhere, but I couldn't find it, so I reused the old one. It is not leaking for now.

Another dumb mistake from my side is that I connected the ASR/ABS pump incorrectly. The line going from the master cylinder was switched with the line going to the pressure accumulator. Now I have every possible ABS/ASR light on the dash. I hope that I didn't do any harm to the ABS pump. I need to check and reset the codes in ASR module.

That's all I had time for today. Tomorrow I'm off for a vacation in the mountains!
 
Hello! Few updates:

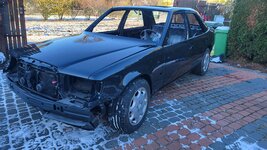
First, I solved my ASR issue. When I was putting the engine wiring back in, I swapped the connector coming in to the ASR pre-charge pump with the brake fluid level sensor... When I plugged everything in correctly, everything went back to normal. So this is the first time that this car moved by it's own power out of the garage in almost 1 year! I checked for errors after this, and everything was clear, no errors apart from the SRS module, but this is to be expected. So I think that my homemade knock sensor harness is working as it should. :choochoo:


20230904_153657.jpg


Second. As maybe someone saw already in the rear glass, NLA thread I managed to destroy my rear glass... I forgot to put a piece of cardboard in front of it when I was cutting out the rear subframe mount on the inside. I already talked to the glass polishing specialist in my city, and maybe within a month or so, he will take this glass and try to make it a little bit better. I will still be hunting for new rear glass as soon as it becomes available from Pilkington I will be buying it.

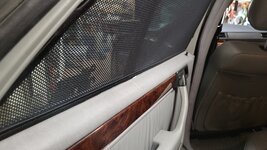
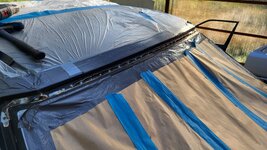
Third. Front and rear glass were successfully removed without breaking! This is a big relief because even the front windshield is temporarily unavailable from Pilkington. IDK about the MB availability, but my glass is less than 6 years old, and I will be reusing it.

20230905_153747.jpg

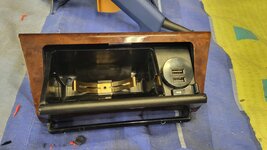
Fourth. I also did some parts organizing, polished the rear tail lights a bit, dug up some parts for the paintjob and the window seals that I bought more than 4 years ago. This is a reproduction, probably made in China, but the quality seems really good.

20230904_185306.jpg20230904_224400.jpg20230904_193325.jpg20230904_185318.jpg20230904_185330.jpg

Here is also the side marker that I bought from AliExpress a long time ago, side by side with the OEM. I will not say which is which, but I was really surprised with the quality when I got them.

20230904_200908.jpg

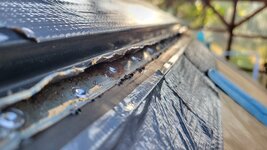
Fifth. I said that there would be no more welding and cutting??? Well, silly me, I have that magnificent device called a F*****G SUNROOF!!! Of course, the roof is rusted out on the edge, because why not! Man, I really hate this stupid option. I hate sunroofs with my whole heart. I already replaced everything in the sunroof mechanism, and now this sh*t... By everything, I mean literally everything: two rails, cable, felt pads, wind deflector, even the metal brackets that hold the seal in place because they were rusted out. Also, when I bought this car, two of the sunroof drains were damaged, and water was leaking inside, destroying the front headliner in the process. I have new/used headliner wating to be instaled.

As an added bonus, the front and rear edges where the glass is bonded to the chassis also need some attention. The rear and front glass were replaced under my ownership. To be precise I replaced TWO rear windows. The first shop that replaced the rear glass put the glass back on the rust, but I saw it after 2 years on the bottom edge where the trim is screwed into the body. I proceeded to remove the rust by first lifting the trim a bit. Yuup I did that. Of course, after painting and treating the rust, there was no way to put the trim back on. So what did I do? I proceeded to remove the trim, cracking the rear glass in the process...

The second time, I gave the car to a different shop, and I told them. If there is any rust on the edge, call me, and I will take the car and fix it before putting the new glass back in. NOPE they just put the glass back on with the rust on the edge... What is wrong with people!!! So this is the second glass that I destroyed... This is a really expensive lesson to be had. The front edge is also my mistake, I didn't have that much experience, I used the wrong products, and I didn't wait enough time before putting the front glass back in. That's why the front edge rusted out again.

20230905_160837.jpg20230905_210441.jpg20230905_210445.jpg20230905_155418.jpg20230905_155428.jpg

Sixth. Sadly, I didn't get the roof and window trims re-anodized... I called the whole country and got the same response everywhere: "Used automotive parts? No, we're not doing that."

So anyone in Europe maybe knows a place where I could send my trims to be re-anodized back to the original black color?

I'm also thinking about just wrapping them with vinyl, but the rear glass trim is still available besides the small piece, so I'm thinking about grabbing just that and maybe wrapping everything else. Because if it's easier to replace in the future, if I will finally find a place where they will just anodize the rest of the trim.

Few weeks ago I saw a silver 500E locally, and all the trim was brand new. I just need to get the same look with my car, I just must! I love the way it looks. I didn't take a picture because it was dark. When I see this car again in the daylight, I will definitely take a picture of it.


Well, this is a long update. Now I need to repair all the rust, and I almost forgot! Four jacking points holes are also rusted, so I need to blast them along with everything else. This is really a never-ending story.
 
Last edited:
I was looking at this LH module for past half a year. Finally decided to buy it. $70 with shipping.

If I searched correctly this is WOT enrichment module.

20230907_095631.jpg

As I'm writing PDR guy is pulling out all of the dents before painting. We counted almost 80 dents. 😅

20230907_100233.jpg
20230907_100223.jpg
 
Today I received a few parts I ordered from MB. Here is how 2 meters of rubber seal came to me, well I see at lest two issues with it. :ROFLMAO:

20230914_123413.jpg

I immediately gave it back for a replacement, glad I have only 6 minute drive to my dealer.

Also, just out of curiosity I asked how many rear window aluminum trims are left in the Germany, and there are 100+pcs. for right and left, well I can't see them going NLA anytime soon. I don't know if anyone ever buys them is MB didn't do another run of the rest of the aluminum trims.
 
I've had the same problem in the past... order 2 meters of something, and receive two 1 meter sections. 😡

Do you mean the rear glass trims, A1246781930 and A1246782030? I really need to get a pair while still available. Pity the center cover piece A1246784237 is NLA.

:apl:
 
Well now I don't know if it wouldn't be better to just replace whole roof panel with slick top. In 1/4 way in anyways. 🤣🙃

I sometimes don't know what happened to this car that it's so freaking rusted. Maybe it went for a swim in the ocean?
 

Attachments

  • 20230922_074312.jpg
    20230922_074312.jpg
    2 MB · Views: 16
  • 20230922_074325.jpg
    20230922_074325.jpg
    1.3 MB · Views: 16
  • 20230922_074357.jpg
    20230922_074357.jpg
    2.7 MB · Views: 15
  • 20230922_080218.jpg
    20230922_080218.jpg
    2.2 MB · Views: 15
  • 20230922_084514.jpg
    20230922_084514.jpg
    2.1 MB · Views: 17
  • 20230922_084519.jpg
    20230922_084519.jpg
    2.6 MB · Views: 17
Spreading of rust prevented for now. There wasn't much that I could do but I hope this will stop the rust from forming for next 6 years. Rusted out hole was also welded.

20230924_132445.jpg20230924_132449.jpg20230924_132434.jpg20230924_134137.jpg20230925_100925.jpg20230925_100919.jpg

Next what I did was wash the sunroof transport bridge because it's also rusty in some places and here we can see brilliant MB design called water trapping sunroof seal. I sometimes wonder how the heck car manufacturer that was making cars for more than 50 years comes with stupid ideas like this, why they didn't use rubber? Now I know why my roof looks like it looks.

20230925_111725.jpg

Lastly I installed new used drivers door because mine looked like this.

20230925_100914.jpg20230925_101108.jpg20230925_101103.jpg
 
Hello, well it was nice year. Today at the track day I crashed my bike and myself. Gladly I almost walked away from it and I'm now laying at home with broken collar bone. My front tire gave up on my while doing 130+ km/h so I think I was actually lucky that it ended up how it ended. Of course my bike is thrashed, but I will be probably rebuilding it.

received_683450577042101.jpegreceived_615392537199118.jpegreceived_297542752999778.jpeg

So because of this my 400E project is now halted, I hope that I will still get it painted this year at least. I was planning to finally get the jacking points done tomorrow but well. Sometimes life doesn't go as we planning.
 
I hope you will feel better, broken collar bone is not a joke, it hurts like hell. Is the collar bone still in place or was it broken out? The healing period of collar bone is very long time.
 
Hello! First, thank all of you very much for kind words.

I'm feeling much better after one month. Still I can't use my left hand to much, but compared to what was before its night and day.

I successfully finished my 400E welding and car went off to be painted! Finally! I hope everything goes smoothly there.

20230930_125158.jpg20230930_125209.jpg20231022_175351.jpg20231022_175408.jpg

I also took a deeper look on my bike and the damage is mostly cosmetic. Rear frame looks to be fine and I didn't saw any cracks in the main frame. One sad thing is that my front cover is busted and guess what. It's NLA from yamaha in this color, even the stickers are discounted. Man this reminds me of something 😂.

Rear end cover is also really hard to come by used and it's NLA brand new in this color. I can only buy red rear and front covers. So I think will be changing color of this bike. Every single painted part needs new paint anyways. Obviously I don't have money for it right now so it's a problem for future me.
 
I watched every listing disappear in recent days so I decided to buy INA accessory belt tensioner just to be safe. As expected Made in Germany, MB part number was removed. Production date stamp is from 2017.

20231114_193452.jpg20231114_193509.jpg

Sunroof transport bridge is also ready to be reassembled.

20230930_125307.jpg20231113_170510.jpg20231113_235610.jpg

If everything goes well I will be getting my car from paint this week! This means that I can finally start putting everything back together. Sad news is that I am prohibited from lifting anything heavy and doing pretty much anything. I don't know if I will be able to resist myself.
 
Sunroof is now resembled. Here was the process.

First I replaced this tape on the underside of these rails, I don't really know what is the purpose of it, but I did it anyway. After that, I sprayed it with wax for some rust protection. Left is before, right is after.

20231115_143338.jpg

Next step is to rivet them back using 5x8mm aluminum rivets. There is no way to mix the left with right because they have holes drilled differently.

20231116_200434.jpg20231116_200620.jpg

Do not forget to flex to your friends and all of the internet that you are using MB sunroof grease from the big can! I got it for free, I'm not that wealthy.

20231116_203218.jpg

After that I replaced this rubber foam seal. I made holes for the screws with a hole punch. I will be using cavity wax on it to make sure it cannot soak water like before. Sadly I couldn't come up with a better solution.


20231116_201632.jpg20231116_201640.jpg20231116_201657.jpg

Sliding rail all greased up and ready to be installed. On the side note, the felt strips are already beginning to fail, the ones that show sings of wear are the pads with part number 126-782-01-30. Six are required, and four of them no longer have felt on them, and I used this sunroof maybe less than 50 times. Rails were replaced with brand new ones 8 years ago.

20231116_203620.jpg

Assembled and ready for temporary storage.

20231116_205727.jpg20231116_205733.jpg
 
I think now I will be forced to sell my 400E. I made it undrivable and I am afraid to touch it. 😅😅😅 I can't stop smiling right now. Man this looks so good. 😍

Now all that's left to be painted is bumpers and lower cladding.
 

Attachments

  • 20231122_130423.jpg
    20231122_130423.jpg
    2.2 MB · Views: 20
  • 20231122_130245.jpg
    20231122_130245.jpg
    2.2 MB · Views: 20
  • 20231122_130137.jpg
    20231122_130137.jpg
    2.4 MB · Views: 20
  • 20231122_125222.jpg
    20231122_125222.jpg
    2.1 MB · Views: 20
  • 20231122_125210.jpg
    20231122_125210.jpg
    2.3 MB · Views: 20
  • 20231122_125204.jpg
    20231122_125204.jpg
    3 MB · Views: 19
  • 20231122_115845.jpg
    20231122_115845.jpg
    2.9 MB · Views: 20
Slow reassembly.

Hood and fenders alignment took me about 1-2 hours to make it 98% perfect. Final alignment of the rest body panels will be after the car comes out of the garage, so I can take a proper look at it.

20231123_111351.jpg20231123_111355.jpg

C-pilar trims reinstalled, every rivet and plastic clip I coat in wax to prevent future rust forming. Masking paint around these trims makes scratching new paint near to impossible.

20231123_131423.jpg20231123_131456.jpg20231123_131727.jpg
Routing the wires in to the door is a real pain and I have too little space to do this right now, so I only did the driver door for now. This one door took me attest 1 hour.

20231123_111421.jpg

I made a template for new sound insulation to make cutting it to size a little bit easier. I also installed additional insulation in few places.

20231127_202645.jpg20231127_202831.jpg20231127_204148.jpg20231209_155229.jpg20231209_162038.jpg20231209_163445.jpg20231209_173726.jpg20231211_173928.jpg20231211_185436.jpg20231219_151730.jpg

Here under the rear lights that likes to rust, I also used wax.

20231219_163522.jpg

Rear sunshade and speakers are back in place, I used this guide to replace the motor with the one from W220. Works wonderfully!

20231220_134640.jpg20231220_133613.jpg

Rear parcel shelf reinstated. Doing this without the rear glass is really pleasant job.

20231220_142515.jpg

I also replaced the old tired pads under the door handles. Here are the part numbers. Looks much better than before.

20231220_143202.jpg20231220_145947.jpg20231220_145952.jpg

Of course everything is cleaned before going back in.

20231220_140413.jpg
 
More pictures of the reassembly process.

20231220_171030.jpg20231220_172433.jpg20231220_172448.jpg20231220_172501.jpg

Sunroof bridge reinstated, wax used all around the seal and on the bolts.

20231220_174359.jpg20231220_174405.jpg

I bought this wind deflector 8 years ago brand new and clips already broke. Replaced them with brand-new ones.

20231220_180820.jpg

Removing respray from the old paint job.

20231220_181315.jpg20231220_181700.jpg

Brand new magnetti marelli headlights. They really can't decide where they are manufactured. :ROFLMAO: MB stars were removed.

20231220_221507.jpg20231220_221512.jpg20231220_221601.jpg20231220_221604.jpg20231220_221609.jpg

3D printed some vent tubes.

20231220_221456.jpg

Of course, I applied protection on them.

20231220_230343.jpg20231220_232401.jpg

It's Starting to look pretty again. :choochoo:

20231220_235419.jpg
 
Another update. I'm doing whatever I can that doesn't involve opening the doors fully, that's why the wiring for the passenger side door is still laying on the floor.

Fixed up the broken insulation in the passenger foot well and installed some more in the back. After this, I coated the inside of the doors with the cavity wax.

20231221_170939.jpg20231221_182642.jpg20231221_194223.jpg

I installed the hella fanfare that I bought this year. The air pump I installed near the computer box and I made a metal bracket to mount the horns (I will zinc plate it later). Everything is routed and installed like from factory. The ground I got from the strut tower and relays are hidden in the fuse box along with the fuse for them. I can also turn off the fanfare with horn switch in the cabin, and then only the factory horns will work. If I turn it on, fanfare and factory horns are working together. ASR switch is still not connected, but I really don't care for now, I still need to come up with the solution where to hide the three relays.

20231227_222413.jpg20231227_222621.jpg20231227_223127.jpg20231227_221102.jpg20231228_145853.jpg20231228_150311.jpg

In the meantime, the carpet and dashboard were reinstalled, along with the steering wheel. Of course more of the insulation was missing, so I made a new one.

20231221_201148.jpg20231223_161836.jpg20231223_173650.jpg20231228_180051.jpg20231229_151144.jpg20231229_152658.jpg

Speaker covers were resprayed, and I replaced old foam with the speaker cover fabric. I will still use old factory speakers until they die eventually.

20231223_162949.jpg20231228_125056.jpg20231228_182603.jpg20231228_181501.jpg20231228_181928.jpg20231228_181950.jpg20231223_165537.jpg20231228_184134.jpg

And that's it for now. Everything works and interior reinstallation goes really smoothly. Now I need to get the car out of the garage and put back the front seats.

20231229_161036.jpg
 
I had some leftover sound deadening so I decided to do something. I saw that it's possible to use this material instead of factory vapor barrier, so this is what I did. I also applied some leftover foam on to the door card itself to see if it could still be installed back even with additional insulation.

20240105_163034.jpg20240105_170700.jpg

Turns out there is no problem at all and the door card even fits more snugly than before.

20240105_171645.jpg

I'm just thinking if this is even worth the effort. Also, I'm overly concerned about the condensation. Maybe I should just install the foil like it was from the factory?
 
If you haven't done so already, maybe it is a good idea to change out the aluminum ones to copper ones?
I would love to do that, but copper fuses are impossible to find, but I will check every fuse/socket and clean them. I forgotten about it, so thank you for reminding me that I need to do this.
 
+1 on the 9 switches. I also like the layout of the European climate controls better with the two circles. All very symmetrical.

Your door panel insulation is a good addition. I would leave it in. I'm one who did something similar.
 
Fun fact about this 9 switch panel. Originally this car came with 6 switches, but I found this 9 switch panel 50km away from me for $60 and color is almost exactly the same as the rest.

I think I'm probably the only person that bought this strip in the last year or so. Mine was damaged.

20240108_153938.jpg20240108_153945.jpg

Today I also started to wrap trims around the car, sadly I was not able to find anyone to do re-anodizing of them. Well, I'm still not sold on the idea of wrapping them black, but I can always remove it if I don't like it.

20240108_155439.jpg20240108_155646.jpg20240108_163338.jpg20240108_203028.jpg
 
I was always missing the charging indicator in this car. So I bought usb charger with a 12 volt indicator, and I was hoping that my ashtray would still close without removing it from the cigarette lighter, but nope.

So because I never used this thing for anything else, but charging my phone, I decided to remove the cigarette lighter all together and install this usb charger with charging indicator. Of course everything can be reversed back to stock if I desire to do so.

I disassembled the ashtray completely, trimmed the pcb to size, sanded the cover for usb charger because it was a little bit damaged from the removal, made new wiring and installed everything. I used hot glue to install the cover for the usb charger.
 

Attachments

  • 20240110_005701.jpg
    20240110_005701.jpg
    2.2 MB · Views: 16
  • 20240110_005600.jpg
    20240110_005600.jpg
    2.3 MB · Views: 17
  • 20240110_004836.jpg
    20240110_004836.jpg
    2.5 MB · Views: 16
  • 20240110_003537.jpg
    20240110_003537.jpg
    2.7 MB · Views: 12
  • 20240110_003013.jpg
    20240110_003013.jpg
    2.2 MB · Views: 6
  • 20240110_003007.jpg
    20240110_003007.jpg
    3.1 MB · Views: 6
  • 20240109_233918.jpg
    20240109_233918.jpg
    2.2 MB · Views: 7
  • 20240109_233018.jpg
    20240109_233018.jpg
    1.7 MB · Views: 8
  • 20240109_233013.jpg
    20240109_233013.jpg
    2.6 MB · Views: 12
I was always missing the charging indicator in this car. So I bought usb charger with a 12 volt indicator, and I was hoping that my ashtray would still close without removing it from the cigarette lighter, but nope.

So because I never used this thing for anything else, but charging my phone, I decided to remove the cigarette lighter all together and install this usb charger with charging indicator. Of course everything can be reversed back to stock if I desire to do so.

I disassembled the ashtray completely, trimmed the pcb to size, sanded the cover for usb charger because it was a little bit damaged from the removal, made new wiring and installed everything. I used hot glue to install the cover for the usb charger.
Great job … love it!
Does that display ever vary off of 12.2v?
I bought a cheap aliexpress charger like that and when I started using it, I realized that it seemingly always displayed 12.6v whether the engine was running or not. So I hooked up the charger to a bench top variable DC power supply. I realized that no matter how many volts I fed the charger - anywhere from 6v-18v - the display showed 12.6v. 😡. I got a refund from the seller.
 
How odd. Any idea why the charge indicator circuit isn’t functional?
No one will know, just China doing Chinese things I guess. Mine is working perfectly fine.

Quick update, side windows are now reinstalled along with the door cards. I now need to order more sound insulation for passenger front door. After that I will reinstall the headliner and interior is done! Finito! Well maybe I will add some more sound deadening here and there.

20240120_152754.jpg20240120_155047.jpg20240120_224039.jpg20240120_224838.jpg20240120_225101.jpg20240120_224023.jpg

I bought this kick panel long time ago because mine was damaged. Old one vs new side by side. Design is a little bit different, there is rubber seal along the edge where in the old one it's solid plastic. I would like to buy whole set but of course it's NLA. Back then I couldn't afford it.

20240120_224437.jpg20240120_224534.jpg20240120_224630.jpg20240120_224650.jpg

So this restoration is almost completed. Only things to do right now are: repaint the lower cladding and bumpers, install front and rear glass, refinish the rims, get the car through the inspection, alignment, fill up the AC and that's basically it.

It just occurred to me I was never able to check if the transmission actually works so hope it has more than one gear forward and reverse. 😂 Also one of the lifters started to make ticking noise again! Probably it will go away after first long drive, but it's a little bit annoying anyways. So I don't recommend cleaning the lifters, just replace them.
 
Hello. Today I took out the car for a quick spin around the house and everything was fine until ASR activated for the first time. I heard that ASR pump was not shutting off, I took a quick look around the car and there was a puddle of the brake fluid where the ASR accumulator lives. I quickly drove back to the garage to find that there is brake fluid coming out of this screw hole. I removed the screw to see what is going on before taking a picture, I could unscrew it with my fingers. This screw is plastic, so no wonder it's not holding the pressure, but the question is WTF happened? Is this ASR accumulator is damaged, and I need to replace it? Or do I just use metal screw with some teflon tape to seal it. I really don't know how this thing is suposed to work.
 

Attachments

  • 20240204_124213.jpg
    20240204_124213.jpg
    1.2 MB · Views: 9
  • 20240204_123032.jpg
    20240204_123032.jpg
    1.3 MB · Views: 10
I found the issue. Look what happened to the body of the accumulator, I can't even imagine the force required to do something like this. Here is what happens when someone installs the brake lines at the ABS/ASR pump incorrectly. So 100% my fault... I fixed the brake lines long time ago when I couldn't bleed the rear brakes. Lesson learned, triple check everything with no exceptions. I hope the abs/asr pump will be fine after all of this.
 

Attachments

  • 20240204_134307.jpg
    20240204_134307.jpg
    1.3 MB · Views: 19
I had to replace this accumulator due to corroded sockets, it was so bad that I couldn't get a tight connection. You can buy used accumulator from W140 on Alle or olx, they are plentiful and cheap.
 
I already bought one yesterday. Fun fact, this accumulator, but newer version is still available new, but price is rather steep if you ask me. :ROFLMAO:

Today I delivered the front bumpers and lower clading to the painter. Everything should be done in 2-3 weeks.
 

Attachments

  • 1707127920684.png
    1707127920684.png
    13.1 KB · Views: 11
  • Zrzut ekranu 2024-02-05 111125.png
    Zrzut ekranu 2024-02-05 111125.png
    46.7 KB · Views: 11
Lower cladding reinstalled, I used ppf where the cladding is rubbing against paint.

20240210_190014.jpg20240208_094549.jpg20240214_184613.jpg20240222_082116.jpg20240222_081546.jpg

I also bought the hood foam and rubber seal from @Mbzclassicparts and I'm really happy with the quality. I can recommend them.

20240212_154615.jpg

I'm now waiting for the windows to be glued back on and I'm on the hunt for good condition front chrom bumper trim. That's why the front bumper it's not fully attached. I also installed some additional sound insulation in the trunk and put heat shrink tubes on to the springs to stop them from rattling.

20240123_160050.jpg20240123_160157.jpg

I checked if the engine and transmission is leaking or not after all of this work and of course the god dam oil pan is wet. I will drop the pan next oil change and I'm using reinzosil and thread sealer. This is 4th time that I tried to reseal this pan doing everything by the book. New gasket, new oil pan, everything torqued to spec and it's still leaking every time. Everything else appears to be leak free.

20240124_160930.jpg
 
Today the rear sun shades arrived. They look pretty good. They are mounted with magnets and metal brackets.
 

Attachments

  • 20240223_180239.jpg
    20240223_180239.jpg
    2.8 MB · Views: 14
  • 20240223_174107.jpg
    20240223_174107.jpg
    2.7 MB · Views: 14
  • 20240223_173556.jpg
    20240223_173556.jpg
    2.2 MB · Views: 13
  • 20240223_172954.jpg
    20240223_172954.jpg
    2.6 MB · Views: 13
  • 20240223_172933.jpg
    20240223_172933.jpg
    3.5 MB · Views: 14

Who has viewed this thread (Total: 5) View details

Who has watched this thread (Total: 5) View details

Back
Top