• Hi Guest !

    Welcome to the 500Eboard forum.

    Since its founding in late 2008, 500Eboard has become the leading resource on the Internet for all things related to the Mercedes-Benz 500E and E500. In recent years, we have also expanded to include the 400E and E420 models, which are directly related to the 500E/E500.

    We invite you to browse and take advantage of the information and resources here on the site. If you find helpful information, please register for full membership, and you'll find even more resources available. Feel free to ask questions, and make liberal use of the "Search" function to find answers.

    We hope you will become an active contributor to the community!

    Sincerely,
    500Eboard Management

Rear end whine - diff or center support bearing?

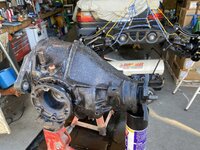
I wire wheeled and POR-15’d mine (New England car) and it came out great! See my owner’s thread for pics.

Be very careful about getting crud inside while the cover is off, and if you are doing the output [side] seals, which I would highly recommend while you have it on the bench. I didn’t touch the front seal, per @gsxr ’s advice.
 
Nice, looks like you did an awesome job. will read thru it more when I get some time. I’m planning on doing the side seals, sadly my Naperville order with those parts parts and others got lost by FedEx so will clean and POR while waiting on those.

How did you press the side seals in? Just had the right size pvc pipe on hand?
 
@IslandMon what was your order of operations on the repaint? I gave one side of mine a light wire brush to get rid of excess crud before pulling one of the axle shafts out, shoving lint free towel in the cavity, and replacing the seal on it. I then painters taped over the seal and its opening to protect the other side. Plan is to do the same on the other side tonight and posisbly start the POR process. The upside to this process is I POR this new one before throwing pulling the existing diff out of the car, but it means the rear cover (needs to be transferred over from the old one) won't be painted. Seems fine to me, just wanted to see if you had any other tips/tricks. I'm also awaiting ASR sensor o rings as I want to pull those at some point and tidy up the crusty HW before reinstalling. Mostly trying to minimize the time I spend with the diff out of the car.
 
The FSM lists a gear puller and a special sleeve as being needed for center support bearing install/removal. Really? Seems most get away without the puller. I should have a PVC pipe that size to use on install.
 
The bearing isn't super tight, you may be able to remove it without the puller. Make sure the two washer/sleeve thingys are facing the correct direction, and are in the right position - they are different. Installation is the easy part.
 
@IslandMon what was your order of operations on the repaint?
Wire brush and then wire wheel on a drill. Got all of the scale off until it looked decent. Next clean with appropriate chemical, Mineral spirits IIRC. I plugged up the sensor openings, changed the output shaft seals, and resealed the rear cover, then set on jack stands to paint with POR-15. The jack stands let me easily flip it to paint both sides easily.

Photo Oct 31, 11 14 03 AM.jpgPhoto Nov 07, 8 51 29 AM.jpgPhoto Nov 07, 11 53 16 AM (2).jpg
 
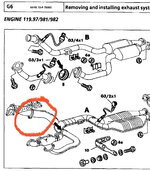
Am I correct in that to remove the Center support bearing, I need to remove the cat which entails basically removing the entire exhaust? If so…I’ve managed to get one of the two bolts at the RH/passenger side connection to the manifold, but access to the higher of the two will be a challenge and the fsm is missing a bit of context. One saving grace is that it appears the mating fasteners are captured on the manifold side so there are no nuts to fiddle with. The drivers side is easy, just the crossover piece.
 
Last edited:
Looks like it’s this guy. The FSM never says to remove this part of the exhaust, just the exhaust shield. Perhaps it’s possible to remove the rear portion of the exhaust and then the catalytic converter rubber supports to gain enough access, but seems unlikely. I think I need a nights rest here to approach the problem fresh.
 

Attachments

  • 695C1448-82CA-4A77-AA1D-89F090121891.jpeg
    695C1448-82CA-4A77-AA1D-89F090121891.jpeg
    622.6 KB · Views: 9
Last edited:
The upper bolt on the passenger side is a PITA to access. I use two long extensions with a universal/swivel joint in the middle. When re-installing those bolts to the manifold, coat with anti-seize, and tighten evenly. Get all four just snug and then loosen slightly, wiggle the main pipe & crossover around so everything is aligned, THEN tighten the bolts fully.

Also, before installing the resonator on to the rear of the catalysts, replace the graphite seal if it's not in good condition, use a wire brush to clean out the inside of the slip-fit pipe (behind the graphite seal), and coat the inside with anti-seize. This helps prevent the pipes from rusting together (making it extremely difficult to remove without damaging irreplaceable components).

:sawzall:
 
Thanks Dave. I'll grab those - looks like there's one on the crossover pipe interface as well. AutohausAZ has em and has been generally faster/more responsive than Naperville. Looks like it's these guys
https://www.autohausaz.com/pn/2014920281 - EPC lists a supercession to 2024920281 but Autohaus has both pns.

I felt one of these bolt heads round ever so slightly so will replace em as well - 4x needed it seems. I'll only 'touch' two but will replace the ones I do and grab extras.


Edit: RMEuropean had em shipped to me in 2 days for $10 so went with that, let's see if it that holds up.

Also yeah, thanks for the tip on the anti-seize, my stock exhaust had to be cut off at the slip fit when I installed my @5thscaleracer new exhaust. Felt the new one starting to get sticky so good to update.
 
Last edited:
Managed to get the exhaust off and the flex disc bolts undone along w the main bolt in the middle of the drive shaft. I was having a hard time getting the flex disc off the nose of the diff so will try again tomorrow when I have a pry bar. Presumably it slides forward and then I can pull it backwards into two once I have it over the diff nose to repoace the Center support bearing - is this the usual procedure here, ie the long shaft gets slightly axially compressed to slide together about 20 mm to free the diff before being pulled apart for the bearing replacement? After that it’s off w the half shafts and then dropping the diff.

I sure hope this works as this has been a real chore. I might also do my shifter bushing while I’m in there… [edit: further investigation seems to show that this job can be done on its own without too much trouble so I may save it for later.]
 
Last edited:
Had a bunch of success Friday night so should be able to drop the diff tonight. I may drop the subframe now to do the diff bushings as I have everything I need - presuming I can mostly just undo the four main subframe bolts and sloooowly lower til I have enough clearance to use the Miller tool. Looks like the rear diff mounts need measuring of their protrusion only if the Miller tool is used - the MB one seems to set the install depth on its own. The other option is to wait a month or so when I do the subframe bushings themselves, but perhaps space will be more constrained then w the diff still in the car.
 

Attachments

  • 74817EA0-E78B-4719-B538-35D3BD691491.jpeg
    74817EA0-E78B-4719-B538-35D3BD691491.jpeg
    281.5 KB · Views: 14
Just an FYI…I’m getting annoyed w Amazon these days, the Redline diff Oil I bought is actually the LSD type. I realized this after I filled and I think it’s fine, but the listing shows photos of both. I had a similar issue when a different seller sent the wrong rtv.
 
If you have the stock diff, it's ok... the LSD version has more friction modifiers. There's no downside to using either type of gear oil.

If you have a Wavetrac or Quaife, then you want to use a gear oil with zero friction modifiers, which can be hard to find (I use Motul Gear 300).
 
You don’t use Redline 75W90NS for your torque biasing diffs? 75W90NS GL-5 Gear Oil
I have used it wit( good effect in a TBD. Quite readily available….
Nope! But, at the time (10+ years ago) I couldn't find a Red Line equivalent that clearly stated no friction modifiers. Either I didn't look hard enough, or they didn't have the "NS" version back then? I can't remember exactly.

Motul Gear 300 was recommended by the Wavetrac distributor which is why I tried it at the time. What sold me on the Motul is that it pours (almost) like water at room temperature, making it far less of a chore to fill a diff in the car through a tube or pump. Most 75W-90 or similar viscosities pour like molasses in winter at room temp. Motul is good stuff, but is a ±50% price premium over the Red Line.

:spend:
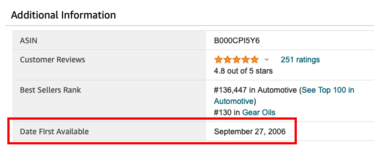
Ah, OK. I know Redline 75W90NS has been avail on Amazon since 2006 .... I was just curious if you had tried it and rejected it for whatever reason since you use Redline motor oils......

1645799958538.png

1645799921983.png
 
I must have missed it for some reason - I can't recall why. But otherwise, I would have no problems using Red Line NS. I'd still prefer the Motul for easy of pouring despite the higher cost, but that is the only reason.

:jono:
 
Is there a special type of grease to use when re installing the two halves of the drive shaft? The FSM says to re-lube the splines and mine are feeling a little dry - is a lithium bearing grease okay, or do I want something heavier?
 
Is there a special type of grease to use when re installing the two halves of the drive shaft? The FSM says to re-lube the splines and mine are feeling a little dry - is a lithium bearing grease okay, or do I want something heavier?
For the splines, you just want something to prevent corrosion. Wheel bearing grease or similar, or anti-seize should also work.

Remember to tap the holes in the side flanges before installing the CV joint bolts, and if not using new bolts, clean/die/etc the old bolts and apply blue threadlock.

:banana1:
 
The upper bolt on the passenger side is a PITA to access. I use two long extensions with a universal/swivel joint in the middle. When re-installing those bolts to the manifold, coat with anti-seize, and tighten evenly. Get all four just snug and then loosen slightly, wiggle the main pipe & crossover around so everything is aligned, THEN tighten the bolts fully.

Also, before installing the resonator on to the rear of the catalysts, replace the graphite seal if it's not in good condition, use a wire brush to clean out the inside of the slip-fit pipe (behind the graphite seal), and coat the inside with anti-seize. This helps prevent the pipes from rusting together (making it extremely difficult to remove without damaging irreplaceable components).

:sawzall:
I was surprised to see these connections at only 20 Nm in the fsm. They sure felt tighter coming out.

I was also surprised the flex disc is only 60 Nm.
 

Attachments

  • 1E823E5A-C641-481C-968D-538BDCC71307.jpeg
    1E823E5A-C641-481C-968D-538BDCC71307.jpeg
    114 KB · Views: 8
  • E155F40A-2BC6-4466-B98D-E986146409E6.jpeg
    E155F40A-2BC6-4466-B98D-E986146409E6.jpeg
    495.3 KB · Views: 8
I was surprised to see these connections at only 20 Nm in the fsm. They sure felt tighter coming out.

I was also surprised the flex disc is only 60 Nm.
I would say that is by design to compensate for the heat expansion from the exhaust. If they were much tighter it would probably snap/break the bolts.

Just thinking out loud :giggle:
 
More in depth update to follow, but got the parts in on Saturday and everything buttoned up yesterday AM and was able to drive the car a bunch to test it out. In short, it's great! Below 35MPH and above 70MPH it's so quiet and serene, much better than before and now as the muddy waters start to clear other small whines and creaks are rearing their heads, but nothing major. Looking at and playing with the new and old diff it was clear the old one had issues w the bearings and gear mesh. The car also just feels much tighter and more responsive, with less lash thru the drivetrain on and off throttle.

Between those speeds the car has a bit of a vibration/resonance that seems to be coming from the rear and can be felt in the steering wheel and seats, regardless of engine speed. The primary suspect is the diff mounting; I'm going to try some different washers/shims on the front mount to see what effect that has. If that doesn't do it I'll turn my attention to other items. I was quite careful with the relative orientations of the two halves of the drive shaft, using bright blue nail polish to mark them as well as confiming that the two marker

When under the car and playing around I also noticed some other things that'll need addressing at some point. I'll start with the subframe mounts, but likely also will snag the Lemforder rear end kit and do that at some point in the next year or so. My halfshafts need repair or refreshing (boots in tact, but play/clicking is there, and I think it's at both the inboard and outboard joints), and the rear wheel bearings could also stand to be done. All four hydro struts were done about 65k mi ago (186k mi, now at 241k) along w the accumulators in 2006 so those should be good and they look fine, but the transmission mount looks failed despite being replaced at 222k mi just before my ownership (that shop seemed to use suspect parts at times); I also need new tires soon. But in the short term I have more pressing upgrades to the lights and stereo that I'll tackle once I tidy up the 35-70 issue.
 
The CV joints can only be tested properly when removed from the car. You need the balls/joints centered, with the axle straight/level. Then you try to rotate the joint - should be zero play. Removal is the PITA though.

The trans mount should be fine with 20kmi on it, assuming it was OE. Under load, the mount will sit lower than how it looks like new in the box, but it shouldn't be collapsed either. There's not a simple test like measuring the air gap below oil pan to determine if the engine mounts have collapsed.

Great to hear the diff job was a success!

:jono:
 
More in depth update to follow, but got the parts in on Saturday and everything buttoned up yesterday AM and was able to drive the car a bunch to test it out. In short, it's great! Below 35MPH and above 70MPH it's so quiet and serene, much better than before and now as the muddy waters start to clear other small whines and creaks are rearing their heads, but nothing major. Looking at and playing with the new and old diff it was clear the old one had issues w the bearings and gear mesh. The car also just feels much tighter and more responsive, with less lash thru the drivetrain on and off throttle.

Between those speeds the car has a bit of a vibration/resonance that seems to be coming from the rear and can be felt in the steering wheel and seats, regardless of engine speed. The primary suspect is the diff mounting; I'm going to try some different washers/shims on the front mount to see what effect that has. If that doesn't do it I'll turn my attention to other items. I was quite careful with the relative orientations of the two halves of the drive shaft, using bright blue nail polish to mark them as well as confiming that the two marker

When under the car and playing around I also noticed some other things that'll need addressing at some point. I'll start with the subframe mounts, but likely also will snag the Lemforder rear end kit and do that at some point in the next year or so. My halfshafts need repair or refreshing (boots in tact, but play/clicking is there, and I think it's at both the inboard and outboard joints), and the rear wheel bearings could also stand to be done. All four hydro struts were done about 65k mi ago (186k mi, now at 241k) along w the accumulators in 2006 so those should be good and they look fine, but the transmission mount looks failed despite being replaced at 222k mi just before my ownership (that shop seemed to use suspect parts at times); I also need new tires soon. But in the short term I have more pressing upgrades to the lights and stereo that I'll tackle once I tidy up the 35-70 issue.
I love this kind of thoroughness to "driving restorations....."
 
The CV joints can only be tested properly when removed from the car. You need the balls/joints centered, with the axle straight/level. Then you try to rotate the joint - should be zero play. Removal is the PITA though.

The trans mount should be fine with 20kmi on it, assuming it was OE. Under load, the mount will sit lower than how it looks like new in the box, but it shouldn't be collapsed either. There's not a simple test like measuring the air gap below oil pan to determine if the engine mounts have collapsed.

Great to hear the diff job was a success!

:jono:
Thanks for all the guidance on this, will keep update with pics/videos once I get the chim sorted out. My first post was almost 9 months ago although only 1 month since I found the diff and pulled the trigger.

I'm suspicious of the AT mount becuase it 'whirrs' when in park and in 2/B and the mount 'looks' low, but others have said this could be whine in the pump itself. In any case, I'll grab some photos - it looked collapsed to the point of being bottomed out.

I had the half shafts on jack stands as close to level as possible and noticed the clicking, but will reserve true judgement until I get them out of the car and on a bench at a later date when I have more time and funds for a project like this (and when this isn't my only car and the lady needs it for other uses...)
 
I'm suspicious of the AT mount becuase it 'whirrs' when in park and in 2/B and the mount 'looks' low, but others have said this could be whine in the pump itself. In any case, I'll grab some photos - it looked collapsed to the point of being bottomed out.

I have a spare AT mount. 20 K miles on it. I replaced it while hunting for vibes but it turned out that this mount was fine. I have been keeping it on my shelf for “just in case” reasons and this is a good reason to use it to troubleshoot if you really have AT mount issues….. and its free….
 
I iterated on the shims a few times this week. My stock was ~3.1mm. I got some washers and went to 4 (same or worse), then 2 (slight improvement, maybe), then 0.9 (better again), then nothing (best by far). I still notice some very faint vibrations through the seat and wheel at some speeds, and some light rattles in the interior, but the overall interior and experience is so much quieter and better (as compared to both pre shim adjustment and pre diff swap) that I think I'm just starting to notice stuff that was being drowned out by the noise before the swap.

As part of this process I also replaced the two front diff mounts. The ones on the car both have a 2mm 'lip' that protrudes into the subframe hole and helps center them. The replacement parts (both available from AutoHaus AZ, thought I got one on eBay) use a 4mm lip on the upper, no lip on the lower. They look slightly different but are dimensionally almost identical and seem to be working fine. 210 351 1842 and 210 351 1942 for reference.

Removing the 'nut' on the upper mount that the bolt threads into was a pain. Supposedly you can get a 17 mm wrench onto it but I couldn't. I;d usually just squeeze it tightly enough (it's really large OD) to provide torque to counter act the 'loosening' force on the fastener and break it. For tightening friction usually held things.
 
I iterated on the shims a few times this week. My stock was ~3.1mm. I got some washers and went to 4 (same or worse), then 2 (slight improvement, maybe), then 0.9 (better again), then nothing (best by far). I still notice some very faint vibrations through the seat and wheel at some speeds, and some light rattles in the interior, but the overall interior and experience is so much quieter and better (as compared to both pre shim adjustment and pre diff swap) that I think I'm just starting to notice stuff that was being drowned out by the noise before the swap.

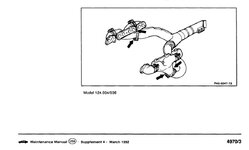
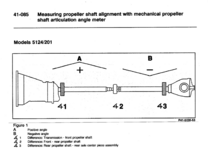
Nice! Now you are falling down the slippery slope of NVH. Have you measured the angles of the driveshaft from the trans to the center bearing and from the center bearing to the diff lately? That angle should drive the amount of shims that you use. See attached pdf.

That being said, I suspect even @gsxr may not be anal enough to ACTUALLY own all those special tools used to measure driveshaft angles!!!! 🤣

1649268345676.png
1649268364560.png
1649268401015.png
As part of this process I also replaced the two front diff mounts. The ones on the car both have a 2mm 'lip' that protrudes into the subframe hole and helps center them. The replacement parts (both available from AutoHaus AZ, thought I got one on eBay) use a 4mm lip on the upper, no lip on the lower. They look slightly different but are dimensionally almost identical and seem to be working fine. 210 351 1842 and 210 351 1942 for reference.

Removing the 'nut' on the upper mount that the bolt threads into was a pain. Supposedly you can get a 17 mm wrench onto it but I couldn't. I;d usually just squeeze it tightly enough (it's really large OD) to provide torque to counter act the 'loosening' force on the fastener and break it. For tightening friction usually held things.
 

Attachments

I sometimes notice a very faint vibration in the 500E when driving at speed that I can feel in the seats and seems to have only come up after the diff swap. It wasn't noticeable before I reshimmed the driveshaft bc there was a much larger vibration then; now that that's gone this one comes up. I'm wondering if I didn't realign the two halves of the drive shaft properly; I marked them with my usual marker (old nail polish) but it didn't seem to be adhering well to the metal on the driveshaft and flaked a bit opening the door for being slightly off. However, I know for certain that the single mark on one end of the driveshaft sits directly between the two 'v' marks on the other side of the driveshaft. I even tried going one spline to either side of this and it was clearly not aligned.

However, in the below 126 video it seems (hard to see exactly) that the single notch is aligned with one of the v notches and not between then. Are the v notches there as a relative reference points/datum, or as an absolute location (ie all drive shafts should have the notch in the middle of the v)

 
However, in the below 126 video it seems (hard to see exactly) that the single notch is aligned with one of the v notches and not between then. Are the v notches there as a relative reference points/datum, or as an absolute location (ie all drive shafts should have the notch in the middle of the v)
The FSM says the notch should be in between the 2 marks on the other half. The splines may prevent the single mark from being exactly centered between the other two:

1659718779639.png
 
FYI... [in January 2022], Naperville told me that 124-410-08-81 is NLA and can't be found at major resellers online.
:update:

It appears the center support p/n 124-410-08-81 for 034/036 is available from Mercedes again, or at least all the RevPart dealers show it available, as does MB Classic. If anyone buys one, let us know if there is a COO on the package or label.

https://partssearch.mercedes-benz-classic.com/parts/A1244100881?tt=automatic

https://www.mboemparts.com/oem-parts/mercedes-benz-rubber-mounting-1244100881

https://parts.mbofcovington.com/oem-parts/mercedes-benz-rubber-mounting-1244100881

:spend:
 
Last edited:

Who has viewed this thread (Total: 2) View details

Who has watched this thread (Total: 2) View details

Back
Top