• Hi Guest !

    Welcome to the 500Eboard forum.

    Since its founding in late 2008, 500Eboard has become the leading resource on the Internet for all things related to the Mercedes-Benz 500E and E500. In recent years, we have also expanded to include the 400E and E420 models, which are directly related to the 500E/E500.

    We invite you to browse and take advantage of the information and resources here on the site. If you find helpful information, please register for full membership, and you'll find even more resources available. Feel free to ask questions, and make liberal use of the "Search" function to find answers.

    We hope you will become an active contributor to the community!

    Sincerely,
    500Eboard Management

Water pump replacement

Maybe I did remove it on the E420?

My 500e has headers- and I did use the tool without header removal. Wow, that means one out of 5 services was easier!


M
 
Maybe I did remove it on the E420?

My 500e has headers- and I did use the tool without header removal. Wow, that means one out of 5 services was easier!
LOL! That could be true... headers MIGHT allow better access to that area, depending how they are routed. Hadn't thought of that...

:jono:
 
For those about to tackle this job-


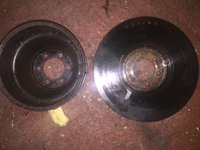
I got the crank pulley off the hub last night. As Dave said the front pulley section with the belt ribs knocks off with a rubber mallet once the 6 bolts are removed.


With a prybar and 27mm ratchet I turned the engine clockwise by hand gently walking the balancer off over the bolt. Took about 5 minutes but the balancer came off without too much fuss. At least I can continue with the waterpump R&R now.

IMG_2437.JPGIMG_2438.JPG


Regarding the access plate for the Mercedes Lock tool, on my car the exhaust downpipe /Crossover tube is way too close for any tool to go in. I have already removed the crossover tube 3x times in 6 months so I don’t fancy doing that again!


There is NO need to make any alignment marks on the balancer. This is because the bolt pattern means all 3 sections will only go back together one way.


I am going to fabricate my own lock tool which has 2 hollow dowels welded to a 5mm steel plate. This will be a snug fit & fixed to the lower bellhousing with 2x m6 bolts similar to the factory blank plate. The dowels will align with 2 of the torque converter bolts so 2x bolts can be used to secure the flywheel. The design of the tool will be simple, very strong and can be removed / installed in minutes from underneath the car. (Not requiring removing the starter or exhaust downpipe)
 
Thanks for the post. Glad to see you got it off.

I am going to fabricate my own lock tool which has 2 hollow dowels welded to a 5mm steel plate. This will be a snug fit & fixed to the lower bellhousing with 2x m6 bolts similar to the factory blank plate. The dowels will align with 2 of the torque converter bolts so 2x bolts can be used to secure the flywheel.

I don't think you are going to be able to access two torque converter bolts at the same time from the lower bell housing access hole. Maybe I'm visualizing the tool differently than you.
 
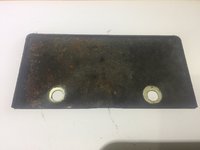
This is a pic of the factory blank plate. I am cutting a replica out of 5mm Mild Steel.

IMG_2439.JPG

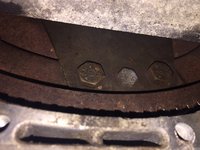
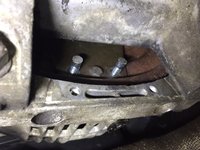
Then two extra bolt locations will be drilled through this 5mm plate to align with the bolts as pictured below. (This is a shot I took under my 500E through the small access hole last night. The crank needs turned a little more to centre the bolts in the access opening but you can see 2x m8 bolts there & a single m6)

IMG_2435.JPG


The 5mm plate will be bolted to the bell housing first & it's a tight fit. Then 2 bolts will pass through the 5mm plate via mild steel dowels and be tightened to both TC M8 bolt slots side by side. This means the tool will have a very strong hold on the TC. The steel dowels will also brace the bolts and plate tight & at right angles to the TC thus eliminating the fear of the bolt bending or breaking off in the TC
 
That's right. There are two bolts next to each other. It has been a long time since I looked at the TQ and my picture in post #11 hides the adjacent bolt. BTW, is there any evidence of the front main seal leaking?
 
BTW, is there any evidence of the front main seal leaking?

No the seal still looks AOK to me. I think either way now I know how to remove the crank pulley it's not such a big job to go back & do the Oil seal. But since I'm in there now & the car is off the road for winter it seems like an opportune time to change the crank seal so I'm going ahead with fitting a new one. Plus I don't want Dave to think I'm a wimp
 
Good for you! That crank nut and washer looks like a dripping water pump for sure. Please document your steps for the crank bolt removal and seal R/R .
 
The lock tool is coming along- for anyone who would like to make one of their own this is progress so far-

I had scrap 20x20mm solid steel stock so I cut them to 22.25mm long & drilled a 8mm hole through.

IMG_2442.JPG


Then cut 2x M8 bolts down which will sit slightly under the top of the dowels when threaded into the TC. (NB; These bolts are only for fabricating the tool)

IMG_2441.JPG


Now coat only the outer end of the dowels with 2 part epoxy & fit dowels over the M8 studs.

IMG_2443.JPG


Bolt on a 4mm steel plate cut to fit the bellhousing tight. Fit the 2x m6 bolts & tighten to bellhousing.

IMG_2444.JPG


This will hold the dowels in perfect alignment with the plate & TC bolt holes. Once the epoxy is cured I can withdraw the plate with the dowels now stuck to the back of it. Then carefully scrape off excess epoxy at the edges & MIG weld the dowels to the plate. Pass a 8mm drill through the dowels & out through the front face of the 4mm plate.


Voila!! Free; & better than the MB tool IMHO as this only takes minutes to remove / install.
 
Got the crank lock finished & installed:

IMG_2445.JPG

IMG_2446.JPG


But then tried to loosen the front crank bolt with a 6ft breaker bar. No go. That bolt is TIGHT!! It felt like the breaker bar joint was going to explode before the bolt let go so I stopped for now. I pulled hard on that bar & nothing.


Need to re-think of how I can safely loosen that bolt....... any ideas? I can’t get an air wrench in there – no room. I do worry this bolt could shear off :blink:
 
Your lock tool is awesome! :deniro: Why didn't the factory create something like that?

So far, I've not had any problems using an air impact wrench on that bolt. However, clearance is tight with the engine in the car. You MAY need to remove the radiator to make room for an impact wrench. My impact is an off-brand 1/2" drive rated at something like 450 lb-ft? The hammering action seems to work well.

In the meantime - soak the washer stack with penetrating oil / Kroil in case there's some corrosion issues.

:runexe:
 
Very nice tool.

The only thing that worked for me was to use a floor jack under the breaker bar from below. I know there are dangers, but the bolt was so tight that the engine actually lifted the motor and pulled on the motor mounts before the bolt finally came loose. Just keep your face away from the breaker bar when you jack it up.
 
Thanks for the tips. I just tried a steel 10ft bar- still no go. This bolt is not coming out with a bar. My 1/2 Air wrench will never be able to remove this bolt.

Either a 3/4 impact wrench or the starter motor method is the next step. I sure hope it doesn't shear off then I'd be in really big trouble.

Edit- I'm eyeing up investing in a 18v impact wrench with 1625nm breakaway torque. That ought to get this b@£&?!d out.
 
Keep your 10 foot or however long bar and get an assistant. Now beg, borrow or steal an impact wrench. Have your assistant torque up on the breaker bar, then hit it with the impact while it is torqued up. It will come loose. Make sure the assistant is prepared for when it lets loose. The trouble is that you'll have to invent some kind of special socket which can accept both the breaker bar and the impact at the same time.... Crow foot on the breaker bar end and socket on the impact?
 
Victory at last!

This morning I also tried the starter method – no go either. Just a click & it couldn’t loosen the bolt. And yes I did remove the lock tool first :)

So I removed the radiator for access with my 450ib 1/2 Air impact gun. It tickled the bolt but that's about it. No go either

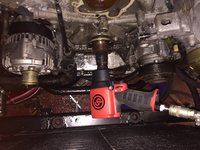
Went to a local tool store and explained the problem. Their solution was a CP7749 ½ air wrench. It’s 1300nm (~960ib ft) maximum real torque in reverse and was actually smaller than my old 450ib ½ Air wrench. Needs must; so I bought it & finally the bolt came out! The harmonic puller hasn’t turned up yet but a 3 arm puller worked just fine. Waiting on MB parts & the giant torque wrench to arrive before I can proceed to re-assemble I'll report back on that in a week or so.

IMG_2450.JPG

IMG_2453.JPG

IMG_2457.JPG

IMG_2458.JPG
 
Yeah! Congrats on the successful removal. :)

Note the ridge in the hub - make sure when you install the new seal, it's not in the same location. Based on your photo, it appears to be in the factory location, which IME seems to be inset ~1.5mm from the face of the timing cover. You cam try to measure the depth to confirm. If my estimate is correct... if you use the seal install tool, it will either get set flush, or inset 3mm, which is only ~1.5mm away from the previous location. Last seal I changed, I installed it ~1.5mm out from the face of the cover (use feeler gauges behind the tool during install), to get 3mm away from the old ridge. That may be overkill... 1.5mm difference may be adequate. I assume you'll use an OE MB seal, not aftermarket. This is a job you won't want to repeat anytime soon!

:banana2:
 
Props to you JC. As usual, I'm amazed by the skills of board members who are willing to tackle jobs like this. Hope reassembly goes smoothly.
 
Props to you JC. As usual, I'm amazed by the skills of board members who are willing to tackle jobs like this. Hope reassembly goes smoothly.
Thanks! I think the worst is over now that bolt is out – reassembly should be ok now.... famous last words :duff:


Yeah! Congrats on the successful removal. :)

Note the ridge in the hub - make sure when you install the new seal, it's not in the same location. Based on your photo, it appears to be in the factory location, which IME seems to be inset ~1.5mm from the face of the timing cover. You cam try to measure the depth to confirm. If my estimate is correct... if you use the seal install tool, it will either get set flush, or inset 3mm, which is only ~1.5mm away from the previous location. Last seal I changed, I installed it ~1.5mm out from the face of the cover (use feeler gauges behind the tool during install), to get 3mm away from the old ridge. That may be overkill... 1.5mm difference may be adequate. I assume you'll use an OE MB seal, not aftermarket. This is a job you won't want to repeat anytime soon!

:banana2:

Yes that sounds about right Dave – the original Crank Oil seal is set in slightly from the outer edge. So I will go for using the MB tool to set it flush with the casing this time. Although it looks like a ridge its not actually indented per say. I just need to give the hub a good clean with fine scotch pad & WD40.


All genuine parts from MB are coming in a few days - including the MB Tool & Crank Oil seal etc. I hope the MB tool turns up & isnt NLA given the low price the dealer qouted. Funny thing is my dealer wouldnt sell me the tools! So I ordered from a different dealer than usual - not sure if they are 'On the ball' or not regarding NLA parts but they did take full payment so fingers crossed.

Yes I don’t want to be tackling the crank seal again any time soon! Besides I am finding of late that Mercedes Parts prices are quite reasonable for most items – doesn’t make sense to explore the minefield of aftermarket parts out there now. I’ve seen posts lately on BanzW where even Lemforder are now sending out Made in China parts – very bad news indeed! I have decided to have the original bolts yellow zinc plated to match the rest of the motor in my car now. So that will take at least a week until I get them back. I do intend to create a DIY on 500E board regarding crank pulley / Oil seal renewal – when all is said & done with the R&R I’ll post that new thread detailing all tools needed and the best approach.


There is a question I wanted to ask regarding the torque of the front Crank bolt - the early m119 setting is 400nm. But then later models have the Torque set at 300nm IIRC. Can I consider then setting the Torque wrench to 350nm as a happy medium? Or give it the full 400nm again? I do have a new MB crank bolt coming also to abate fears of it shearing off. (However it is an updated part number so if it turns up with a allen key instead of 27mm hex I will not be using the new bolt)
 
I’ve seen posts lately on BanzW where even Lemforder are now sending out Made in China parts – very bad news indeed!
That's not good. Any W124 parts? Have a link? :(


There is a question I wanted to ask regarding the torque of the front Crank bolt - the early m119 setting is 400nm. But then later models have the Torque set at 300nm IIRC. Can I consider then setting the Torque wrench to 350nm as a happy medium? Or give it the full 400nm again? I do have a new MB crank bolt coming also to abate fears of it shearing off. (However it is an updated part number so if it turns up with a allen key instead of 27mm hex I will not be using the new bolt)
They are different designs. The old bolt is used with the stack of 4 Belleville (dished spring) washers. The new bolt is used with a single thick/flat washer, and after torquing to 200Nm, it then takes another 90° rotation. See link in post #31. The bolts are different ratings as well, I believe, as the early one is not torque-to-yield like the later one. Don't mix+match parts, and use the proper spec for the parts you have. Remember to follow the directions to oil the bolt/washers before torquing per FSM.

:klink:
 
That's not good. Any W124 parts? Have a link? :(


They are different designs. The old bolt is used with the stack of 4 Belleville (dished spring) washers. The new bolt is used with a single thick/flat washer, and after torquing to 200Nm, it then takes another 90° rotation. See link in post #31. The bolts are different ratings as well, I believe, as the early one is not torque-to-yield like the later one. Don't mix+match parts, and use the proper spec for the parts you have. Remember to follow the directions to oil the bolt/washers before torquing per FSM.

:klink:

Thanks for the clarification – I didn’t know the later bolt does not have the 4 washers also. EPC gave me this part number for my 500E’s crank bolt- N308676018001 so it should be a match & suitable for my 119.974 motor. I will compare the new bolt with the original – if it is not a match I will not use the new bolt. I’ll torque to 400nm.


First mention was here

2016-11-25 18.14.38_zpskflssbsu.jpgIMAG0603.jpg


Well I’m still waiting on the parts from MB so I can start putting stuff back together on my 500E. However, tonight when cleaning the motor I think I found the source of the noise I was experiencing from the waterpump area :detective: Check out the pic-

IMG_2480.JPG

See how the waterpump impeller has been making contact with the timing cover? I think this is because I had the engine drained of coolant for a couple months almost. The cast iron impeller must have corroded during that time then when I re-commissioned the engine again the noise began to occur.

The corrosion will be carefully cleaned off with fine scotch pads before fitting the new waterpump. It is good to have found the potential source of the annoying noise though!
 
so ..i tried to read all this stuff...BUT

Does the balancer come off "just" by removing the 6 hex bolts..from the workshop manual i get abit confused?

or is it fastened by the center bolt holding the HUB also...?
 
so ..i tried to read all this stuff...BUT

Does the balancer come off "just" by removing the 6 hex bolts..from the workshop manual i get abit confused?

or is it fastened by the center bolt holding the HUB also...?
The balancer comes off after the 6 hex bolts are removed. It can be VERY tight and difficult to remove, or rusted in place.

The large 27mm center bolt only fastens the hub.
 

Attachments

  • crank_seal7.jpg
    crank_seal7.jpg
    198.7 KB · Views: 23
Make sure you turn it CLOCKWISE. Ask me how I know. lol. FYI balancer can only go on one way.

oh ..so its only turned clockwise you say? what happens if you turn it anti clockwise..maybe you can tell us about it :)"giggles" :)

just kidding..im well aware of that mister..im pretty old in the car world and mbworld beeing a technician, but thank you for letting me know anyways:) i apreaciate tips whatever they may be :)
 
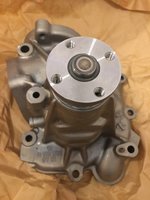
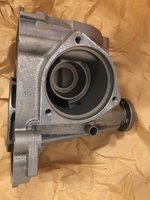
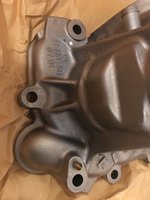
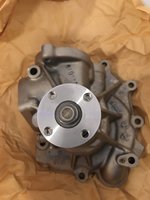
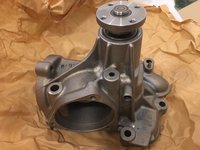
I ordered a new MB OEM water pump for my 1991 Bornite Metallic 500E since the engine is out and there is a sign of water stain under the bottom hole and little noise on the bearing and MB in Germany replied to the local MB dealer that they are out of stock and will take a few months for the order, so apparently MB is preparing a new batch of A119-200-15-01 water pumps.
 
I couldn’t wait till January 2020 (as per dealer email from Germany) for MB to rebuild a new batch of M119 OEM water pumps so I purchased an original MB water pump from another store.
You can see and feel the difference in the workmanship and quality and the weight in the casting of the original water pumps.
 

Attachments

  • 4C272D82-0E04-45D4-982F-8D01C16A915D.jpeg
    4C272D82-0E04-45D4-982F-8D01C16A915D.jpeg
    2.1 MB · Views: 16
  • BCD3A092-B5D9-4BC3-88DC-010BB534FC8A.jpeg
    BCD3A092-B5D9-4BC3-88DC-010BB534FC8A.jpeg
    1.2 MB · Views: 20
  • C345C92A-02A2-40A8-B6FE-693ECB0E92A0.jpeg
    C345C92A-02A2-40A8-B6FE-693ECB0E92A0.jpeg
    1.2 MB · Views: 21
  • 279747A8-B5D4-4A5A-B1CD-A0442D90785C.jpeg
    279747A8-B5D4-4A5A-B1CD-A0442D90785C.jpeg
    1.2 MB · Views: 16
  • 0043A2EC-2AA1-4E63-AAEF-033BAEA40A37.jpeg
    0043A2EC-2AA1-4E63-AAEF-033BAEA40A37.jpeg
    1.4 MB · Views: 14
  • 2FF0F6DE-7D11-42C1-99D6-2980AECE64CF.jpeg
    2FF0F6DE-7D11-42C1-99D6-2980AECE64CF.jpeg
    1.2 MB · Views: 14
  • B0D4BFBB-A201-421B-BC7F-54DADDBDD0E1.jpeg
    B0D4BFBB-A201-421B-BC7F-54DADDBDD0E1.jpeg
    1.1 MB · Views: 12
  • 8C9E2994-1E62-469D-8155-961D0265ED26.jpeg
    8C9E2994-1E62-469D-8155-961D0265ED26.jpeg
    1.3 MB · Views: 11
  • 12F8BD71-485F-4880-A7D4-E4B0E217800F.jpeg
    12F8BD71-485F-4880-A7D4-E4B0E217800F.jpeg
    1.3 MB · Views: 12
  • C17B6820-B228-4A19-AAE2-992440267372.jpeg
    C17B6820-B228-4A19-AAE2-992440267372.jpeg
    1.2 MB · Views: 13
  • DE3CC109-0B0E-448E-8676-8B093AA624DA.jpeg
    DE3CC109-0B0E-448E-8676-8B093AA624DA.jpeg
    1.8 MB · Views: 12
  • 9091C560-8C2B-4987-B707-3363AA4CCED1.jpeg
    9091C560-8C2B-4987-B707-3363AA4CCED1.jpeg
    2.4 MB · Views: 12
  • 24C55ED9-BE3E-4BCE-BE5E-462088B2DD0D.jpeg
    24C55ED9-BE3E-4BCE-BE5E-462088B2DD0D.jpeg
    1.9 MB · Views: 13
  • E1BEAC0D-1588-41BE-81DD-A5F0E91FDD71.jpeg
    E1BEAC0D-1588-41BE-81DD-A5F0E91FDD71.jpeg
    1.1 MB · Views: 14
  • 61EF66EC-A5BA-40FD-AD7C-2C8E2B331FD2.jpeg
    61EF66EC-A5BA-40FD-AD7C-2C8E2B331FD2.jpeg
    1.3 MB · Views: 14
  • BF3E027C-8E77-40EC-A900-E05E09746476.jpeg
    BF3E027C-8E77-40EC-A900-E05E09746476.jpeg
    1.3 MB · Views: 14
  • F8A7E93C-AC31-4233-92A1-F7A4EAB5939E.jpeg
    F8A7E93C-AC31-4233-92A1-F7A4EAB5939E.jpeg
    1 MB · Views: 12
  • 53415E81-6E71-4135-BFC1-C3BC973F4006.jpeg
    53415E81-6E71-4135-BFC1-C3BC973F4006.jpeg
    1.8 MB · Views: 13
FYI, there is 51 pieces of early 500E water pumps available as of 15/11/2020 in the Main GLC Stuttgart as per photos below.
 

Attachments

  • 5A721FC8-F6EF-4F78-87A7-17F66EAD6779.jpeg
    5A721FC8-F6EF-4F78-87A7-17F66EAD6779.jpeg
    1.7 MB · Views: 16
  • B98991A7-23A0-43BF-92F8-E5C8B26C2539.jpeg
    B98991A7-23A0-43BF-92F8-E5C8B26C2539.jpeg
    1.8 MB · Views: 15
Is your model year the type that you even have to take the crank bolt out to replace the water pump? If it's not, like nocfn said, I'd probably leave it alone unless the front seal was leaking. The crank/ring gear lock tool that goes in where the starter goes was really expensive when I checked ten years ago (it looks like it came down to $210 now), and you risk the bolt breaking while torquing if you use the bolt/sleeve method on the torque converter. In either case, it won't be fun trying to stand on the torque wrench in the engine compartment. I guess you could hang on it if you have a shop lift.

Installing retaining lock for crank/ring gear:
http://www.w124-zone.com/downloads/MB CD/W124/w124CD1/Program/Engine/119/03-5000.pdf

Replacing front seal:
http://www.w124-zone.com/downloads/MB CD/W124/w124CD1/Program/Engine/119/03-3240.pdf

The crank lock is $210:
Retaining Lock Wrench 116-589-01-40-00 | MB OEM Parts

The seal tool is $62.40
Crankshaft Oil Seal Tool 119-589-01-14-00 | MB OEM Parts
Will the 119-589–01-14-00 (crankshaft seal tool) work on a M104 crankshaft?
 
The first one, with the pins, is 112-589-03-40-00 for the M112/M113/M137.

The second one, with holes, is 601-589-02-40-00 for the 102, 103, 104, 111, most OM60x, and most OM611/612/613 engines.

Neither of those crank/flywheel locks work on the M119, which requires lock tool 116-589-01-40-00. This fits most M116/117/119 and most OM61x engines. Photo attached.
hello sir, My son and I have a 1993 e 420 with the m119 engine. We try to get the harmonic balancer off to get to a hard to reach bolt on the waterpump. We're looking for this 116-589-01-40-00 tool and can't find it. It seems not available from Baumtools. Do you have any advice? I would not mind sending you a deposit check if you would loan me your tool or sell it to me. I would pay freight of course. Friendly greetings, Hans Rademaker
 
hello sir, My son and I have a 1993 e 420 with the m119 engine. We try to get the harmonic balancer off to get to a hard to reach bolt on the waterpump. Were looking for this 116-589-01-40-00 tool and cant find it. It seems not available from Baumtools. Do you have any advice? I would not mind sending you a deposit check if you would loan me your tool or sell it to me. I would pay freight of course. Friendly greetings, Hans Rademaker
Hello Hans,

The flywheel lock tool 116-589-01-40-00 is not normally required to remove the balancer. The balancer is a slip-fit on to the hub, but may be corroded / stuck on, and could be difficult to remove. See photos earlier in this thread.

You'd only need the lock tool if you could not separate the balancer from the hub and had to remove both together, but you'd also need a torque wrench capable of 400Nm / 300 lb-ft to re-install the large center bolt. AND, you would also need a harmonic balancer / hub puller to remove the hub+balancer... and then need a hot plate to heat the hub for re-installation.

Lock tool 116-589-01-40-00 is available new from online dealers like MB of Naperville (link), free shipping with code 500EPROMO. If you remove the hub, make sure to replace the front crank seal as well. More info on the crank seal is at this link.

:banana1:
 
Hello Hans,

The flywheel lock tool 116-589-01-40-00 is not normally required to remove the balancer. The balancer is a slip-fit on to the hub, but may be corroded / stuck on, and could be difficult to remove. See photos earlier in this thread.

Youd only need the lock tool if you could not separate the balancer from the hub and had to remove both together, but youd also need a torque wrench capable of 400Nm / 300 lb-ft to re-install the large center bolt. AND, you would also need a harmonic balancer / hub puller to remove the hub+balancer... and then need a hot plate to heat the hub for re-installation.

Lock tool 116-589-01-40-00 is available new from online dealers like MB of Naperville (link), free shipping with code 500EPROMO. If you remove the hub, make sure to replace the front crank seal as well. More info on the crank seal is at this link.

:banana1:
thank you very much for taking the time to answer me and so quickly.
I found out that this tool is still available at Baum tools, it was not findable on their website.
Very reassuring to know that I can get one if needed.
Thanks again and friendly greetings, hans rademaker. Good thing this forum exists and is open to e 420 and e 400 owners.
 
What I found early on the c-126 HB removal was to take an appropriate length of pvc 1/2” and a rubber mallet and strike all around the shaft area after a night of pb blaster. It then was grabbed at 10/6 and 8/2 and walked right off.
 

Who has viewed this thread (Total: 3) View details

Who has watched this thread (Total: 4) View details

Back
Top