• Hi Guest !

    Welcome to the 500Eboard forum.

    Since its founding in late 2008, 500Eboard has become the leading resource on the Internet for all things related to the Mercedes-Benz 500E and E500. In recent years, we have also expanded to include the 400E and E420 models, which are directly related to the 500E/E500.

    We invite you to browse and take advantage of the information and resources here on the site. If you find helpful information, please register for full membership, and you'll find even more resources available. Feel free to ask questions, and make liberal use of the "Search" function to find answers.

    We hope you will become an active contributor to the community!

    Sincerely,
    500Eboard Management

HOW-TO: Replacing E500E SLS Rear Hydraulic Struts

gerryvz

Site Honcho
Staff member
Introduction and Background

A common malady that ALL E500Es (and 400E/E420s with rear SLS) suffer sooner or later, is a distinct and loud "clunking" at the rear, when the car travels over certain bumps. Not ALL bumps, but certain sharp bumps such as curbs, large pavement cracks/potholes and expansion joints, and other significant road irregularities. The rear suspension typically does NOT "clunk" when driving down the road, over typical uneven road surfaces.

The cause of this problem are worn lower bushings on the rear SLS hydraulic struts. These bushings wear with age and mileage, and this leads to abnormal flexing of the bushing and eventually, essentially metal-to-metal contact as the inside metal portion of the bush contacts the outside of the bush over these significant bumps.

For some reason, the passenger side (right side) strut seems to be the first one to go bad, the majority of the time. However, when one fails, even if the other one looks to be usable, it is just a matter of a short time until the "good" bushing also fails.

Earlier this year, my 1994 E500 with 131,000 miles on the odometer started suffering this malady. It was immediately apparent as to what the problem was, based on numerous descriptions of the problem and threads posted here on the forum about it.


Job Overview

This job entails replacement of the rear struts. These struts are available through your local MB dealer or mail-order establishment, and are also available as aftermarket units solely made by the part's OEM, Sachs.

To accomplish the job, the self-leveling hydraulic system needs to be bled, and then the struts are removed at their upper mounts (in the trunk) and their lower mounts (at the lower control arms). The time required for the job for a first-time mechanic would be around 2.5-3 hours, and only simple hand tools are required for this job.

A good procedure for this job can be found in the factory manual, which can be either augmented or completely supplanted by this HOW-TO article.

I would call this a "light-moderate" DIY job, probably a 3.5 on a scale of 1-10 for the DIY shade-tree mechanic.


Job Requirements

The following parts are required to do this job. A few "optional" parts are also listed below, which would be prudent & highly recommended to replace at the same time, as no incremental labour would be required to do so.

  • Sachs or MB rear SLS hydropneumatic strut (two required): MB part number 124-320-42-13 - NLA as of late 2023
  • Four copper O-rings: MB part number 007603-012102
  • Two self-locking lower control arm nuts: MB part number 910113-010003
  • OPTIONAL: Two upper strut rubber bushings: MB part number 201-326-18-68 - NLA as a separate part
  • OPTIONAL: Two lower strut rubber bushings: MB part number 124-326-03-68
  • OPTIONAL: Two hardware kits, which include upper & lower rubber bushings: MB part number 124-320-03-56 - only way to get the NLA rubber bushing above (201-326-18-68)

The following tools are required. No esoteric tools are needed for this job, and it can generally be done with a normal home mechanic's assortment of tools.

  • Hydraulic floor jack
  • Lug bolt wrench
  • Wheel chocks (for safety)
  • One jack stand (for safety)
  • Small or medium flat-blade screwdriver
  • 1/4" and 3/8" ratchets
  • 17mm 3/8" socket (shallow required; deep and shallow preferred)
  • 10mm 1/4" socket
  • 10mm combination wrench (box + open-end)
  • 17mm combination wrench (box + open-end)
  • 1/2 can brake cleaner
  • Rags and/or shop towels
  • Jar to collect hydraulic oil
  • 1 liter SLS hydraulic oil (use correct spec oil) - optional
  • Medium-size funnel


Job Preparation

Before you get started, it's a good idea to spread cardboard (I used a mover's blanket) beneath your work area under the rear of the car and rear wheel area that you are working on to catch dripping hydraulic oil.

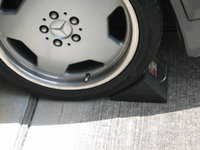
Park the vehicle on a level surface and use your lug bolt wrench to loosen the lug bolts on both rear wheels, although you will only be working on one side of the vehicle at a time. Place your chocks under the FRONT wheels, with the car in Park, and the rear parking brake OFF.

IMG_6959.JPG IMG_6960.JPG IMG_6961.JPG


Getting Started

The first thing you need to do after stabilizing the vehicle, is to jack up one side of the vehicle. I chose to raise the passenger side first, so I jacked it up with the floor jack at the rear rubber jacking point, and I set the jack at that level with the rear wheel about 6 inches off the ground. Then I placed a jack-stand under the rear of the car near the jack as an additional safety measure.

After you do this, you need to locate the rear SLS hydraulic control valve. It is located in the center rear of the car, just behind the rear differential and near the rear flex disc. Here is a photo of the unmolested rear SLS control valve.

IMG_6962.JPG


It's a good idea to give the outside of the valve a good shot of brake cleaner, which you can "catch" the spills with a rag. This will help clean it off a bit and make things easier to identify. The next thing you need to do is to locate the pressure relief screw, which is a 10mm bolt that is immediately adjacent to the lever on the front of the valve. You can see its head sticking out immediately to the right of the lever in the above photo - it's the bright bolt head.

Take your 10mm combination wrench, and having your jar handy to catch hydraulic fluid (you need about a quart-size jar) CAREFULLY and SLOWLY open the pressure relief screw with a counter-clockwise motion. You will immediately see hydraulic fluid start to dribble down from the screw where it enters the valve's housing. With your jar handy to catch drips, keep turning the screw counter-clockwise and opening it up further. You should see a stronger flow of foamy oil dripping down into the jar, and probably will hear a hissing sound as the pressure begins to release.

MB procedure says that you can and should use a hose around the bleed screw to direct the fluid into the jar, but it's fairly easy to just let the fluid drip down in a steady stream into the jar. You'll let about 3/4 of a quart (liter) drain before the pressure subsides.
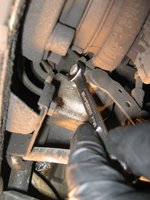
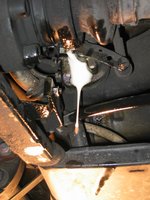
IMG_6963.jpg IMG_6964.jpg

After the fluid drains and the escaping pressure subsides, tighten the bleeder screw to the factory torque of 14 Nm.

Doing the drain and pressure release this way will take about a half-hour to accomplish. You can just set your wide-mouth jar under the valve and let the fluid drip-drip-drip into the jar on its own while you get some other preparatory jobs done.

The next prep job you can do is to remove the inner side trunk linings on both sides of the car. This will allow you to get at the top strut mounts when the time comes, which will be pretty soon.

Another "prep" job you should do is to get under the car, and remove the two plastic lower control arm covers. These are each held on by two 10mm short screws, which you can use a 10mm socket (deep or shallow) to remove. The two covers pull right off, straight downward after releasing the elongated tabs on the sides that hook onto the top of the control arm.

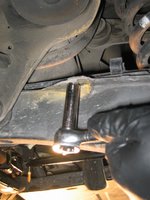
IMG_6965.JPG IMG_6967.jpg IMG_6968.jpg IMG_6969.JPG


Here's a shot of the hydraulic line that goes from the hydraulic sphere to the top of the rear SLS strut, just for giggles. You're going to disconnect this line at the strut later on.

IMG_6972.jpg


After removing the trunk lining, here is what the exposed upper strut mounts look like.

IMG_6966.JPG IMG_6974.JPG


Wait for the hydraulic fluid to stop draining, remove the jack stand and use the hydraulic jack to LOWER THE CAR to the ground. This is IMPORTANT given the next step.

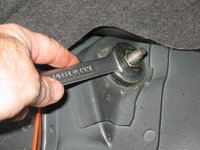
After lowering the car to the ground, so that the tire is touching the ground and the weight of the car is on it, you can begin to remove the upper strut mount inside the trunk. There are two 17mm nuts that hold the top of the strut to the car's body structure. Use your two 17mm combination wrenches to loosen the top nut (counterhold the lower nut with your second wrench as shown), and remove it with your fingers. Then loosen the bottom 17mm nut, and use your deep 17mm socket (or your wrench if you want to go slower) to remove it. Then remove the rubber top bushing and its large washer.

IMG_6976.JPG IMG_6977.JPG IMG_6978.JPG IMG_6979.JPG IMG_6980.JPG IMG_6981.JPG IMG_6982.JPG


After you've removed the strut's top mount inside the trunk, use your floor jack and jack stand to raise the car again, and stabilize it with the jack stand. Remove the lug bolts that you already loosened, and remove the wheel and tire from the car and set it aside. This will give you working room to access the strut.

IMG_6983.JPG


After removing the wheel, this is what you should see. The threaded upper part of the strut should have released from the body of the car and traveled downward as you jacked up that side of the car.

IMG_6984.jpg IMG_6985.JPG


Give the banjo bolt of the hydraulic hose connection at the top of the strut a shot of brake cleaner, to clean it off.

IMG_6986.JPG


Then, using your 17mm combo wrench, and a handy rag to catch pressure and fluid that will released when you loosen the banjo bolt, CAREFULLY loosen the banjo bolt. Catch the fluid/pressure with the rag. It will subside after a couple of seconds.

IMG_6987.JPG IMG_6988.JPG


Loosen the banjo bolt a bit more until you can remove it with your fingers. Set it and its two copper washers aside. You will be replacing these washers with new ones.

IMG_6989.JPG IMG_6990.JPG


Here's what the strut looks like with the hydraulic line removed.
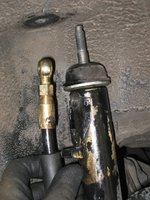
IMG_6991.jpg


Next, it's time to turn your attention to the lower nut and bolt combo that connect the bottom of the SLS strut to the lower control arm. There is only a single bolt that holds the strut to the LCA (the 124 wagons have dual bolts). Use a 17mm combo wrench and a 17mm socket (one being a counter-hold for leverage) to loosen the very tight nut, and loosen and remove it with your fingers. It should have a single washer on each side of the LCA.

IMG_6992.jpg IMG_6993.jpg IMG_6994.JPG IMG_6995.jpg


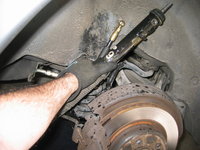
Then, carefully lift the strut out of the wheel well of the car. Pour its remaining oil (probably 1-2 oz) out of the upper hole into your hydraulic oil receptacle/jar. Drain it carefully and completely so it doesn't leak after you put it aside.
IMG_6996.JPG IMG_6997.JPG


Remove the rubber lower bushing and washer from the top of the old strut.

IMG_6998.jpg


To be continued in next post ....

1623854653062.png
 
Last edited by a moderator:
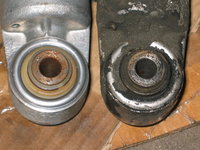
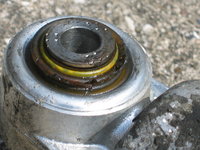
Here are some close-up photos of the ruined lower bushing of the passenger-side SLS strut, as well as some comparison with a new strut bushing. You can see the broken section of the bushing. I was able to move the inner part of the bushing freely back and forth with my fingers inside of its outer bore. There was VERY little to no damping capability with this worn-out bushing.

IMG_7000.JPG IMG_7001.JPG IMG_7002.JPG IMG_7003.JPG IMG_7004.JPG IMG_7005.JPG IMG_7006.JPG


And here are the Sachs part numbers between the new (blue label) and original MB (white label) rear SLS struts.

IMG_7007.JPG IMG_7008.JPG IMG_6999.JPG


Now it's time to move into the final stretch of the job. You need to prepare the new strut for installation onto the vehicle. First, place the washing and then lower rubber bushing onto the top of the strut. This is an EXCELLENT time to replace the tired, worn original bushings that your car probably has, with new MB rubber strut bushings. You should have put these on your parts order (per the list above) and this is when you need to replace the LOWER rubber bushing. The lower one is the one with the domed (curved) top.

IMG_7009.jpg


Carefully lower the new strut down into place, so that its lower mount fits into the slot in the lower control arm.

IMG_7010.jpg


You need to do a careful visual check of the banjo bolt, so that it doesn't have any apparent cracks or other defects.

IMG_7011.JPG IMG_7012.JPG


Then, prepare your new copper washers for the banjo bolt.
IMG_7013.JPG


Next, remove the yellow plastic plug that screws into the top of the strut. This was placed into the strut at the time of shipping to keep dust and dirt out of the inside of the strut. Keep these caps -- they may come in handy for future repairs as plugs.

IMG_7014.JPG


Place your new copper washers on the banjo bolt (either side of the banjo head) and carefully align it with the threads into the top of the strut. TAKE YOUR TIME and BE CAREFUL NOT TO CROSS-THREAD THE BANJO BOLT INTO THE TOP OF THE STRUT. IF IT DOESN'T GO IN EASILY, REMOVE IT AND TRY AGAIN.

IMG_7016.JPG IMG_7017.jpg IMG_7018.jpg

The banjo bolt should be tightened to approximately 25 Nm.

Next, it's time to attach the lower end of the strut at the lower control arm. Use your small flat-blade screwdriver to position the strut bushing so that it lines up with the holes in the LCA. Use a socket head or small mallet/ball peen hammer to carefully tap the long bolt through the LCA and bushing holes once aligned.

IMG_7019.jpg IMG_7020.jpg


Place the washer on the other side of the bolt where it emerges from the LCA, and replace the nut with a new one per MB factory procedure. This nut should be tightened to 60 Nm -- fairly tight.

IMG_7021.jpg


Snap the plastic covers back onto the bottom of the LCA of the side of the car you are working on, and tighten its 10mm screws with your 1/4" ratchet and 10mm socket.

IMG_7022.jpg


Replace the top mount of the strut as the reverse of the removal procedure. First, re-attach the wheel and tighten the lug bolts with your lug wrench.

Then, have a helper guide the threaded top of the strut through the hole in the body structure in the trunk as you lower the car on the jack. Replace the upper rubber bushing (hopefully you ordered a new upper bushing too) and then its flat washer. Then replace the first nut, and tighten it down until you hit a lot of resistance. You need to tighten this first nut to 25Nm. Then, add the second nut to the top of the first one, and using a 17mm wrench as a counter-hold, tighten the second nut to 25-30 Nm.

Then, replace the side of the inner trunk lining for the side of the vehicle you worked on.

Rinse and repeat the strut removal procedure for the other side of the car.

IMG_7024.JPG


After you have replaced both struts, you need to replace the drained hydraulic fluid back into the car's system. It's advisable to use new fluid, but if your drained fluid isn't too dark, then you can re-use it. Get a medium sized funnel, and remove the filler cap at the SLS reservoir under the hood. Using the funnel and a strainer (I used a fine white cloth as a strainer), pour the old (or just pour new) fluid into the reservoir until it's filled up near the top. Replace the cap.

Start the car and run it for a minute or two, to pump the new fluid back. Add any remaining fluid to the reservoir, and then check the banjo connections and the bleed screw on the rear SLS hydraulic valve for any seepage or leakage of fluid. If there is none, take the car for a test drive.

When you get home from the test drive, check the SLS fluid level again, via the dipstick attached to the filler cap. Adjust fluid (remove or add) as necessary to keep it between the MIN and MAX lines on the dipstick.

With this, you are done with this procedure.

I hope this is helpful to someone.

Cheers,
Gerry
 
Excellent thank you. Will do this job the next weeks. But will do it with new spheres. Is there a guide already for the spheres too?
 
I don't have a guide for the spheres on the E500E, because I've never had to do them.

However, it is a very similar job to doing the spheres on the C126, and I have detailed a HOW-TO article on that job at this location.

The main difference is that the .036 (and .034) SLS spheres are located inside of the spare tire well inside the trunk, whereas the W126/C126 SLS spheres (like the W201 2.3-16) are mounted on the underside of the vehicle and thus are a bit easier to access from the underside.

Cheers,
Gerry
 
I haven't read the manual so forgive me if I'm off base here but re: releasing fluid pressure at the leveling valve. In your picture:

[500Eboard] IMG_6962.JPG

There appears to be a bleed nipple at 6 o'clock relative to the bolt you used, it has a rubber cap like a brake bleeder cap...seems to me that would be used to attach a hose to and release pressure.
 
Glen is correct. Use the bleeder valve to release system pressure and drain fluid prior to disconnecting any of the hydraulic hoses/lines/fittings. Connect a rubber hose to the bleeder nipple for neat, clean draining; same as you would for bleeding brake calipers.

Couple of other comments:

1) If the fluid has been changed recently and is fairly clean, you could re-use if desired as Gerry describes. Otherwise, it will probably be a nice dark brown color and IMO would not be a good idea to save and re-use. New fluid is ~$10 per liter bottle and the new stuff is almost clear. Even better if you drain/siphon the reservoir to extract as much of the old, brown fluid as possible before refilling with new/clear fluid.

2) After filling the system and starting the engine, the bleed procedure in the FSM should be followed. Otherwise, the system may not fill properly, which can result in clunking noises (don't ask how I know). Basically, you disconnect the linkage on the valve, set it at "max fill" and run the engine for a couple of minutes. The rear end will lift way up in the air in stinkbug stance. Shut the engine off, reconnect the linkage, and check fluid level in the reservoir.

Great writeup and photos, Gerry!

:banana1: :jono:
 
Yes, you guys are correct that the bleed valve (3p in the factory diagram, with the little rubber cap on it, just like the brake bleeder valves) is the proper valve to drain fluid from. From my vantage point, it was a bit more difficult to get at because of its vertical orientation (pointing up toward the bottom of the car) and to get a hose onto, so I chose to use the horizontally positioned screw-in plug next to the lever. It was also much easier to access with the wrench.

I guess it's a bit of a "GVZ short-cut" and I should have been more explicit as to which outlet I chose to release pressure on, and why.

My fluid was medium colored, but was mostly new as of two years ago when I re-sealed the tandem pump, so I chose to re-use it while straining out any large particles. If it's Coca-Cola colored or darker, or thick, I'd definitely replace it.

I used the factory filling procedure, and everything filled up fine. I did not have any clunking problems ... drove the car 35 miles into work this morning with nary a clunk. Felt great !!

Cheers,
Gerry
 
As one would expect, Honcho has this exactly correct for the "real world" I've never seen anyone that actually does this for a living ever touch that screw. The pressure relief screw on the valve is a massive PITA to reach in the 124. It's awkward as hell, and since most of them haven't been turned for decades, they are usually very difficult to break loose the first time, most people simply managing to deform the brackets that hold the valve in place. Far better to simply break loose the fitting of your choice, EXTREMELY slowly. Once the tiniest stream of fluid starts to flow, just let it drain out until it stops flowing...
:klink:
 
I haven't read the manual so forgive me if I'm off base here but re: releasing fluid pressure at the leveling valve. In your picture:

There appears to be a bleed nipple at 6 o'clock relative to the bolt you used, it has a rubber cap like a brake bleeder cap...seems to me that would be used to attach a hose to and release pressure.

Glen is correct. Use the bleeder valve to release system pressure and drain fluid prior to disconnecting any of the hydraulic hoses/lines/fittings. Connect a rubber hose to the bleeder nipple for neat, clean draining; same as you would for bleeding brake calipers.

As one would expect, Honcho has this exactly correct for the "real world" I've never seen anyone that actually does this for a living ever touch that screw. The pressure relief screw on the valve is a massive PITA to reach in the 124. It's awkward as hell, and since most of them haven't been turned for decades, they are usually very difficult to break loose the first time, most people simply managing to deform the brackets that hold the valve in place. Far better to simply break loose the fitting of your choice, EXTREMELY slowly. Once the tiniest stream of fluid starts to flow, just let it drain out until it stops flowing...

Merde! Fais chier!
 
Having driven the car on a 10-mile "shakedown" cruise after replacing the hydro-legs, and now about 70 miles on a day's commute to downtown Houston, all I can say is "WOW!!" what a difference. The rear of the car is quiet and just very poised. Well worth the cost, time and effort to replace them.

If you have the dreaded rear suspension clunk caused by worn bushings in the rear hydro-struts, you won't be disappointed by this repair. It's more or less on par with the motor+transmission mount for overall satisfaction and bringing that "smooth, stock" quality back to your ride.

Cheers,
Gerry
 
As one would expect, Honcho has this exactly correct for the "real world" I've never seen anyone that actually does this for a living ever touch that screw. The pressure relief screw on the valve is a massive PITA to reach in the 124. It's awkward as hell, and since most of them haven't been turned for decades, they are usually very difficult to break loose the first time, most people simply managing to deform the brackets that hold the valve in place. Far better to simply break loose the fitting of your choice, EXTREMELY slowly. Once the tiniest stream of fluid starts to flow, just let it drain out until it stops flowing...
:klink:
It's probably harder to access if you don't have a lift, but yeah, the valve is not easy to get your hands on. I use a toothbrush-size wire brush to clean the area around the bleeder screw, then spray a bit of Kroil on it, and let it set for a while before turning. So far, I've not had any issues with them being frozen/seized. Might be more of a concern on rust-belt cars? As a neat phreak, I like being able to attach a hose and evacuate the system without making a mess!

:grouphug:
 
I had plenty of room to access the valve from underneath the car. The fact is that it's pointing straight up, with no easy way to get at the base of the bleeder valve without a super-short/stubby wrench. Which doesn't give you a lot of leverage or rotation room for the wrench, Kroil or no kroil. The side-to-side clearance at the valve is very tight (in addition to the vertical valve clearance) because of how/where it is mounted under the car.

The "mess" from draining was pretty localized to a small area, and after draining the "mess" was cleaned up in 15 seconds with a rag and some brake cleaner. It was all on the side/bottom of the valve (not the top, per the laws of gravity) and nearby area so easy to clean up.

The valve is much easier to access, with more room next to and above it, on the W/C126 cars. As FYI ... the SLS system on the 126 models utilises the identical valve as the .036, and this is an excellent "spare" to score off of a 560-class 126 car at a wrecking yard given the price of a new valve from MB (prepare to have a heart attack if you see the price).
 
I had plenty of room to access the valve from underneath the car. The fact is that it's pointing straight up, with no easy way to get at the base of the bleeder valve without a super-short/stubby wrench. Which doesn't give you a lot of leverage or rotation room for the wrench, Kroil or no kroil. The side-to-side clearance at the valve is very tight (in addition to the vertical valve clearance) because of how/where it is mounted under the car.
I've done this a few times and although it's tight up there, I don't recall having any real problem with access. By comparison, the engine mount upper bolts are a nightmare. I'll take another look to see if my memory is going. :?:

UPDATE: I was looking at this again the other night... I believe if you remove the plastic shield covering the fuel pump/filter package, it allows quite a bit more access to the SLS valve bleeder nipple. I've attached a hose to this valve several times and don't recall it being difficult, but I may have had the plastic shield off each time.

:scratchchin:


What kind of motor oils and transmission fluids are you guys using? :jono:
I'm glad you asked!!

http://www.500eboard.com/forums/showthread.php?t=1363

http://www.500eboard.com/forums/showthread.php?t=6925

http://www.500eboard.com/forums/showthread.php?t=6209


:5150:
 
re: the aftermarket Sachs hydrostruts...Gerry, did you buy them via Amazon or another source? How much are they?
 
Having driven the car on a 10-mile "shakedown" cruise after replacing the hydro-legs, and now about 70 miles on a day's commute to downtown Houston, all I can say is "WOW!!" what a difference. The rear of the car is quiet and just very poised. Well worth the cost, time and effort to replace them.

If you have the dreaded rear suspension clunk caused by worn bushings in the rear hydro-struts, you won't be disappointed by this repair. It's more or less on par with the motor+transmission mount for overall satisfaction and bringing that "smooth, stock" quality back to your ride.

Cheers,
Gerry

+1 on this. I had my mechanic change my struts a couple of weeks ago due to the well known clunking noise coming from the rear. Noise disappeared and the car also seems to behave better on the road.
 
re: the aftermarket Sachs hydrostruts...Gerry, did you buy them via Amazon or another source? How much are they?
I got them from my friend Robert Fenton from his parts stock. I think I paid around $300 apiece for them.
 
Re: HOW-TO: Rear Lower Control Arm & Wheel Carrier Joint Bushing Replacement

FYI, lower bushing p/n 1243260368 is NLA. Apparently, only 3 left among all North American dealers. I ordered 2. Not sure if I'll get them or what German inventory looks like.
 
I think this is a common part that will not be NLA for long. If it ever becomes NLA officially, there will certainly be other bushings that can be substituted for it. So, I'm not TOO alarmed about it.

Thanks for the report, Terry !!
 
Must have been Glen or GSXR ... Not me. I was too busy ranting about 126 parts and MB business practices.

:oldman:


Sent from my iPhone using Tapatalk
 
If it does go permanent NLA, most likely the bushing will be replaced / superceded by the kit which includes both bushings & hardware.

:spend:
 
I'm sure that URO will come out with said bushing/kit with a distinctly Harbor Freight rubber smell.
 
Having driven the car on a 10-mile "shakedown" cruise after replacing the hydro-legs, and now about 70 miles on a day's commute to downtown Houston, all I can say is "WOW!!" what a difference. The rear of the car is quiet and just very poised. Well worth the cost, time and effort to replace them.

If you have the dreaded rear suspension clunk caused by worn bushings in the rear hydro-struts, you won't be disappointed by this repair. It's more or less on par with the motor+transmission mount for overall satisfaction and bringing that "smooth, stock" quality back to your ride.

Cheers,
Gerry

I own a 1986 Mercedes 560sel and I have a question about the rear Sls shocks or Rams. I often hear a clunk in the rear when driving over bumps or dips. Most of the time it's smooth and unnoticed. I believe the bushings are the culprit and may be worn out. Is the clunking associated with the two bushings on the top of ram or at the bottom one? I believe my rams are good and I don't want to replace them if I don't have to. Can I just replace the two bushings on top? Will replacing just those two bushing help? And if I'm only replacing the upper bushings—can I skip the depressurization and draining of the hydraulic fluid? In order to remove and replace upper bushings only?
 
Yea Ozelot250, on the W126/C126 you can purchase the two bushings for the top of the Rams, and they are two different part numbers and sizes. If you have a low speed clunk, have a look at your sway bar links as they are plastic and the ball joint there is very weak to begin with. If your hasn't any records, spend the 25 bucks and replace them as well. If your struts are leaking fluid, you have to replace them as the seal and the bushings internally and at the bottom are NLA. The cheapest rout for you to go is the top bushings, 4 required and the if needed, the links. If your not leaking fluid and your boots are dry and not torn, you got a 50% chance of a remedy. But if it doesn't fix the issue and you need new struts/rams, then you would replace the bushings up top anyhow. Hope that helps and consider new fluid anyway, always use new copper crush washers when installing new struts and buy a new filter at least, new line or bottle assembly when you service the system. If you bounce badly or become very hard and fluid level goes down with no leaks, you need new accumulators aka spheres.
 
Only replace the hydro-legs if you see external leaking on them. Generally, the rubber bushings at the top of the hydro-legs don't cause inordinate clunking. It may be a relatively cheap and easy fix to try, but it's likely that the hydro-strut-top bushings won't solve the problem.

More normally, it's the bottom bushing of the hydro-leg itself that wears, and causes the clunk. Another clunk culprit on the W126 can be the rear sub-frame and/or differential mounts, and/or the bushings where the rear lower control arms attach to the rear subframe. If the car has much above 200K miles on it, then it's likely the rear suspension "chassis rubber" needs replacing.

I'm actually going to remove my rear subframe in the near future and replace all of the rubber that attaches it to the car. It's not a horrendous job, but I'm sure it will be a full weekend job for me.

thanks, the information you provided really clarifys things for me. My rams aren't leaking, but I think the lower bushings are shot. Really hard due to age. The car has only 65,000 miles but some of the rubber hoses and plastic is getting old.
 
Yes, you can see how the lower bushings deteriorate from my photos. This very definitely causes the clunking sounds over pavement irregularities.

Did you see my 126 rear SLS replacement HOW-TO? It's located here: http://www.500eboard.com/forums/showthread.php?t=8666

There is a separate HOW-TO section for 126-related jobs here on this forum.

Cheers,
Gerry
 
Just completed this repair (bushings and hardware only, struts still good) as part of a complete SLS system flush and refurbishment, including new SLS reservoir, nitrogen spheres (thanks GVZ for that how to) & high pressure line. Also re-sealed tandem pump, again (don't ask). Hydro struts were apparently replaced by a PO, lower bushing intact & like new. After refilling the system with new MB OE fluid and checking for leaks, car seems to sit a bit lower in the rear. I did not touch or alter the SLS valve settings at all. Not sure if it matters but I dropped the car on its wheels before re-filling system. Running the engine did re-pressurize the system as the rear end picked itself up but has not returned to its previous position. I'd be appreciative if someone could tell me if its easy to raise the rear about 1/2" - 1" inch (and how). On my test drive (about 30 min), car drove well. Rear end felt planted with what subjectively felt like normal damping, no clunks or other unusual noises coming from the rear that I could hear. Checked the rear hydro-struts banjo fittings - no leaks. None from underside of car where accumulators sit. Reservoir level where it should be, hopefully no air in lines. So now its mainly an aesthetic thing for me. TIA for any advice.
 
Last edited:
thanks everyone. I really appreciate your positive feed back. I'm going to attack the brakes for now as they need replacing. Can someone guide me in the right direction as to where to find a useful repair manual for repairs and maintenance? Thanks.
 
Some have expressed concern that the rubber bushings may be in diminished supply and/or going NLA. If you need them, and at some point, you will, please know that rear strut hardware/rubber bushing kits including all the bolts, nuts, washers and rubber bushings are readily available as part 124 320 03 56. One kit does one strut, so 2 kits are required if replacing both sides.
:jono:

Do these bushing kits contain the same parts that are listed in Gerry's post #1?

Yes. They include all of the parts listed in the How-To under "Job Requirements" in addition to all of the bolts, nuts, and washers.
 
here is an uncle Kent version on the W126, but the concept is the same. Mods: If you want this elsewhere, feel free to move it. https://youtu.be/zTt3enFL0ek

[video=youtube_share;zTt3enFL0ek]https://youtu.be/zTt3enFL0ek[/video]
 
Both of them had the stickers, aye.

Thank you sir!

Hmmm, trying to date mine, approximately of course, 3yrs, 5yrs, 7yrs, etc. When I pulled mine off both had the lower blue label but only the drivers-side had the upper holographic sticky. Again, I appreciate the follow-up.
 
Hi Gerry,

I just completed this project on the E500 and it is an awesome write up! The details were super helpful! I had the typical symptoms with the clucking passenger side over bumps and after disassembly of the shocks I found the bushings on both sides were just totally destroyed. While I was in there I did a full rear suspension refresh kit from FCP Euro and am happy to say that the shocks and suspension feel great now. The only thing that doesn't feel great after all of this is my wallet after Mercedes-Benz of Annapolis charged $130 for 2 nuts, 4 copper crush washers ($10 a piece, wtf??) and the bushings that needed replacement with the parts numbers up above :shock:

Anyway, I know I am about 4 years late to this thread, but just wanted to give my feedback about how helpful it was!

Thanks again, Gerry!
 
The only thing that doesn't feel great after all of this is my wallet after Mercedes-Benz of Annapolis charged $130 for 2 nuts, 4 copper crush washers ($10 a piece, wtf??) and the bushings that needed replacement with the parts numbers up above :shock:
Yikes! Have part numbers for the $10 washers? That don't sound right...

:blink:
 
All part numbers were the ones Gerry listed above. I ordered the Sachs shocks online from a company in the UK for about $600 delivered for the pair. I found the rest of the parts on getmercedesparts.com, but they normally charge about $30 to ship across the bridge (45 minute drive to MB of Annapolis)... I looked at the pricing online and compared with the listed MSRP, and not the "discounted" price and expected them to be similar... my bad. Crush washers were about $.70 online and like $2.00 each MSRP, not $10 each! I didn't notice until I got home and didn't want to make the 45 minute drive each way again.
Did you use their internet site to order parts, or go into the dealership? What were the part numbers? Did you use www.getmercedesparts.com to order them? Please PM me a copy of the receipt.
I will try and find the receipt and PM it to you
 
You are going to pay matrix-priced MSRP ( = more than retail) if you go into the dealership. For cheap parts like hardware, dealerships use matrix pricing, which actually means that they charge MORE than MSRP.

They may pay $0.25 (dealer cost) for a washer, but the MSRP for it is $0.50. But they will charge you $0.85 for it if you walk in to the parts counter and pay for it. If you order it over the MB Annapolis internet site, you will pay like $0.35, or about 30% off of MSRP.

If you use the web site to order, and tell them in the "comments" at checkout that you are local, and will pick up in person, then they won't charge you shipping. If you have any issues in the future, let me know and I'll talk to Eddie Alexander in the parts department there.
 
I've done this once before and I got the impression from Eddie not to this again... He said that the online purchases and the in person purchases are to remain separate. But, if you have any influence there... 😃
 
Like I said, online orders and walk-in orders ARE separate.

a walk in order is any schlub who walks in off the street. They are going to pay MSRP (or more). The internet site is a totally separate operation.

if I walk in and hand Eddie a list of part numbers, even though he knows me, I’m going to pay MSRP. But if I use their internet site, i pay dealer cost + 20% or 25% (usually about 28-30% off of MSRP) and I can just come in to pick up the order. It saves them time and effort to pack and ship it too.

but this is NOT the same as walking in and buying. You HAVE to use the Internet site

what you need to do is order online, and in the comments box note that this is a local pickup. This is a flag not to charge shipping. Then he will email you and let you know when the order is ready to pick up. They will have it sitting on the counter in a box for you when you come in.

tbis is what I e been doing with them since 2018. Heck, i put an order in on Monday morning this week and got an email on Tuesday AM saying it was ready to pick up.

otherwise, just order from MB Naperville or another online site like a lot of folks do.

I’ll price out the parts in the AM that you got and see what happened, vs. what you would have paid if you used the web site to order.
 
Note that walk-in, over-the-counter pricing on low priced items can be multiple times MSRP. For example a washer that is $0.30 dealer cost and $0.50 MSRP, may ring up as anywhere from $2.00 to $5.00 each. The receipt will show this as a fake MSRP, and if you get something like MBCA discount, they'll knock that $5 down to $4.50 and make you feel they are being generous.

The online sites which show true MSRP (until recently anyway) expose this profiteering, but the majority of of the public is clueless.

:spend:
 
Okay, I'll give what Gerry said a try here soon with my next parts order and keep what you said in mind, Dave.

Thanks again to everyone for the help!
 
OK, given the vague parts list you provided me, here are the part numbers and the quoted prices from MB Annapolis, in the table below.

Even if you paid full retail and a $30 shipping charge, something is NOT adding up. Is the list of parts you provided me totally complete?

As an alternative to the table below, let's do this with full list prices for parts (knowing this does not take into account matrix pricing):
List price parts subtotal: $52.00 + MD 6% sales tax ($3.12) = $55.12 + $30 shipping = $85.12

$130 — $85.12 = ~$49 extra markup beyond MSRP. You just paid for a half-dozen jumbo blue crabs for the owner of MB Annapolis!!

Compare with the ~$40 figure below, for local pickup of the parts, ordered through the web site, out the door.

Part DescriptionPart NumberMB Quoted List PriceWeb Site PriceQuantityTotal Price
Copper crush washerN007603 012102$3.40$2.404$9.60
Upper rubber bushing201 326 18 68$4.50$3.242$6.48
Lower rubber bushing124 326 03 68$11.00$7.802$15.60
Lower hydro-strut boltN000960 010058$3.70$2.642$5.28
Parts subtotal$36.96
MD Sales Tax 6%$2.22
TOTAL$39.18
 
OK, given the vague parts list you provided me, here are the part numbers and the quoted prices from MB Annapolis, in the table below.

Even if you paid full retail and a $30 shipping charge, something is NOT adding up. Is the list of parts you provided me totally complete?

As an alternative to the table below, let's do this with full list prices for parts (knowing this does not take into account matrix pricing):
List price parts subtotal: $52.00 + MD 6% sales tax ($3.12) = $55.12 + $30 shipping = $85.12

$130 — $85.12 = ~$49 extra markup beyond MSRP. You just paid for a half-dozen jumbo blue crabs for the owner of MB Annapolis!!

Compare with the ~$40 figure below, for local pickup of the parts, ordered through the web site.

Part DescriptionPart NumberMB Quoted List PriceWeb Site PriceQuantityTotal Price
Copper crush washerN007603 012102$3.40$2.404$9.60
Upper rubber bushing201 326 18 68$4.50$3.242$6.48
Lower rubber bushing124 326 03 68$11.00$7.802$15.60
Lower hydro-strut boltN000960 010058$3.70$2.642$5.28
Parts subtotal$36.96
MD Sales Tax 6%$2.22
TOTAL$39.18

Thanks Gerry,

That looks a little more reasonable to me 😂 too bad everything is already put back together otherwise I would return it and buy it online... the parts list provided to you was complete, and the bill did not include any other items. I know for sure the crush washers were $9.99/each but the pricing on the bushings could be slightly off. Total was $127 and change...

Those blue crabs sound great standing off the back of the swim platform with a cold gin and tonic this evening!
 

Who has viewed this thread (Total: 2) View details

Who has watched this thread (Total: 6) View details

Back
Top