Every 10-15 years, it is a prudent preventative maintenance item to replace the intake air temperature sensor. Located in the black plastic air scoop behind the driver's side headlight, the IAT sensor provides a key input to the LH injection system that meters fuel to the engine.
This IAT sensor is exposed to much of the incoming air and associated moisture, bugs and debris, etc. that is ingested into the driver's side "Zoom Tube" that leads to the air-box and air filters. Thus, it is bound to get degraded over time through surface corrosion, age and exposure to a broad variety of undesirable elements.
The time required for this job is approximately 10 minutes.
The job difficulty is a "2" on a scale of 1-10 (extremely easy).
Tools required for the job are:

PROCEDURE:
First, release the hood of the vehicle from inside the cabin, driver's side, below the headlight switch. Open the hood at the front of the car.
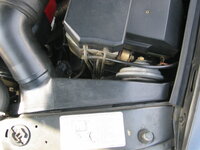
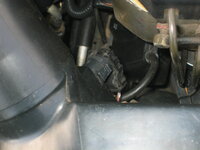
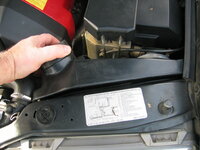
Next, locate the black plastic air scoop panel behind the driver's side headlight, as shown below. The second photo shows the intake air temperature sensor plug, at the sensor location in the air scoop panel.
Then, remove the driver's side air intake ("zoom") tube and set it aside -- if your engine is hot, set it atop the fuse box/master cylinder area on the driver's side.

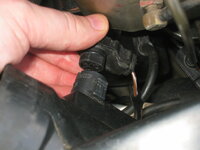
Unplug the two-pronged intake air temperature sensor plug by pulling it rearward, toward the ABS/ASR pump nearby.
After the IAT plug has been removed, pull the plastic air scoop panel directly upward to remove it from the engine compartment.


Bring the hood scoop panel over to a flat workbench, and lay it down, showing the inside of the panel as in the photos below. You can see the metal spring clip that holds the IAT sensor in position on the inside of the hood scoop.


Using your flat-blade screwdriver, carefully pry the clip off of the IAT sensor. Work each side of the clip with the end of the screwdriver blade, to ensure the clip is removed evenly from its bite on the IAT sensor's black plastic "wings."


This is what it looks like when the clip is released from the IAT sensor.


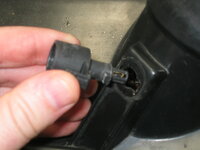
Turn the plastic air scoop panel upside down, and carefuly pull the IAT sensor out of its hole in the panel.

OPTIONAL: If you have a bench grinder with a wire wheel or sandpaper available, give the surface of the metal spring clip a few passes to clean it off.

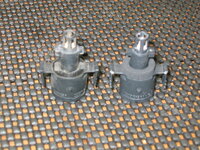
Comparing the old (left) and new (right) intake air temperature sensors. Note the foam ring around the base of the new IAT -- there is a 100% guarantee that your foam ring on your IAT sensor is dilapidated and is 100% gone. The purpose of this foam ring is to eliminate air leakage around the sensor area.


Installation is pretty much the reverse of disassembly. Before you install the new IAT sensor, take a rag and some quick detailer spray, and thoroughly clean out the inside of the air scoop panel, focusing on removing the dirt around the area where the IAT sensor sits in the scoop.
Insert the IAT sensor into the hole in the outside of the air scoop panel.
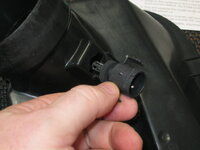
Flip the intake air scoop panel over, holding the IAT sensor in place, and carefully begin pressing the spring clip into place under the little "wings" of the IAT sensor. Here are a few views of the clip partially and then fully installed underneath the IAT sensor.

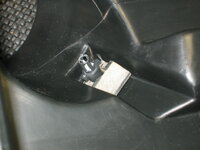

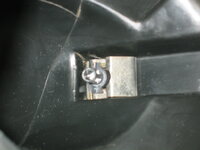
After double-checking that the IAT sensor is securely held by the spring clip, re-install the air scoop behind the headlight and drop it into place. Plug in the connector to the new IAT sensor. Then re-install the zoom tube to the air scoop.


At this point you have completed the job.
This IAT sensor is exposed to much of the incoming air and associated moisture, bugs and debris, etc. that is ingested into the driver's side "Zoom Tube" that leads to the air-box and air filters. Thus, it is bound to get degraded over time through surface corrosion, age and exposure to a broad variety of undesirable elements.
The time required for this job is approximately 10 minutes.
The job difficulty is a "2" on a scale of 1-10 (extremely easy).
Tools required for the job are:
- Medium to large size flat-blade screwdriver, or other prying lever
- Rag
- Quick detailer or other cleaning fluid
- Mercedes-Benz A 009 542 68 17 -- currently $19.50 list price, discounted to ~$14.00.

PROCEDURE:
First, release the hood of the vehicle from inside the cabin, driver's side, below the headlight switch. Open the hood at the front of the car.
Next, locate the black plastic air scoop panel behind the driver's side headlight, as shown below. The second photo shows the intake air temperature sensor plug, at the sensor location in the air scoop panel.


Then, remove the driver's side air intake ("zoom") tube and set it aside -- if your engine is hot, set it atop the fuse box/master cylinder area on the driver's side.

Unplug the two-pronged intake air temperature sensor plug by pulling it rearward, toward the ABS/ASR pump nearby.

After the IAT plug has been removed, pull the plastic air scoop panel directly upward to remove it from the engine compartment.


Bring the hood scoop panel over to a flat workbench, and lay it down, showing the inside of the panel as in the photos below. You can see the metal spring clip that holds the IAT sensor in position on the inside of the hood scoop.


Using your flat-blade screwdriver, carefully pry the clip off of the IAT sensor. Work each side of the clip with the end of the screwdriver blade, to ensure the clip is removed evenly from its bite on the IAT sensor's black plastic "wings."


This is what it looks like when the clip is released from the IAT sensor.


Turn the plastic air scoop panel upside down, and carefuly pull the IAT sensor out of its hole in the panel.


OPTIONAL: If you have a bench grinder with a wire wheel or sandpaper available, give the surface of the metal spring clip a few passes to clean it off.

Comparing the old (left) and new (right) intake air temperature sensors. Note the foam ring around the base of the new IAT -- there is a 100% guarantee that your foam ring on your IAT sensor is dilapidated and is 100% gone. The purpose of this foam ring is to eliminate air leakage around the sensor area.


Installation is pretty much the reverse of disassembly. Before you install the new IAT sensor, take a rag and some quick detailer spray, and thoroughly clean out the inside of the air scoop panel, focusing on removing the dirt around the area where the IAT sensor sits in the scoop.
Insert the IAT sensor into the hole in the outside of the air scoop panel.

Flip the intake air scoop panel over, holding the IAT sensor in place, and carefully begin pressing the spring clip into place under the little "wings" of the IAT sensor. Here are a few views of the clip partially and then fully installed underneath the IAT sensor.


After double-checking that the IAT sensor is securely held by the spring clip, re-install the air scoop behind the headlight and drop it into place. Plug in the connector to the new IAT sensor. Then re-install the zoom tube to the air scoop.


At this point you have completed the job.


 was on. The part was $10.00 at the time.